SEARCH FINESCALE.COM

Enter keywords or a search phrase below:

Mighty 8th GB 1-Nov-2010 - 31-Oct-2011

142358 views
1358 replies
1 rating 2 rating 3 rating 4 rating 5 rating
  • Member since
    December 2002
  • From: Bury St Edmunds, Suffolk, England
Posted by Bish on Sunday, January 9, 2011 8:49 PM

O right, i would have thought it would have been to thick. I imagined it was some special foil just for modelling. I have a few old broken kits in the shed. I think i might read up on this and give it a try on an old kit.  Can't hurt to try it.

I am a Norfolk man and i glory in being so


On the bench: Airfix 1/72nd Harrier GR.3/Fujimi 1/72nd Ju 87D-3

  • Member since
    June 2010
  • From: Austin, TX
Posted by DoogsATX on Sunday, January 9, 2011 8:48 PM

Bish and Owl - yeah it's pretty subtle so far, hence going back for a second application. But I'd rather build up slowly than go all at once with a thicker ratio and ruin things, you know?

Bish - yeah, the filter certainly took some of the shine off. I'll be restoring that and messing with it a bit with the final clear coats.

Owl - I'm no expert, but as I understand and use it, a filter is a highly thinned wash. I'm using about half a Testors jar of Mona Lisa Odorless Thinner with a little dollop of W&N raw umber artist oil, then brush it on. I've found it works very well for 1) knocking down contrast and 2) relatively uniform, and very subtle, tinting. 

On the Bench: 1/32 Trumpeter P-47 | 1/32 Hasegawa Bf 109G | 1/144 Eduard MiG-21MF x2

On Deck:  1/350 HMS Dreadnought

Blog/Completed Builds: doogsmodels.com


  • Member since
    January 2010
  • From: Nebraska, USA
Posted by CallSignOWL on Sunday, January 9, 2011 8:47 PM

yup, that means the same thing! Smile

------------------------

Now that I'm here, where am I??

  • Member since
    December 2002
  • From: Bury St Edmunds, Suffolk, England
Posted by Bish on Sunday, January 9, 2011 8:42 PM

Owl When we say tin foil, we mean the metal foil we use to wrap food in before cooking. Is this what you used, or does tin foil mean somthing else to you guys.

I am a Norfolk man and i glory in being so


On the bench: Airfix 1/72nd Harrier GR.3/Fujimi 1/72nd Ju 87D-3

  • Member since
    January 2010
  • From: Nebraska, USA
Posted by CallSignOWL on Sunday, January 9, 2011 8:39 PM

oops, missed you Doogs. We must have posted at the same time!   I like the addition of the filter. It helps bring out more details on the rudder. But what exactly is a "filter"? I've heard it used a few times, but mostly about armor.


OWL

------------------------

Now that I'm here, where am I??

  • Member since
    December 2002
  • From: Bury St Edmunds, Suffolk, England
Posted by Bish on Sunday, January 9, 2011 8:38 PM

Doogs I had to look a few times, but ye you can see it, very subtle. It seems to be more noticeable on the green than the grey. Also, is it the photos or has it taken some of the shine away. Its looking great, i take it the D-Day stripes came out ok.

I am a Norfolk man and i glory in being so


On the bench: Airfix 1/72nd Harrier GR.3/Fujimi 1/72nd Ju 87D-3

  • Member since
    January 2010
  • From: Nebraska, USA
Posted by CallSignOWL on Sunday, January 9, 2011 8:35 PM

Scorpiomikey: Why did you find the foil so scary? 

Bish: the foiling took a couple of days, on-and-off. And I did use aluminum foil (which everyone around here calls tin foil too) I varied the hues by using the shiny side of the foil, the dull side in some areas, and the shiny side rubbed with 0000 steel wool.


I kinda like using foil. I'm a lot less stressed applying it than applying paint. I even have a second Mustang that will be getting the foil treatment!


OWL

------------------------

Now that I'm here, where am I??

  • Member since
    June 2010
  • From: Austin, TX
Posted by DoogsATX on Sunday, January 9, 2011 8:34 PM

Owl - that foil job looks nice! Certainly better than I could hope to pull off!

A bit more progress on Hairless Joe last night. We're definitely in the home stretch now!

I've been noticing that my build has been a lot, I don't know, cleaner than the reference pics. Not that HJ is all beat up - on the contrary the plane looks recently waxed, which isn't surprising for a CO's personal bird. But still, there's a slightly worn quality...

Some of that's obviously the weird brown/desaturated nature of the print, but I decided to play with some armor techniques and apply a raw umber filter to tone things down a bit more.

Here's the before and after. Subtle so far. I'm thinking about a second hit tonight.

And another angle...

On the Bench: 1/32 Trumpeter P-47 | 1/32 Hasegawa Bf 109G | 1/144 Eduard MiG-21MF x2

On Deck:  1/350 HMS Dreadnought

Blog/Completed Builds: doogsmodels.com


  • Member since
    December 2002
  • From: Bury St Edmunds, Suffolk, England
Posted by Bish on Sunday, January 9, 2011 8:29 PM

With photos like that your fogiven. How long did it take you to do the foiling. I have never tried it.. Thew thought of it always put me off, i guess i imagined it somthing like tin foil. But that looks great.

I am a Norfolk man and i glory in being so


On the bench: Airfix 1/72nd Harrier GR.3/Fujimi 1/72nd Ju 87D-3

  • Member since
    March 2010
  • From: New Zealand
Posted by Scorpiomikey on Sunday, January 9, 2011 8:22 PM

Foiled again, lol. she looks pretty awesome owl. im jealous of your foiling ability. I did it once, never ever again. 

"I am a leaf on the wind, watch how i soar"

Recite the litanies, fire up the Gellar field, a poo storm is coming Hmm 

My signature

Check out my blog here.

  • Member since
    January 2010
  • From: Nebraska, USA
Posted by CallSignOWL on Sunday, January 9, 2011 8:08 PM

CallSignOWL

I have a bunch of work done on Lambie, but I cant show you guys because I left the camera charger and transfer cord in my room....which is an hour away from my dorms. I do not have a car,and it will be really odd for my mom to make a special trip all the way to school to give me camera stuff. Dead


well, I found my camera stuff in a shoe box.... I feel so silly! Embarrassed

anyhow, I can now show you guys the progress I've made on Lambie. The foiling is now complete and I have some painting to do!


OWL

------------------------

Now that I'm here, where am I??

  • Member since
    December 2002
  • From: Bury St Edmunds, Suffolk, England
Posted by Bish on Sunday, January 9, 2011 3:47 PM

Thats looking nice. From what i can see, the problem with the cockpit and w nose gun mount windows doesn't seem to show at all. Nice idea with filling the gap in the windows. Will this be the 91st or 100th BG aircraft.

I think you may have mentioned it ealier, but i can't find it at the moment. Could you give me the measurmenst for those Squadron waiste windows. They look exactly like the ones i will need for one of my B-24's.

I am a Norfolk man and i glory in being so


On the bench: Airfix 1/72nd Harrier GR.3/Fujimi 1/72nd Ju 87D-3

  • Member since
    September 2003
  • From: AandF in the Badger State
Posted by checkmateking02 on Sunday, January 9, 2011 2:45 PM

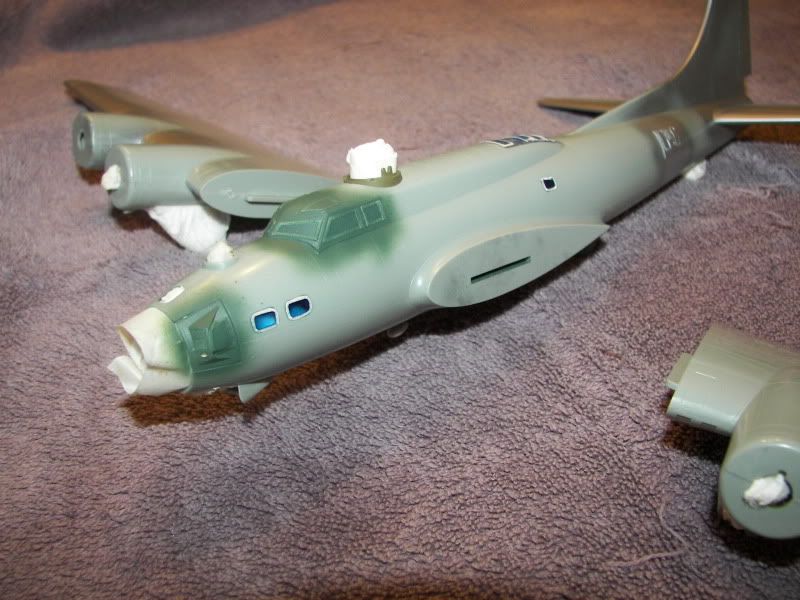
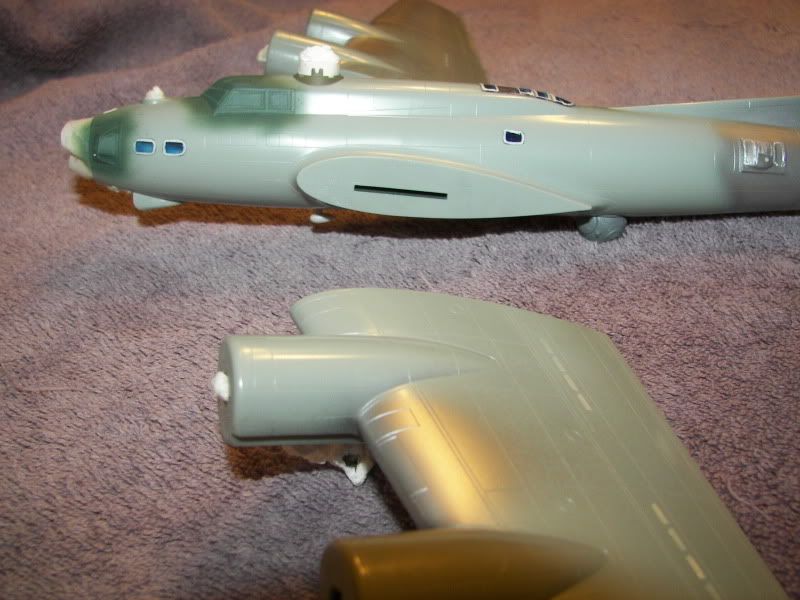
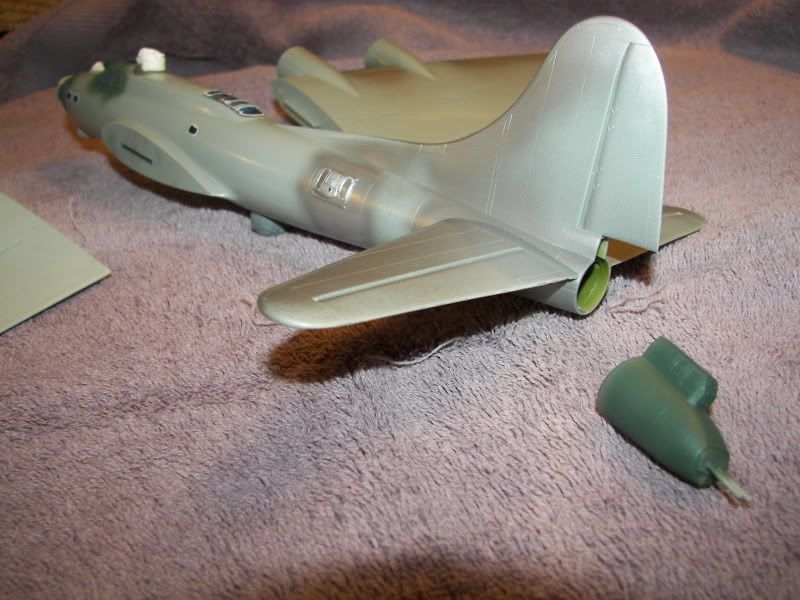
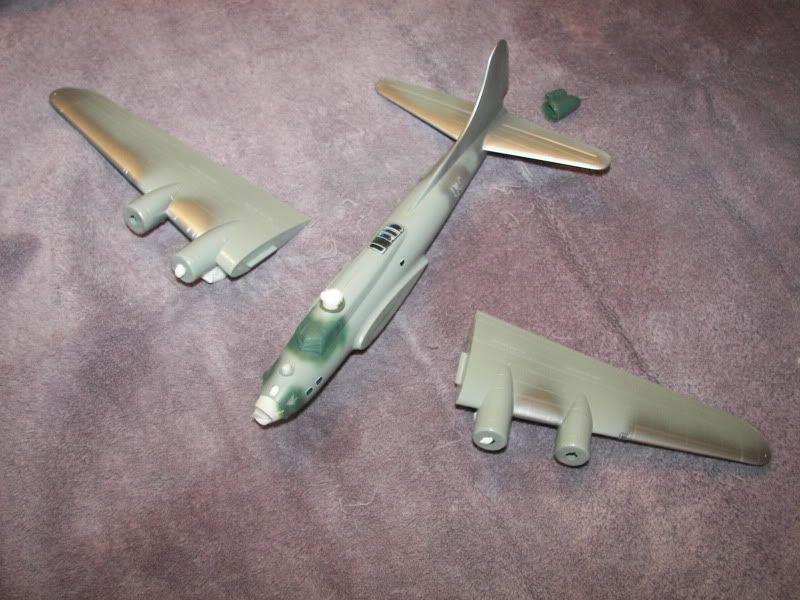
Finally some progress to post.  Christmas and New Year were busy, as usual, but I got back to things last week.

I reached the point where I could mask windows and do some preliminary painting before fitting the sub-assemblies together.

[View:/themes/fsm/utility/:550:0]
 

[View:/themes/fsm/utility/:550:0]


[View:/themes/fsm/utility/:550:0]


[View:/themes/fsm/utility/:550:0]

Assembly turned up some "issues."  The cockpt canopy is too wide for the fuselage, and protrudes somewhat at each side.  Since there is no good way I can think of to fix it, that's the way it will have to be.  The gun mount windows in the nose do not sit quite flush with the fuselage.  So I will live with this too.  Neither does the radio room gun window, but the problem here was the locator tabs in the fuselage being either placed too high or being too thick.  By the time I discovered this, it was beyond fixing on this kit--but I did sand them down on my second build, and I think this will allow the window to settle in better.

In fact, most of the parts in this kit just don't fit well without some sanding to reduce them to proper size.  The same is true for the tail gun mount.  The gun piece wouldn't fit in the opening without a bit of shaping with an emery board.

Both Fortresses I'm working on had de-icer boots removed or worn away, so these will appear in natural metal.  For NMF, I've always had good results using Floquil's RR paints in various silverish configurations (old silver, bright silver, platinum mist).  They all go on relatively smoothly, and produce a pretty durable finish that can stand up to masking tape once the paint is fully cured.  And I will be waiting 10 days to two weeks before I attempt to mask the NMF areas and get on with assembly.  But, nothing is ever certain in modeling, and I have encountered paint lift with the Floquil family of silvers, even after two weeks of curing.  Building models is often so much like gambling.

I dislike using filler and having to sand said-places smooth, especially with clear plastic, so the canopies and nose gun mounts were attached with white glue, then thinned white glue was run in with a tiny paint brush to fill the seams.  When dry, a couple of swipes with a q-tip (or is it a "cotton bud?"), and the overage washes off.  The technique was written up in FSM ages ago.

I did use superglue for the fuselage windows and 3-piece waist gun windows (vacu-formed, by Squadron).  The latter took some attention and effort to sand of the excess, and after I took these photos I did a little more smoothing on them.  I think they will look OK after the final paint.

I've been enjoying seeing everyone else's progress.  There is much 3-D art being produced here. 


  • Member since
    December 2002
  • From: Bury St Edmunds, Suffolk, England
Posted by Bish on Sunday, January 9, 2011 1:46 PM

I know the feeling. I am travelling back and forth every week. All my modelling is done during the week while in barracks. and theres been a few tgimes when i have left the camrea or lead in thew wrong place.

So you are let off this time. Look forward to seeing them next week.

I am a Norfolk man and i glory in being so


On the bench: Airfix 1/72nd Harrier GR.3/Fujimi 1/72nd Ju 87D-3

  • Member since
    January 2010
  • From: Nebraska, USA
Posted by CallSignOWL on Sunday, January 9, 2011 1:38 PM

I have a bunch of work done on Lambie, but I cant show you guys because I left the camera charger and transfer cord in my room....which is an hour away from my dorms. I do not have a car,and it will be really odd for my mom to make a special trip all the way to school to give me camera stuff. Dead


OWL

------------------------

Now that I'm here, where am I??

  • Member since
    April 2010
  • From: Green Bay, WI
Posted by redraider56 on Friday, January 7, 2011 3:37 PM

The Alclad came today....just gotta wait for the package from Ultracast now and then I can start painting

-Matt

On The Bench: 1/48 HK B-17G "Man-O-War II"

On Deck: 1/48 Tamiya P-38H, 1/48 Revell PV-1


  • Member since
    November 2008
  • From: Crawfordsville, Indiana
Posted by Wabashwheels on Friday, January 7, 2011 7:11 AM

Hugh.  Nice looking cockpit there.  I really like how you showed the dusty dirt on the radio deck.  Isn't it a shame how the cowl covers up so much of all that cockpit detail?  Are you putting this build in the P-38 Group Build also?  There's a lot of good stuff going on over there.  I'll try to keep an eye out for your progress.  There's a bunch of detail that can be added to the gear wells and booms.  I've started an Academy F5-E photo recon version.  So far I'm likin' the lookins' of the Academy fit.  Good luck.  Rick.


  • Member since
    January 2007
  • From: Cleveland, OH
Posted by Clebode on Friday, January 7, 2011 5:10 AM

Hook--Nice to see another Liberator on the bench.  Hope you can solve the seam issue.  I have a 1:48 Fort in waiting and it has to be NMF.  Your Lib is a nice inspiration.

All--I have started the Acedemy P-38J and have the "office" painted.  It's a True Detail resin upgrade.  Here are the photos:

Hugh

  • Member since
    December 2002
  • From: Bury St Edmunds, Suffolk, England
Posted by Bish on Thursday, January 6, 2011 3:54 PM

I wuill deffinatly be following that on the weathering GB. The Eduard kit was at the top of my list for a 32nd 109E. But now with the new Dragon kit i am not so sure. The weathering GB will be one i will be keeping an eye on from a distance, as i will be in the Falklands by then. Thats a good excuse to be sneaky and pick up some tips before i get home and start on my Fort.

I am a Norfolk man and i glory in being so


On the bench: Airfix 1/72nd Harrier GR.3/Fujimi 1/72nd Ju 87D-3

  • Member since
    June 2010
  • From: Austin, TX
Posted by DoogsATX on Thursday, January 6, 2011 3:50 PM

Bish

How did the decals take to masking, or had you sealed them in before.

What build is the Mossie for, and have you started on the 109 yet. I wanna make sure i don't miss that.

I sealed them with Future first. The port side, thank god, had very few problems. Only a tiny corner of the S came up. The starboard side was a bit worse. Lost a chunk out of one of the bars of the M, had some black on the stripes pull up thanks to a bit of the Tamiya decals I couldn't get off the first time around. Other than that, no problems!

The Mossie's for the Nightfighter GB. I'm going to be building it as an all-black NF.II model. After this guy and the 109, I think I'll be in the mood for a relatively simpler paint scheme!

I have started the 109, but I'm not far enough to really show anything yet. I've hit a point where I need to start spraying primer and painting pieces before I can assemble them any further...but I'll be posting my progress up in the weathering GB if you want to follow along.

On the Bench: 1/32 Trumpeter P-47 | 1/32 Hasegawa Bf 109G | 1/144 Eduard MiG-21MF x2

On Deck:  1/350 HMS Dreadnought

Blog/Completed Builds: doogsmodels.com


  • Member since
    December 2002
  • From: Bury St Edmunds, Suffolk, England
Posted by Bish on Thursday, January 6, 2011 3:36 PM

How did the decals take to masking, or had you sealed them in before.

What build is the Mossie for, and have you started on the 109 yet. I wanna make sure i don't miss that.

I am a Norfolk man and i glory in being so


On the bench: Airfix 1/72nd Harrier GR.3/Fujimi 1/72nd Ju 87D-3

  • Member since
    June 2010
  • From: Austin, TX
Posted by DoogsATX on Thursday, January 6, 2011 3:32 PM

Bish - thanks! For the record, though, the invasion stripes are paint, not decals. Hate having to mask over other decals like that to get the job done, but with the way the stripes hug the markings there's really no other way.

Owl - Yeah the gear's on the right way. I had to double-check it myself, though. I think it just looks funny without the gear doors! The P-51s are looking great by the way. I'm really itching to kick one off soon. Maybe after the Mossie.

Hookdriver - Have you tried Tamiya's AS-12 I think it is? Their bare-metal silver rattlecan? Sprayed some on my P-38, literally just to see where I still had to fill and sand, and I was really impressed. It looks very much like worn metal, dries smooth, seems very, very tough. I'm thinking about using it as a primer moving forward. Going to have to test its durability first though.

On the Bench: 1/32 Trumpeter P-47 | 1/32 Hasegawa Bf 109G | 1/144 Eduard MiG-21MF x2

On Deck:  1/350 HMS Dreadnought

Blog/Completed Builds: doogsmodels.com


  • Member since
    December 2002
  • From: Bury St Edmunds, Suffolk, England
Posted by Bish on Thursday, January 6, 2011 3:20 PM

I have been useing Alclad for my NMF finishers and like wise it shows every minr detail. But with the vareity of shades you can get good panel variation.

I think i am going to have to look into printing my own decals before to long. It will be nice to be able to do unuasual subjects. I am also finding it hard to find German code letters in the size i want, so i might start with those.

I am a Norfolk man and i glory in being so


On the bench: Airfix 1/72nd Harrier GR.3/Fujimi 1/72nd Ju 87D-3

  • Member since
    September 2010
  • From: Ft Lewis, Wa
Posted by Hookdriver on Thursday, January 6, 2011 2:02 PM

.Bish, It's Tamaya Silver Leaf TS-30 in a spray can. It goes on very well but it will show every imperfection in the model. It also polishes very easily. Once my airbrush and compressor get here I'm going to spray the panels different colors and see which one I like best. If I can't find the academy decals that I showed you when I build my 1:48 I think I'm going to order some decal paper and try printing my own.

NSDQ!

  • Member since
    December 2002
  • From: Bury St Edmunds, Suffolk, England
Posted by Bish on Thursday, January 6, 2011 11:41 AM

Hook Got ur. I will be watching cloely then, i might pince a few ideas from you as i have not yet had to make up my own set of markings.

Owl My mistake. I had you down for a D not a B. have changed it now.

I am a Norfolk man and i glory in being so


On the bench: Airfix 1/72nd Harrier GR.3/Fujimi 1/72nd Ju 87D-3

  • Member since
    January 2010
  • From: Nebraska, USA
Posted by CallSignOWL on Thursday, January 6, 2011 10:48 AM

oh, I am doing teh B mustang for this build. That is Lambie. The D mustang is for the NMF build (well, both are technically) but the D is going to be a fictional plane. I'm making it for a family member.

Sorry for any confusion!


OWL

------------------------

Now that I'm here, where am I??

  • Member since
    December 2002
  • From: Bury St Edmunds, Suffolk, England
Posted by Bish on Thursday, January 6, 2011 10:25 AM

Hook And that NMF is looking great. And you are useing Tamiya silver leaf, that correct.

CallSignOWL Great looking Mustangs. I take it you are useing foil for the Bodney aircraft. Thats one way to get around the shape of the blue nose.

I think i might have missed something, again. I only have you down for the P-51D. Is the other Mustang for this GB as well.

I am a Norfolk man and i glory in being so


On the bench: Airfix 1/72nd Harrier GR.3/Fujimi 1/72nd Ju 87D-3

  • Member since
    September 2010
  • From: Ft Lewis, Wa
Posted by Hookdriver on Thursday, January 6, 2011 10:24 AM

Bish- as far as decals go I found the ones that I need "RE-Z"  from academy but they are for a 1/48. This will pay off later if I can find the kit or get them from academy somehow, because I am using this 1/72 as practice for the NMF. But I ordered generic letters and numbers off the internet for tail numbers and the nose art, for the rest I'm going to try making stencils, we will see how that goes.

NSDQ!

  • Member since
    December 2002
  • From: Bury St Edmunds, Suffolk, England
Posted by Bish on Thursday, January 6, 2011 10:16 AM

Hookdriver  I see what you mean about the bambadiers window. That does look different from the H model i did.

I would love to know where you got your decals. I am after doing a B-24 from hardwick and i would love to do a NMF B-24 from Norfolk.

red Fully understand, life has a way of getting in the way of the hobby. Looking forward to seeing your two fighters.

Doogs Awsome, yet again, and so glad the decals didn't let you down this time.

I am a Norfolk man and i glory in being so


On the bench: Airfix 1/72nd Harrier GR.3/Fujimi 1/72nd Ju 87D-3

  • Member since
    September 2010
  • From: Ft Lewis, Wa
Posted by Hookdriver on Thursday, January 6, 2011 9:19 AM

His gear is on correctly. An interesting fact :  the 47's air-oil shock struts actually compress nine inches as they fold into the wings, the space-saving gear system allowed each of the P-47s to carry more ammunition and a seventh and eighth machine gun

NSDQ!

JOIN OUR COMMUNITY!

Our community is FREE to join. To participate you must either login or register for an account.

SEARCH FORUMS
FREE NEWSLETTER
By signing up you may also receive reader surveys and occasional special offers. We do not sell, rent or trade our email lists. View our Privacy Policy.