SEARCH FINESCALE.COM

Enter keywords or a search phrase below:

Mighty 8th GB 1-Nov-2010 - 31-Oct-2011

142358 views
1358 replies
1 rating 2 rating 3 rating 4 rating 5 rating
  • Member since
    December 2002
  • From: Bury St Edmunds, Suffolk, England
Posted by Bish on Saturday, February 26, 2011 5:52 AM

Wash, those stangs look great. I will update the front page next time i am on as my time is running low.

Little J. i started useing Pro Modeller wash last year,got the tip from daywalker. And i love the stuff. I find it easy to use, easy to correct mistakes and go from subtle to heavy weathering. And 4 days from the UK, thats bloody quick, where did you get yours from.

I am a Norfolk man and i glory in being so


On the bench: Airfix 1/72nd Harrier GR.3/Fujimi 1/72nd Ju 87D-3

  • Member since
    May 2010
Posted by Little J on Saturday, February 26, 2011 8:47 AM

Bish,  I purchased the wash set from Flory Models.  I think he is the guy who invented the stuff.  Any ways, all my modeling stuff is pack away right now because my family and I are moving next weekend.  I hope to have every thing unpacked in a couple of weeks.  

  • Member since
    September 2003
  • From: AandF in the Badger State
Posted by checkmateking02 on Saturday, February 26, 2011 4:00 PM

I finished the B-17G "Just Plain Lonesome" a couple of weeks ago, but didn't post photos since my daughter is in Canada with the camera.  I "just plain" got tired of waiting for her to return, so I got out the old camera and here are the results.

But first, a look at the original 1:1 item.  First is a photo of one of the crews, followed by an inflight photo of the aircraft on a mission.

[View:/themes/fsm/utility/:550:0]
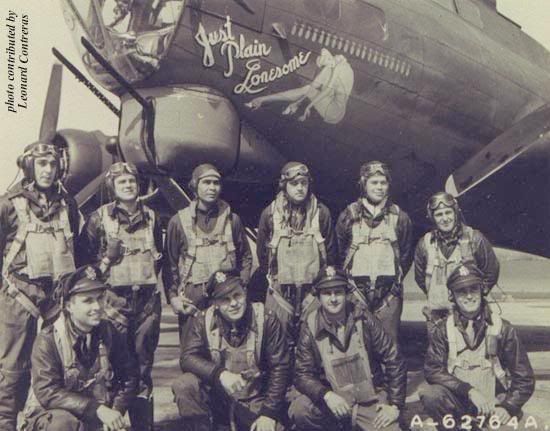
Serial #42-39975 

Back Row - Left to Right

S/Sgt. Fred R. Honey, Waist Gunner, Detroit Mich.; T/Sgt. Gerard J. Bradley, Top Turret Gunner/Engineer, Shamokin Pa.; Sgt. Enrique (Pat) Tafolla Perez, Ball Turret Gunner, Uvalde TX.; S/Sgt. Joseph Morrison, Waist Gunner; Sgt. Clemmet D. Hester, Tail Gunner, New London Iowa; S/Sgt. Edward J. Cook, Radioman, Newark New Jersey. (S/Sgt. Tommy Cogdill, Waist Gunner. not in photo)

Front Row - Left to Right

Lt. Richard M. Carlson, Co-Pilot, Glendale Calif.; Lt. Ronald J. Nichols, Pilot; Lt. Stanley Sweitzer, Navigator, Louisville KY.; Lt. Fredric T. Neel Jr., Bombardier.

Source:  http://www.91stbombgroup.com/crewphotos/justplainlonesome.html

[View:/themes/fsm/utility/:550:0]
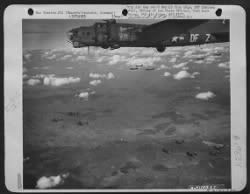
I can't remember what source the in-flight photo comes from, since I've had it saved for quite a while. 

JUST PLAIN LONESOME
42-39975 B-17G
91/324 DF-Z
91/323 OR

Only four days had passes after assignment to the 91st before this plane lifted off on its first mission to bomb a V-weapon site in France on 14th January 1944. It was to be a poor start as 1/Lt.McGee was forced to abort prior to the target when the bomb release malfunctioned and accidentally salvoed the load.

Perhaps it was this first lone bomb release that prompted the choice of name, in any case, Tony Starcer was soon busy painting another of his lovely ladies onto the side of the nose. It was not long before a string of mission bombs had been added below the side windows as the plane clocked up trips to Berlin, Koln, Kassel and the ultimate-tongue-twister of Oberpfaffenhofen.

Ronald Nichols was assigned to the plane for the mission to Berlin on 8th March and he took it back to the same target on the following day. In all he would make eleven successful sorties in "Just Plain Lonesome" until he ended his tour of combat duty on 13th April by flying to Schweinfurt. Richard Burch's crew then took over the plane for another four missions but at the end of April, along with the bulk of 324th Squadron's regular aircraft, "Just Plain Lonesome" was transferred to the 323rd. This was as a result of the 324th's concentration on specialized lead missions in its new modified PFF aircraft. The first sortie with its new owners was on 1st May to the marshaling yards at Troyes and others quickly followed. Jack Collier was assigned to the airplane for the 7th May raid on Berlin and he would fly another four successful missions in the ship before Fate overtook him.

In all Just Plain Lonesome completed 40 sorties, including five attacks on Berlin, but on 3Oth May the Grim Reaper was waiting. The Junkers aero-engine plant at Dessau was the primary that day and 1/Lt.Jack Collier took the ship over the target and bombed accurately with the group.' But deadly shards of flak had found them and just after bombing Collier was heard on the VHF radio stating that two engines were out, ailerons were damaged and requesting fighter support. At that moment a series of vicious enemy fighter attacks was launched which drew all of the available fighter escorts into action to defend the formation. When the melee had subsided Collier and his crew had disappeared from the sky - only two men survived from the nine on board.

"Story taken from Plane Names & Fancy Noses, by Ray Bowden"

Source:  http://www.bombsqd323rd.com/b17-justplai.html

I'm going to continue this in a separate post, since I just had "Photobucket" jam up on me, and I lost everything while trying to put things into one post.  Sorry.


  • Member since
    September 2003
  • From: AandF in the Badger State
Posted by checkmateking02 on Saturday, February 26, 2011 4:19 PM

Hmm, "Photobucket" did jam up on me again, after the first post.

Anyway, here's an overhead view.

[View:/themes/fsm/utility/:550:0]

Next, the starboard side, where the noseart isn't.

[View:/themes/fsm/utility/:550:0]

View from port aft, which sort of shows the three-piece waist window position, a vacu-formed item from Squadron.

[View:/themes/fsm/utility/:550:0]

Since I've gotten this far, I'm not going to push my luck.  I'll continue with another post.


  • Member since
    September 2003
  • From: AandF in the Badger State
Posted by checkmateking02 on Saturday, February 26, 2011 4:27 PM

Port side showing nose art (somewhat fuzzy).  I scrapped the wheels that came with the kit (Airfix's offering of the Academy original), and used Hasegawa wheels from the parts box.  Both Airfix and Academy provide wheels with covers; most B-17's didn't have them.

[View:/themes/fsm/utility/:550:0]

 [View:/themes/fsm/utility/:550:0]

More of a elevated view.

[View:/themes/fsm/utility/:550:0]

Again, not to tempt fate, I will finish with one more post.  Thanks for your indulgence.


  • Member since
    September 2003
  • From: AandF in the Badger State
Posted by checkmateking02 on Saturday, February 26, 2011 4:38 PM

I added a set of crewmen by CMK.

[View:/themes/fsm/utility/:550:0]

[View:/themes/fsm/utility/:550:0]

The 1:72 Airfix kit is virtually identical to the Academy offering that has been around for fifteen years or more, and has all the pluses and minuses associated with the earlier release.  Still I think it builds up to a good representation.  Most noticeable are the engines and engine cowlings which don't look very accurate at all.

In addition to the wheels, I also salvaged the RDF football from a Hasegawa kit since the Airfix/Academy version looks a little big and bulky to my eye, and also the Norden bombsight--which Airfix/Academy failed to get right at all (not that you can see it very well anyway).  The nosecone and the astrodome also come from the Squadron vacu-form set.  Decals are from AeroMaster.  Beyond that, everything else is out of the box.

This was an enjoyable project, and I'm working on another Fort, to use the decals for "Little Patches," also from the 91st Bomb Group.  Hopefully then I can move on to "Our Gal Sal" from the 100th Bomb Group.


  • Member since
    July 2010
Posted by jbrady on Saturday, February 26, 2011 9:12 PM

Very nice build... well done.


  • Member since
    December 2002
  • From: Bury St Edmunds, Suffolk, England
Posted by Bish on Sunday, February 27, 2011 5:27 AM

Little J, no worries, and i hope you pack all those models up well. Nothing worse than moving and then spending weeks re-paireing all the damage.

checkmate the B-17 looks great. I didn't realise the Airfix and Academy were one and the same. I had read a review about the acedamy B-17s that says one flaw if the engine colwings which don't have the flaps on the back edge. So i was looking at getting some resin ones for my F and G. Then when i looked in the box i noticed it had two sets of cowlings, one with and one without flaps, so i guessed this must have been a correction after the reviws were done. But i will look more cloely at them when i get home and see if they do look right.

You willhave to bear with me on the photos, having to use public computers means i can't download pics and then save them to photobucket. So i will do all that when i get home.

I have found that its best to add no more than 4 pics to photobucket at a time, any more than that and it freezes.

I am a Norfolk man and i glory in being so


On the bench: Airfix 1/72nd Harrier GR.3/Fujimi 1/72nd Ju 87D-3

  • Member since
    July 2010
Posted by jbrady on Sunday, February 27, 2011 9:11 AM

Bish: I haven't found any problems with loading multiple photos to Photo Bucket (up to 8 or 9) as long as you resize them. I keep the size down to no more 845 pixels wide. Usually that means that you are loading about 300 or 400 kbs.


  • Member since
    September 2003
  • From: AandF in the Badger State
Posted by checkmateking02 on Sunday, February 27, 2011 3:49 PM

jbrady:  thanks!

Bish:  actually there are flaps on the cowls for both "F" and "G" models with the Airfix/Academy Forts; I actually did a little weathering by using a pinwash in them--but they are rather indistinct.  But there are flap-less cowls in the box, too.  They are supposed to be used for the early Fortresses of the "B, C, and D" types, which Academy also makes (or used to make--they seem to have disappeared from the shops).

It is a quirk of Academy to include certain parts for nearly all the Fortress versions in the same box.  In fact, you even get narrow chord propellers in the box too, plus some of the floors and bulkheads for the early versions.. It's a waste of plastic, but probably a holdover from the days gone by when oil was cheap, and they could afford to put more plastic in the boxes than needed.

It does appear Airfix did some minor tweaking.  The Airfix version has a locator mark for the RDF football, which the Academy version did not have--at least the one I built years ago.  I'm wondering now if Academy has kept the changes. 


  • Member since
    December 2002
  • From: Bury St Edmunds, Suffolk, England
Posted by Bish on Monday, February 28, 2011 5:09 AM

Ye, i seem to recall the lines on the flaps and not very disticnt. Maybe a bit of scribing would be in order. I did get hold of the C/D kit last year, as i plan i doing a Fortress I. I don't remeber what the review site was that said about having the wrong cowls. I found it odd as when i checked, the correct cowls didn't seem to be a piece that was added into the sprue, but looked like it had been there all the time. Maybe the guy writing it had a bad kit.

And have you seen any of the new dragon armour kits. talk about having bit in the box you don't use. Talk about a waitse of plastic. I will check out the Acedamy kits when i get home, as well as the C/D i have an F and a G, and of course i will be building the F.

I am a Norfolk man and i glory in being so


On the bench: Airfix 1/72nd Harrier GR.3/Fujimi 1/72nd Ju 87D-3

  • Member since
    September 2003
  • From: AandF in the Badger State
Posted by checkmateking02 on Monday, February 28, 2011 2:00 PM

Bish:  here are the sprues from the Airfix B-17G with unused parts.

[View:/themes/fsm/utility/:550:0]

Upper left are cowls for the early Forts--B through D models.  I think they are very accurate for those versions.  Just don't need them in the kit for an F or a G.  The later cowls, for the E through G models are not so accurate. 

Next to them are the horizontal stabilizers for the early models, and below them in the center are the props for the early forts.  Over to the right are various parts also for the early Forts, including floors, seats, bulk heads and even the lower gun tub/turrent that wasn't used after the D model.

I will post pcs of a B-17B I finished a few years ago, along with a G model, both from Academy.


  • Member since
    September 2003
  • From: AandF in the Badger State
Posted by checkmateking02 on Monday, February 28, 2011 2:11 PM

Here is an overhead view of Academy's B-17G, finished for "Looky Looky," from the 490th Bomb Group.  I did modify this with parts left over from a Hasegawa kit--the engine cowlings, the props and the main wheels.

[View:/themes/fsm/utility/:550:0]

Next is the B-17B, from below showing the open bomb bay.  That's a nice option, but I usually close the doors for wartime aircraft.  My research indicated that practice "dummy" bombs were painted yellow pre-war.

[View:/themes/fsm/utility/:550:0]


  • Member since
    September 2003
  • From: AandF in the Badger State
Posted by checkmateking02 on Monday, February 28, 2011 2:20 PM

The view from port aft.

[View:/themes/fsm/utility/:550:0]

Above.

[View:/themes/fsm/utility/:550:0]

And from port front.

[View:/themes/fsm/utility/:550:0]

The specific aircraft is based on two photos in Great American Bombers of WWII, published by Motor Books.  She is said to be named "Flagship," and may be the group lead aircraft, since her cowls are painted in all three of the squadron colors.

I think you'll enjoy building the early Academy Fort, although parts often have to be sanded to fit properly.  I was pleased with the way the early Forts turned out, and they are certainly some of Academy's best work. 


  • Member since
    December 2002
  • From: Bury St Edmunds, Suffolk, England
Posted by Bish on Friday, March 4, 2011 12:32 PM

Thanks for posting those pics. Those B-17's look great. I am going off memory, but i am pretty sure the layout on thiose sprues is the same as the acedamy F and G i have. I may just give in a get the resin cowls anyway. I will be sending an order to hannats just before i leave here and that should get to me before i start the F. With the amount of PE i am trowing at it i might as well go the whol;e hog. I will be building the 17 with bomb bays open and a couple of the M6 bomb trolleys close by, but just not sure what to use as a towing truck.

I am a Norfolk man and i glory in being so


On the bench: Airfix 1/72nd Harrier GR.3/Fujimi 1/72nd Ju 87D-3

  • Member since
    November 2008
  • From: Crawfordsville, Indiana
Posted by Wabashwheels on Tuesday, March 8, 2011 4:55 PM

I was able to finish my two Mustangs over the weekend.  I'd like to share a few angles with the group.  First up is the Revell/Monogram "Boise Bee'.  This is not the old Monogram version.  It has the recessed panel lines and is a little better detailed than the old Monogram kit.  Pretty much straight from the box.  I did give it True Details wheels and the extra set of wing tanks from the Tamiya kit.  Also, I modified the canopy.  I used the kit windscreen, and then carefully sliced the rear canopy panels from the kit's main canopy part.  I added a couple little tabs in the rear openings to give a solid support to the rear window panels, rather than try to just glue them in and hope the edges hold.  I used the leftover main canopy pieces from the Tamiya kit.  The one piece folds down the side of the fuselage, and the other piece is shown lifted up.  It's a nice look for an open canopy. One I didn't want to throw in the spare parts bin.  I only needed to modify these parts slightly.  I filed a little framework off each end and they fit into the rest of the canopy very well.  It's painted with Model Master OD and Neutral Gray.  The stripes are decanted Rustoleum white primer.  Microscale provided the decals.

The "Missouri Mauler" is a Tamiya kit, straight from the box. I did juice up both cockpits with some scratchbuilt boxes and Eduard placards, and added hydraulic lines to the landing gears.  But for the most part the builds were pretty straight forward. I used the Malcom Canopy on this kit.  Alclad Aluminum over flat black primer covered the "Mauler".  It went on very nice through the airbrush, and the Alclad Airbrush Cleaner was the best solvent I have ever seen at cleaning the airbrush and even making my cruddy old mixing bottles look new again I applied Aeromaster Invasion stripes hesitantly, but with a lot of Micro Sol they sucked down pretty well into the contours of the Mustang.  With a little touch-up paint the stripes came out pretty convincing.  Microscale also provided the personal markings for this aircraft.

It was a fun way to do a build.  For a while it was two pretty identical aircraft, but down the stretch the work was quite different as can be seen in the different schemes.

Thanks for lookin.  Rick.


  • Member since
    September 2003
  • From: AandF in the Badger State
Posted by checkmateking02 on Tuesday, March 8, 2011 5:03 PM

Wabash:  Both of these aircraft look excellent.  You got some great results with the invasion stripe decals.  It looks like they are painted on.  The stripes really make an aircraft "pop."  It's a nice job all around. 


  • Member since
    June 2003
  • From: Garland, TX
Posted by pepper kay on Tuesday, March 8, 2011 5:18 PM

Hiya Rick:

Nothing short of stupendous ... fabulous work on these 'not too oftern seen' Mustangs ...

Thanks for sharing !! ...

pepper

  • Member since
    July 2010
Posted by jbrady on Wednesday, March 9, 2011 7:21 AM

Great job on both Rick. Love the NMF very very well done.


  • Member since
    December 2002
  • From: Bury St Edmunds, Suffolk, England
Posted by Bish on Wednesday, March 9, 2011 11:17 AM

Great looking builds Rick. As i have mentioned before, i won't be able to get the pics on the front page for a bit, possably when i get home in May. Think i will use the first one of the two together. But i won't forget. Thanks for taking part in the GB, a great contribution

I am a Norfolk man and i glory in being so


On the bench: Airfix 1/72nd Harrier GR.3/Fujimi 1/72nd Ju 87D-3

  • Member since
    June 2010
  • From: Austin, TX
Posted by DoogsATX on Wednesday, March 9, 2011 11:19 AM

Love the 'Stangs, Rick!

Of the two, do you have a preferred kit? I've heard great things about the Revell, but I've only built the Tamiya (and it's about as shake-and-bake a kit as I've ever touched!)

On the Bench: 1/32 Trumpeter P-47 | 1/32 Hasegawa Bf 109G | 1/144 Eduard MiG-21MF x2

On Deck:  1/350 HMS Dreadnought

Blog/Completed Builds: doogsmodels.com


  • Member since
    May 2010
Posted by Little J on Wednesday, March 9, 2011 12:23 PM

Awesome job on the P-51s RickBow Down  

  • Member since
    April 2010
  • From: Green Bay, WI
Posted by redraider56 on Thursday, March 10, 2011 3:56 PM

I have been MIA on here for the last couple months, but I finally have the oppurtunity to finish up both my builds in this coming week

-Matt

On The Bench: 1/48 HK B-17G "Man-O-War II"

On Deck: 1/48 Tamiya P-38H, 1/48 Revell PV-1


  • Member since
    December 2002
  • From: Bury St Edmunds, Suffolk, England
Posted by Bish on Friday, March 11, 2011 8:32 AM

No problems red, glad to see you back and look forward to seeing some pics. I haven't been able to get on that much myself.

I am a Norfolk man and i glory in being so


On the bench: Airfix 1/72nd Harrier GR.3/Fujimi 1/72nd Ju 87D-3

  • Member since
    November 2008
  • From: Crawfordsville, Indiana
Posted by Wabashwheels on Saturday, March 12, 2011 12:45 AM

Doogs, I agree that the Tamiya P-51B is a great kit to put together.  It is the preferred kit to put together.  The cost of kits was not a factor.  I got it on ebay for about $12.00.  It was a bagged kit.  But there's nothing wrong with the Revell/Monogram kit.  If you consider that I put tanks and the open canopy from the Tamiya kit on the R/M, it was a bit of a hybrid.  I also put a Verlinden cockpit and True Details wheels in/on the R/M which were not really necessary.  But it was fun to cut, scratch and sand a little bit to get the finished product.  There is a lot of satisfaction in doing the extra work.  Building along side the Tamiya kit helped guide the look on the R/M kit.  Now I've got an ICM, Accurate Miniatures, and another Tamiya B model to take a look at in the future.  Rick


  • Member since
    January 2007
  • From: Cleveland, OH
Posted by Clebode on Sunday, March 13, 2011 12:44 PM

Rick--The P-51 Bs look fantastic! 

All--Here is my finished "Jeanne" flown by Capt. Roy Scrutchfield, 55th FS. 20th FG.

Next up is the B-17  G "Bottome Up"!

Hugh

  • Member since
    September 2003
  • From: AandF in the Badger State
Posted by checkmateking02 on Sunday, March 13, 2011 7:00 PM

Sharp looking Lightning.  I like the way you achieved the feathering between the colors. 


  • Member since
    May 2010
Posted by Little J on Sunday, March 13, 2011 9:25 PM

Awesome job on your P-38!!!!!!!!!!!Toast

  • Member since
    December 2002
  • From: Bury St Edmunds, Suffolk, England
Posted by Bish on Tuesday, March 15, 2011 7:45 AM

Great looking P-38, thanks for adding that to the growing list of completed kits.And once again, i will add that to the front page as soon as i can, whci may not be until i gte home in May, but i won't forget.

I am a Norfolk man and i glory in being so


On the bench: Airfix 1/72nd Harrier GR.3/Fujimi 1/72nd Ju 87D-3

  • Member since
    August 2006
  • From: Neenah, WI
Posted by HawkeyeHobbies on Thursday, March 17, 2011 1:13 PM

This was buzzing around my house today.

Gerald "Hawkeye" Voigt

http://hawkeyes-squawkbox.com/


"Its not the workbench that makes the model, it is the modeler at the workbench."

JOIN OUR COMMUNITY!

Our community is FREE to join. To participate you must either login or register for an account.

SEARCH FORUMS
FREE NEWSLETTER
By signing up you may also receive reader surveys and occasional special offers. We do not sell, rent or trade our email lists. View our Privacy Policy.