SEARCH FINESCALE.COM

Enter keywords or a search phrase below:

Mighty 8th GB 1-Nov-2010 - 31-Oct-2011

142358 views
1358 replies
1 rating 2 rating 3 rating 4 rating 5 rating
  • Member since
    March 2006
Posted by simpilot34 on Saturday, May 21, 2011 8:36 AM

Cheers mate!!Toast

Cheers, Lt. Cmdr. Richie "To be prepared for war, is one of the most effectual means of preserving the peace."-George Washington
  • Member since
    September 2003
  • From: AandF in the Badger State
Posted by checkmateking02 on Saturday, May 21, 2011 12:07 PM

Bish:

that will build up into a nice Fort.  It has a pleasing appearance when finished.  If I may offer unsolicited advice, be sure to test fit all pieces--as some require some sanding down to fit.  If I remember correctly, the top turret is one of them (I sanded the hole in the fuselage, rather than the turret itself), and some of the interior bulkheads.   

Are you going to buid with an open or closed bomb bay?  If open, I found it necessary to drill a hole through the bomb rack (in the back of the rack, at each proper spot) and into each bomb, then securing each bomb with a cut-off pin glued through the rack and into the bomb with superglue.  Otherwise, it was too easy to knock the bombs off the rack during the rest of construction. 

Once you close the fuselage around the bomb rack, there is no way to get in there and put back any erring bombs (this is the frustration of experience speaking!). 

Good luck with construction.  I'll be looking forward to seeing it.

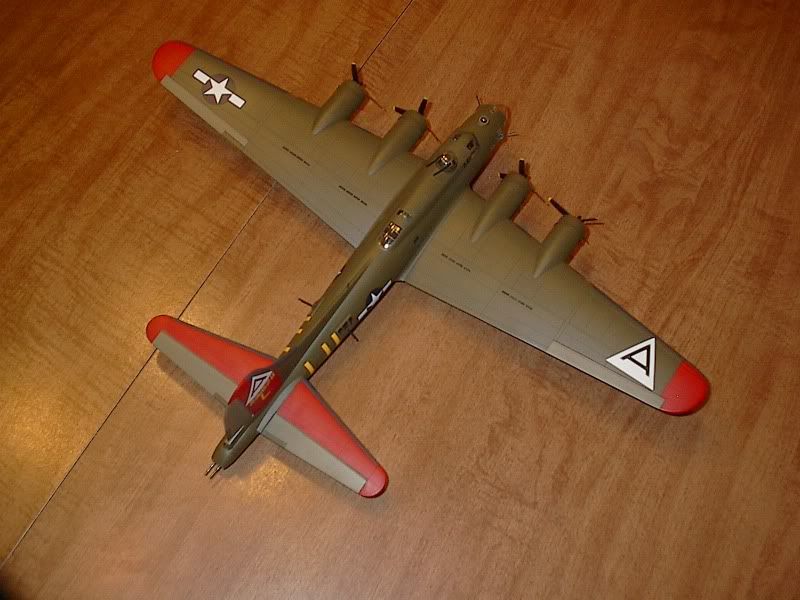
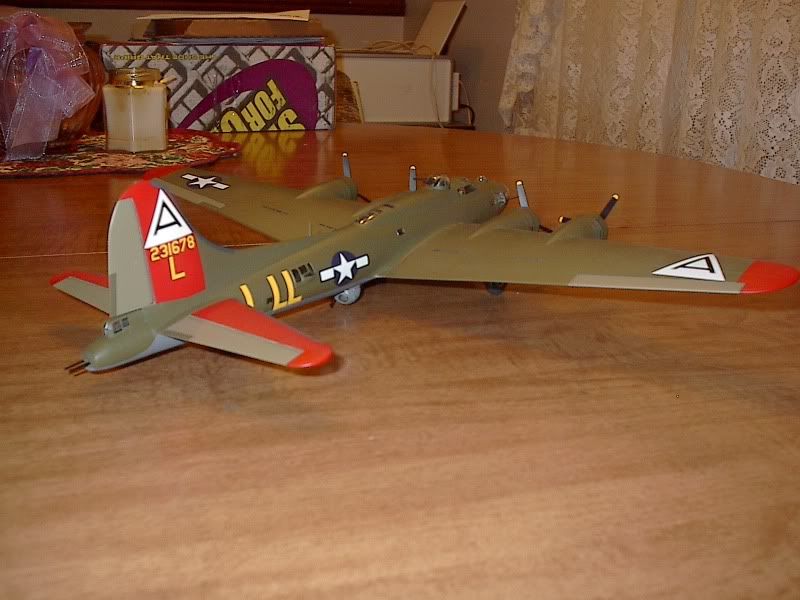
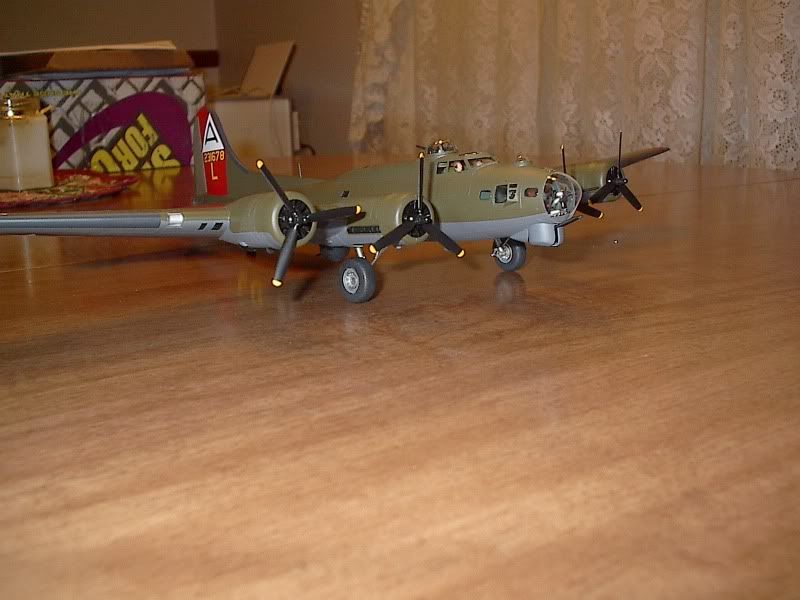
And. . .I am nearly done with B-17G "Little Patches."  I have a couple more of the final, fiddly pieces to install. 


  • Member since
    December 2002
  • From: Bury St Edmunds, Suffolk, England
Posted by Bish on Saturday, May 21, 2011 12:52 PM

All advice is welcome, more so from those who have had hands on with the kit yhour doing. I am doing an open bomb bay, adding the Eduard PE set. I have some M5 bomb trolleys so going to have a dio with the bombs being loaded. So i might put a couple of bombs in and have the rest on the trolleys. I am not sure if you are going to be able to see inside the bomb bay, maybe a little. But at least i will know it is as good as i can get it. I will have to study the Eduard instructions carefully. And i will be that about the turret in mind.

The only thing i am missing is a truck to pull the bomb trolleys. trying to get hold of an M6, but having no luck.

Look forward to seeing some pics. Hopefully i can get enough done, work allowing, next week, to get some pics up next week.

I am a Norfolk man and i glory in being so


On the bench: Airfix 1/72nd Harrier GR.3/Fujimi 1/72nd Ju 87D-3

  • Member since
    September 2003
  • From: AandF in the Badger State
Posted by checkmateking02 on Sunday, May 22, 2011 10:44 PM

Here is my second contribution to the group build, and not one I planned on when we began; but I had the decal sheet, and thought I'd use it before moving on to the 100th Bomb Group's "Our Gal Sal." 

This is "Little Patches," from the 91st Bomb Group's 401 Bomb Squadron.  First, some background on the original craft, sourced from:  http://www.usaaf-noseart.co.uk/misslist-31678.htm

LITTLE PATCHES --- B-17G-25-BO --- 42-31678

91st Bomb Group 324th & 401st Bomb Sqns Codes: DF-L & LL-L

To USAAF : 6 Dec 43
To Kearney AAB : 19 Dec 43
To Presque Isle : 9 Jan 44
Arrived ETO : 18 Jan 44 (Nutts Corner)
Ass'd to 91BG : 27 Jan 44
BASSINGBOURN, England
Crew Chief : M/Sgt Arthur Hole

The name "Little Patches" was acquired after the aircraft's first combat mission with Lt William Major's crew when Frankfurt flak put many splinters through the ship. The damage was primarily cosmetic but the skin required numerous small aluminium patches prompting Lt Major to name the ship. Starcer's original pin-up painting portayed a blonde wearing an Air Force cap. His artwork was probably based on the popular Gil Elvgren illustration entitled 'Net Results' painted in 1941 -- which was based on his earlier rendering called 'Forced Landing'.

[View:/themes/fsm/utility/:550:0]
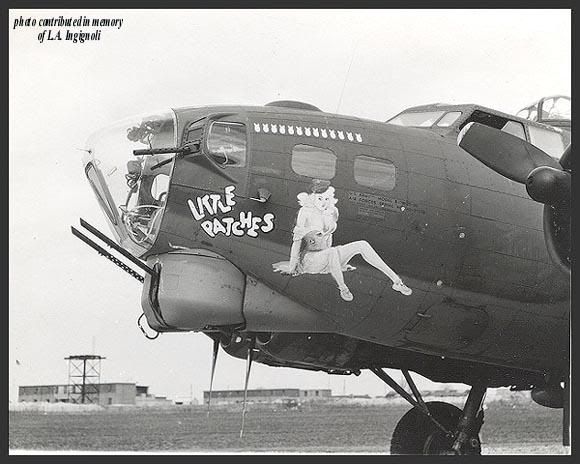
After the 29th Mar 44 mission to Brunswick, "Little Patches" caught fire during maintenance and was so badly damaged that it was removed from operations and sent to the sub-depot for extensive repairs. It was not fit to return to combat flying until early in May when it was re-assigned to the 401st Bomb Squadron.

 [View:/themes/fsm/utility/:550:0]
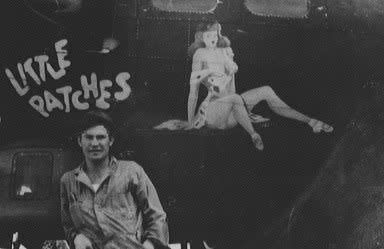
The fire damage affected the nose section of the plane and Tony Starcer repainted the pin-up girl at this time and made some slight amendments to his original imagery. The girl became slightly slimmer as well as a brunette, the Air Force cap was omitted and the dress received a different pattern. The title lettering however remained identical and untouched.

At least 34 different combat crews were assigned to "Little Patches" during its operational tour. The first pilot to take the ship after it was transferred into the 401st Sqn was Sam Newton -- immortalised in Bert Stiles' famous book 'Serenade to the Big Bird.' Stiles later flew as co-pilot with John Green on 29th July to Leipzig when "Little Patches" took 20mm cannon hits, caught fire and was forced from the formation to return alone. It flew to all the toughest targets including Schweinfurt, Regensburg, Augsburg, Munich, Merseburg, Frankfurt and Berlin (at least 8 times). Serious battle damage over Merseburg on 2nd November put the ship out of action for most of that month. Repaired, it was put back into combat and continued flying missions until the end. In the final month of war, "Little Patches" notched up nine raids -- the last being to Brandenburg on 20th April 1945.

Finally when it was all over, "Little Patches" landed just north of Berlin on 8th May to collect RAF prisoners of war and ferry them back to England. One month later, it took off from Bassingbourn for Valley in Wales on the first leg of the return flight to the USA and ultimate scrapping, piloted by Francis Breidenbach. After landing at Bradley Field, Connecticut, it passed on to Romulus Field, then Topeka and finally Kingman RFC, Arizona.

 Here is a crew photo sourced from:   

http://www.kits-world.co.uk/index.php?&CONTENT=37

[View:/themes/fsm/utility/:550:0]
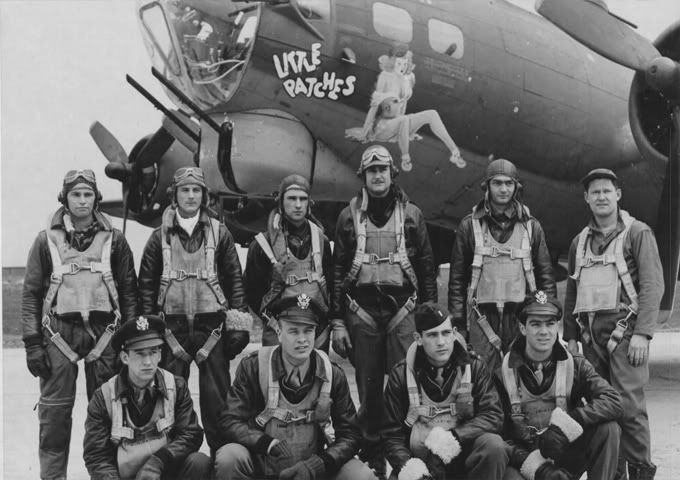
No indication of which crew, as "Little Patches" was flown by several crews in her career.  A complete list is included in the first website cited.

The kit is the Airfix 1/72 B-17G, which is a virtual copy of the Academy model.  A few minor modifications were apparently made by Airfix, such as crudely etching into the starboard fuselage the rear crew entry door (it is missing entirely on Academy kits, at least the early ones I have; and adding a little placement "nodule" for the RDF football--also not there on the Academy effort).

[View:/themes/fsm/utility/:550:0]
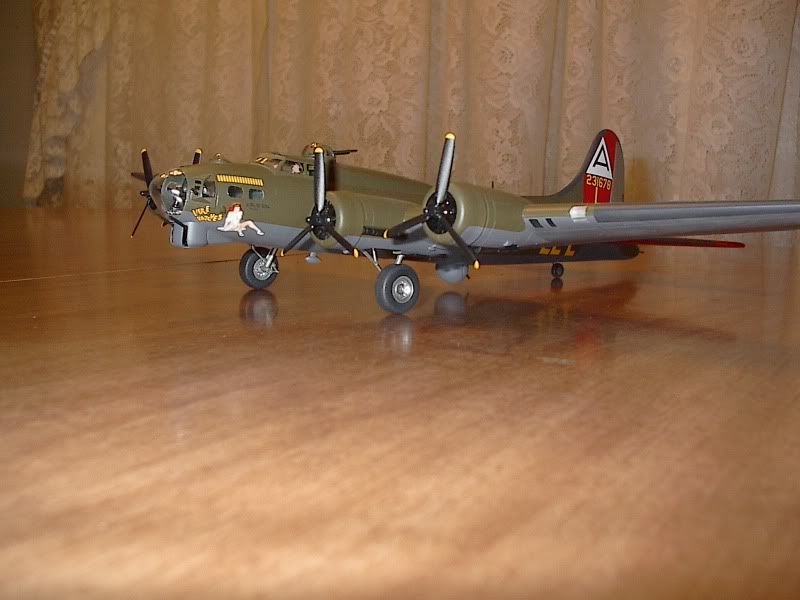
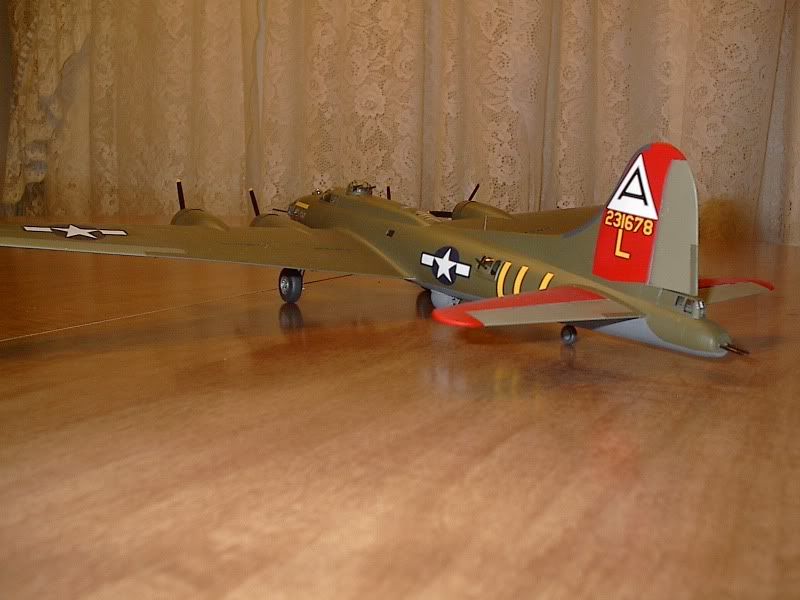
The decals apparently represent the second version of the noseart.  It is also evident there is no stencil data on the prop blades.

[View:/themes/fsm/utility/:550:0]
[View:/themes/fsm/utility/:550:0]

[View:/themes/fsm/utility/:550:0]

[View:/themes/fsm/utility/:550:0]

[View:/themes/fsm/utility/:550:0]

I used AeroMaster paint, no longer in production, for the OD and neutral gray colors.  The decals are also 11 year old AeroMaster products.

After I took the pictures, I noticed one gun had disappeared from the ball turret.  I found a spare in the parts box, and the situation has been remedied.  Thanks for looking.


  • Member since
    March 2006
Posted by simpilot34 on Monday, May 23, 2011 3:55 AM

GREAT WORK Check!!!! Awesome build and nice story behind her!! WELL DONE!!Toast

Cheers, Lt. Cmdr. Richie "To be prepared for war, is one of the most effectual means of preserving the peace."-George Washington
  • Member since
    December 2002
  • From: Bury St Edmunds, Suffolk, England
Posted by Bish on Monday, May 23, 2011 4:32 AM

Ditto Great build and thank you very much for the background info. I'll add it to the front page soon. Yes

Finally got some plastic glued together last night, so the B-17F is under way. Big Smile

I am a Norfolk man and i glory in being so


On the bench: Airfix 1/72nd Harrier GR.3/Fujimi 1/72nd Ju 87D-3

  • Member since
    September 2003
  • From: AandF in the Badger State
Posted by checkmateking02 on Monday, May 23, 2011 3:09 PM

Thanks to both of you for the generous comments.  Sometimes during the build I wondered if it would ever turn out.

Bish:  have you glued the wings halves together for your "F?"  "Little Patches" was the second Airfix/Academy "G" and I built one Academy "F," and noticed that the wing halves don't align very well fore and aft.  The top of the wings overhand noticeably at the front, particularly evident at the nacelle faces, and the bottom of the wing protrudes beyond the back of the top of the wing at the rear (if I'm explaining adequately).  I was going to experiment with the next Fort by cutting off the alignment pins and seeing if the top and bottom wing pieces would fit better.

I was wondering if you have the same issue, because it's always possible that I've just been careless and not observant enough.

Also, another unsolicited comment:  when you install the main landing gear, it's helpful to trim a little of the forward opening where the braces at the front of the gear "intersect" the front wall of the gear well.  The plastic is too thick there, and tends to prevent the brace from seating properly.  I'm not sure I'm explaining this very well, but if you dry fit the gear into the well, you'll probably see what I mean.


  • Member since
    December 2002
  • From: Bury St Edmunds, Suffolk, England
Posted by Bish on Tuesday, May 24, 2011 3:29 AM

Funny you should mention the wing. I glued the left wing halves together yesterday. The front of the wing lined up fine, though there were a few small gaps around the engines. The back of the wing was ok at the wing tip, but the bottom half did stick out sligthly further down the wing, but not alot. Not sure if its me, but the rear of the wing does seem a bit thick, not as fine an edge you you normally see on 72nd aircraft.

As it turned out i was getting ahead of myself. I remembered that the BIG ED set i am useing has PE for the undercarrige. So i had to take the wing apart. I did test fit the main landing gear, as i wanted gto see if i could fit it after the wing halves had been joined so i could fit it after painting. And ye, i see what you mean about the plastic being to thick. Thanks for the heads up again. I think a bit of fine sanding will resolve these, the bottom wing issue doesn't look to bad. I will have to check out the right wing.

I am a Norfolk man and i glory in being so


On the bench: Airfix 1/72nd Harrier GR.3/Fujimi 1/72nd Ju 87D-3

  • Member since
    April 2010
  • From: Green Bay, WI
Posted by redraider56 on Tuesday, May 24, 2011 10:45 PM

Excellent build Check, only thing I noticed is that the nose art should have white letters, not yellow

-Matt

On The Bench: 1/48 HK B-17G "Man-O-War II"

On Deck: 1/48 Tamiya P-38H, 1/48 Revell PV-1


  • Member since
    September 2003
  • From: AandF in the Badger State
Posted by checkmateking02 on Wednesday, May 25, 2011 9:51 AM

redraider:

thanks; I'm not sure that the lettering color is the only snafu in the decals.  Do you have a source for the color difference?  I didn't find any color photos on the web.

I did find other models of the plane, and some of them also showed NMF de-icer boots.  In painting, I slavishly followed the profiles that came with the decals.

I'm almost certain now that by the time the plane had the second version of the noseart, it also carried more mission markers and had a radar antenna on the nose.

Years ago, when I was doing German Messerschmitts from the old MicroScale sheets, I found that they took markings from the front of one plane, plus markings from the back of another of the pilot's planes, and combined them together.  You couldn't build a correct version of either.  Don't remember whose plane it was, but the sheet also included a 109 for Erich Hartmann--which was also wrong.

With decals, I guies "it is what it is."  Thanks for your comments and observations.


  • Member since
    September 2003
  • From: AandF in the Badger State
Posted by checkmateking02 on Wednesday, May 25, 2011 10:05 AM

Bish:

good luck with it!  Even with all the little issues, it builds up into a nice looking aircraft. 

Enjoy your leisure, before the Army sends you somewhere else again!


  • Member since
    December 2002
  • From: Bury St Edmunds, Suffolk, England
Posted by Bish on Wednesday, May 25, 2011 2:29 PM

Thanks check, its coming along nicely, still got a bit of pe to fit before i get the inside painted.

Think i am safe for a while. Only place i will be off to is the falklands again, maybe December.

I am a Norfolk man and i glory in being so


On the bench: Airfix 1/72nd Harrier GR.3/Fujimi 1/72nd Ju 87D-3

  • Member since
    April 2010
  • From: Green Bay, WI
Posted by redraider56 on Wednesday, May 25, 2011 10:21 PM

Check: I don't have a color reference, but do have a credible source.  Much of the inspiration for my current 1/48 B-17 dio came from a guy who did a similar 1/48 dio with "Little Patches" as his subject.  Much of that guys research came from talking and meeting with several members of the crew(s) that flew her during the war.  He also had problems with finding accurate decals and noted that there were some mistakes with his 1/48 version of the Aeromaster sheet, but your plane appears to be accurate except for the letters.

What he had to say about the nose art:

Also “Little Patches” nose art has a very interesting history behind it as well as a lot of incorrect decals made of this also! The correct version of the decal with “little patches” in bubble letters is white letters with black outline (not the yellow letters/never appeared with yellow letters!), also be sure of when you are depicting her during her service, as early on in service little patches displayed a blonde pinup girl (good up to 13 mission markers), she then was in a maintenance fire and sent to sub depot for repairs and upon returning Tony Starcer repainted her as a brunette, which stayed that way the rest of her service!….anyway I started with the decals and finished up with nose art and repainting the pin-up as accurate as possible over the Aeromaster one, which worked very well in this case due to only hair and a few other things that needed attention!

And a link to his build http://www.aircraftresourcecenter.com/Fea1/301-400/Fea395_B-17_Perry/00a.shtm


-Matt

On The Bench: 1/48 HK B-17G "Man-O-War II"

On Deck: 1/48 Tamiya P-38H, 1/48 Revell PV-1


  • Member since
    September 2003
  • From: AandF in the Badger State
Posted by checkmateking02 on Wednesday, May 25, 2011 10:50 PM

redraider:

great diorama and great story about the research; sources can't be more impeccable than that!

I did some searching on the web, and find that Kitsworld makes "Little Patches" decals in 1/72 with the proper white lettering.  Of course, since I'd had the Aeromaster sheet for years already, I didn't even consider looking for options.

Thanks again for your comments and insight.  It's what I like about research:  there's always something to learn, even if you learn it too late. 


  • Member since
    December 2002
  • From: Bury St Edmunds, Suffolk, England
Posted by Bish on Thursday, May 26, 2011 1:27 PM

Afraid my 17 is going to be put on hold for a bit, just as i got started. I have broken a bone in my right wrist and now in a cast from my fingurs to elbow. And yep, i am right handed. I might be able to get a little done, but i can't use cutters, knife or much else. And i could be in this for upto 8 weeks Crying

Going to really bugger up my building now.

I am a Norfolk man and i glory in being so


On the bench: Airfix 1/72nd Harrier GR.3/Fujimi 1/72nd Ju 87D-3

  • Member since
    September 2003
  • From: AandF in the Badger State
Posted by checkmateking02 on Thursday, May 26, 2011 2:33 PM

That's really bad news, Bish; very sorry to hear this.  I know how it feels.  I tore up my rotator cuff two winters ago (shoveling snow--I hate snow), and couldn't do much building at all for 8-12 weeks. 

Tell us it didn't happen while you were modeling!

Best wishes for a speedy recovery.


  • Member since
    December 2002
  • From: Bury St Edmunds, Suffolk, England
Posted by Bish on Thursday, May 26, 2011 4:07 PM

No, thankfully, it was at work. Was hooking up a load on a Chinook yesterday, as i was backing out i lost my footing and fell backwards putting my arm out.

I broke the left one 11 years ago when i was in Bosnia, but i was still able to do stuff as i still had right hand. Well gutted.

I am a Norfolk man and i glory in being so


On the bench: Airfix 1/72nd Harrier GR.3/Fujimi 1/72nd Ju 87D-3

  • Member since
    April 2011
Posted by manji99 on Friday, May 27, 2011 10:36 PM

Found some great reference material on the Doublebolt field conversions...they did not just cut the turtleback to make room for a second cockpit, they built an entirely new turtleback to extend the canopy all the way back, thus making it wider also to accommodate the second cockpit. Nice way to complicate things for me...

Ken

Building 1/48 P-47G "Doublebolt", 1/48 MiG-15bis, 1/144 B52-I "Old Dog"


  • Member since
    April 2010
  • From: Green Bay, WI
Posted by redraider56 on Friday, May 27, 2011 11:32 PM

Hopefully you didnt have surgery, cuz that sets back the healing time a bit.  When I shattered my wrist a few years back the doctors left it to see if it would heal correctly on its own, but it didnt so they had to go put a couple pins in and it took almost 4 months before I got the cast off.....good luck to you sir

-Matt

On The Bench: 1/48 HK B-17G "Man-O-War II"

On Deck: 1/48 Tamiya P-38H, 1/48 Revell PV-1


  • Member since
    December 2002
  • From: Bury St Edmunds, Suffolk, England
Posted by Bish on Saturday, May 28, 2011 3:28 AM

Ken, sounds like a bit of work you got. But i am sure its goping to be worth it to see somthing i certaintly have not seen in a model. Look forward to it.

red, no, no surgery. A caiste for upto 8 weeks, thats the hard bit, then lots of pyshio.  I am hopeing it heals fast and the caiste isn't on that long.

Thanks guys.

I am a Norfolk man and i glory in being so


On the bench: Airfix 1/72nd Harrier GR.3/Fujimi 1/72nd Ju 87D-3

  • Member since
    April 2011
Posted by manji99 on Saturday, May 28, 2011 7:06 AM

Bish, I could always drop back and punt by building the factory "Doublebolt" conversion, which puts the second cockpit in front of the original. But that wouldn't be the one that the 56th FG had, would it? Big Smile

Ken

Building 1/48 P-47G "Doublebolt", 1/48 MiG-15bis, 1/144 B52-I "Old Dog"


  • Member since
    April 2011
Posted by manji99 on Saturday, May 28, 2011 7:12 AM

Hope you get well soon, and that therapy goes well. Makes me nostalgic, it does...I built my first model with one hand. I was 6 years old and put my arm through a glass door, to keep me quiet my Mom got me a Monogram 1/48 Piper Tri-Pacer to put together. She had no idea what kind of monster she was creating LOL...

Ken

Building 1/48 P-47G "Doublebolt", 1/48 MiG-15bis, 1/144 B52-I "Old Dog"


  • Member since
    December 2002
  • From: Bury St Edmunds, Suffolk, England
Posted by Bish on Saturday, May 28, 2011 11:10 AM

I am sure the extra work on the double will be worth it. And ye, deffo post some pics of that other build when you post the ones of your double.

Good old mum, always knows whats best.

I am a Norfolk man and i glory in being so


On the bench: Airfix 1/72nd Harrier GR.3/Fujimi 1/72nd Ju 87D-3

  • Member since
    June 2003
  • From: Garland, TX
Posted by pepper kay on Saturday, May 28, 2011 7:45 PM

manji99

I built my first model with one hand. I was 6 years old and put my arm through a glass door, to keep me quiet my Mom got me a Monogram 1/48 Piper Tri-Pacer to put together.

I had scarlet fever and my Dad got me a Strombecker - anyone here old enough to remember these 'kits' ? - B-24 to build ... lots of blocks of wood, some paltry instructions and 2 sheets of sandpaper ... if you sanded enough on the wooden blocks, a B-24 would come out ... been building ever since ...

Bish, take care, pal - don't over-do and do what the nursey-ladies tell you - be a good boy ... been there - done that - no fun !! ...

pepper

  • Member since
    December 2002
  • From: Bury St Edmunds, Suffolk, England
Posted by Bish on Sunday, May 29, 2011 4:38 AM

Thanks pepper. Afraid i have not heard of those kits. How did the B-24 turn out.

I got the GF looking after me this weekend, so making the most of that.

I am a Norfolk man and i glory in being so


On the bench: Airfix 1/72nd Harrier GR.3/Fujimi 1/72nd Ju 87D-3

  • Member since
    November 2008
  • From: Crawfordsville, Indiana
Posted by Wabashwheels on Sunday, May 29, 2011 6:33 AM

Bish, sorry to hear about the accident.  Time to catch up on the research.  Get well quick.  Rick


  • Member since
    December 2002
  • From: Bury St Edmunds, Suffolk, England
Posted by Bish on Sunday, May 29, 2011 6:58 AM

Thanks Rick, i am sure making the most of my time. Hopefully will be back at the bench soon. In the meantime, look forward to seeing all the other building taking place.

I am a Norfolk man and i glory in being so


On the bench: Airfix 1/72nd Harrier GR.3/Fujimi 1/72nd Ju 87D-3

  • Member since
    June 2003
  • From: Garland, TX
Posted by pepper kay on Sunday, May 29, 2011 12:11 PM

Bish

Thanks pepper. Afraid i have not heard of those kits. How did the B-24 turn out.

Well, the B-24 turned out as well as can be expected being built by a 7 year old with 2 sheets of 180 sandpaper and a tube of Ambroid glue :-) ... I painted it silver using the little, square bottle Testors enamel with some black enamel on the wheels and props ...

My Dad kept it for years on his desk in his office, but it flew away one day, never to be seen again ... and thinking about it, I've never built another -24 in all these years since ...

pepper

  • Member since
    December 2002
  • From: Bury St Edmunds, Suffolk, England
Posted by Bish on Sunday, May 29, 2011 12:20 PM

I am sure you loved it, pity it is no more. There are some great 24 kits out there, you should grab urself one.

I am a Norfolk man and i glory in being so


On the bench: Airfix 1/72nd Harrier GR.3/Fujimi 1/72nd Ju 87D-3

  • Member since
    June 2003
  • From: Garland, TX
Posted by pepper kay on Sunday, May 29, 2011 7:38 PM

Bish

I am sure you loved it, pity it is no more. There are some great 24 kits out there, you should grab urself one.

I've always wanted to do a 'formation' ship because of the oddball paint schems ... another, would be the PB4-Y variant as a firebomber ... that because I watched them fly from a little airport not too far from my home for years ... of course, that wouldn't fit with this GB, but there is a 'firebomber' GB I'm sure :-) ...

Keep it low and slow with no stress on your break ... research is a good substitute for building right now, I s'pose ... 'mmm. maybe not, but ya gotta do whatcha gotta do !! ...

pepper

JOIN OUR COMMUNITY!

Our community is FREE to join. To participate you must either login or register for an account.

SEARCH FORUMS
FREE NEWSLETTER
By signing up you may also receive reader surveys and occasional special offers. We do not sell, rent or trade our email lists. View our Privacy Policy.