SEARCH FINESCALE.COM

Enter keywords or a search phrase below:

Macross Group Build 2010 - 2011

57155 views
326 replies
1 rating 2 rating 3 rating 4 rating 5 rating
  • Member since
    September 2010
Posted by Cabecar on Friday, November 12, 2010 5:41 PM

Well, here are some updates, almost ready for decals!!!


Thanks for looking


  • Member since
    December 2007
  • From: Louisville, KY.
Posted by Cosmic J on Thursday, November 11, 2010 3:36 AM

Whoot! Whoot, I say! Big Smile

  • Member since
    September 2010
Posted by Cabecar on Saturday, November 6, 2010 8:57 AM

Big Smile I just receive the cobalt blue paint, so Im ready to continue. Soon more updates!!!

  • Member since
    December 2007
  • From: Louisville, KY.
Posted by Cosmic J on Friday, November 5, 2010 3:36 AM

Cabecar

Thanks. I run out of cobalt blue, so I'm waiting for the paint to arrive to continue with these project.

You have my sympathies, sir. I hate when that happens, brings my builds to a crashing halt. I'm having trouble moving my MaK build forward because I don't have any black primer at the moment. Sad

  • Member since
    September 2010
Posted by Cabecar on Wednesday, November 3, 2010 12:40 AM

Cosmic J
Cabecar: Like the blue/white paint scheme. The off-center stripe on the “head” is very eye catching. The metallic parts look good too.


Thanks. I run out of cobalt blue, so I'm waiting for the paint to arrive to continue with these project.

  • Member since
    May 2010
  • From: North Carolina
Posted by Gunpla Master on Tuesday, November 2, 2010 8:42 PM

Well I did get the VF-1D out and looked @ it, put back in box and sat there looking @ a kit that has been calling my name for months, so w/o further ado, a VF was worked on, but it was a VF-25F Super Messiah.  You see I suffer from a malady that has been a true curse, I lose interest fast if not challenged by the model and that is just what is happening w/the VF-1D, but the VF-25F is as challenging a kit as I have ever tried my hand @.  So please forgive my jumping around and look for photos soon of this piece of modeling marvel produced by Bandai

/ ]

  • Member since
    May 2010
  • From: North Carolina
Posted by Gunpla Master on Tuesday, November 2, 2010 6:09 PM

Getting the VF-1D out and working on tonight.  Hope to post photos ASAP!  Hmm

the Gunp Cool

/ ]

  • Member since
    December 2007
  • From: Louisville, KY.
Posted by Cosmic J on Saturday, October 30, 2010 8:18 PM

Kugai: I confess that I cannot look at your Glaug without feeling intense envy. Looking forward to watching it take shape.


Cabecar: Like the blue/white paint scheme. The off-center stripe on the “head” is very eye catching. The metallic parts look good too.


I am proud to say that I did my first cutting of parts on my YF-19 kit this week. I opened the plastic bag, and separated several bits from the sprues, including the major fuselage parts. I then test fitted them, and examined the instructions closely to determine if I wanted to deviate from them. The kit appears to go together in subsections, which should make assembly fairly easy.

That’s it. No actual assembly, but at least it’s somethingWhistling

 Soon, very soon... I shall have earned the right to wear The Badge... Bwaahaahaa!  Big Smile

  • Member since
    August 2005
  • From: Sydney, Australia
Posted by Phil_H on Wednesday, October 27, 2010 10:58 AM

Cabecar
Why so little movement here lately????

Still here and still watching, just been a bit preoccupied the last week or so - among other things, my old laptop died and I've been setting up and getting to know a new one (and Windows 7)  and getting stuff off the old one. Dead

Cabecar,

Your "Max" is looking very nice. Smile

  • Member since
    May 2010
  • From: North Carolina
Posted by Gunpla Master on Sunday, October 24, 2010 9:59 PM

eptingmike

Maybe...procrastinating? :)

I for one have barely started the little pile I have for this GB mainly because I am scrambling to finish up some kits for other GBs!

Mike

Could not have said it better, been busy and have not posted much here.  Hope to post some progress shots this week.  Really nice builds going on and I got to get on the ball.

the Gunp  Cool

/ ]

  • Member since
    January 2009
  • From: Tempe, AZ
Posted by eptingmike on Sunday, October 24, 2010 10:52 AM

Maybe...procrastinating? :)

I for one have barely started the little pile I have for this GB mainly because I am scrambling to finish up some kits for other GBs!

Mike

Horten_IX_Go-229

  • Member since
    September 2010
Posted by Cabecar on Sunday, October 24, 2010 10:35 AM

Thanks for your comments.


Why so little movement here lately????

  • Member since
    July 2003
  • From: Huntington, WV
Posted by Kugai on Sunday, October 24, 2010 1:46 AM

That Blue Max is looking great! Bow Down

http://i712.photobucket.com/albums/ww122/randysmodels/No%20After%20Market%20Build%20Group/Group%20Badge/GBbadge2.jpghttp://i6.photobucket.com/albums/y211/razordws/GB%20Badges/WMIIIGBsmall.jpg

  • Member since
    September 2010
Posted by Cabecar on Sunday, October 24, 2010 1:13 AM

More updates.


I painted the metal parts, using aclad II steel.


Still need to work with the gun pod, don't like the seam in the upper seem. The rest is coming fine  I think.


Thanks for looking

  • Member since
    July 2003
  • From: Huntington, WV
Posted by Kugai on Saturday, October 23, 2010 8:09 AM

So, I was getting tired of sanding seams on the Monster and decided to take an active break from it by getting some of the basic subassemblies started of the RVF-25.  While working on it, I was thinking about what I wanted to modify, since I have another kit to make into the standard Luca version and had plans for some of this one's parts for another project.

This one is going to skip the top-mounted dish and pylon, but I thought some retaining kind of non-standard fighter role would be a good idea.  Finally, this morning, an idea came to me that I think I'll go with: a Wild Weasel variant.

I still haven't decided on a paint scheme or if and how to add missiles, but figured an update on the direction that project's heading was due.  As far as the 3 drones from the kit, one's going to the same project as the RVF's pylon, one's going to be converted into the Macross Galaxy version with a cannon while the other is going to get either the NUNS paint scheme or ( if it looks like I can pull off the modifications ) converted into the Ghost X-9 from Macross Plus.

I wish Bandai offered the drones in a seperate kit like they did with the Super VF-25 parts.  If I could get more without paying for the whole RVF kit, I wouldn't mind making both the X-9 and the NUNS version as well as a buddy or 2 for the Wild Weasel ( which would also make sense in helping offset the risk of such a mission ).

http://i712.photobucket.com/albums/ww122/randysmodels/No%20After%20Market%20Build%20Group/Group%20Badge/GBbadge2.jpghttp://i6.photobucket.com/albums/y211/razordws/GB%20Badges/WMIIIGBsmall.jpg

  • Member since
    September 2010
Posted by Cabecar on Friday, October 22, 2010 7:01 PM

Hi, just a quick update. Finally I paint the blue parts.

Still a lot of work to do, need some touches here and there but overall I feel good about the resoults.


If you have any suggestions, please feel free to do it


  • Member since
    December 2009
Posted by Harshman II on Sunday, October 17, 2010 1:13 AM

Looks nice bro..


  • Member since
    September 2010
Posted by Cabecar on Sunday, October 17, 2010 12:47 AM

Hi again!

Some updates, jeje lots of masking tape and masking sol :)


First the hole model was painted white with Mr. Base White 1000 (great product btw), then I start masking the white sections.


I use masking sol to mask the little circles, then I will use the decals over a withe base color, looks better Big Smile


The blue I am using is a combination of cobalt blue and agresor blue (70/30)


Hope to have more updates soon.

  • Member since
    July 2003
  • From: Huntington, WV
Posted by Kugai on Saturday, October 16, 2010 7:34 PM

Not much to update because of the delays caused by the putty issue with the Glaug, beu here goes.

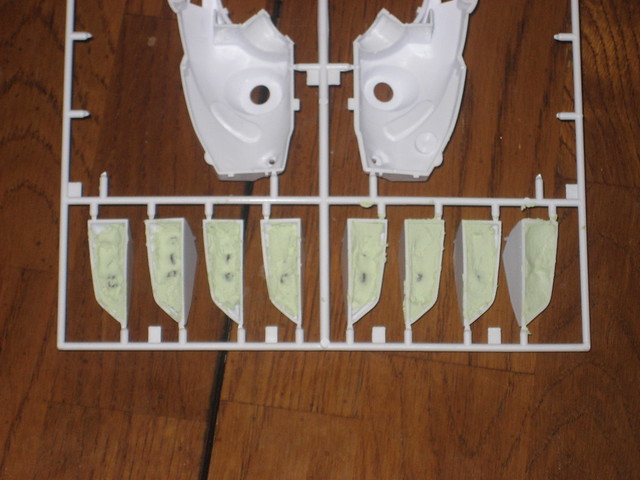
First, the first subassemblies for the Monster.  I have puttied most of the seams since this was taken, but will wait until I'm done sanding to post more pics of this one.

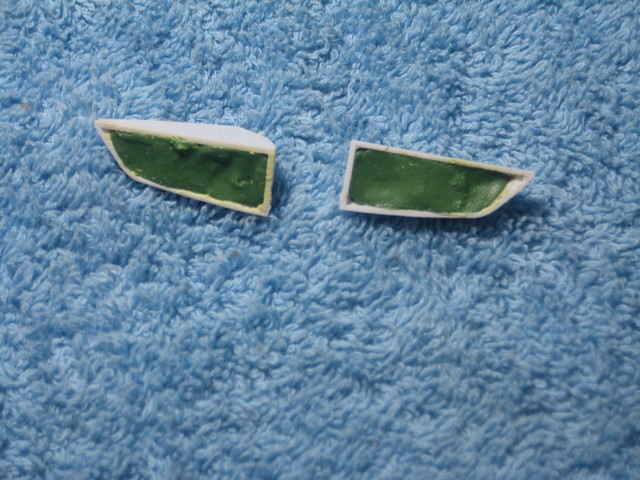
Next, the Glaug.  Here are the toes with the pellets in place for stability.  The second pic is the first attempt at puttying with the Tamiya stuff that caused so much trouble.

After clearing out what I could of the Tamiya, I used some stuff from the LHS that's apparently intended for metal minis ( they couldn't get any Milliput in and I was getting impatient after 2 weeks of waiting and looking elsewhere in the area ), but it worked well enough here.

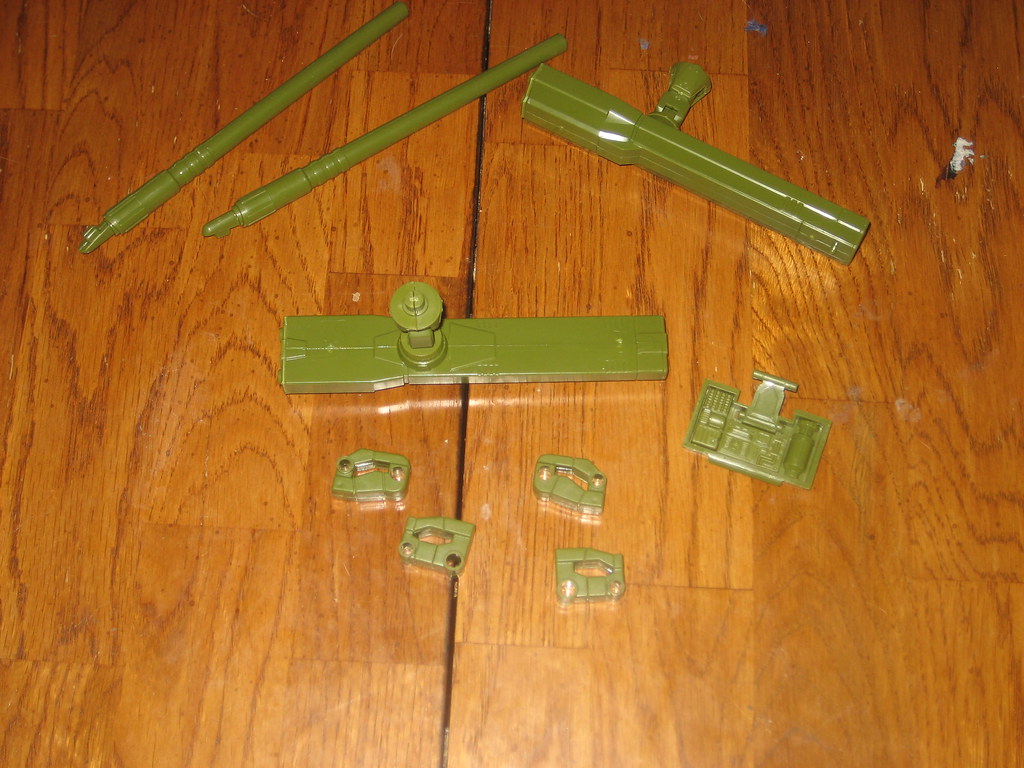
Once I finally got the toes taken care of, I started working on some of the other sub-assemblies, and prepping the visible parts of the interior near the joints.  I usually paint these sections black or dark gray instead of leaving the base color of the plastic exposed.  The top cannon's also there, waiting to be primered once I get a few more subassemblies ready to spray at the same time.

Next for me on this kit is taking care of a surface detail on the shoulders.  The box art shows raised armor plate edges over the black stripe, but the kit onlu has raised lines above and below where the stripe will be.  I'll use Tamiya gray putty to create a taper with these existing lines, with masking tape to keep the putty out of where the black line will be.

More progress pics coming soon.

http://i712.photobucket.com/albums/ww122/randysmodels/No%20After%20Market%20Build%20Group/Group%20Badge/GBbadge2.jpghttp://i6.photobucket.com/albums/y211/razordws/GB%20Badges/WMIIIGBsmall.jpg

  • Member since
    August 2005
  • From: Sydney, Australia
Posted by Phil_H on Saturday, October 16, 2010 9:26 AM

Cosmic J
Thank you. Think that would work w/ the Yf-19?

Hi CJ,

I haven't seen the YF-19 in the flesh, so I'm not sure if it will fit. The side console panels in the PE set are 2mm wide at the rear and taper down to about 1.2mm at the front end and 15mm long overall.

Having looked at the instructions for the YF-19 online, those side pieces look even narrower, so it appears doubtful. Sad

  • Member since
    December 2007
  • From: Louisville, KY.
Posted by Cosmic J on Saturday, October 16, 2010 4:56 AM

Phil_H

Just a quick tip for anyone building a 1/72 VF-1 fighter  (either Bandai/Imai or Hasegawa flavours) or Gerwalk and finding the side consoles in the cockpit a bit bare.

Check out Eduard PE Zoom set SS273 for Hasegawa's 1/72 F-18C - the side console panels look to be about the right width (very narrow) though they're a bit long (but easily cut down to length).Some nice detail bits in the set including seat belts and other bits n pieces and a very cheap upgrade.Big Smile

Thank you. Think that would work w/ the Yf-19?


  • Member since
    September 2010
Posted by Cabecar on Friday, October 15, 2010 9:41 AM

Hey!

I masking up the narrow bands first because i don't like the effect to paint red over blue (the legs bands), same with the black bands for the forearms.


About continuity, you are correct, Final Battle or the ep. #27 don't give you a really good view of the Max or Millia fast packs, just a  few seconds. Millia's VF-1 have a good shot where you can see the red booster with the front part in a grey/white, I saw the episode a few times in the past days and never saw the Max VF-1 completly, only the shot I post above in Battroid mode.

If I take Yamato's VF-1J Max Custome as a reference (most people say they are wrong) they paint the arms armor, the inside legs armor and the missile launcher part of the booster in a blue/gray color, the booster and the outside of the legs armor same as Max/Millia color.  It look nice and most of the people said thats the Final battle schema.


The Factory schema (ep #30) is  different , the fast pack color is overall the same color of the mass production supper Valkyries you see in the final battle, blue/gray.

I want to do it in the final battle schema, i will follow the Yamato colors but not the same blue/gray color they use for the armor,  I will use a slightly  blueish  tone .


  • Member since
    August 2005
  • From: Sydney, Australia
Posted by Phil_H on Friday, October 15, 2010 8:19 AM

Cool, I was wondering though why you were masking up the arms and legs to paint the narrow bands before you painted the overall blue. The forearms should be blue as should the side panels on the legs.

One interesting thing to note, In the "final battle" episode, you see the Max and Millia fighters witht grey-tipped booster pods, but when they change to battroid just before the "back to back" move, the tips of the pods are the respective blue and red colours. Oh well, continuity in the series wasn't exactly a strong point. Smile

  • Member since
    September 2010
Posted by Cabecar on Friday, October 15, 2010 8:02 AM

Thanks!

Full TV version, so mostly blue, including some parts of the fast packs (legs and boosters).  People from www.macrossworld.com told me that there are 2 versions of the MAX J type Super Valkyrie in the tv show. Final Battle and Factory battle. Well he is right. The blue fast packs and boosters are from final battle. The factory battle are mostly like the movie version.

I will buil id Final Battle :)


Factory battle screen shot:


  • Member since
    August 2005
  • From: Sydney, Australia
Posted by Phil_H on Thursday, October 14, 2010 11:46 PM

Hi Cabecar,

Shes certainly coming together. Are you going to be painting it as per the image above from the show or doing it white overall with the blue chest chevron?

The reason I'm asking is that if you do it as per the image, the leg packs and the rear of the booster pods are the same blue as on the body. Or are you doing a colour scheme more reminiscent of the movie version "A" witht he dark grey leg packs and boosters?

Either way, it's looking good. Smile

  • Member since
    September 2010
Macross Group Build 2010 - 2011
Posted by Cabecar on Thursday, October 14, 2010 8:16 PM

Ok, some minor advances, mostly in preparation for painting.


I want to buil the Max Super Valkyrie TV version:


I need to paint these band red.


Here I need to paint these bands black, there are no decals for these bands so I thats why I need to paint.


These  apinture with the some of the armor, just to test the fit.


Thanks for looking

  • Member since
    July 2003
  • From: Huntington, WV
Posted by Kugai on Wednesday, October 13, 2010 9:24 PM

Mad-Modeler

Isn't Wave also releasing a 1/200 Monster?


I looked it up as soon as I read this and the reports I found are indicating the Monster kit will be 1:100 scale.  Now you've gotten me plotting a lineup with the 1:100 scale Bandai destroids!

http://i712.photobucket.com/albums/ww122/randysmodels/No%20After%20Market%20Build%20Group/Group%20Badge/GBbadge2.jpghttp://i6.photobucket.com/albums/y211/razordws/GB%20Badges/WMIIIGBsmall.jpg

  • Member since
    August 2005
  • From: Sydney, Australia
Posted by Phil_H on Wednesday, October 13, 2010 3:30 AM

Just a quick tip for anyone building a 1/72 VF-1 fighter  (either Bandai/Imai or Hasegawa flavours) or Gerwalk and finding the side consoles in the cockpit a bit bare.

Check out Eduard PE Zoom set SS273 for Hasegawa's 1/72 F-18C - the side console panels look to be about the right width (very narrow) though they're a bit long (but easily cut down to length).Some nice detail bits in the set including seat belts and other bits n pieces and a very cheap upgrade.Big Smile

  • Member since
    July 2010
Posted by Mad-Modeler on Tuesday, October 12, 2010 8:02 PM

Hey All.

Greetings from Spain, next stop Monaco than heading north.


I pre-ordered 2 Regults and the Spartan/Archer, not really interested in the Monster.

For the Tomahawk and Defender I will get/have the Wave kits and will get more if they release more designs.

Isn't Wave also releasing a 1/200 Monster?

Even though I am getting the bandai reissues, hope that wave will have kits to replace them.


As for the Guns on the Tomahawk, should be easy to drill out, only needs to go as deep as 1~2 parts, IMHO. can be shallow if the hole is cone-shaped.

I think they made it like that to avoid seams running the length of the barrels and also to make applying the decals easier.

Friend is planning on modding a Wave Tomahawk to a his Battletech mech that used different guns, etc.

  • Member since
    December 2007
  • From: Louisville, KY.
Posted by Cosmic J on Tuesday, October 12, 2010 1:38 AM

Kugai

While I'm considering the 1:72 Regult, I think I'll pass on the other re-issues in that scale.  Based on my experience with their VF-0 battloids, I'm willing to accept Wave's prices for the added detail and accuracy.

 I think we're of like minds. I'll probably get the Regult and the Monster (hoping for a Glaug), but as far as the others  the detail on the Wave kits looks much better. I have to admit that the design of the guns on the Tomahawk does give me pause though... I don't much like the filled in gun barrels, and I wonder how hard it would be to drill them out considering how the pieces go together...


JOIN OUR COMMUNITY!

Our community is FREE to join. To participate you must either login or register for an account.

SEARCH FORUMS
FREE NEWSLETTER
By signing up you may also receive reader surveys and occasional special offers. We do not sell, rent or trade our email lists. View our Privacy Policy.