SEARCH FINESCALE.COM

Enter keywords or a search phrase below:

StuG. Group Build. 1/1/2011- 6/30/2011

35838 views
177 replies
1 rating 2 rating 3 rating 4 rating 5 rating
  • Member since
    November 2008
  • From: Jefferson City, MO
Posted by iraqiwildman on Saturday, October 1, 2011 11:20 AM

I really like the white-washed Stug. any more updates on this build?

Tim Wilding

  • Member since
    March 2003
  • From: Rain USA, Vancouver WA
Posted by tigerman on Saturday, October 1, 2011 12:09 PM

WW II psycho, that's a nice catchy camo job. One note though, the MG mount could only stand up if the hatch was opened and propped against it. HTH

Too bad this GB kind of died out. I love the topic and there are many different variations.

   http://i7.photobucket.com/albums/y269/wing_nut_5o/PANZERJAGERGB.jpg

 Eric 

  • Member since
    April 2005
Posted by Thunderbolt379 on Saturday, October 1, 2011 7:03 PM

I'm still hoping to finish my Academy -IV, it's ready for paint, it's a question of finding time. I've been heaps busy in the past three or four months, and have just got back to the bench, I'm currently finishing three kits simultanerously, hopefully by next week I'll be onto a new batch of completions, but the StuG probably won't be among them -- maybe the batch after that!

Cheers, M/TB379

http://worldinminiature.blogspot.com/

  • Member since
    September 2007
  • From: Relocating
Posted by Mobious on Saturday, October 1, 2011 9:12 PM

 I'm hoping to finish the drywall in the spare bedroom and reestablish the modeling bench there soon. The Tamiya Stug III has been packed away in the garage collecting almost as much dust as I have. 

"It's a problem of applied physics" Roy Brown

  • Member since
    December 2009
Posted by ww2psycho on Sunday, October 2, 2011 8:13 AM

tigerman

WW II psycho, that's a nice catchy camo job. One note though, the MG mount could only stand up if the hatch was opened and propped against it. HTH

Too bad this GB kind of died out. I love the topic and there are many different variations.

Thanks, I was kind of thinking the same thing about the MG after I put it together. I'll have to change that the next time I build a StuG.

  • Member since
    December 2009
Posted by ww2psycho on Sunday, October 2, 2011 8:14 AM

iraqiwildman

I really like the white-washed Stug. any more updates on this build?

If youre talking about my StuG, I just airbrushed white over the dark yellow.

  • Member since
    April 2005
Posted by Thunderbolt379 on Sunday, January 29, 2012 11:54 PM

This one's been over for a while but I thought I'd like to report that after a long hiatus dogged with real life and other projects to complete, I just gave my StuG IV a coat of dark yellow and worked on the muffler -- there's hope for me yet!

M/TB379

http://worldinminiature.blogspot.com/

  • Member since
    March 2003
  • From: Rain USA, Vancouver WA
Posted by tigerman on Sunday, January 29, 2012 11:59 PM

Needs pics Thunderbolt. Glad to see your back.

   http://i7.photobucket.com/albums/y269/wing_nut_5o/PANZERJAGERGB.jpg

 Eric 

  • Member since
    April 2005
Posted by Thunderbolt379 on Monday, January 30, 2012 12:17 AM

Yo! Tigerman! Longtime no hear!

Pics will be forthcoming, I'm looking forward to doing my first three-tone ambush scheme on this animal. I have the templates for the wheels set up (a different size for each side of them, how persnickety/daft is that? The tires were sprayed long ago, and most construction is done, so if I'm not too fancy with what I'm doing and the AB behaves itself, I could probably turn in a finished StuG before too long.

Cheers, M/TB379

http://worldinminiature.blogspot.com/

  • Member since
    March 2003
  • From: Rain USA, Vancouver WA
Posted by tigerman on Monday, January 30, 2012 1:04 AM

Hang in there. Camo schemes always intimidate me. It's not unusual for me to respray a pattern up to 3-4 times.

   http://i7.photobucket.com/albums/y269/wing_nut_5o/PANZERJAGERGB.jpg

 Eric 

  • Member since
    April 2005
Posted by Thunderbolt379 on Monday, January 30, 2012 1:17 AM

Ouch! The only one I remember respraying pretty much from scratch was the LAH Tiger I I did for Big Cats, that was an issue about pattern tightness and overspray (not just switch down to the fine tip and needle, but bang the flow up to about 30psi, the opposite of conventional logic!) Well, I'm paritcularly pleased with the Isherman I just finished so I'm all fired up do some more armour.

M/TB379

http://worldinminiature.blogspot.com/

  • Member since
    April 2005
Posted by Thunderbolt379 on Friday, February 3, 2012 6:40 AM

Pic as promised:

Everything is into Dunkelgelb barring the skirt hangers and gunshield. I did the wheels today using photoetched templates, and cleaned up and repainted the sprue gates on the edges. Camo is not far away...

Cheers, Mike/TB379

http://worldinminiature.blogspot.com/

  • Member since
    March 2003
  • From: Rain USA, Vancouver WA
Posted by tigerman on Friday, February 3, 2012 11:55 AM

Looks nice Mike. I need to try a template someday. I just hand painted about 40 wheels for my Semovente. Fortunately they were small.

   http://i7.photobucket.com/albums/y269/wing_nut_5o/PANZERJAGERGB.jpg

 Eric 

  • Member since
    September 2007
  • From: Relocating
Posted by Mobious on Friday, February 3, 2012 3:09 PM

Mike, Looks good! Looking forward to seeing the camo applied. I have to get a set of circle templates for myself and give it a try. I've been hand painting road wheels far too long and with not so nice looking results[*-)


"It's a problem of applied physics" Roy Brown

  • Member since
    April 2005
Posted by Thunderbolt379 on Friday, February 3, 2012 5:00 PM

Thanks Tigerman, Mobious -- I started using a plastic drawing template years back and even if they're not quite the same size they get you close enough for brush touch-ups to go quickly and with a minimum of drama. The PE templates are by Alliance Modelworks and are GREAT, you get a snug fit and a low profile, and there's twenty-something models catered to on the three frets. I wish they would do more of these sets, for instance a contemporary US set. This set is expressly German WWII but you can  usually find something close to what you're looking for and touch up from there. They really make the job fly, and I'd have to say this particular batch has gone like clockwork.

Today I'm looking at wash-weatheringh the wheels, and getting the gunshield and skirt rails into yellow, respraying the tracks (I mixed too dark a shade previously), and maybe starting to paint the pioneer tools. Then I need to bite the bullet, adjust the AB and go for the camo. Or maybe the shade coat under the fenders first.

Cheers, Mike/TB379

http://worldinminiature.blogspot.com/

  • Member since
    April 2005
Posted by Thunderbolt379 on Saturday, February 4, 2012 11:46 PM

Hi all,

Progress on the Academy StuG IV: The wheels were wash-weathered and the shade coat under the fenders and behind the running gear went on yesterday: today I tackled the three-tone camo. My AB behaved very well and the job was done without dramas, including precision touchups of the dunkelgelb and rotbraun. Here she is, all bright from the sprayshsop:

Next, the 'blowing leaves' will be brush painted (I'm pretty sure I'm not up to cleanly airbrushing spots that small, and I'm sure they would have been brush painted in the field much of the time anyway). Then the fade coat to start to lock it all together, and on to the oil washes.

I resprayed the tracks yesterday also, and found one more difference from the Tamiya original, the bearer bar that holds the spare track at the bow seems to seat differently. On the original the spare track just dropped neatly in, on this one I had to grind the back of the track part on sandpaper down way thin to get it to go.

I'm thinking of doing something special with the barrel, such as primer red on at least part of the length, and a filthy muzzle with dirt streaked back into the primer -- might be interesting!

Cheers, Mike/TB379

http://worldinminiature.blogspot.com/

  • Member since
    September 2007
  • From: Relocating
Posted by Mobious on Sunday, February 5, 2012 12:44 PM

Mike, The Stug IV looks great. The "ambush" scheme is my all time favorite pattern.Glad the AB was working in your favor. Looking forward to seeing updates.

"It's a problem of applied physics" Roy Brown

  • Member since
    March 2003
  • From: Rain USA, Vancouver WA
Posted by tigerman on Sunday, February 5, 2012 2:37 PM

Nicely done on the camo Mike. I too on my Panther just brushed thinned down paint with a fine-tip brush. Worked well.

   http://i7.photobucket.com/albums/y269/wing_nut_5o/PANZERJAGERGB.jpg

 Eric 

  • Member since
    April 2005
Posted by Thunderbolt379 on Monday, February 6, 2012 6:33 AM

Thanks Mobious and Tigerman!

Here's today's progress -- leaf/dapple painted, and fade/dustcoat airbrushed. First the dapple:

Then the overspray of highly diluted XF-60 to tone things down and draw the camo together -- not sure how well it shows up in the pic.

Tomorrow I'll start the first round wash weathering and possibly get the tracks washed and drybrushed. This one is moving along nicely, and the scheme makes me think how much fun it would be to finally do that Tiger II (Porsche turret) in ambush scheme over zimmerit...

Cheers, Mike/TB379

http://worldinminiature.blogspot.com/

  • Member since
    April 2005
Posted by Thunderbolt379 on Thursday, February 16, 2012 2:39 AM

Quick update (no pic...) I've done a fair bit more oil wash work, it's close to done, plus sprayed the skirt hangers into camo and faded them. If I can get the wash done soon I can wash/weather the tracks, hangers and tools and  start bringing this one together at last.

Cheers, Mike/TB379

http://worldinminiature.blogspot.com/

  • Member since
    April 2005
Posted by Thunderbolt379 on Saturday, February 18, 2012 5:41 AM

Hi all,

I pushed the Academy StuG IV along today. I washed and drybrushed the tracks yesterday, today I did a last round of rust/wash work (I may still do another, I'm spotting bits that my gut tells me should be rusty), went ahead and mounted the running gear, and have about half the external tools/fittings done.

Here she is with the wheels fitted:
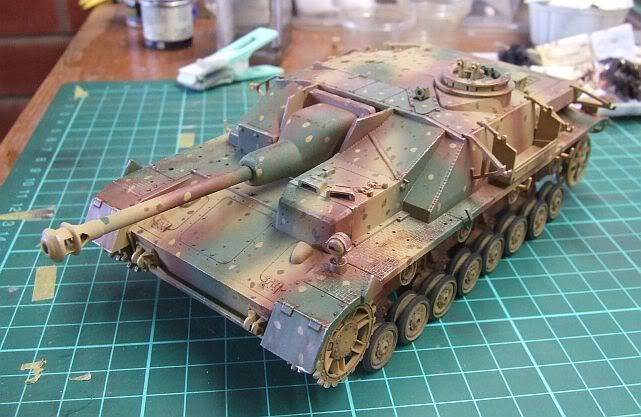
The wheels were an extraordinarily tight fit, tighter than I remember the Tamiya original being. I had to file the axles a bit and apply a lot of force to get them into place. The drybrushing, or most of it, is done, I feel I might have gone a bit heavy in a few places, the penalty of working in light that is not the best in terms of angle.

And here she is with the tracks and a batch of fittings mounted:
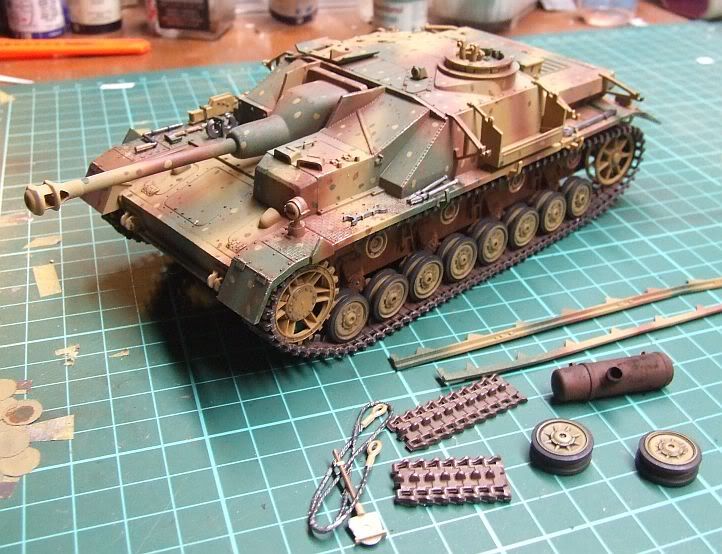
I'm hoping to have her finished tomorrow. There's precious little to do -- jackblock and barrel cleaning rods, two tiny parts that go on the back end and I usually do last to avoid them disappearing, decals, fit the items you see here, plus the fire extinguisher which has temporarily disappeared on my bench, a round of dust, paint the periscopes, sights and convoy light, add a radio mast...

My next update shoukd be the gallery shots.

Cheers, Mike/TB379

http://worldinminiature.blogspot.com/

  • Member since
    March 2003
  • From: Rain USA, Vancouver WA
Posted by tigerman on Saturday, February 18, 2012 1:59 PM

Glad to see that you're plugging away Mike. Almost to the finish line.

   http://i7.photobucket.com/albums/y269/wing_nut_5o/PANZERJAGERGB.jpg

 Eric 

  • Member since
    April 2005
Posted by Thunderbolt379 on Sunday, February 19, 2012 12:43 AM

Thanks, Tigerman!

She's almost finished -- a handful of jobs to do, such as rust/scrape the skirt hangers, paint the radio mast and splash some dust around the running gear. I should be doing the gallery photos tonight.

Would love another Tigers GB... A year long, and knock out two big cats!

Cheers, Mike/TB379

http://worldinminiature.blogspot.com/

  • Member since
    April 2005
Posted by Thunderbolt379 on Sunday, February 19, 2012 1:43 AM

Finished! She goes in front of the camera tonight...

M/Tb379

http://worldinminiature.blogspot.com/

  • Member since
    April 2005
Posted by Thunderbolt379 on Sunday, February 19, 2012 5:52 AM


Here she is, guys, Academy's knock-off of Tamiya's StuG IV, and my first Ambush project. I reproduced the scheme in the box photos but the markings for that one (the StuG Brigade of the Grossdeutschland, going by the crest) were not on the kit sheet. I did some research and checked the sheet from the Tamiya original and chose the crest of the 251st Assault Gun Battalion, which, if I'm reading sources correctly, was in the west in late '44 and is thus a good candidate for wearing the ambush scheme just prior to the Ardennes offensive. It's a guess but one I'm fairly happy with. The crosses are from the Academy sheet, the tactical and divisional markings are from Tamiya.

The dust and dirt don't seem to show up very strongly in these photos, the exposure may be a bit harsh, but it was extensively shaded, faded, wash weathered and dusted with pigments. The fire extinguisher has not shown up yet, it'll be attached when it does. And the periscopes are not painted, I need to devise a good technique for them and apply them to several models waiting for this aspect.

I hope you enjoy it, and all comments are welcome.

Cheers, Mike/TB379


http://worldinminiature.blogspot.com/

  • Member since
    September 2007
  • From: Relocating
Posted by Mobious on Sunday, February 19, 2012 9:49 AM

Thunderbolt, Awesome finish. Nice job on the Ambush scheme.Yes Only thing I noticed is the return rollers and drive sprockets need some paint scrape/wear. Overall, a great finish!

"It's a problem of applied physics" Roy Brown

  • Member since
    March 2003
  • From: Rain USA, Vancouver WA
Posted by tigerman on Sunday, February 19, 2012 1:39 PM

Very nice Mike. I too think the camo came out really well. Great pictures too. I still suck at taking them.

   http://i7.photobucket.com/albums/y269/wing_nut_5o/PANZERJAGERGB.jpg

 Eric 

  • Member since
    April 2005
Posted by Thunderbolt379 on Sunday, February 19, 2012 5:01 PM

Thanks Mobius and Tigerman. I spotted the return rollers last night and realised I had forgotten to graphite them for wear. The drives and idlers were drybrushed with silver for scraped paint but for some reason it didn't show up in the pictures. I figured dark rust would be incorrect on the contact face as abrasion against the track would keep it clean, albeit unpainted.

Glad you liked it, I had fun getting this one to the finish line. It's eight months after the scheduled end of this GB, so I won't be taking a badge!

Cheers, Mike/TB379

http://worldinminiature.blogspot.com/

JOIN OUR COMMUNITY!

Our community is FREE to join. To participate you must either login or register for an account.

SEARCH FORUMS
FREE NEWSLETTER
By signing up you may also receive reader surveys and occasional special offers. We do not sell, rent or trade our email lists. View our Privacy Policy.