SEARCH FINESCALE.COM

Enter keywords or a search phrase below:

Falklands/Malvinas War 30th Anniversary GB

244448 views
1492 replies
1 rating 2 rating 3 rating 4 rating 5 rating
  • Member since
    October 2008
  • From: italy
Posted by bsyamato on Tuesday, March 20, 2012 8:46 AM

Azorean

Back to the SUE. 

..

Already with the white on.

http://i1200.photobucket.com/albums/bb328/pacheco1976/sue52.jpg

this is white on Sue Yes

  • Member since
    January 2003
Posted by el_jere on Tuesday, March 20, 2012 6:41 AM

Great looking bird Casper, so far so good!

The Sue is turning out great too Azorean, you are almost there.

Bish, the Lear will have wheels, I was working with those part yesterday, I will post a few pics maybe tomorrow.

best regards


Jere

Res non verba

  • Member since
    December 2009
  • From: San Miguel Island, Azores, Portugal
Posted by Azorean on Sunday, March 18, 2012 4:34 AM

Nice Harrier, Vance.

 The Chinook looks great. Bish. Great work.

What a big work on a big kit, Casper. Keep the good pace.

Nice advances on the Harrier, Stikpusher.

I´m amazed with your Learjet, Jere. What a great look. I have on to to do some day.


  • Member since
    December 2009
  • From: San Miguel Island, Azores, Portugal
Posted by Azorean on Sunday, March 18, 2012 4:27 AM

Back to the SUE. 

I did a kid of card board.

With the canopy closed.

Already with the white on.

  • Member since
    October 2010
  • From: Hobart, Australia
Posted by Casper the Chihuahua on Friday, March 16, 2012 7:04 PM

So the stage that I have been putting off for as long as I can is the canopy. As nice as the Flight path set is, the instructions leave a lot to be desired!

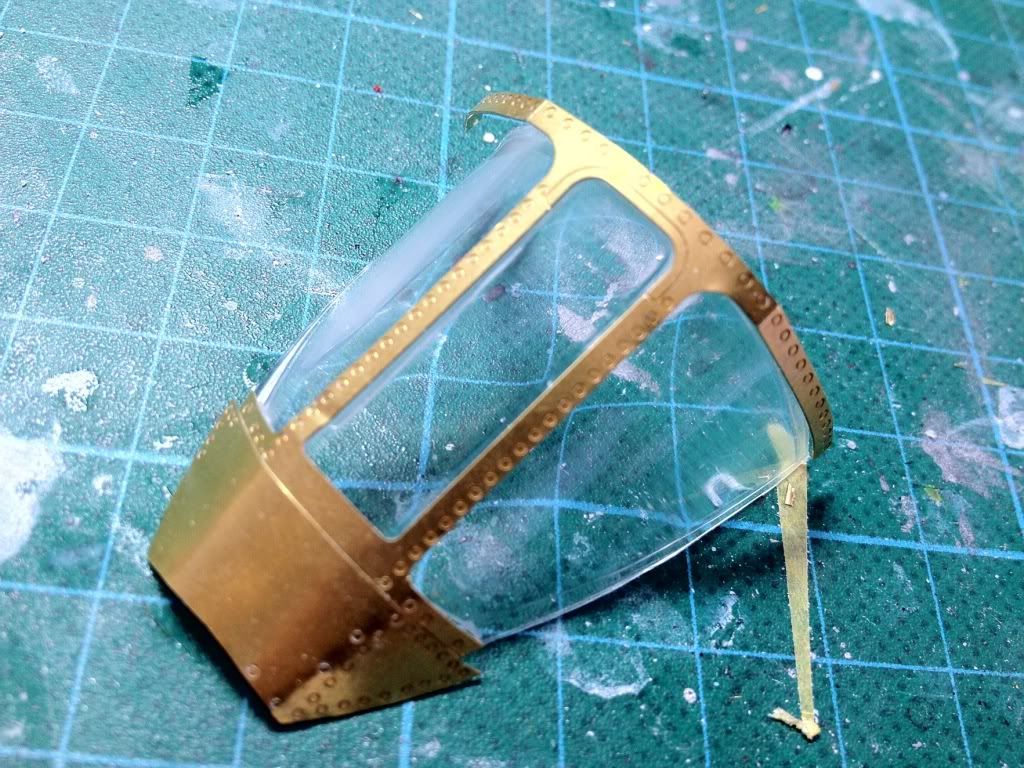
The front canopy section has a raised section just where it meets the front of the fuselage. The Flight Path set contains nice sill details with riveting. It however does not mention how to apply the new sill to the clear plastic part.
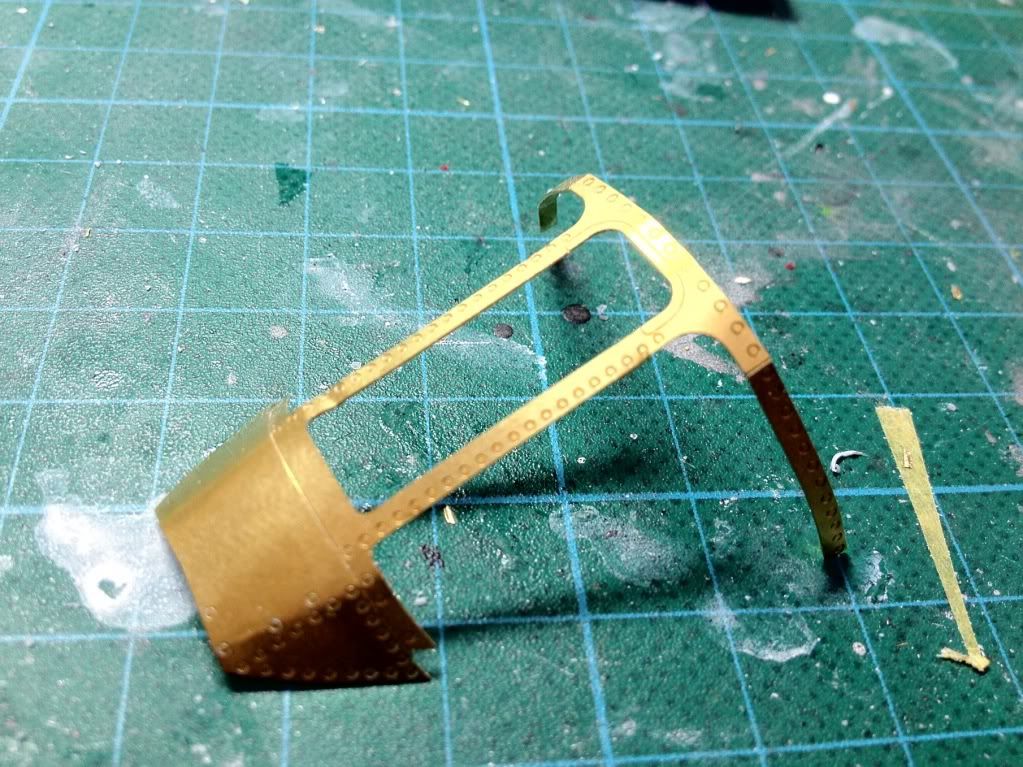
So I had a think about this and there is a secondary brass part that fits on top of the front of the sill. I thought that this simulates the 'bulge' in this section so I decide to saw off the front part of the canopy.
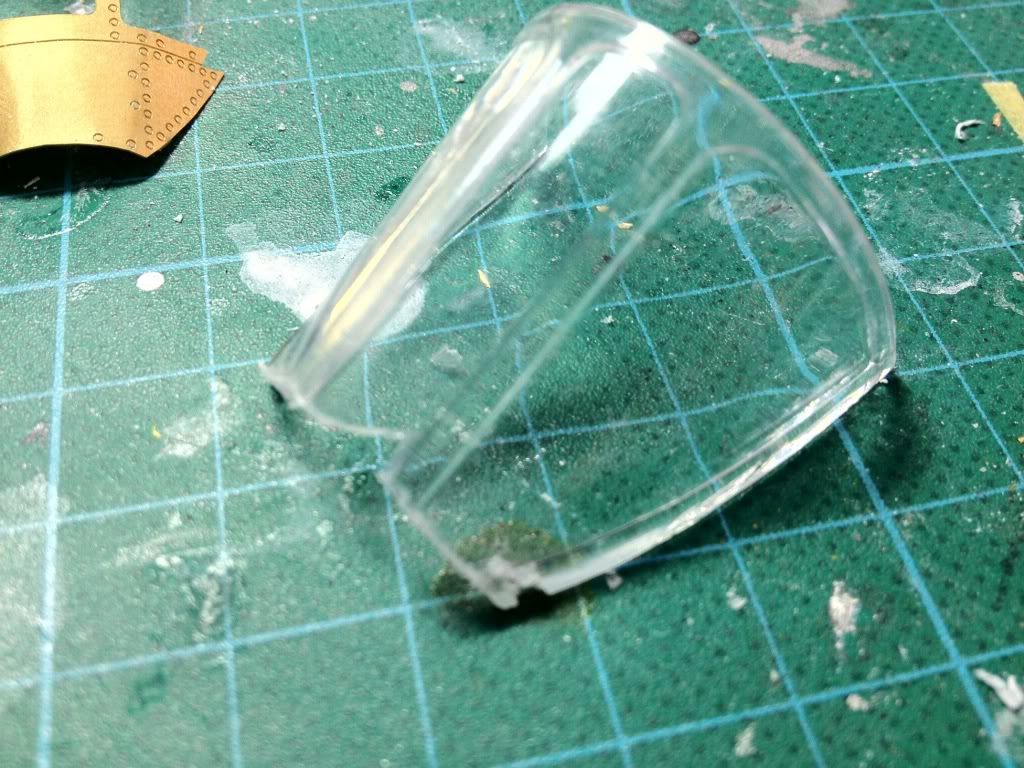
A disaster! A poor sawing job, the blade kept bouncing and making a new cut and finally the glass snapped in a very conspicuous place.

Lucky there are 2 front canopy parts in this kit. The second part seems to be a bit messier in its molding but Future should help with that. So I carefully scribed the cut outline first and made very slowly but slightly firmer strokes. A much better result.
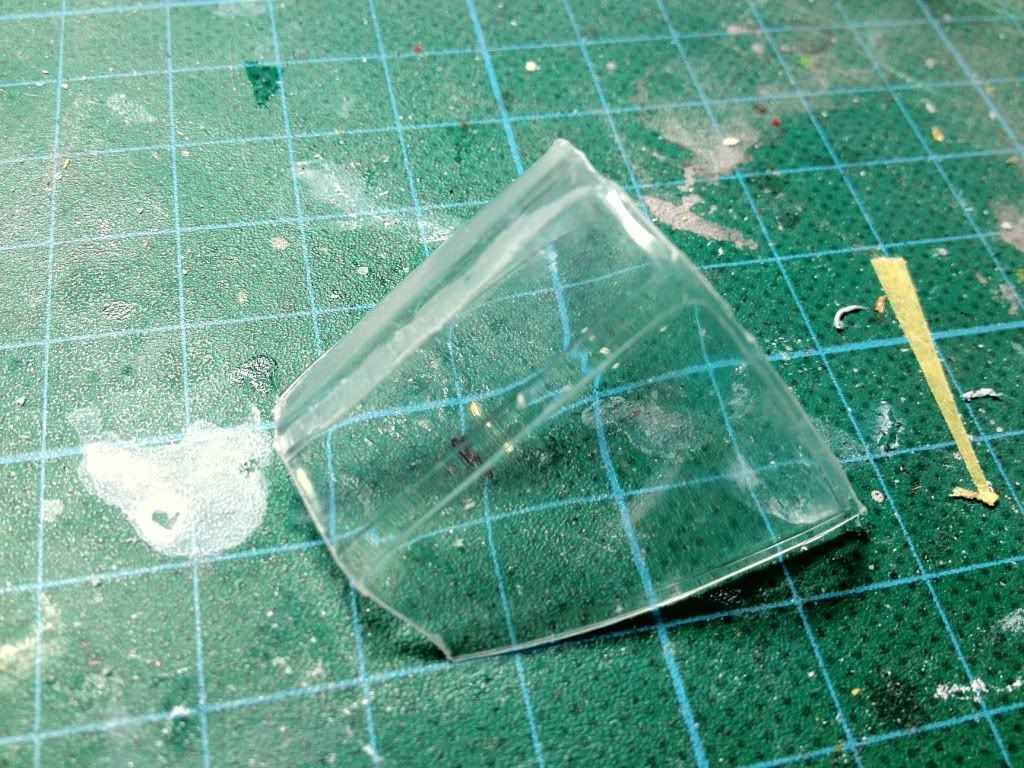
PHEWW!!! Huh? A botched canopy can ruin a model. A test fit with the brass sill confirms that this will work just fine.
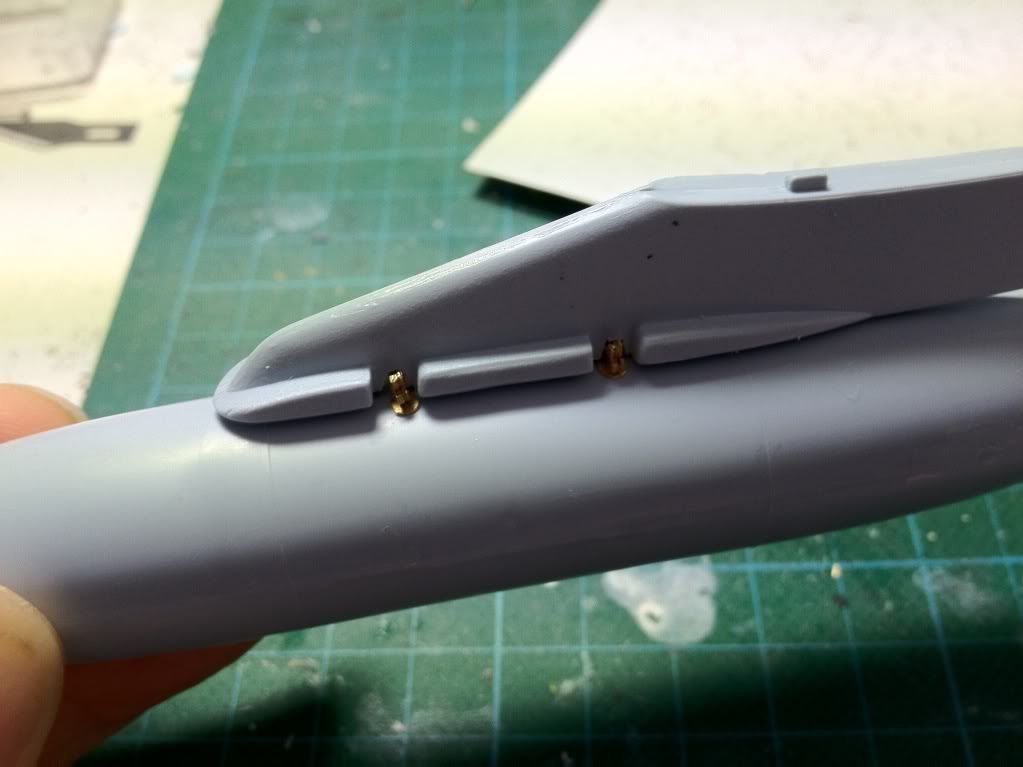
Also got the first external fuel tank done. Note the brass sway braces, they really help with the detail.
Cheers
On the bench: A-4F 1/32 Hasegawa

Just deployed: F6F-5N Hellcat Nightfighter 1/48 Eduard

Up next: A6-E Intruder 1/48 Revell

  • Member since
    October 2008
  • From: italy
Posted by bsyamato on Wednesday, March 14, 2012 5:11 AM

El Jere good finish friend Toast

  • Member since
    December 2002
  • From: Bury St Edmunds, Suffolk, England
Posted by Bish on Tuesday, March 13, 2012 5:23 PM

Thanks jere. And yours is looking sweet. I can't see any errors form here. Are you adding any legs to this or is it going to be wheels up.

I am a Norfolk man and i glory in being so


On the bench: Airfix 1/72nd Harrier GR.3/Fujimi 1/72nd Ju 87D-3

  • Member since
    January 2003
Posted by el_jere on Tuesday, March 13, 2012 4:26 PM

I am close to finish my build too... this is how it looks today

Sorry for the quality of th pics, but I was in a hurry to take som pics before the sun sets completly.

The decals are a mix of home made (strips, numbers and th Fuerza aerea) and commercial (the flags and round ntionl markings) I don´t like the hue of the light blue, is too dark, but I had no choice but to use that decals.

Is not perfct, there are a few errors but since the spirit of this build is to tke it ligh the are no problems LOL.

maybe this week end will be finished, I still have to add some decals (I forgot to print a little id number on the nose) and add a few antennas.

well that is all for now, regards

Jere

Res non verba

  • Member since
    January 2003
Posted by el_jere on Tuesday, March 13, 2012 4:19 PM

Bis, your Chinooks looks great! I like it, you are close to th finish lin my friend, one las effort and you will be done.

Casper: all the brass looks damm good, I like it too. It´s a big bird you hve there, so all the detail you can add worth the effort.

bst regards guys

Jere

Res non verba

  • Member since
    December 2002
  • From: Bury St Edmunds, Suffolk, England
Posted by Bish on Sunday, March 11, 2012 4:54 PM

Thanks dupes. Its been a while since i have seen any of your work so i'm looking forward to it.

I am a Norfolk man and i glory in being so


On the bench: Airfix 1/72nd Harrier GR.3/Fujimi 1/72nd Ju 87D-3

  • Member since
    November 2006
  • From: Coastal Maine
Posted by dupes on Sunday, March 11, 2012 4:08 PM

Bish - great looking Chinook!

Casper - man, that is a lot of PE. Nice work. Yes

The Scimitar is still in the works, once the spring contests are over here in the next few weeks, I'm going to chain myself to the bench until it is DONE. Don't even remember when I started that guy.

  • Member since
    December 2002
  • From: Bury St Edmunds, Suffolk, England
Posted by Bish on Sunday, March 11, 2012 2:09 PM

Ye, with the price of metal at the moment, i would keep that Harrier safe, it will be worth a fortune. That's looking very nice indeed. I like the look of the undercarriage.

I am a Norfolk man and i glory in being so


On the bench: Airfix 1/72nd Harrier GR.3/Fujimi 1/72nd Ju 87D-3

  • Member since
    February 2003
  • From: Rothesay, NB Canada
Posted by VanceCrozier on Sunday, March 11, 2012 12:56 PM

wow Casper, look at all that brass! The rivet details look great!

On the bench: Airfix 1/72 Wildcat; Airfix 1/72 Vampire T11; Airfix 1/72 Fouga Magister

  • Member since
    October 2010
  • From: Hobart, Australia
Posted by Casper the Chihuahua on Saturday, March 10, 2012 10:21 PM

First Sidewinder. This almost took 3 hours of work to assemble! I think I'll only do 2 of these are fit the external fuel tanks as well.

Cheers

On the bench: A-4F 1/32 Hasegawa

Just deployed: F6F-5N Hellcat Nightfighter 1/48 Eduard

Up next: A6-E Intruder 1/48 Revell

  • Member since
    October 2010
  • From: Hobart, Australia
Posted by Casper the Chihuahua on Friday, March 9, 2012 7:38 PM

Some work done on the front wheel

and the inside of the airbrake

Slow work but it's starting to come together

Cheers

On the bench: A-4F 1/32 Hasegawa

Just deployed: F6F-5N Hellcat Nightfighter 1/48 Eduard

Up next: A6-E Intruder 1/48 Revell

  • Member since
    December 2002
  • From: Bury St Edmunds, Suffolk, England
Posted by Bish on Friday, March 9, 2012 3:23 PM

Your a poet

and we didn't now it

Thanks vance.

I am a Norfolk man and i glory in being so


On the bench: Airfix 1/72nd Harrier GR.3/Fujimi 1/72nd Ju 87D-3

  • Member since
    February 2003
  • From: Rothesay, NB Canada
Posted by VanceCrozier on Friday, March 9, 2012 7:12 AM

I like the look

of your Chinook!

On the bench: Airfix 1/72 Wildcat; Airfix 1/72 Vampire T11; Airfix 1/72 Fouga Magister

  • Member since
    October 2008
  • From: italy
Posted by bsyamato on Friday, March 9, 2012 6:19 AM

Great sunk of a chinook YesYes

With flat coat really looking better Bish

  • Member since
    December 2002
  • From: Bury St Edmunds, Suffolk, England
Posted by Bish on Friday, March 9, 2012 6:09 AM

I was hopeing to have this done this week, but though i am close, theres still a little to do. So here another update. I am away for a couple of weeks on a course, so i should have this wrapped up soon after i get back.

I gave it a flat coat and then used Pro Modeller wash for some weathering. I had tried just to do the raised panel lines, but this didn't work out to well. So i used a cotton bud and covered large areas with it. Once it had dried i used a damp bud and removed most of the wash. I rather like the result. Slightly grimy with the panel lines standing out a little from the rest.

I added the terrain useing Celluclay and added the grass. I wanted the Chinook sunk into the soft soggy Falklands ground . So i cut off half of the wheels and then sunk the rest into the still damp Celluclay.

Once this was done, i replaced the antennas on the left side and started adding the windows. I still have to confirm which type of windows go where on the left side. The rotors are almost ready, so its really just thos ethings and the patchs to go on the front of the base.

So close and yet so far.

I am a Norfolk man and i glory in being so


On the bench: Airfix 1/72nd Harrier GR.3/Fujimi 1/72nd Ju 87D-3

  • Member since
    October 2008
  • From: italy
Posted by bsyamato on Sunday, March 4, 2012 11:44 AM

El_Jere first time i see a similar subject Yes nice work with the white!!!

  • Member since
    January 2003
Posted by el_jere on Sunday, March 4, 2012 9:14 AM

Thanks Bish,

The red is tamiya x-7 and th white is from polly scale, both acrylics.

I really like the tamiya´s red.

Wile I was checking picturs of the real aircraft I realize that I can count LOL, the model is one window short on each side! So I had to do what no modeler want to do, to do a major modification on an almost finished kit.

Of course it came out poorly, but at least I got the numbr of windows right LOL.

bst ragrds

Jere

Res non verba

  • Member since
    December 2002
  • From: Bury St Edmunds, Suffolk, England
Posted by Bish on Sunday, March 4, 2012 4:44 AM

Thanks Jere, i am hopeing i can get this done this week as i am then away for 2 weeks, and i really want to finish this. I normally do full on Diorama's for my builds, so this one is a bit toned down to my usual.

Thats come along nicely, i like the look of the red. Don't you just hate it when you drop or knock a model during the build.

What were these used for.

I am a Norfolk man and i glory in being so


On the bench: Airfix 1/72nd Harrier GR.3/Fujimi 1/72nd Ju 87D-3

  • Member since
    October 2010
  • From: Hobart, Australia
Posted by Casper the Chihuahua on Saturday, March 3, 2012 9:38 PM

Slow progress but slowly coming together.

Cheers

On the bench: A-4F 1/32 Hasegawa

Just deployed: F6F-5N Hellcat Nightfighter 1/48 Eduard

Up next: A6-E Intruder 1/48 Revell

  • Member since
    January 2003
Posted by el_jere on Saturday, March 3, 2012 1:26 PM

Looking good Bish!

You are almost there. I have to start with bases for my models some day, a simple base adds a lot to the whole thing.

My lear is in painting stage, I used mr surfacer 500 as a primer, a littl sanding and thn white acrylic for the base colour and tamiya for the red.

I droped the model yesterday and some joints were damaged but notting to bad.

I just finished with the red and there are many spots that need corrections, both red and withe, but is looking good so far.

I will have to start with the decals in a few dys, I have to print my own so I have to look for a fount.

best regards to all


Jere


ps: casper, maybe a little styrene on the oint will help as a base for a layer of putty

Res non verba

  • Member since
    October 2010
  • From: Hobart, Australia
Posted by Casper the Chihuahua on Friday, March 2, 2012 11:00 PM

My first exhaust nozzle with PE. 1 down, 3 to go. A bit fiddly but worth the effort

Got the engine fitted inside and glued the fuselage together. Quite a nasty seam underside as you can see Tongue Tied

Cheers

On the bench: A-4F 1/32 Hasegawa

Just deployed: F6F-5N Hellcat Nightfighter 1/48 Eduard

Up next: A6-E Intruder 1/48 Revell

  • Member since
    December 2002
  • From: Bury St Edmunds, Suffolk, England
Posted by Bish on Thursday, March 1, 2012 2:33 PM

Thanks. Its just going to be a small patch of terrain under the chinook, useing Celluclay, with the Chinook sunk into it slightly. And a couple of patchs at the front.

I am a Norfolk man and i glory in being so


On the bench: Airfix 1/72nd Harrier GR.3/Fujimi 1/72nd Ju 87D-3

  • Member since
    October 2008
  • From: italy
Posted by bsyamato on Thursday, March 1, 2012 12:57 PM

Good updates guys

Bish the chinoock looks great , wishing to see more about the basement Stick out tongue

  • Member since
    December 2002
  • From: Bury St Edmunds, Suffolk, England
Posted by Bish on Wednesday, February 29, 2012 5:11 PM

casper, you have deffinatly given your self a challenge there. But its paying off. I am sure the end reslut will be worth it. And thats deffinatly one big kit.

I am a Norfolk man and i glory in being so


On the bench: Airfix 1/72nd Harrier GR.3/Fujimi 1/72nd Ju 87D-3

  • Member since
    December 2002
  • From: Bury St Edmunds, Suffolk, England
Posted by Bish on Wednesday, February 29, 2012 4:39 PM

Finally its up date time again for the Chinook. I have finishged getting all the decals on. These were not the best decals i have worked with. But being Matchbox, i wasn't expecting them to be perfect. And given how some of my kits have been stored in the last 9 years, there are in better condition than i expected.

So next step is to get the flat coat on. The base arrived today. That has been stained and has had its first coat of gloss varnish.


And here you get an idea of the end result.

I am a Norfolk man and i glory in being so


On the bench: Airfix 1/72nd Harrier GR.3/Fujimi 1/72nd Ju 87D-3

  • Member since
    December 2002
  • From: Bury St Edmunds, Suffolk, England
Posted by Bish on Monday, February 27, 2012 6:40 AM

el_jere

Bish: th chopper is looking fine, I like th colours you choose. what weathering are you planning?


Thanks, the colours i used were xtracolours Dark Sea Grey and Dark Green. And they seem to match the photos i have pretty well. As for weathering, i don't plan on doing to much. Again, going off photos of BN in the Falklands, it shows the aircraft failry clean. There isn't much dust thrown around down there. And the RAF only brought the Chinook into service in 1981 so they were stiull fairly new. I will have some worn paint on the rear ramp, and do the panel lines and not much more than that.

I have just started on the decals, so they should be on as well as a flat coat by the end of this week. I have just ordered a base, i usually make my own but i am not doing my normal Diorama for this one. So with any luck, this should be finished soon.

I am a Norfolk man and i glory in being so


On the bench: Airfix 1/72nd Harrier GR.3/Fujimi 1/72nd Ju 87D-3

JOIN OUR COMMUNITY!

Our community is FREE to join. To participate you must either login or register for an account.

SEARCH FORUMS
FREE NEWSLETTER
By signing up you may also receive reader surveys and occasional special offers. We do not sell, rent or trade our email lists. View our Privacy Policy.