SEARCH FINESCALE.COM

Enter keywords or a search phrase below:

The group build to end all group builds - THE GREAT WAR

157483 views
1091 replies
1 rating 2 rating 3 rating 4 rating 5 rating
  • Member since
    March 2006
Posted by TD4438 on Sunday, June 12, 2011 7:38 PM

That is one fine looking fig!

  • Member since
    April 2005
  • From: Piscataway, NJ!
Posted by wing_nut on Sunday, June 12, 2011 7:27 PM

WOW jack, that is just plain beautiful.

Marc  

  • Member since
    April 2006
  • From: ON, Canada
Posted by jgeratic on Sunday, June 12, 2011 2:04 PM

***completed pics***

Austrian infantryman as depicted in the latter half of WW1.   The three stars on either collar denote rank of zugsfuhrer (sergeant).  The 87th regiment was another one with a major portion of it's recruits coming from Slovenia,  the recruitment center based in the town of Celje.

.

regards,

Jack


  • Member since
    March 2006
Posted by TD4438 on Sunday, June 12, 2011 8:08 AM

bondoman

I've got the basics done on the Emden- Revell 1/350 kit. I'm kind of at a stopping point until the PE shows up.

Out of the box a good kit and I have high hopes for the detail parts.

http://i295.photobucket.com/albums/mm150/6134rdm/DSC_0190-2.jpg

Another hull in the fleet!

I'll be watching this one!

  • Member since
    June 2010
  • From: Austin, TX
Posted by DoogsATX on Sunday, June 12, 2011 8:03 AM

Jack - my goodness that's small! After the experience with this Pup, I couldn't imagine building a WWI-era bipe in 1/48. Much less the psychos who build them in 1/72!

Marc - OMG LOVE those Spandaus! Master makes a set that look pretty gorgeous as well. Sadly, no love for the Vickers yet, and if there's a weak point with this kit detail-wise, I'd have to call the Vickers as it.

And it looks like we're in a race to install the top wing. Mine's probably going on tonight. Depends how efficient I can get looping mono through micro tubing!

Last night was spent on eyebolts! Eyebolts, everywhere! 

And another lesson learned - glue the eyebolts in place with medium CA. Dipped and placed with thin CA at first, but couldn't get enough onto the wire to fill the holes they were being mounted in. Started pulling them out, dipping them in medium CA, and dropping them back in place. Rock solid.

I've messed up enough on this Pup that it'll never be more than a shelf queen, but with everything I've learned, I think I can make the night trainer into something awesome.

The actual stringing things together starts tonight. Stay tuned!

On the Bench: 1/32 Trumpeter P-47 | 1/32 Hasegawa Bf 109G | 1/144 Eduard MiG-21MF x2

On Deck:  1/350 HMS Dreadnought

Blog/Completed Builds: doogsmodels.com


  • Member since
    April 2005
  • From: Piscataway, NJ!
Posted by wing_nut on Saturday, June 11, 2011 4:52 PM

Rob-those track looks sweet.

Doogs-Can't wait to see that all rigged up.

Bondo-  Looks great.  Ship PE scares the hell outta me

Jack- Yikes that's smallIndifferent  But should look terrific in the fuselage.

Sean... The late answer to your question is yes and no.  The cabanes are real thin and I was worried about too much pressure on them.  And if they lifted the upper wing high enough to be in the right spot the lower tips wold have t come way up to get the inter plane struts in their holes.


Trying to get the last bits done so I can get the upper wing installed.  I made a jig for the cabanes by laying out the holes pattern from the wing to a piece of .030 plastic sheet and gluing on some strips square to the leading edge and thrust line.  Makes for an easy visual reference so the cabanes are set just right.

The Aber set for the Spandaus is awesome. And a final mock up before everything is glued in place for the wing install.

The "new" lower wings with some dihedral.

Marc  

  • Member since
    April 2006
  • From: ON, Canada
Posted by jgeratic on Friday, June 10, 2011 3:18 PM

Well was off the whole week and it is almost over, and don't have much to show for my Fokker build (busy with other things around the house).  Did three bends on the photo-etch framework and glued one piece to it.  This is a product from Part, but was designed for the Roden kit, so will have to thin the insides of the Eduard fuselage halves to get it to fit. 

The Aber fret arrived in the mail today, so back to the figure.

regards,

Jack

  • Member since
    April 2006
  • From: ON, Canada
Posted by jgeratic on Friday, June 10, 2011 12:05 PM

Doogs - your build is look'n A1 Yes

  • Member since
    June 2010
  • From: Austin, TX
Posted by DoogsATX on Friday, June 10, 2011 1:39 AM

The Pup continues to almost be ready for rigging. Strut and prop logo decals are now on. Tomorrow I'll seal them, install the Vickers gun, and start mounting eyebolts.

Hopefully the Uni-mono shows up tomorrow or Saturday so I can start rigging!

I'm also considering stripping off one of the landing gear wires, since it keeps going out of taut on me.

On the Bench: 1/32 Trumpeter P-47 | 1/32 Hasegawa Bf 109G | 1/144 Eduard MiG-21MF x2

On Deck:  1/350 HMS Dreadnought

Blog/Completed Builds: doogsmodels.com


  • Member since
    March 2007
  • From: Carmel, CA
Posted by bondoman on Thursday, June 9, 2011 12:39 AM

I've got the basics done on the Emden- Revell 1/350 kit. I'm kind of at a stopping point until the PE shows up.

Out of the box a good kit and I have high hopes for the detail parts.

  • Member since
    March 2006
Posted by TD4438 on Wednesday, June 8, 2011 6:02 PM

PANZERWAFFE

DOOGS - The rigging is looking Great!!

MARC - Nice save!

Both tracks have been painted now just have to adjust them and get them attached on.  Here is a partial section of how these Model Cellar tracks look.

http://i951.photobucket.com/albums/ad352/PANZERI/MK%20IV%20Male/DSC00005.jpg

Those tracks have a ton of detail you'll never see!They look great.

  • Member since
    March 2006
Posted by TD4438 on Wednesday, June 8, 2011 6:01 PM

DoogsATX

Marc - EPIC save! That's the kind of thing where, if I encountered it, I would have said screw it rather than pull the friggin' wings off!


Yup,what he said.I would have accompanied it with some seriously colorful language and a lot of it!

  • Member since
    October 2009
Posted by PANZERWAFFE on Wednesday, June 8, 2011 1:52 PM

DOOGS - The rigging is looking Great!!

MARC - Nice save!

Both tracks have been painted now just have to adjust them and get them attached on.  Here is a partial section of how these Model Cellar tracks look.

Rob

  • Member since
    August 2005
  • From: Oshawa, Ontario
Posted by u-69 on Wednesday, June 8, 2011 11:53 AM

Marc;

Did you check with the fuselage struts in place? My Alb looked the same - no dihedral on the bottom wings until the rigging was in place. 

What you did will work [and I'm glad you worked it out without damage] but I think you just might have gone through that for nothing.


-sean

BigBlock Studios web design:
http://www.bigblockstudios.ca

My Models:
http://www.onetofortyeight.com

  • Member since
    December 2002
  • From: NYC, USA
Posted by waikong on Wednesday, June 8, 2011 11:44 AM

Marc, you are a better man than me!  LIke Doogs, I would've just left it and remember to never look at it straight on.  Taking wings off, that's major - good one.

  • Member since
    April 2005
  • From: Piscataway, NJ!
Posted by wing_nut on Wednesday, June 8, 2011 11:42 AM

Thanks.  In the midst of my panic all i could think was that it was about to become a crash dioWhistling

Marc  

  • Member since
    June 2010
  • From: Austin, TX
Posted by DoogsATX on Wednesday, June 8, 2011 11:35 AM

Marc - EPIC save! That's the kind of thing where, if I encountered it, I would have said screw it rather than pull the friggin' wings off!


On the Bench: 1/32 Trumpeter P-47 | 1/32 Hasegawa Bf 109G | 1/144 Eduard MiG-21MF x2

On Deck:  1/350 HMS Dreadnought

Blog/Completed Builds: doogsmodels.com


  • Member since
    April 2005
  • From: Piscataway, NJ!
Posted by wing_nut on Wednesday, June 8, 2011 11:18 AM

The rigging looks great doogs.  Pre-drilling the holes is one of the thing I did right.  Still had to find them under the decal when that part was done.


I did a test fit of the upper wing and have a big problem.  The wing practically rests on the fuselage.  No way the guns will fit underneath.  I immediately went the the WNW site to look and the finished model pics and my eye went right to this one...

This photo is being used for discussion purposes only
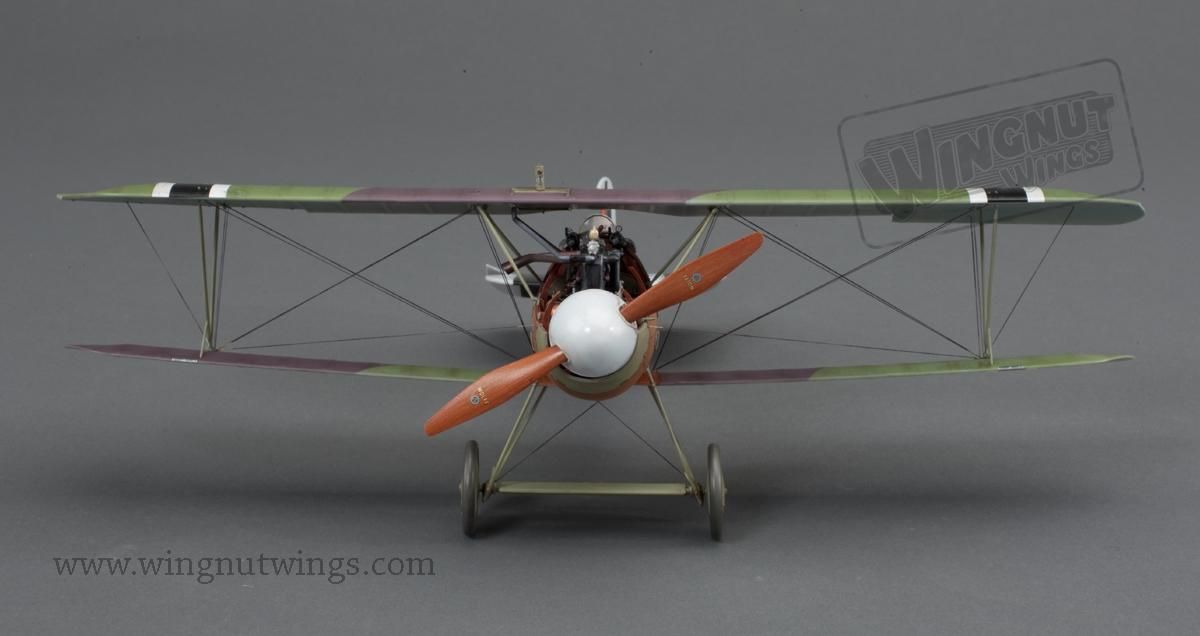
My lower wing are flat and maybe even a tiny bit of anhedral.  The weight of the upper wing pushes them down even more.  The fit everywhere else in the kit was so good and the wing joint so tight I just figured it was right. 

Having used a tiny bit of CA, thankfully not the Tenax, and the tight fit of the wing it must not have penetrated to deep and i was able to work the wings off with zero damage.

I looked at the wing root and came up with what seemed to be a logical course of action.

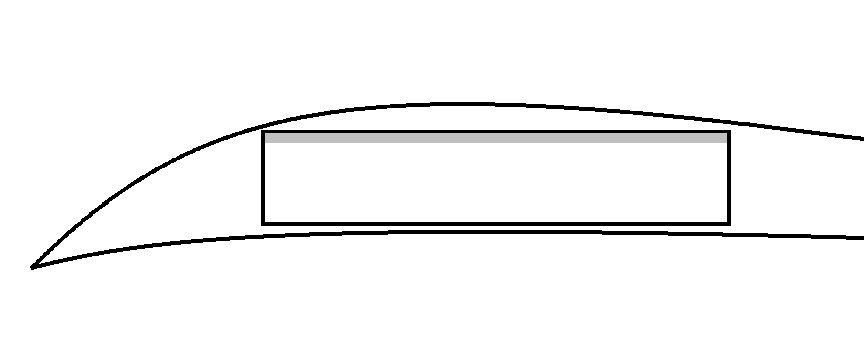
First I trimmed the top edge of the hole in the wind slot indicate by the gray line.
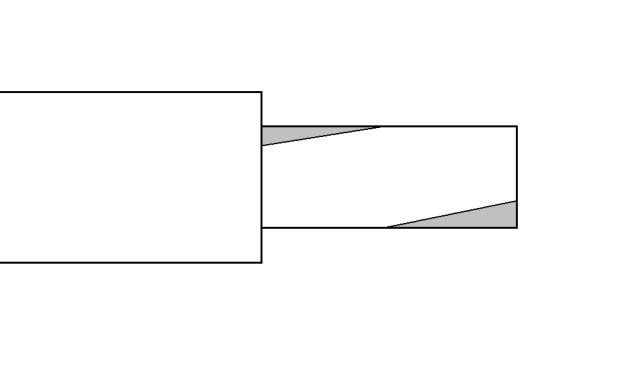
Then I trimmed the gray areas away on the tab on the wing.  My though was to allow that tab room to rotate on its axis and still keep it as solid as possible.
It all looked good in the dry fit so I made a jig taping 2 blocks of wood to the cutting mat, with 2 blocks standing at the front edge to press the wing leading edge against to keep them straight.  The fuselage is set along a line to keep every saqure... note how the rudder lines up.  Small block under the tips to hold the dihedral.  The LG was off the mat about 3/16" so I weighted the fuselage to push it down.  The wing was glued in with some slow cure CA to have a bit of work time to get it all set up.
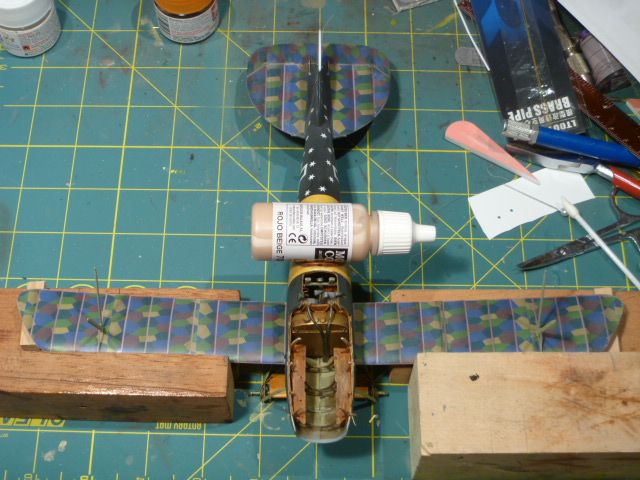
The last thing I did was to redo the nose cables while in the jig and got them real tight to help add some support.   No photo of the result but it looks pretty good.


Marc  

  • Member since
    June 2010
  • From: Austin, TX
Posted by DoogsATX on Wednesday, June 8, 2011 9:58 AM

Biggest lesson I've learned with the Pup so far - plan for the rigging from the outset.

Wingnut Wings is pretty good about placing the rigging holes in the wings and such, but time and again I've found myself drilling into already-painted surfaces. Elevators. Ailerons. The cockpit framing.

The latest? The struts.

Spent part of last night drilling out miniscule holes in the strut brackets. Talk about stressful. Zero margin for error. I ended up using my trusty old Iwata .3mm airbrush needle as a punch, then using the divot to locate the drill. Somehow I managed not to destroy a single strut, but I'm going to need to go back and repaint the brackets tonight.

Unfortunately, I'm SOL on the rear cabane struts, as they're molded directly to the cockpit framing, already installed, and I fear not sturdy enough to drill through. Not exactly sure what I'm going to do there yet, but I'll figure it out.

Oh well. Lesson for the next Pup. DRILL ALL HOLES BEFORE PAINTING!

On the Bench: 1/32 Trumpeter P-47 | 1/32 Hasegawa Bf 109G | 1/144 Eduard MiG-21MF x2

On Deck:  1/350 HMS Dreadnought

Blog/Completed Builds: doogsmodels.com


  • Member since
    June 2010
  • From: Austin, TX
Posted by DoogsATX on Tuesday, June 7, 2011 2:05 AM

Pupdate - rigging has begun!

On the Bench: 1/32 Trumpeter P-47 | 1/32 Hasegawa Bf 109G | 1/144 Eduard MiG-21MF x2

On Deck:  1/350 HMS Dreadnought

Blog/Completed Builds: doogsmodels.com


  • Member since
    October 2009
Posted by PANZERWAFFE on Monday, June 6, 2011 8:59 PM

JACK - Another GREAT looking figure so far.  My hats off to you with the excellent facial features!

TD - Very intresting the reddish deck color, looks great.

MARC - Awesome looking radiator and linkage.  The rigging looks right on the money too.

Well have been packing for the up coming move so not much done.  Have completed one track and the second one is close.  Have to say I'm really liking the Model Cellar tracks, will purchase them again for the Whippet.  Hope to have pics soon, maybe Tongue Tied

Rob

  • Member since
    June 2010
  • From: Austin, TX
Posted by DoogsATX on Monday, June 6, 2011 10:01 AM

Marc - the rigging looks great! 

I've got a decent start on rigging the Pup. Have the control horn-to-elevator connections rigged, as well as the rudder control horns-to-fuselage. I was going to go ahead and rig up the rest of the tail, but got to thinking I'd probably be placing it on bottles and other stabilizers while I rig the front, so I'm leaving the rest until later.

Up front, I've rigged the center support line for the landing gear. Next time I build the Pup, I'll add the eyebolt for this line BEFORE I put the landing gear together. Tough to add after the fact, and in fact I had it rip free on me twice.

Was hoping to get a bit more done last night, but opted for sleep instead. Sinuses have been killing me, and after nearly 11 hours of sleep I'm still exhausted. Stupid sinuses.

On the Bench: 1/32 Trumpeter P-47 | 1/32 Hasegawa Bf 109G | 1/144 Eduard MiG-21MF x2

On Deck:  1/350 HMS Dreadnought

Blog/Completed Builds: doogsmodels.com


  • Member since
    April 2005
  • From: Piscataway, NJ!
Posted by wing_nut on Monday, June 6, 2011 7:10 AM

Any faster and the friction will soften the plastic. Wink


Here is a pic of the new rigging material.  If you try it the only ting I suggest is a tiny drop of CA on the cut end that will be threaded through the brass tube.  Make it stiff and poking it through is a snap.

I scratched  the handle and linkage for the radiator,  The handle was turned with a Dremel the shape filed. With that last detail for upper wing it is ready to be mounted.

Marc  

  • Member since
    March 2006
Posted by TD4438 on Sunday, June 5, 2011 10:04 PM

Actually,I'm going far slower than I used to!

  • Member since
    April 2005
  • From: Piscataway, NJ!
Posted by wing_nut on Sunday, June 5, 2011 9:45 PM

Jeez TD, you are on a tear with that thing.  Looking' good so keep going.

Marc  

  • Member since
    March 2006
Posted by TD4438 on Sunday, June 5, 2011 9:35 PM

I think it's looking mighty fine,wing.

Portholes,turrets and hull painted.


  • Member since
    April 2005
  • From: Piscataway, NJ!
Posted by wing_nut on Sunday, June 5, 2011 11:11 AM

Well when I wad done and I sat back clapping and grinning like Peewee Herman... I may not have been very objective.

But in the light of the new day... I am still clapping and grinning like Peewee HermanStick out tongue


In the vent anyone wants to give this stuff a go... it can also be tightened with heat like stretched sprue.  It just does not shrink as much as sprue.

Marc  

  • Member since
    August 2005
  • From: Oshawa, Ontario
Posted by u-69 on Sunday, June 5, 2011 10:14 AM

Lokos great Marc...  but more importantly - 'what do you think?'

-sean

BigBlock Studios web design:
http://www.bigblockstudios.ca

My Models:
http://www.onetofortyeight.com

  • Member since
    April 2005
  • From: Piscataway, NJ!
Posted by wing_nut on Sunday, June 5, 2011 7:42 AM

LG cables and the nose cables replaced.  Whatcha think?

Marc  

  • Member since
    April 2005
  • From: Piscataway, NJ!
Posted by wing_nut on Saturday, June 4, 2011 6:07 PM

Roster updated.

Doogs that is a very cool scheme.

Jack, I am glad you said you needed to add the helmet.  For a sec there I though his head got blown off but he just had not hit the ground yet.  Great work on that guy.

BMan, thanks to the link I know why the thread I decided to go with looks good.  it is 70 denier which works out to .07"... same as the Ultra Wire.

Sean... going back a few posts for you about a bug. The answer is... OH YEAH BABY!Stick out tongue Especially now that I think I have the rigging material all worked out.

Marc  

JOIN OUR COMMUNITY!

Our community is FREE to join. To participate you must either login or register for an account.

SEARCH FORUMS
FREE NEWSLETTER
By signing up you may also receive reader surveys and occasional special offers. We do not sell, rent or trade our email lists. View our Privacy Policy.