SEARCH FINESCALE.COM

Enter keywords or a search phrase below:

The OFFICIAL Panzer III and Its Variants GB

298875 views
2308 replies
1 rating 2 rating 3 rating 4 rating 5 rating
  • Member since
    February 2003
  • From: Allentown, PA
Posted by BaBill212 on Thursday, October 13, 2011 4:26 PM

Andy,,  thanks for the Sam's tip....     guess I should stock up    (ha)

Your PE clamps, clasps, holders, etc. etc. are very well done. As much of a pain-in-posterior they can be,,, they sure do look nice.

And,,,  great find with the idlers....   they do offer a much better look

I have the day off tomorrow so I am looking forward to putting in some more work on the base for the micro pz.........        will post some pics

Enjoy the ride!


  • Member since
    April 2009
  • From: Carmel, IN
Posted by deafpanzer on Thursday, October 13, 2011 10:18 AM
Guys- OK OK OK I lied!!!  I couldn't go to bed without fondling my StuG last night.  I am happy to report that I am finally done with the PE stuff for all tools I think... I couldn't wait another day to finish this part. Tongue Tied
 
That S hook was easy and I am getting better at doing those clasps now...
 

I have to say that now this is my favorite so far... the wood block is a resin part that came with the upgrade set.
 

So far the rear of hull looks like... I hope I haven't missed something. I will add Fruil spare winterketten tracks in the rear when the order arrives.
 

While I was looking inside my spare parts box when I was looking for a starter rod that I broke, I discovered better wheels. It came from my earlier build Tamiya StuG Ausf B... same one Chazzer is working on. The details are far superior than the old Imperial parts so I am going to use those... the holes are smaller so I need to drill bigger holes for better fit.
 

It pays to save every spare parts... thanks for looking. Comments or feedback are always welcome! Beer

Andy

  • Member since
    April 2009
  • From: Carmel, IN
Posted by deafpanzer on Thursday, October 13, 2011 9:40 AM

Anthony- Oh no!  I am sorry to hear that your wife didn't let you go.  Just kidding!  Maybe next time... I hope to visit that place but not sure if I will be coming back to Califunny that soon. 

Looking forward to see more of your work... don't be shy... post pictures while you are working.  Everybody knows it gets Carl all excited up...


Andy

  • Member since
    March 2003
  • From: Western North Carolina
Posted by Tojo72 on Thursday, October 13, 2011 8:58 AM

Bill and Andy thanks,


Andy,unfortunately no tank museum it's  only by appt on Saturday's and I couldn't swing it

  • Member since
    April 2009
  • From: Carmel, IN
Posted by deafpanzer on Wednesday, October 12, 2011 8:18 PM

Anthony-  WOW  You are on roll!  Happy to have you jump aboard.  Looking forward to see it painted.  Try not to have too much with the indy links....

And PLEASE tell us you went to that tank museum in Califunny???

Bill- Oh Sam's Club offers best deal on those asprins... 500 pills for few bucks.  You will need them... LOL Thanks again for stopping by.  I need something to deal with the soreness in my fingers from dealing with the PE.  I am definitely taking a break tonight... Sleep

Andy

  • Member since
    February 2003
  • From: Allentown, PA
Posted by BaBill212 on Wednesday, October 12, 2011 7:15 PM

Anthony,,      some progress?   Wow, you are moving!   Great progress I would say...  looking FINE....    awesome break out of the gate

Enjoy the ride!


  • Member since
    March 2003
  • From: Western North Carolina
Posted by Tojo72 on Wednesday, October 12, 2011 5:50 PM

stowage,camo,and weathering look great Ben,you got another gem coming along.

Andy,those PE clasps would drive me nuts,great work.

  • Member since
    March 2003
  • From: Western North Carolina
Posted by Tojo72 on Wednesday, October 12, 2011 5:48 PM

Well I'm finally able to get on the scoreboard by posting some work.Between Hurricane Irene and cleanup,vacation in California,and heavy workload,it has been tough to find time.Plus this kit has proved to be fiddly,but it is coming along.Still much to do but here is some progress :

  • Member since
    February 2003
  • From: Allentown, PA
Posted by BaBill212 on Wednesday, October 12, 2011 4:22 PM

Ben,,    quite welcome of course.   The compliments are very deserved.      32nd birthday coming up eh?  Well happy early birthday,, and a nice gift you've chosen too.     (hell, I am not sure I remember my 32nd birthday)...  All the best and will be looking for your finale-postings

Andy,,    now I am in need of some asprins!    Those clamps are awesome. And, like you, I wouldn't worry about the starter rod. Those rigs were always losing something here and there.   In fact the missing piece adds some character (in my opinion).    Excellent work

Enjoy the ride!


  • Member since
    April 2009
  • From: Carmel, IN
Posted by deafpanzer on Wednesday, October 12, 2011 10:34 AM

Ben- Always a pleasure to help a mate... see you in Ostfront II GB when you are ready.   Glad you liked the PE... it is taking up so much time than I expected.  Be sure to stock up your refrigerator with beer for your birthday....

Guys- Couple of tools added last night.  This time I really cussed... nearly lost a part to the carpet monster.  Wait a minute there is no carpet in the basement... make it vinyl monster

Clasps for the starter rod... unfortunately the rod broke into three pieces.  No way I can save it.  I am leaving it empty... let's say one of the crew played a prank and hid the starter rod so they don't want to fight.

Now this is my favorite part but it was really pain-in-*** for sure.  Clasps for the jack.  I think I can do better next time since instructions were confusing just like Dragon.  Five pieces into one...

Can't wait to finish few more tools then I can finally move to the next step.  Thanks for looking!

Andy

  • Member since
    September 2009
  • From: Rugby, England
Posted by Hinksy on Wednesday, October 12, 2011 6:40 AM

deafpanzer

Ben- Jeez, love those tracks!  Everything is looking good.  I agree with Bill's comment about your Black trak offers better result than Blacken-It set.  Have you used Blacken-It before?  I have read mixed results about those Blacken-It.  Can't wait to see your next build Tiger... I assume it will be part of Ostfront II GB so I can follow your work there. 

Thanks Andy and Bill,

I don't think we can even get Blacken it in the UK? I've looked for it but with no success. All I know is this stuff definately won't melt the pivot wire between the links and the colour is just perfect!

Andy - nice work so far, I hope you kept some of those Asprin back from looking at Bill's Micro Panzer to take whilst assembling that PE. Rather you than me! Wink Looks really good!

I've just had a call from the LHS, literally 15 minutes ago. My Leningrad Initial Production Tiger I is in! It's not cheap BUT it's my 32nd Birthday on November 4th and my folks are getting me it for my Birthday. Result Cool

Remember - NOVEMBER 4th!!!!! Happy Birthday

Potential final update this Sunday on my Panzer - I've loved this build and making that scratch built rack was great fun and very educational. Good idea on joining the Ostfront II GB for the Tiger Andy. I'll be building my third entry for this GB sometime in the new year Yes

Take care guys,

All the very best,

Ben Toast

On the Bench - Dragon Pz. IV Ausf. G (L.A.H.) Yes

Your image is loading...


  • Member since
    February 2003
  • From: Allentown, PA
Posted by BaBill212 on Tuesday, October 11, 2011 8:16 PM

Andy,,,     thanks. Actually the total scenic area of the base is only 5.75 x 8.75" (or close). The pic is deceiving as that schwim is so small.             And, I understand what you are saying about the PE additions.    I must also state that your clamps and holders are awesome...  very nicely done !

Ben,,,    great advice on the Black Trak / CA issue,,,  always nice to park that knowledge in the brain. The AK system sure does look good,,,  will be awaiting the Tiger pics....    !  

Enjoy the ride!


  • Member since
    April 2009
  • From: Carmel, IN
Posted by deafpanzer on Tuesday, October 11, 2011 7:50 PM

Ben- Jeez, love those tracks!  Everything is looking good.  I agree with Bill's comment about your Black trak offers better result than Blacken-It set.  Have you used Blacken-It before?  I have read mixed results about those Blacken-It.  Can't wait to see your next build Tiger... I assume it will be part of Ostfront II GB so I can follow your work there.

Guys- Working on those tiny PE stuff can be pain-in-@ss!  It is taking me forever but they do look good.  Added couple of tools to the hull today...

The hammer...

The shovel... my favorite so far.  It took me an hour and half...

More to come...

Andy

  • Member since
    September 2009
  • From: Rugby, England
Posted by Hinksy on Tuesday, October 11, 2011 5:09 AM

Hi guys,

Just a quick update and thanks for the Yes re my Black Trak job. It works great and after some pigment work shall look great. A word of warning if you ever use this stuff - be careful with the CA. It won't colour it and if you overdo it the entire inside length where the trackpins go will be totally white and need painting or heavy pigmenting. Luckily I learnt this from last time I used Black Trak and applied all my CA in TINY amounts with a toothpick.

Anyway, I've been playing around with AK Streaking Grime and AK Winter Streaking Grime. I've used this on the turret 'top', the side hull walls behind the running gear and the front sloping armour. It's a good start and looks promising.

This weekend I'll finish the tracks properly, highlight some corners with the Graphite penceil, add a little chipping, weather the wheels, add a light Umber Wash all over and I'll use a MIG Dark Wash for the pin washes. A final coat of matt varnish followed by extra pigment and we should be about there!

Oh, I've also got an RB Brass Antennae to go on and I need to make another short run of track to go on the front glacis.

I hope you like her so far guys. Next up is the Dragon 6600 Leningrad Tiger which I'll build as a 'sister' to this Leningrad Panzer III N. It's due in the LHS this week.


I reckon this will turn out really well. I think a light Umber wash and wheel weathering alone will look great.

Possible final update this weekend!

All the best,

Ben Toast 

On the Bench - Dragon Pz. IV Ausf. G (L.A.H.) Yes

Your image is loading...


  • Member since
    April 2009
  • From: Carmel, IN
Posted by deafpanzer on Tuesday, October 11, 2011 12:40 AM

Bill- WOW!  The base is alot bigger than I expected.  Can't wait to see how it comes out.  I could use this toot because I have yet build a base for all of my past builds.   Thanks for the comment on my StuG! Beer

Guys- Spent few more hours on my StuG... remember I am off tomorrow so I can sleep in!

Fire extinguisher is resin part from the upgrade set.  No question it looks better!  Added bracket to back of the rear light too.

Spent more than an hour just for this axe...

Many more tools to come... ARRRGGHHH!! Bang Head  Try not to work too hard tomorrow...

Andy

  • Member since
    February 2003
  • From: Allentown, PA
Posted by BaBill212 on Monday, October 10, 2011 8:17 PM

Ben,,,     have to say again,, the black trak seems far superior to blacken-it. No doubt that the one step seems the same, but blacken-it is a single step (basically)..      I'll have to look into that system more closely.      Superb job !

Andy,,    wow,,  what a pickle those idlers seem to be,,,   who thought of that engineering mess, Great fix on the hull details. Wonderful looking PE clamps and hooks too,,  they sure do take it to a different level,   big time !          And, glad you lept in with both feet,,,  good to see your progress.

Rob,,,   thanks much !             Did a bit more work on the base over the weekend - -

I laid down a few layers of Celluclay

I test fit where I wanted the Schwim....  and gouged out some "wheel" tracks...    A test fit here and there to make sure.....

The little bastaad looks a bit lost....        will work on that aspect


After drying, I applied some base paint for the lake section....     I had to drill out the rear wheel areas to get the Schwim to sit a bit lower "in" the base. I thought about simply snipping sections of the back wheels to achieve the same effect....    I couldn't bring myself to do it...  I figured if I goofed something up (base-wise) I would still have the completed Schwimmwagen intact....  so I opted for the safer, more time consuming route (drill and scrape out).
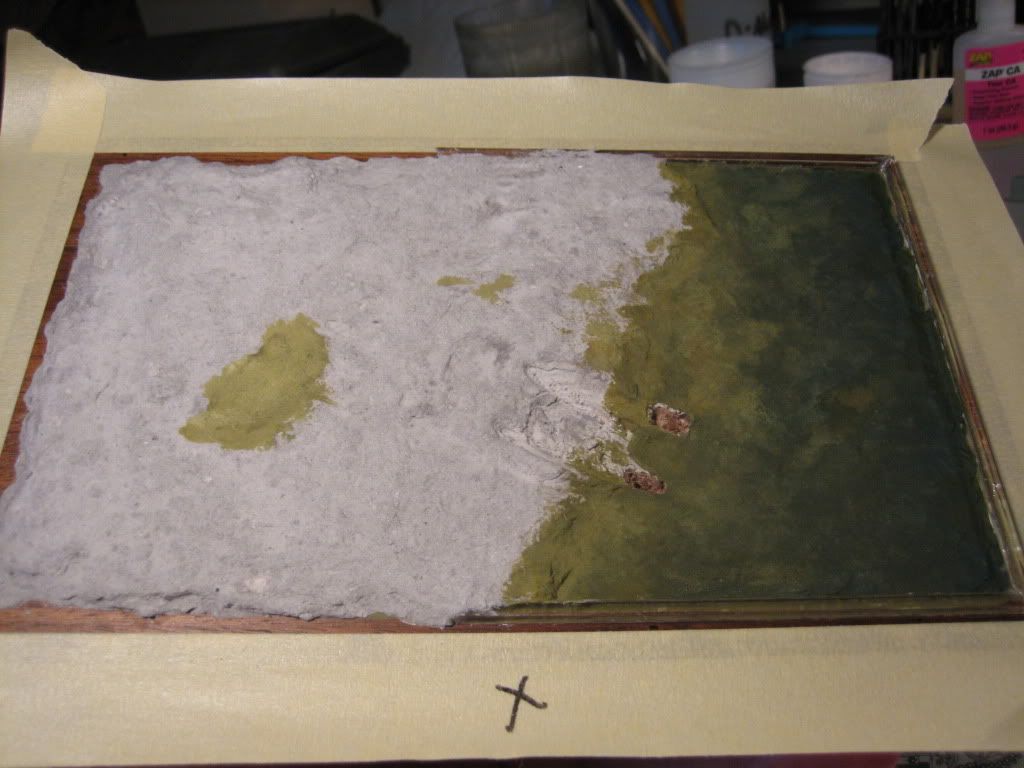
The lighter green area (left center) was what I used as a palette area....  sort of a dry-brush / wipe off for the lighter areas of the lake painting effort.

Next will be a resin pour followed by grass, brush, stumps,  weeds, mud, fish jumping, Heron, etc.           (ok, no jumping fish or Heron,,  got carried away there).

I may have over estimated a small section of the scene,, as I see it in my head.  BUT, I may be able to cover this oversight,,,  time will tell.

So, nothing earth shattering to report, but,,,,,,,  moving along a bit.

Hope you enjoy......

Bill

Enjoy the ride!


  • Member since
    April 2009
  • From: Carmel, IN
Posted by deafpanzer on Monday, October 10, 2011 7:50 PM

Guys- I couldn't wait to work on the StuG til tonight... hit the work bench as soon as I got home from work. LOL  Here's little update...

Bent the rear mud guard... keep in mind I am going for real worn out look. 

 I wasn't satisfied with the kit set of barrel cleaner rods holder...

I managed to find something from Pz III Ausf F PE set... I think it looks alot better now.

Wire cutter is on... used PE clasp from RB.  Sorry about the fuzzy picture!

I am off tomorrow because I had to work over the weekend.  I will definitely work on the StuG again tonight and some tomorrow.  Thanks for looking!

Andy

  • Member since
    April 2009
  • From: Carmel, IN
Posted by deafpanzer on Monday, October 10, 2011 11:23 AM

PANZERWAFFE

ANDY - Your basement looks more inviting all the time.  Ya have room for me to move in.

Nice to see you get started on the Stug!  Looks like you did a good job on our favorite part, the wheels.  I know how much you like doing them so I will send all of mine to you from now on so that you can fix them up for me Wink  When I had built the old Imperial Pz III K it to had the taps left in the idler wheels.  Looking at your parts they all look like the same ones I had for the K.  Really like those PE clasps.

Rob- You are more than welcome to move in as long as you bring all of the kits and built models with you...

Sorry it took me long before I can jump in my own GB.  We still have plenty of time... 8 months left for me to build two here.  Oh yes, I LOVE wheels... not!  You know my policy... send a case of Beer along if you want my service. Big Smile

Glad you like the PE clasps... more coming your way! 

Andy

  • Member since
    October 2009
Posted by PANZERWAFFE on Monday, October 10, 2011 12:50 AM

BILL - Looking forward too see more on your base, good start.

BEN - The tracks came out great!  It looks as if the BLACK TRAKS comes out more black then the BLACKEN IT that I had tried.  Like the result you have better.  They sure are going to look good all dirtied up.

ANDY - Your basement looks more inviting all the time.  Ya have room for me to move in.

Nice to see you get started on the Stug!  Looks like you did a good job on our favorite part, the wheels.  I know how much you like doing them so I will send all of mine to you from now on so that you can fix them up for me Wink  When I had built the old Imperial Pz III K it to had the taps left in the idler wheels.  Looking at your parts they all look like the same ones I had for the K.  Really like those PE clasps.

Rob

  • Member since
    April 2009
  • From: Carmel, IN
Posted by deafpanzer on Monday, October 10, 2011 12:24 AM

Guys- More pictures... I know how much you love pictures.  Wink

Dry fitting the return rollers...

Rear completed... mufflers little banged up!

Will use PE for all hooks like below... the kit hook was huge and thick.  I won't mind only if it was for the steaks...

Added on armor... common sight of those StuG F/8s.  

Thanks for looking! 

Andy

  • Member since
    April 2009
  • From: Carmel, IN
Posted by deafpanzer on Monday, October 10, 2011 12:05 AM

Ben- Do appreciate your offer. Beer  Let's save that and get yourself another kit!  I will definitely buy few sets if I am coming to England.  It is overdue for me to visit my family there...

Guys- Finally I found plenty of bench time after my parents left last Friday.  I have been on roll... built my StuG thru step 8 in two days. 

I never saw this before... the kit was manufactured in 1995.  The wheels required more work than usual...

Did I ever tell you I hate wheels???  As usual step 1 for Dragon kits are all about wheels... I am going for real beat up StuG did the chippings on the rubber rims. 

Another unusual thing for me to do... looks like Dragon re-packaged Pz III hull so it requires removal of about 15 outlined seams to make it work.

Where did the lines go?  A coat of Mr Surfacer 1200 will take care of this too.

Drilled holes inside the mufflers...

The clamps were molded on the tool box... didn't like 'em so I went for my PE set.  I brought it at IMPS show last spring.

Looking alot better now...

Sorry I couldn't resist!!! Tongue Tied  It was supposed to be done during step 17 but I had to see how the RB aluminum barrel looks. 

More to come...

Andy

  • Member since
    September 2009
  • From: Spring Branch, TX
Posted by satch_ip on Sunday, October 9, 2011 2:33 PM

Ok, cool.  I thought you were finished with them.  Looking forward to the end product. 

I used the AK Blue/Brown wash for Panzer Grey on my Pz III and was not really happy with it. I had pre and post shaded the grey paint then added the wash.  It completely obscured the tonal variations of the paint.  It was also very concentrated out of the bottle.  Don't know if I used it wrong or what but I'm anxiously waiting to see what you can do with AK products.

Satch

  • Member since
    September 2009
  • From: Rugby, England
Posted by Hinksy on Sunday, October 9, 2011 11:36 AM

[/quote]

satch_ip

Ben, I've said this before, but your talent is amazing.  Can't call it experience because you have been doing this only for a few years.  Very nice job of the IIIN

I'm not one to criticize so I'll ask you.  What would you think of more natural metal showing on the contact points of you tracks?  The head on photo suggests some uneven wear.  Not a criticism, just looking for your perspective.

Satch

No problem buddy!

When the tracks came out the bath and had dried I gave them a quick one over with a small file more for the benefit of the photo than anything else so they probably are a bit uneven yet.

They are off the tank again now as I've been doing a few more washes and adding AK Streaking Grime with a 10/0 brush on the hull walls behind the running gear. Basically you do LOADS of super fine streaks with the tiny 10/0 brush on the hull walls and up front on the sloping armour, leave for 20 minutes and using a flat brush just lightly dampened with AK White Sprit you 'feather' the streaks in a downward motion so they all merge together and create an excellent streaky finish - just take your time and go easy on the White Spirit!

Next weekend I'll do the final Raw Umber wash and add a run of spare Winterketten track links. Then onto pigments and weathering the wheels.

When that's all done I'll be touching up the tracks where they haven't blackened properly and addidding some muck then finally, before putting them back on, they'll be filed properly to expose the bare metal on the raised areas. Sorted Yes 

I reckon I'm about 75% done and if I don't get roped into working next weekend I think I might be calling it done this time next week!

Cheers Satch!

Ben Toast

On the Bench - Dragon Pz. IV Ausf. G (L.A.H.) Yes

Your image is loading...


  • Member since
    September 2009
  • From: Spring Branch, TX
Posted by satch_ip on Sunday, October 9, 2011 9:59 AM

Ben, I've said this before, but your talent is amazing.  Can't call it experience because you have been doing this only for a few years.  Very nice job of the IIIN

I'm not one to criticize so I'll ask you.  What would you think of more natural metal showing on the contact points of you tracks?  The head on photo suggests some uneven wear.  Not a criticism, just looking for your perspective.


Satch

  • Member since
    September 2009
  • From: Rugby, England
Posted by Hinksy on Sunday, October 9, 2011 8:10 AM

deafpanzer

Ben- Holy cow!  I like the tracks... they look GREAT!!! Yes  Now I want to try that on my Fruil if possible.  How many tracks do those bottles set can do? I hope more than just few tracks if they are that expensive? 

Hi Andy,

Glad you like them - they look superb.

The guy that sells them reckons the contents of the bottles can treat up to three sets of tracks but I doubt that. I've done these bigger Winterkettens and I reckon I should be able to treat another set of small friuls like ones for a Pz I but that's it - the chemical just loses it's strength.

If you were building a Tiger for example I think you could do the tracks for them but that would be it as they are so big in 1/35. I did Panther tracks fine but it struggled to work again when I went to do the spare run of links.

Anyway, at a cost of £12-50 posted in the UK I'll be happy to buy a new set of bottles for every new build. £12-50 isn't expensive but I just don't know if he'd ship to the US.

If you want I'll buy you a set of bottles and send them to you - my treat?

I'm going to put another cold grey wash on the tank later as I'm still working from home covering the emergency work phone until 3pm. Next weekend I'll start getting this mucky stuff on as I think I'm going to struggle with time this weekend.

Hopefully she'll be completed by the weekend of the 22nd/23rd October.

Take care buddy,

Ben Toast

On the Bench - Dragon Pz. IV Ausf. G (L.A.H.) Yes

Your image is loading...


  • Member since
    April 2009
  • From: Carmel, IN
Posted by deafpanzer on Saturday, October 8, 2011 10:43 PM

Chazzer

When do you use an airbrush and when do you paint. I want to do the commander for the "B". Just oob. Thanks pal. Have you heard from Maj Mike? We were the three Amigos prior to our build. I hope he's OK. I think he said something about being busy for the summer. I'm not sure. 

Chazzer- Missed the second part... I haven't heard from Maj Mike either.  His last post was on Sept 23rd.  Hope he is OK too. 

Thanks!!! For the figures, I only airbrushed once for the base coat of uniforms.  Also I airbrushed black for the shadow from the bottom.  Then every else was hand painted using LifeColor and Vallejo.  Used several different shades to make it work.  You can see my WIP on figures on Ostfront GB and Korea War GB too. 

Andy

  • Member since
    April 2009
  • From: Carmel, IN
Posted by deafpanzer on Saturday, October 8, 2011 10:27 PM

Malone- Thanks again!  Will check it out again at Michael's or Hobby Lobby. Right now I have all of my builds inside displayment cases.  Two days ago I had the shelves installed in the basement next to my work bench so I can show off my work. Big Smile

Chazzer- LOL!  I can see how much you love StuGs.  I am with you... I hope to build all variants even if it will take me decades.  So far I have built Ausf B, next one will be Ausf F/8 which I have started last night and I have Ausf G in the stash.  Long way to go...

You know you are welcome to do your build on Ausf E here.  Looking forward to hear about the seminar!

Ben- Holy cow!  I like the tracks... they look GREAT!!! Yes  Now I want to try that on my Fruil if possible.  How many tracks do those bottles set can do? I hope more than just few tracks if they are that expensive? 


Andy

  • Member since
    February 2003
  • From: Allentown, PA
Posted by BaBill212 on Saturday, October 8, 2011 7:36 PM

Hi Ben,,,    those tracks look great    !!    

Very nicely done

Enjoy the ride!


  • Member since
    September 2009
  • From: Rugby, England
Posted by Hinksy on Saturday, October 8, 2011 12:59 PM

Hi guys,

It's been a bit of a busy week but I've managed to get round to blackening my Friuls - they came out really well.

Now I've finally got the tracks sorted I can concentrate on the heavier weathering and super detailing Yes

Time to break out the washes and AK Winter Streaking Grime! Cool

After treatment:


Sorry, the tracks came away from the sprocket here as you can see! I might take a link off this side? 


Thanks for looking guys,

I hope you like them and how they've turned out. I'm going to remove them now to help me get better access for lower hull weathering and I'll take the file to the track horns to show some more wear.

Update tomorrow.

All the best,

Ben Toast 

On the Bench - Dragon Pz. IV Ausf. G (L.A.H.) Yes

Your image is loading...


  • Member since
    January 2011
  • From: The Great North Woods, Maine
Posted by Chazzer on Friday, October 7, 2011 7:59 PM

Andy, Stugs, Stugs, and more Stugs! They are my Favorite German tanks. I like the lines and the progression from the "A" and up to the "G"  and any variants. Like this build. It's all your fault! Once this "B" is done I am planning on the "E". I think. I am committed to the "Blitz" GB., I'm building the Matilda. Should be lots of fun. Anyway, After that I'm gonna paper the walls, the headboard of the bed and maybe the ceiling with Stugs, Stugs and......more Stugs. Did I tell ya I like Stugs?

This is a little late but you figures came out so cool. I have never built and painted one. When do you use an airbrush and when do you paint. I want to do the commander for the "B". Just oob. Thanks pal. Have you heard from Maj Mike? We were the three Amigos prior to our build. I hope he's OK. I think he said something about being busy for the summer. I'm not sure.  

Thanks

Scott


ChazzerBlack Eye

JOIN OUR COMMUNITY!

Our community is FREE to join. To participate you must either login or register for an account.

SEARCH FORUMS
FREE NEWSLETTER
By signing up you may also receive reader surveys and occasional special offers. We do not sell, rent or trade our email lists. View our Privacy Policy.