SEARCH FINESCALE.COM

Enter keywords or a search phrase below:

Airfix Group Build 2011-2012

145683 views
1374 replies
1 rating 2 rating 3 rating 4 rating 5 rating
  • Member since
    September 2011
  • From: Earth (usually)
Posted by Centhot on Friday, October 7, 2011 4:28 AM

the real red baron
will alcohol work as a thinner?

Is that pure alcohol?  For acyrlic or enamel?  Actually, why not just experiment?  Try a tiny bit of paint, some alcohol, and see what the color looks like?

2012 A/B/C: 10/3/0 (Acquired/Binned/Completed)

  • Member since
    February 2011
  • From: Launceston, Australia
Posted by the real red baron on Friday, October 7, 2011 2:39 AM

progress has been halted on my hurricane, im sorta well.... 'out of thinner' Embarrassed

will alcohol work as a thinner?


  • Member since
    March 2006
Posted by TD4438 on Friday, October 7, 2011 1:34 AM

These decals sure aren't the same quality as those on the Walrus!

They just don't want to lay down! I poked a few holes in 'em to take care of some bubbles as well.

  • Member since
    March 2006
Posted by TD4438 on Thursday, October 6, 2011 11:54 PM

That really sucks about those struts,Centhot!

Current progress on the Buffalo.The decals aren't the worst I've worked with,but the yellow and white portions are very opaque.I'm glad I went with spray paint for the stripe.A decal is included,but I'm sure it would have sucked!

  • Member since
    March 2010
  • From: New Zealand
Posted by Scorpiomikey on Thursday, October 6, 2011 7:35 PM

traveller

FINALLY!!! I start annual leave tonight after I finish my shiftStick out tongue I might be able to get some things doneConfused

LOL no you wont, it will start with "I wonder whats on TV?" and end with "OH GOD ITS MONDAY AGAIN!"

"I am a leaf on the wind, watch how i soar"

Recite the litanies, fire up the Gellar field, a poo storm is coming Hmm 

My signature

Check out my blog here.

  • Member since
    February 2003
  • From: Towradgi, near the beach!
Posted by traveller on Thursday, October 6, 2011 7:33 PM

FINALLY!!! I start annual leave tonight after I finish my shiftStick out tongue I might be able to get some things doneConfused

  • Member since
    March 2010
  • From: New Zealand
Posted by Scorpiomikey on Thursday, October 6, 2011 6:12 PM

Are you sure? Do you want me to post that pic on the front page? or do you have another one you would prefer?

"I am a leaf on the wind, watch how i soar"

Recite the litanies, fire up the Gellar field, a poo storm is coming Hmm 

My signature

Check out my blog here.

  • Member since
    September 2011
  • From: Earth (usually)
Posted by Centhot on Thursday, October 6, 2011 5:56 PM

That Buffalo looks fantastic!

Here's the latest on the Camel.  Yes, one strut bent, and looks weird.  The wings are in the correct location, but the struts are looking, well, weird.  As this now just a throw-away to test rigging, I've left the wheels and gun loose (and the tires badly painted!).  So, for this GB, the Camel is finished and dead!  If the rigging goes nicely I might post it, else, that's it, finito!

2012 A/B/C: 10/3/0 (Acquired/Binned/Completed)

  • Member since
    March 2006
Posted by TD4438 on Thursday, October 6, 2011 4:56 PM

Current progress.

I lost count of how many thin coats of paint I used for this stripe.I hate working with white paint.More to follow later.

  • Member since
    February 2003
  • From: Rothesay, NB Canada
Posted by VanceCrozier on Thursday, October 6, 2011 7:03 AM

Centhot

...These colors were scientifically chosen by seeing what mini-tubs of paint I had opened

I love the method Centhot, I hate throwing out paint that has simply dried out! Making good progress on the Camel despite the problems. Those decals - I'd rather have them too large than too small. I'd trim them & then do a little touch-up to wrap the colours around the edges as needed.

Exhaust pics for my Mirage - I was actually able to track down a good-sized photo looking back into the exhaust can. Now I just need to scale it down & cut it properly, one of the last things I'll be doing.

On the bench: Airfix 1/72 Wildcat; Airfix 1/72 Vampire T11; Airfix 1/72 Fouga Magister

  • Member since
    September 2011
  • From: Earth (usually)
Posted by Centhot on Thursday, October 6, 2011 3:36 AM

Thanks guys!  I used a sharp blade to trim back the decals.  However, the decals also began to break up, after application!  I've seen decals break up and shatter before application (or stick the moment they touch plastic, no ability to move them), but never after application.  Anyway, I found spruce I'd stretched for the undercarriage, and will use some of that for the missing strut (one of the small ones above the engine.  It's not quite right, but I've given up on accuracy already.  The main exercise will be rigging an aircraft for the first time...  Yikes!

In Airfix's defence, it is an old kit, with old decals, maybe from the 1980's?  New kits, even of the Camel, will have decent decals.

2012 A/B/C: 10/3/0 (Acquired/Binned/Completed)

  • Member since
    August 2007
  • From: back country of SO-CAL, at the birth place of Naval Aviation
Posted by DUSTER on Thursday, October 6, 2011 12:18 AM

picture is a good idea;

course you could  just cut small strips of styrene and lay 'em in a circle to represent the internals

Shutterstock has a nice picture-abit costly, but ....... might do

http://www.shutterstock.com/pic-15093571/stock-photo-view-inside-jet-engine.html


Steve

Building the perfect model---just not quite yet  Confused

  • Member since
    September 2003
  • From: AandF in the Badger State
Posted by checkmateking02 on Wednesday, October 5, 2011 11:51 PM

I think you've done well with the paint colors, Centhot.  Nice smooth application, too.

Ah, decals.  One of the last things that can still go wrong on an otherwise beautiful model.  I still haven't got the hang of them enough to assure consistently good results.  It's always a nail-biter waiting to see how they'll turn out when dry. 

You probably know this already, but it looks like you might be able to shave that excess with a sharp x-acto blade.  Hope whatever you do turns out well for you.


  • Member since
    March 2010
  • From: New Zealand
Posted by Scorpiomikey on Wednesday, October 5, 2011 11:48 PM

"I am a leaf on the wind, watch how i soar"

Recite the litanies, fire up the Gellar field, a poo storm is coming Hmm 

My signature

Check out my blog here.

  • Member since
    September 2003
  • From: AandF in the Badger State
Posted by checkmateking02 on Wednesday, October 5, 2011 11:42 PM

"The verrry empty exhaust cone. I really should have done something more here... maybe I can find a picture looking inside a tailpipe, print that out on some card stock & glue it in with white glue - what does everyone think of that?!?!"

That sounds like very creative way to address the problem.  Progress is impressive so far.  Good to see.


  • Member since
    March 2006
Posted by TD4438 on Wednesday, October 5, 2011 11:29 PM

I just got back from Vegas and will hopefully have an update on the Buffalo later today.I am definately liking what I see around here.Centhot,I feel your pain on those decals.What a PITA!

  • Member since
    September 2011
  • From: Earth (usually)
Posted by Centhot on Wednesday, October 5, 2011 6:06 PM

Thanks Bysmato!  Coming from such an excellent builder as yourself that's fantastic!  The aircraft is just over 3" long, or in European, around 7 centimeters.

2012 A/B/C: 10/3/0 (Acquired/Binned/Completed)

  • Member since
    September 2011
  • From: Earth (usually)
Posted by Centhot on Wednesday, October 5, 2011 6:03 PM

Those decals!  On one hand they settled in nicely, on the other, thee tail sections all were a fraction too large, whilst one roundel had a two spots that had glued themselves to the backing paper.  The red dots were also slightly out of register.  More than ever, this is a kit for testing purposes only...

On another note, some struts are missing.  As with the undercarriage, I'll need to make some.  Oh dear, this isn't a great build!

2012 A/B/C: 10/3/0 (Acquired/Binned/Completed)

  • Member since
    October 2008
  • From: italy
Posted by bsyamato on Wednesday, October 5, 2011 4:36 PM

Centhot the camel looks pretty and really little? It's really long time not see in my hand a wwI fighter Surprise

Vance the f-1 shapes looks really good more than an usual delta mirage Smile good luck with the canopy 

  • Member since
    September 2011
  • From: Earth (usually)
Posted by Centhot on Wednesday, October 5, 2011 4:26 PM

Here's the latest position on the Camel.  The underside color is of my own mixture, using RLM 65 and yellow.  These colors were scientifically chosen by seeing what mini-tubs of paint I had opened (acrylic dries out quickly once opened).  Seems OK though, actually pleased with the result.

Some touching up of paint needed, and the undercarriage is very wrong!  I used Humbrol 86 for the fuselage, and it seems to be good.  The wood is 118, and both of these used the same scientific method mentioned before!  Again, they look OK.  The metal is no.27 as the instructions say.

2012 A/B/C: 10/3/0 (Acquired/Binned/Completed)

  • Member since
    February 2003
  • From: Rothesay, NB Canada
Posted by VanceCrozier on Wednesday, October 5, 2011 11:07 AM

Thanks Theuns, I was wondering if I should have checked the canopy fit - after I glued everything in... Bang Head
I think I'll be leaving the canopy up on this one anyway so I can see my ejection seat better!

On the bench: Airfix 1/72 Wildcat; Airfix 1/72 Vampire T11; Airfix 1/72 Fouga Magister

  • Member since
    April 2010
Posted by Theuns on Wednesday, October 5, 2011 11:03 AM

@ Vance and the F-1.


Just a tip, when I did the 1/72 Heller F-1 I also made ejection handle, but the canopy fouled when I tried to close it.The same thing on the Super Etandard I am now building.

I recomend you do a trile fit so you can trim the bottom of the seat to fit better if needed.


Theuns

  • Member since
    February 2003
  • From: Rothesay, NB Canada
Posted by VanceCrozier on Wednesday, October 5, 2011 10:47 AM

Quick update on the Mirage - reinforcing done to allow me to reposition the elevators; cockpit/seat finished up; fuselage halves joined, nose cone & exhaust cone attached; elevators attached; wings attached...

For the reinforcing, I laid a thin strip of styrene to close off the open slot, then backed that again with a thicker piece. I "drilled" a hole through this area from the outside with a thick needle that I heated over a candle, melted right through exactly where I wanted it.

She's shaping up now. I didn't realize how, uhh, "pointy" this Mirage is! The fit has been really good so far, the ony issue so far is the wing-to-fuselage join. Lower portion seems alright, and the tabs actually kep everything aligned at the proper angles, but leaves a noticeable gap on top. There is also a slight step on the lower fuselage joint near the tail, I'm guessing that is either "pilot error", or one fuselage half may be a little bit warped. A little putty will take care of both issues.

The verrry empty exhaust cone. I really should have done something more here... maybe I can find a picture looking inside a tailpipe, print that out on some card stock & glue it in with white glue - what does everyone think of that?!?!

On the bench: Airfix 1/72 Wildcat; Airfix 1/72 Vampire T11; Airfix 1/72 Fouga Magister

  • Member since
    September 2003
  • From: AandF in the Badger State
Posted by checkmateking02 on Wednesday, October 5, 2011 9:37 AM

RRBaron:

Here is an example of an Airfix Hurricane I did last year for the BoB GB.  Hopefully it will illustrate what you can do, but I didn't have a good camera back then.

[View:/themes/fsm/utility/:550:0]
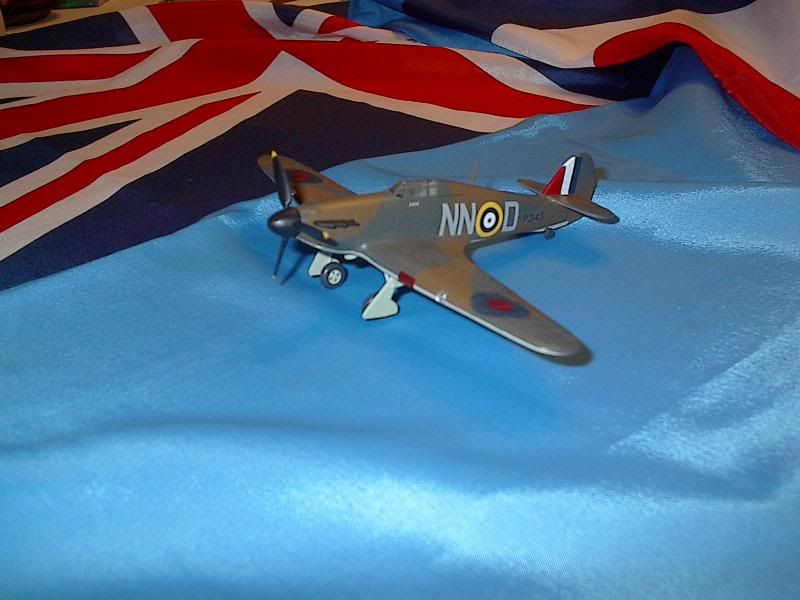
I masked the canopy with narrow strips of tape, cut from regular old masking tape.  They need to be very narrow.  Then you "box in" each window panel, leaving the frame uncovered.  I use liquid Micro Mask to fill in the clear area, but sometimes you can do the same thing with tiny, square pieces of masking tape.  That takes longer and is tedious, but either process can be boooorrring.

For the camouflage, I use masks made from masking tape.  If you go over to the Spitfire group build, I posted photos using the same type masks that I did on the Hurricane along with an explanation for how to use them (except of course I used Hurricane masks for the Hurricane).  I'm no good at free handing camouflage with an airbrush, especially not in 1/72.

I did a Google search through the web for 1/72 Hurricane masks at that time and came up with several pictures of masks various people had created.  You might find some that way.  Alternatively, I can look through my stuff I saved on CD roms, and see if I still have the masks I used.  Only thing is, I have to be out of town on my job till Friday, and won't be able to do much till then.

Anyway, this gives you some ideas, I hope.


  • Member since
    September 2011
  • From: Earth (usually)
Posted by Centhot on Wednesday, October 5, 2011 5:48 AM

The Buffalo is looking really nice, and the Henschel's coming along well!  Such good builds, makes me feel embarressed.  A scratch-built cockpit for the Hurricane?  Pity can't see it, but, what little I can see looks good.  Your stuff is really good Vance, can't wait to see it finished!

As for me, well, I've stopped on the Widgeon, to allow me to finish the Camel.  However, as the wife pointed out, the lower wings aren't on square on the Camel, so, no matter what I do, it just won't look right.  I also found I was missing some of the lower struts.  Using stretch sprue made two more, only to find I put it on backwards (Farman style).  So, I'll treat this Camel like a training exercise and quickly finish it, and use it to practise rigging (never done before), and move onto the Widgeon.  I'll post a picture of the Camel later.

2012 A/B/C: 10/3/0 (Acquired/Binned/Completed)

  • Member since
    October 2008
  • From: italy
Posted by bsyamato on Wednesday, October 5, 2011 4:30 AM

Nice progress RRB Yes On new tecniques too Big Smile 

I actually don't mask canopy because don't use airbrush (and really tedious Whistling) but a normal coachbuilder tape can be work, just put a piece on the matt and cut one by one the clear rectangles needed (and this is really tedious, if you build a b-29 for example) and place on the canopy frames.

A tip for simply detailing raised panel lining kits (then 80 or 90% of airfix kits)

Last night re-found an old article into an old italian modelling magazine:

after the camouflage is finished and before the decals gloss coat, with very fine sandpaper and water, sand gently the whole subject and the raised panels appear as a draw or normal panel lining. Naturally more the plastic is darke better will be the result. Naturally not needed pieces as antennas ,gears etc will be glued after.

I'll try this option on the scout.

  • Member since
    February 2011
  • From: Launceston, Australia
Posted by the real red baron on Wednesday, October 5, 2011 1:24 AM

well i finallty got started on my hawker hurricane, i made a nice scratch build cockpit and seatbelts etc. but i closed up the fuselage and then thought for a moment... doh! i forgot to take pics!

so the cockpit pics will not be as clear as they normally would... Sad

im almost up to the stage of paint but how to i go about makeing a camo paint job with a airbrush? do i spray a coat of brown on then mask out the camo print then spray the green??

how to i mask canopies ive never really been good at masking the canopies. (keep in mind this is 1:72)

Thanks Smile

well here are the pics:

I also had to scratch build something to be suitable as wheel wells, since if i hadnt done this you would see right through to the bottom of the cockpit. Stick out tongue


  • Member since
    July 2008
  • From: USA California
Posted by vetteman42 on Tuesday, October 4, 2011 10:41 PM

Sorry guys guess I cant read EmbarrassedPosted to the wrong group


Randy So many to build.......So little time

  • Member since
    February 2003
  • From: Rothesay, NB Canada
Posted by VanceCrozier on Tuesday, October 4, 2011 7:14 AM

Noah - Cobia? That thing looks like a little shark! I'm not a "serious" fisher, all I bother with is trout (mostly rainbow, some browns) up here, a few times a year with my father. I'll have a look around for some alternate sizes before all the supply shops switch their seasonal stuff out. I wonder if the braiding could actually trap some dullcote in between the strands to help keep it taught?!?!

checkmateking02 - Thanks! I was just killing time waiting for the wife in a craft store & spotted those loopy-things & realized they had a better purpose than "beading"!

A few little items worked on last night, nothing that would show in a photo though. More later this week,

On the bench: Airfix 1/72 Wildcat; Airfix 1/72 Vampire T11; Airfix 1/72 Fouga Magister

  • Member since
    August 2011
  • From: Panhandle Fl
Posted by Noah T on Monday, October 3, 2011 6:18 PM

Vance,

I fish all the time (Pensacola Florida area and mainly saltwater) and 3lb test is some light gear. I bet you could get smaller diameter line (if you wanted it) with braid instead of mono. For example some 30lb braid is as small as 10lb mono, and they make braid way down to 5lbs. It would be harder to keep taut, maybe spray like dullcote or something might stiffen it up. I'll tell you if you try to bring a green Cobia in by lifting the line (braid) and not by using a gaff you'll be sewing your palms back together.


On the bench: 72nd scale P51D, P47D Razorback

---Everything Is What It Is, And Not Another Thing.---

JOIN OUR COMMUNITY!

Our community is FREE to join. To participate you must either login or register for an account.

SEARCH FORUMS
FREE NEWSLETTER
By signing up you may also receive reader surveys and occasional special offers. We do not sell, rent or trade our email lists. View our Privacy Policy.