SEARCH FINESCALE.COM

Enter keywords or a search phrase below:

No More Excuses GB: Part Deux. Closed to New Entries But Finish What You Signed Up For

82200 views
690 replies
1 rating 2 rating 3 rating 4 rating 5 rating
  • Member since
    March 2010
  • From: Buffalo, NY
Posted by macattack80 on Saturday, February 11, 2012 3:34 PM

Awesome work Mike!  The panel wash color you chose looks fantastic.  Yes

Kevin

[


  • Member since
    April 2005
Posted by Thunderbolt379 on Saturday, February 11, 2012 12:22 AM

Thanks, man! I'm doing the topsurface wash right now, I could actually do with the pure black to make ti stand out, but that might actually be unrealistically stark, and the dark grey might be the more accurate. With luck I'll have a sealer coat on over the wash later on, then I can get to decals.

Cheers, Mike/TB379

http://worldinminiature.blogspot.com/

  • Member since
    July 2006
  • From: San Francisco Bay Area
Posted by bufflehead on Saturday, February 11, 2012 12:14 AM

The Meteor is looking real good Mike!  You can really see the camo colors now and the wash seems to be turning out great!

Ernest

Last Armor Build - 1/35 Dragon M-26A1, 1/35 Emhar Mk.IV Female


Last Aircraft Builds - Hobby Boss 1/72 F4F Wildcat & FW-190A8


  • Member since
    April 2005
Posted by Thunderbolt379 on Friday, February 10, 2012 10:37 PM

Thanks, guys! Moving along -- the underside was glossy enough as it was to do the panel wash, like so:

Followed by a coast of Microscale Satin overall:

One shiny bird! Some panel lines were rejecting wash, I'll try to get them now I'm onto the next stage, while I do the topside lines. I may bring the final lustre down, after decals, too.

Cheers, M/TB379

http://worldinminiature.blogspot.com/

  • Member since
    September 2007
  • From: Relocating
Posted by Mobious on Friday, February 10, 2012 3:29 PM

Waynec, Nice work on the steam engine.

Thunderbolt, Great masking work on the Meteor.

"It's a problem of applied physics" Roy Brown

  • Member since
    March 2010
  • From: Buffalo, NY
Posted by macattack80 on Friday, February 10, 2012 3:27 PM

That looks great Mike!  Yes Bow Down  I bet seeing that silver paint show up got you a bit peeved.  Sure glad you were able to easily sand it away. 

Kevin

[


  • Member since
    April 2005
Posted by Thunderbolt379 on Friday, February 10, 2012 12:31 AM

Thanks Ernie and Kevin! Okay, the main masking is now away, here she is:

Not too shabby... When I removed the masking protecting the edges of the undersurfaces I found that silver paint which had collected on the tape from the previous job it was used for had adhered to the paint, so that was very carefully sanded away and rinsed, and the model is now air-drying.

Touchups to come, unmask the yellow leading edges, and possibly do some oil and dirt staining on the underside. When I'm happy with that lot, I'll get some clear onto her, then on with the panel wash...

M/TB379

http://worldinminiature.blogspot.com/

  • Member since
    March 2010
  • From: Buffalo, NY
Posted by macattack80 on Thursday, February 9, 2012 10:35 PM

bufflehead

 macattack80:

Thanks for checking in bufflehead. 

The reason for the gloss black paint is the that is the color of the F-14D's flown by the VX-9, which are the markings I will be using.

http://www.airliners.net/photo/USA---Navy/Grumman-F-14D-Tomcat/1171067/&sid=5f367b38db44c39ecac983548dfd44ee


Well, whaddya know......Surprise  I never knew that!  Thanks for the link!  The black F-14 is a very cool looking machine!!

No problem bufflehead.  That is a pretty good website for reference pics too.  Ya learn somethin' new everyday!

Mike, nice work with the preshading too.  Lookin' good sir!

Kevin

[


  • Member since
    July 2006
  • From: San Francisco Bay Area
Posted by bufflehead on Thursday, February 9, 2012 10:07 PM

Tbolt (Mike), excellent masking job on the Meteor!  Its looking verra verra nice!

Ernest

Last Armor Build - 1/35 Dragon M-26A1, 1/35 Emhar Mk.IV Female


Last Aircraft Builds - Hobby Boss 1/72 F4F Wildcat & FW-190A8


  • Member since
    July 2006
  • From: San Francisco Bay Area
Posted by bufflehead on Thursday, February 9, 2012 10:05 PM

macattack80

Thanks for checking in bufflehead. 

The reason for the gloss black paint is the that is the color of the F-14D's flown by the VX-9, which are the markings I will be using.

http://www.airliners.net/photo/USA---Navy/Grumman-F-14D-Tomcat/1171067/&sid=5f367b38db44c39ecac983548dfd44ee

Well, whaddya know......Surprise  I never knew that!  Thanks for the link!  The black F-14 is a very cool looking machine!!

Ernest

Last Armor Build - 1/35 Dragon M-26A1, 1/35 Emhar Mk.IV Female


Last Aircraft Builds - Hobby Boss 1/72 F4F Wildcat & FW-190A8


  • Member since
    April 2005
Posted by Thunderbolt379 on Thursday, February 9, 2012 6:36 PM

Green's on -- Tamiya did a prety good job of matching the lustre, it has the same sheen as the Humbrol enamel I used for the underside. Oddly, the topside grey in both ranges is completely flat.

It doesn't look terribly green here but that's a trick of the light.

I'll be unmasking later, then checking out the touchup situation, hopefully getting to the first clearcoat later as well...

Mike/TB379

http://worldinminiature.blogspot.com/

  • Member since
    March 2010
  • From: Buffalo, NY
Posted by macattack80 on Thursday, February 9, 2012 3:33 PM

Thunderbolt379

http://i301.photobucket.com/albums/nn48/MikeTheModeller/Tamiya%20Meteor/DSCF3743a.jpg

http://i301.photobucket.com/albums/nn48/MikeTheModeller/Tamiya%20Meteor/DSCF3744a.jpg

Looks like you did a great job masking.  Thats what I would have done too.  I can imagine that touch ups are gonna be part of the game when doing this.  Smart move saving the cut masking tape for touch up purposes.  I will have to put that one in the bank. 

Kevin

[


  • Member since
    April 2005
Posted by Thunderbolt379 on Thursday, February 9, 2012 12:47 AM

Hi guys, first progress report on the Tamiya Meteor. It's taken me some days but I've just finished the curvy hard masking, here's the evidence:

I may have been doing it the hard way, but this is my first go at this type of job, so I'm fairly happy with it. Some curves as not as curvy as they should be (post spraying touch-ups in order) and there are places where I missed with the first colour, so they'll get reverse masked (I kept all the negative parts) and rezapped later. Next job -- touch up the preshading, then on with the green (Tamiya XF-82, I decided not to finish the project in enamels as the solvents seem to be giving me persistent headaches, which is not a good thing...) My next forray in this department will be a lot better planned!

Cheers, Mike/TB379

http://worldinminiature.blogspot.com/

  • Member since
    March 2010
  • From: Buffalo, NY
Posted by macattack80 on Wednesday, February 8, 2012 9:07 PM

Thanks for checking in bufflehead. 

The reason for the gloss black paint is the that is the color of the F-14D's flown by the VX-9, which are the markings I will be using.

http://www.airliners.net/photo/USA---Navy/Grumman-F-14D-Tomcat/1171067/&sid=5f367b38db44c39ecac983548dfd44ee

Good time and material management keeping with the OD machines.  Looking forward to seeing your progress.

Kevin

[


  • Member since
    July 2006
  • From: San Francisco Bay Area
Posted by bufflehead on Wednesday, February 8, 2012 8:38 PM

Great looking builds guys!  I'll be getting in here soon.....just need to finish off a couple more builds!

Kevin - Why did you paint the F-14 black after the primer?  Post shading?

BTW, I decided to change my focus from the Coree Pz.IV Ausf.A  to my unfinished Tamiya M4A3.  I'm currently working on a couple of green/olive colored tanks and its just easier to do the M4 since I'll already have all the paints, filters, washes and pigments out for green machines! Propeller  Hopefully you'll see photos in a couple of weeks!

Ernest

Last Armor Build - 1/35 Dragon M-26A1, 1/35 Emhar Mk.IV Female


Last Aircraft Builds - Hobby Boss 1/72 F4F Wildcat & FW-190A8


  • Member since
    April 2005
Posted by Thunderbolt379 on Wednesday, February 8, 2012 4:21 PM

Thanks, Kevin -- I've been finally knuckling down to the job, getting my brain around it, and I think I've come up with a decent technique. Hopefully I'll be posting a pic within 24 hours of the finished masking.

Waynec -- that's looking great, I have a sneaking interest in building a locomotive at some point, it would be a real challenge!

Cheers, Mike

http://worldinminiature.blogspot.com/

  • Member since
    March 2010
  • From: Buffalo, NY
Posted by macattack80 on Wednesday, February 8, 2012 3:30 PM

waynec
may finally be over this cold. at least i got some bench time. got the drive train done. a suggestion to folks building steam locomotives. on my next build i will not add any fiddly stuff until the complete drive train, valve assys and drivers are done. that means no front bumpers, lights, piping under the cab, ladders or anyting on the boiler not necessary. there is a lot of manipulation and handling to get the entire drive assy correct and these fiddly stuff can get broken off. this will go against the instructions so really study them in case needs to added because something else goes over it. may have this ready for track laying and weathering today.the 1/35 should be a lot of fun since the parts are bigger.a lot more airbrushing on that one. may start with the diesel , br-86, br-52 k-5. or i may build ships for a bit. http://i172.photobucket.com/albums/w17/waynec_kits/WIP%20KITS/group%20builds/br-52wipboilerleftside01.jpg

Glad you are feeling better.  Nice updates and thanks for the tips on assembly.  Keep up the good work!

Kevin

[


  • Member since
    March 2010
  • From: Buffalo, NY
Posted by macattack80 on Wednesday, February 8, 2012 3:27 PM

potchip

Case of bitten off more than I can chew, or maybe the appetite didn't last. Started this Dragon 1/72 Ka-50 Hokum 3 years back. In a spur of madness cut open a couple panels (dragon plastic's soft, easy to cut).

http://i1184.photobucket.com/albums/z329/potchippy/ha2.jpg

http://i1184.photobucket.com/albums/z329/potchippy/ha3.jpg

So this is my entry for the shelf queen (more like a hidden box in a cornerish queen). Oh how the sink marks come back to haunt me again...

That detailing you did looks great.  Looking forward to seeing it all painted up. 

Kevin

[


  • Member since
    March 2010
  • From: Buffalo, NY
Posted by macattack80 on Wednesday, February 8, 2012 3:21 PM

Thunderbolt379

Hi Kevin -- could I add a build to the roster? I have Tamiya's 1:48 Gloster Meteor F.3 which has been a shelf queen since the middle of last year, when my Early Jets GB ended, and I've been putting it off for a long time as I couldn't get my head/patience around masking the hard-edge organic camo, but that dam appears to have broken just today. This one looks like a prime candidate for a No More Excuses completion!

Cheers, Mike/TB379

Of course your can Mike.  I will update the roster.  I have yet to tackle a hard edge camo paint job myself for the same reason.....masking.

Kevin

[


  • Member since
    April 2006
  • From: Denver, Colorado
Posted by waynec on Wednesday, February 8, 2012 2:07 PM
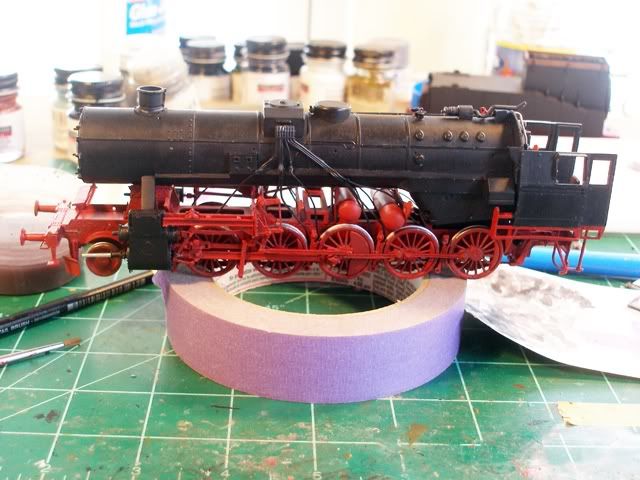
may finally be over this cold. at least i got some bench time. got the drive train done. a suggestion to folks building steam locomotives. on my next build i will not add any fiddly stuff until the complete drive train, valve assys and drivers are done. that means no front bumpers, lights, piping under the cab, ladders or anyting on the boiler not necessary. there is a lot of manipulation and handling to get the entire drive assy correct and these fiddly stuff can get broken off. this will go against the instructions so really study them in case needs to added because something else goes over it. may have this ready for track laying and weathering today.the 1/35 should be a lot of fun since the parts are bigger.a lot more airbrushing on that one. may start with the diesel , br-86, br-52 k-5. or i may build ships for a bit.
Никто не Забыт    (No one is Forgotten)
Ничто не Забыто  (Nothing is Forgotten)


  • Member since
    October 2008
  • From: italy
Posted by bsyamato on Tuesday, February 7, 2012 3:52 AM

good updates here guys Yes

Potchip terrific details on the ka-50 Toast this is what i really like

  • Member since
    September 2010
Posted by potchip on Tuesday, February 7, 2012 3:37 AM

Case of bitten off more than I can chew, or maybe the appetite didn't last. Started this Dragon 1/72 Ka-50 Hokum 3 years back. In a spur of madness cut open a couple panels (dragon plastic's soft, easy to cut).

However it has since been sitting in this state, luckily the masking tape is not shedding glue residual, yet.

So this is my entry for the shelf queen (more like a hidden box in a cornerish queen). Oh how the sink marks come back to haunt me again...

  • Member since
    April 2005
Posted by Thunderbolt379 on Tuesday, February 7, 2012 12:21 AM

Hi Kevin -- could I add a build to the roster? I have Tamiya's 1:48 Gloster Meteor F.3 which has been a shelf queen since the middle of last year, when my Early Jets GB ended, and I've been putting it off for a long time as I couldn't get my head/patience around masking the hard-edge organic camo, but that dam appears to have broken just today. This one looks like a prime candidate for a No More Excuses completion!

Cheers, Mike/TB379

http://worldinminiature.blogspot.com/

  • Member since
    March 2010
  • From: Buffalo, NY
Posted by macattack80 on Monday, February 6, 2012 12:48 AM

waynec
thank you. me too. going to the doctor for my annual physical this week so we shall see. steam locomotives are quite complicated, they are amazing pieces of technology more so than airplanes or ships. will build my own track bed. as a test i spent 5 hours working on the plastic one and it still looks plastic. with my mini miter saw and some ho stuff i can do a much better job. interesting, for judging purposes at NATs the rail bed is considered a base and should not be judged though i doubt many judges could ignore a crappy base. alos have the 1/72 k-5 rr gun ready to paint. another practice piece for the 1/35. haven't decided on the color scheme but leaning toward pz yellow.

I agree with you on the steam locomotives being amazing technology.  They have a nice mechanical look to them.

I also agee with you on the idea of you base for your model.  They may not judge that but if you're gonna put all the time and effort into building a quality model, you may as well give it justice by letting it sit on a nice base.  If it's worth doing, it's worth doing right.  Keep up the good work.

Kevin

[


  • Member since
    April 2006
  • From: Denver, Colorado
Posted by waynec on Saturday, February 4, 2012 9:09 PM
added the drivers and dirtied things up bit. starting to look like a locomotive. looks like all 12 wheels match the rails too. the side view pic looks like the boiler is bent but it isn't.

Никто не Забыт    (No one is Forgotten)
Ничто не Забыто  (Nothing is Forgotten)


  • Member since
    April 2006
  • From: Denver, Colorado
Posted by waynec on Saturday, February 4, 2012 5:48 PM
thank you. me too. going to the doctor for my annual physical this week so we shall see. steam locomotives are quite complicated, they are amazing pieces of technology more so than airplanes or ships. will build my own track bed. as a test i spent 5 hours working on the plastic one and it still looks plastic. with my mini miter saw and some ho stuff i can do a much better job. interesting, for judging purposes at NATs the rail bed is considered a base and should not be judged though i doubt many judges could ignore a crappy base. alos have the 1/72 k-5 rr gun ready to paint. another practice piece for the 1/35. haven't decided on the color scheme but leaning toward pz yellow.

Никто не Забыт    (No one is Forgotten)
Ничто не Забыто  (Nothing is Forgotten)


  • Member since
    March 2010
  • From: Buffalo, NY
Posted by macattack80 on Saturday, February 4, 2012 4:30 PM

Looking good waynec!  Nice fix on the airhoses.  For a practice model this sure looks fantastic.  Hope you get well soon.

Kevin

[


  • Member since
    April 2006
  • From: Denver, Colorado
Posted by waynec on Friday, February 3, 2012 9:46 PM
i've been dealing with a cold too. snowed in today so got some work done on br-52. dropped one of the two air hoses for the tender yesterday and lost it in the rug so i fabricated 2 new ones. broke one of them off this am and, while looking for it, found the lost one from yesterday. this is just practice for the trumpeter 1/35 br-52 i may build for 2013 nats here in colorado.

Никто не Забыт    (No one is Forgotten)
Ничто не Забыто  (Nothing is Forgotten)


  • Member since
    March 2010
  • From: Buffalo, NY
Posted by macattack80 on Thursday, February 2, 2012 3:21 PM

Here are a few progress pics.  One is the model primed with Testor's primer out of the spray can.  It worked pretty good.  Only took a day to dry.  The second is after the gloss black was sprayed on with the airbrush.  I used Model Master gloss black.

Kevin

[


  • Member since
    March 2010
  • From: Buffalo, NY
Posted by macattack80 on Friday, January 27, 2012 3:18 PM

I finally was able to primer the tomcat last night.  The seams and mold lines look a lot better.  I also finished up the burner cans.  I will get some pics taken tonight.

Kevin

[


JOIN OUR COMMUNITY!

Our community is FREE to join. To participate you must either login or register for an account.

SEARCH FORUMS
FREE NEWSLETTER
By signing up you may also receive reader surveys and occasional special offers. We do not sell, rent or trade our email lists. View our Privacy Policy.