SEARCH FINESCALE.COM

Enter keywords or a search phrase below:

Semper Fi War in the Pacific

66567 views
854 replies
1 rating 2 rating 3 rating 4 rating 5 rating
  • Member since
    February 2003
  • From: Allentown, PA
Posted by BaBill212 on Monday, February 13, 2012 7:39 PM

Rob,,,     coming along great!    I like the added dirt - weathering

Tonika,,,   glad to have you with us.........    will be looking forward to your fig build

Enjoy the ride!


  • Member since
    April 2009
  • From: Carmel, IN
Posted by deafpanzer on Monday, February 13, 2012 7:28 PM

Rob- How in the world I missed your post earlier.  I was probably using iPhone or iPad... nice touch with the dirt!!!  Never thought about that... I am so glad you redid the camo! Yes

No worries about NOLA if your schedule is tight... we will be there first week of April.  We plan to visit D-Day museum this time.  Any word where you are going to be relocated? Hope I didn't miss that... remember I lost my mind to sinus infection for two weeks. 

Andy

  • Member since
    March 2006
  • From: Right Side of a Left State
Posted by Shellback on Monday, February 13, 2012 4:40 PM

Rob , interesting what you did to represent the build up of gravel on the top run of track guide .Yes

  • Member since
    October 2009
Posted by PANZERWAFFE on Monday, February 13, 2012 4:19 PM

TONKA - Great to have you, welcome aboardBeer  The figure does sound nice, will make for the first figure build here.  Let me know what you plan and I will add you to the rosterYes

Rob

  • Member since
    April 2009
  • From: Carmel, IN
Posted by deafpanzer on Monday, February 13, 2012 3:16 PM

Tonka- Nice avatar!!!  You are going to make many men here happy.  No, it is not too late for you to join especially that I haven't started mine.  The only thing you have to do is to buy us few Beer first before you can start your build.  Big Smile

120MM figure sounds GREAT!  I am into figures too... 

Andy

  • Member since
    March 2007
  • From: Michigan
Posted by tonka on Monday, February 13, 2012 3:00 PM

Just came across this build.

Is it too late to join??  As you can see by my avatar,, this is my favorite modeling subject...

Have many kits needing built, but will probably pull out a 120MM figure.

Semper Fi!


]

  • Member since
    October 2009
Posted by PANZERWAFFE on Sunday, February 12, 2012 7:25 PM

DEATTILIO - The extinguisher photos will be helpful, ThanksBeer

Did some tone change with chalks and then used different grit and pigment to make some Iwo Jima sand.  Added the sand to the top of the sponsons by mixing 50 / 50 water and white glue with the sand.  Applied with an old paint brush and sealed it with a few coats of dullcoat.

Believe it or not this concoction has a pretty durable finish.  The sides of the sponsons will be weathered in the end, final weathering stage. 

After the sand then put the tracks on permanently.

Closer view of how the sand looks with the tracks.

Now I can get the top of this thing put on and things should become more interesting now.  Finally feel like I'm making some progressYes

Rob

  • Member since
    December 2009
Posted by ww2psycho on Sunday, February 12, 2012 2:50 PM

PANZERWAFFE

BEN - I'm hoping they come out with more LVT's myself.  Even though the one I'm doing is a re box maybe it is a sign that more will come?  There is also the new kit from AFV Club so we will see if it leads to more?  I want 1/35 though.

Ive only ever built 1:48, now Im so used to it Im scared to try anything else. Also the scale seems to be best for the space I have, 1:72 is too small.

  • Member since
    October 2005
  • From: New Port Richey
Semper Fi War in the Pacific
Posted by deattilio on Sunday, February 12, 2012 2:13 PM

PANZERWAFFE,  I have not broken my resin set out of the packaging and it is discouraging to hear that it will not work well.  The LVT4 had its bilge pump discharge from the forward bumper, not sure what the rationale behind the change from previous variants was though.  I scanned the several pages from the TM providing information on the fire extinguisher.  I also scanned and measured the PE gun shield, it measures 1.792 inches between the lowest two points.  I scaled down the measurement for 1/72 and although it looked too large to the Mk1 eyeball, once cut from paper and shaped it looks proper when propped on the kit; another lesson in trust the math not the eyes.  I will take couple pictures and post them later in the day, got some work homework and favors to knock out first.


deafpanzer,  I have also heard bad reviews about the Verlinden sets, once again disturbing since I snagged them up as they became available but, have not used any of them yet.  I have the Eduard, Voyager and E.T. Models sets and all appear as though they will be more user friendly than Verlinden.  The Verlinden stuff looks much thicker than the Eduard, Voyager and E.T. Models sets.


Scan of ET Models PE gun shield:


Information concerning portable fire extinguisher per TM 9-776:


WIP:
Trying to get my hobby stuff sorted - just moved and still unpacking.


"Gator, Green Catskill....Charlie On Time"


  • Member since
    October 2009
Posted by PANZERWAFFE on Sunday, February 12, 2012 12:51 PM

BEN - I'm hoping they come out with more LVT's myself.  Even though the one I'm doing is a re box maybe it is a sign that more will come?  There is also the new kit from AFV Club so we will see if it leads to more?  I want 1/35 though.

CARL - Very nice job with the turretYes  I really like the texture and the way you were able to mold the side shell hatch is beautiful.

DEATTILIO - Both LVT's are looking greatYes  The lower headlights did come out nice.  I plan on working on the headlights for mine today.  It's nice to see the top put on both of the LVT's.  The added armor and the MG ring is also a nice touch.  Question: On the (A)4, top port sponson, is that the bilge pump outlet?  That is on all the armored variants but on the LVT 4 the bilge outlet comes out of the bow "bumper", is that correct?  Those videos do make me feel better now, Thanks!

Thanks also for the scan of the PE sheet.  I had almost ordered that one and I now wish I had.  Instead I got the Trakz LVTA2 detail set and was hoping to use the shields from that.  Will not though, not pleased with the shields at all.  They are way to small in overall size and they will not fit a .50 MG.  They are rather thick also.  May use your scan to see if I can fabricate something?  Here is a pic of the Trakz set:

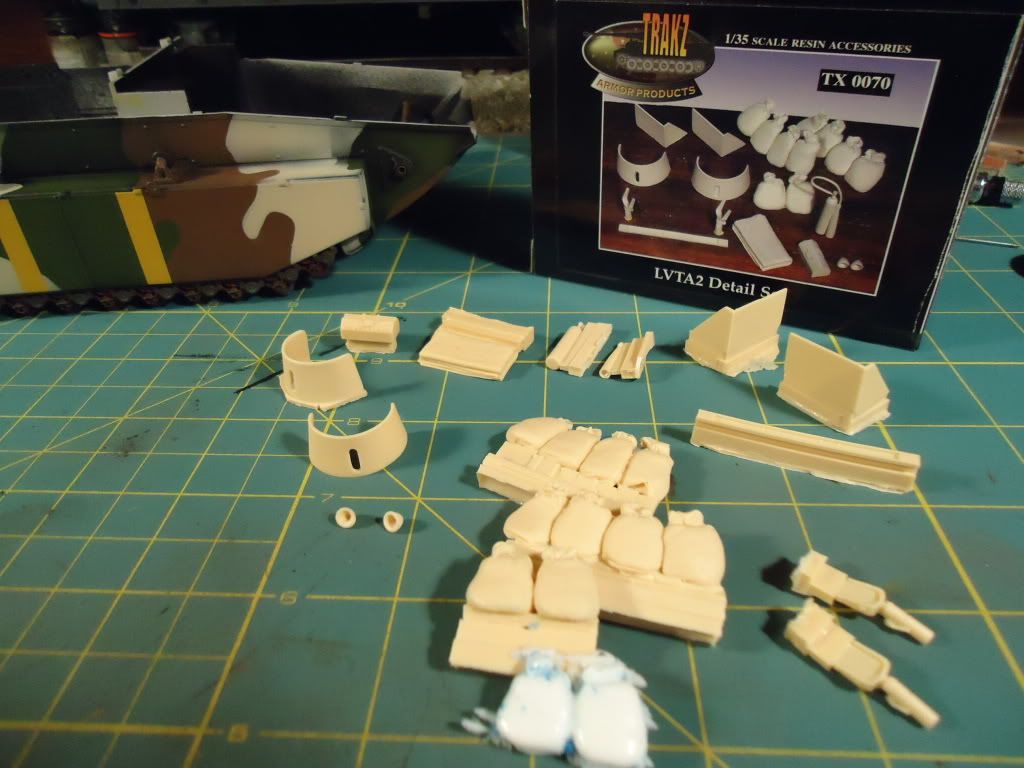
I usually scratch my added details so I may still try to make some shields?  I will use the fire extinguisher and headlights.  Will save the rest and see if the parts will work for the other LVT kits.  Were should the extinguisher be located / mounted?

BILL - Thanks, good to hear you like the paintBig Smile

ANDY - Will look into work schedule and see about a New Orleans trip.  We just went last week which is one reason for my lack of presence here.


The LVT 4 build has been at a snails pace Tongue Tied  This is mainly due to the Fruil tracks and waiting for markings.  The tracks have to be put on before I can attach the top and I wanted to do some weathering before the tracks were in the way.  Before any weathering had wanted to put on the decals on the sponsons but I am still waiting for them.  Will not even use the "A43" anymore because of the painting problems but had also ordered a set of yellow stenciled numbers and letters.  Have now assigned the LVT to Yellow Beach 2 and it wears the two yellow beach bars.  It has been over a week now and I am tired of waiting for the decals so believe I will go ahead and put the tracks on so that I can continue construction.  Will have to weather at the end with the tracks in the way.  I like to have everything weathered normally without the tracks being in the way.

Glad all of you like how she looks now.  It really helps!  This has been the most frustrating model I've ever built!  It's not the kit, it is pretty good.  It's me with all the paint problems, ordering AM that I don't like, and the waiting.   It is frustrating to say the least.  Several times it has come close to being smashed but instead I walked away.  Have never experienced this problem with my other builds but I am determined to get this one too the finish line, no matter what!!!

Rob

  • Member since
    April 2009
  • From: Carmel, IN
Posted by deafpanzer on Sunday, February 12, 2012 9:14 AM

Deattilo- Great process on your LVTs, I have to say that my heart has grown bigger toward to the LVTs.  I almost brought an upgrade set from E.T. Model earlier but I didn't cause I wasn't too sure if they are that good.  How do you rate it against Verlinden sets?  My experience with Verlinden wasn't that great... 

Andy

  • Member since
    March 2006
  • From: Right Side of a Left State
Posted by Shellback on Saturday, February 11, 2012 7:38 PM

Detail , nice work . I just read an account of the assault landing on Peleliu . Imagine traveling in the water under fire  at the speed of  3-5 miles per hour ! Some the LVT's made several round trips from the beach back to the reefs and back under agian the enemy fire .

Thanks  Andy, Bill and Detail .Yes

  • Member since
    October 2005
  • From: New Port Richey
Posted by deattilio on Saturday, February 11, 2012 6:04 PM

I am pleased with how experiment one turned out on the LVTA4 and will apply the same process to the LVT4.  The non-modified LVT4 headlights have a “crab-eye” like appearance.  The LVT4 will be easier as I do not have to worry about sanding away details such as the boat hooks on the LVTA4.
I also affixed the top-deck to the hull on the LVT4 and the gap is readily apparent where I needed to glue a strip of plastic.  Had to add some putty to even out some of the spaces in the cargo area and now I will have to add some details because it looks rather barren.


WIP:
Trying to get my hobby stuff sorted - just moved and still unpacking.


"Gator, Green Catskill....Charlie On Time"


  • Member since
    February 2003
  • From: Allentown, PA
Posted by BaBill212 on Saturday, February 11, 2012 2:27 PM

Rob,,,   it does look better,, very nice indeed

Carl,, I like that turret. You've added some great detail.....

Deat,,,  LVT coming along,,,,   see you are tweaking a bit too...   great job

Enjoy the ride!


  • Member since
    October 2005
  • From: New Port Richey
Semper Fi War in the Pacific
Posted by deattilio on Saturday, February 11, 2012 1:18 PM

PANZERWAFFE,  immensely commendable patience!  I am fairly certain I would have literally punted it through the uprights and started on a new kit had I arrived at the same hurdles.  The camouflage is looking good too.  I found a couple color videos on Critical Past that show LVTs with camouflage and I am willing to bet you will be most pleased at how close your choice of colors matches what is in the video.  Although it is of an LVT3 and LVTA4 on Okinawa I imagine the colors available only a year earlier would not have differed greatly.  I received my PE set this week that may interest you as well, if your project can wait on the delivery from China; additionally at only $15 it is a pretty good deal.  It provides the rounded gun shields and ammo cans that would compliment that LVT.  I purchased it purely to scan and scale-down the gun shields for my 1/72 LVT4.  I scanned the instructions for you to peruse.

Shellback
,  the turret is looking good, will be impressive with some paint and weathering.

I managed some time at the hobby desk during the week and made a little more progress on both the LVT4 for this GB and a little work on one of my LVTA4s.  I am nearing completion of the hatch on the LVT4 and am experimenting on the LVTA4 for a process to apply to the LVT4.  The headlight guards are too tall on the kit so, I have fixed one but for experiment one will saw it off, thin the sides and height of the guard and then reattach to the top deck.  For experiment two, I will attempt to remove the headlight and replace the guard with a thin strip of plastic.

ET Models 1/35 PE for LVT4:


Progress on my LVT4:


Progress on my Iwo LVTA4:


LVT videos:

http://www.criticalpast.com/video/65675052850_United-States-Marines_L-Day-landings_burial-vaults_Japanese-caves

http://www.criticalpast.com/video/65675052910_22nd-Marines-1st-and-2nd-Battalion_vehicles-stuck-in-mud_advance-in-Naha


WIP:
Trying to get my hobby stuff sorted - just moved and still unpacking.


"Gator, Green Catskill....Charlie On Time"


  • Member since
    April 2009
  • From: Carmel, IN
Posted by deafpanzer on Friday, February 10, 2012 11:56 PM

Rob- WOW!  The camo looks MUCH better now.  Often second attempt comes out better.  Remember my Pz IV... had to redo the camo and I was so happy I did.  

Looks like we are coming to New Orleans for our spring break in April.  You in mood for couple of hand grenade drinks on Bourbon Street? Stick out tongue

Carl- You had a very productive day working on the turret.  It looks GREAT!  Hope you were wearing mask when you sanded that... Ick!

Andy

  • Member since
    March 2006
  • From: Right Side of a Left State
Posted by Shellback on Friday, February 10, 2012 11:44 PM

I've been gawging with my dremel , puttying , sanding , gawging with a # 7 hobby knife, puttying  ...............on the stock Tamiya turret and here is what its been thru .

I never noticed this b4 but the side hatch opening has  raised castings for the opening all around it so i built that up with putty .

I noticed that some turrets had a step in the back of the bustle from an offset in the molds . I used stretched sprue for the lip edge and puttied below it .

According to my research there should be a "chin" on the starboard side . It was there for added protection due to thinning of the inner wall to allow for installation of a fire protction system .

I added some putty on top to indicate more casting marks .

I also gawged the plastic and coated it with lacquer thinner to disolve sharp edges .  I added some putty to the back of the bustle .

With paint on it the detail really stands out now  .


  • Member since
    March 2006
  • From: Right Side of a Left State
Posted by Shellback on Friday, February 10, 2012 11:22 PM

Rob , i do like this camo .  Man that was a lot of sanding and changing of the camo and colors . Glad you were able to get to this point . Is there going to a color stripe on this one also ?

  • Member since
    December 2009
Posted by ww2psycho on Friday, February 10, 2012 11:15 PM

I hope they come out with one of those LVTs in 1:48 sometime.

Just got done painting the black camo on the sherman, I'll probably have pictures up tomorrow.

  • Member since
    October 2009
Posted by PANZERWAFFE on Friday, February 10, 2012 8:54 PM

Hey all, remember me?

BILL - Really nice workYes  Radio just looks great and the wiring to go with it is very well done.  The texture on the seats came out great also.  Frame for the top must have been tedious, Nice all around Beer

CARL - Good job getting the gun in.  Believe it will add just the right amount of interior with a figure in there too.

Thanks for doing those color comparisons with the LVT.

Alright, the hull has went through a few changes sense the last post.  Had tried cleaning up what I had had but decided that I just did not like it.  So sanded everything down and re-primed with flat black.  Was so frustrated with the camo decided to paint it a blueish gray.  Even though it does not show well in this picture the color was perfect and I really liked it.

Played around with a dark yellowish sand color and was going to camouflage it and re-assign the LVT to the 2nd Amphibian Battalion on Tinian.  Was not able to do this because I had already dated the model to a later version with the side armor on the pontoons because of this I once again sanded and re-primed and went back to work on the camo.  I changed the brown color and the pattern.  She now looks like this.

Carl that is a sand color but it is a very light one.  It is not quite as white as it appears in the pictures and has a slight tan tint to it.  Theres no way to tell but looking at pictures I'm convinced it was a really light color.  Anyway will see how this works with the weathering.

The ramp was started and this is were I will be picking back up to continue.  The inner plate is only dry fit, added weld bead and started to make the tiny pulleys.  These will connect to the ramp in the recessed triangle areas.

Thats it for now and I hope not to be so long checking in from now on.  It's finally the weekend so plan to get some building doneYes

Rob

  • Member since
    March 2006
  • From: Right Side of a Left State
Posted by Shellback on Thursday, February 9, 2012 1:28 PM

Andy , nothing to drinkBeer last night but i was tired . Sleep There is some nice texture on the turret already and thats what you see in that picture . I am adding to the texture though . Trying to not overdo it . Pictures soon Thanks for the comment .Yes

  • Member since
    April 2009
  • From: Carmel, IN
Posted by deafpanzer on Thursday, February 9, 2012 12:41 PM

Carl-  I am seeing double posts... how many Beer did you have last night? Big Smile  Nice work!!!  Am I seeing some kind of texture on the turret surface?  

Andy

  • Member since
    March 2006
  • From: Right Side of a Left State
Posted by Shellback on Thursday, February 9, 2012 12:16 PM

Thanks Bill . Yes , i agree with adding the figure . At least this one will be from the waist up only ...............Yes

  • Member since
    February 2003
  • From: Allentown, PA
Posted by BaBill212 on Thursday, February 9, 2012 11:11 AM

Very nice Carl....   if you add a fig you won't have to worry much about a lot of interior detail showing,,,  good plan!

Enjoy the ride!


  • Member since
    March 2006
  • From: Right Side of a Left State
Posted by Shellback on Wednesday, February 8, 2012 9:21 PM

I thought the first post didnt make it so reposted .Whistling

  • Member since
    March 2006
  • From: Right Side of a Left State
Posted by Shellback on Wednesday, February 8, 2012 9:19 PM

Hey guys i want the tank commanders hatch to be open (maybe a figure in it ?) There is no gun detail inside the turret of the Tamiya kit but there is on the Testors kit . I dont want to use the Testores turret so i grafted the Testors gun onto the Tamiya gun .

  • Member since
    March 2006
  • From: Right Side of a Left State
Posted by Shellback on Wednesday, February 8, 2012 9:13 PM

Hey guys I'm going to have the tank commanders hatch open (maybe a figure in it ?) so i wanted some detail of the gun to be seen . The Tamiya kit has nothing for that so i used the gun detail from the Testors kit . Its basic but Not much of it will be seen so i'm not adding any scratch detail .


  • Member since
    February 2003
  • From: Allentown, PA
Posted by BaBill212 on Wednesday, February 8, 2012 8:47 PM

You gentlemen are very kind, ,thank you...    I am happy with the radio as well.....  A Verlinden piece...  excellent resin molding,,, which makes things easier for sure,,,   especially for me.

Yeah, Carl, the decals went down very nicely...    I used the same sheet but different numbers from your gem....  and those damn rails,,    they were real buggers.     I may add a few sachels hanging over in specific spots....  just to camoflage the connecting points a little better.

Again,,  much thanks for the kind words

Enjoy the ride!


  • Member since
    March 2006
  • From: Right Side of a Left State
Posted by Shellback on Wednesday, February 8, 2012 8:37 PM

Oh man that was enjoyable to look at Bill Yes SWEET !!!! The radio really adds a lot of interest . Nice radio and the wiring is cool . I see your decals went on well . The rails for the top turned out perfect . I didnt even want to attempt fixing them on mine .I'm liking how this is turning out Bill YesYesYes

  • Member since
    April 2009
  • From: Carmel, IN
Posted by deafpanzer on Wednesday, February 8, 2012 8:30 PM

Bill- Your jeep looks great... so much has been done since the last update.  I like your plan using the radio!  Yes

Andy

JOIN OUR COMMUNITY!

Our community is FREE to join. To participate you must either login or register for an account.

SEARCH FORUMS
FREE NEWSLETTER
By signing up you may also receive reader surveys and occasional special offers. We do not sell, rent or trade our email lists. View our Privacy Policy.