SEARCH FINESCALE.COM

Enter keywords or a search phrase below:

First Annual Berny Memorial Group Build

225104 views
3649 replies
1 rating 2 rating 3 rating 4 rating 5 rating
  • Member since
    November 2010
  • From: Lafayette, Indiana
Posted by Son Of Medicine Man on Sunday, June 3, 2012 5:55 PM

Hey thanks Rich for the kudos, I really appreciate it.  One thing though, I need to start picking up the pace or I will never get all these models done that I have in my stash.  I do not want any unfinished kits left for whom ever when I am dead and gone.  I have already decided that the next one will be straight out-of-the-box.  It would be different if there was someone to leave them to, but no one in my family has any desire to take up this hobby besides me.

SoMM (the other Ken)

  • Member since
    August 2009
  • From: Toledo Area OH
Posted by Sparrowhyperion on Sunday, June 3, 2012 5:10 PM

Ken.  I wish that I had the patience and manual dexterity to do that kind of work.  The loops look great.   Seriously.  You could probably make a fortune selling them on eBay to Klutzes like me. 

Oh I discovered something by accident today that I never knew.  I got some white Tamyia putty on my hands and a small spot on the Sabre fuselage when I was filling in the wing joins.  I accidentally spilled a bit of CA de-bonder while I was refilling my little sprayer from the big bottle.  It took the dried putty clean off...  No more scrubbing my hands raw to get putty off... lol   I wish I had learned that 40 years ago, I might not have had to toss so many experiments when I was just learning.

Scorpio..

Thanks.  I have an unused Academy Corsair I am pretty sure is the correct version.  I'll PM my address.


Rich


Scorpiomikey

Nice work on that sabre.

Cheers for the help guys.

Sparrow. I have a spare set of decals (The ventura set came with 2) for a dark blue F4U-1D called "Tutai Wera" Which loosely translates to "Sh** Hot" The only thing missing is the NZ on he front of the serial numbers, i stuffed mine up twice and had to pinch them lol. If you want them PM me and ill send them off.

In the Hangar: 1/48 Hobby Boss F/A-18D RAAF Hornet,

On the Tarmac:  F4U-1D RNZAF Corsair 1/48 Scale.

  • Member since
    March 2010
  • From: New Zealand
Posted by Scorpiomikey on Sunday, June 3, 2012 4:24 PM

Nice work on that sabre.

Cheers for the help guys.

Sparrow. I have a spare set of decals (The ventura set came with 2) for a dark blue F4U-1D called "Tutai Wera" Which loosely translates to "Sh** Hot" The only thing missing is the NZ on he front of the serial numbers, i stuffed mine up twice and had to pinch them lol. If you want them PM me and ill send them off.

"I am a leaf on the wind, watch how i soar"

Recite the litanies, fire up the Gellar field, a poo storm is coming Hmm 

My signature

Check out my blog here.

  • Member since
    November 2010
  • From: Lafayette, Indiana
Posted by Son Of Medicine Man on Sunday, June 3, 2012 4:19 PM

Nice work there Rich.  Once again you are working at warp speed.  That Sabre will be completed in a matter of days.

I have come with an idea on how to attach the ejection seat handles.  I will use the photo-etch, bend it over the wire that I made.  I don't know if it will work but I think it might.  The first step was to glue the wire to the photo-etch so that it will stay in place as I bend the photo-etch over it.  I will have to let it dry over night before I try bending the photo-etch.  Here is picture with one photo-etch piece right side up to show what it looks like on the other side of the one that has the wire glued to it.


I will use the loops to get the position and length for the wire, then I will cut them off leaving the wire in their place.

SoMM (the other Ken)

  • Member since
    August 2009
  • From: Toledo Area OH
Posted by Sparrowhyperion on Sunday, June 3, 2012 11:04 AM

Thanks.

I just Googled New Zealand F4U and selected images and filter to large images to make sure I got the ones with the most visible detail.

I have some WIP Images of the Academy Sabre.  It's moving right along.  I have the horizontal stabilizers/elevators drying now as well to a small part on the tail that didn't go together right that I had to re-glue.  Here they are...
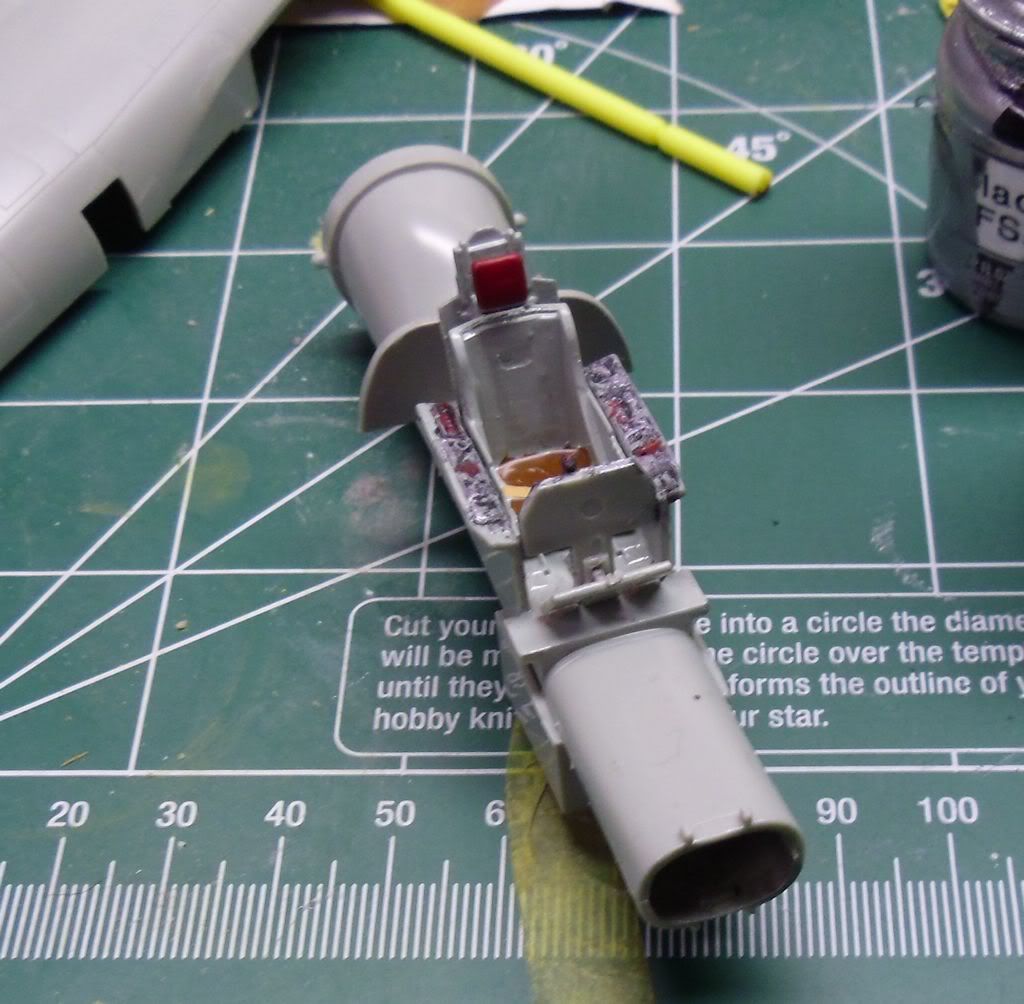
Here is the completed cockpit as seen from the front.  I still had a bit of touch up to do when this was taken.
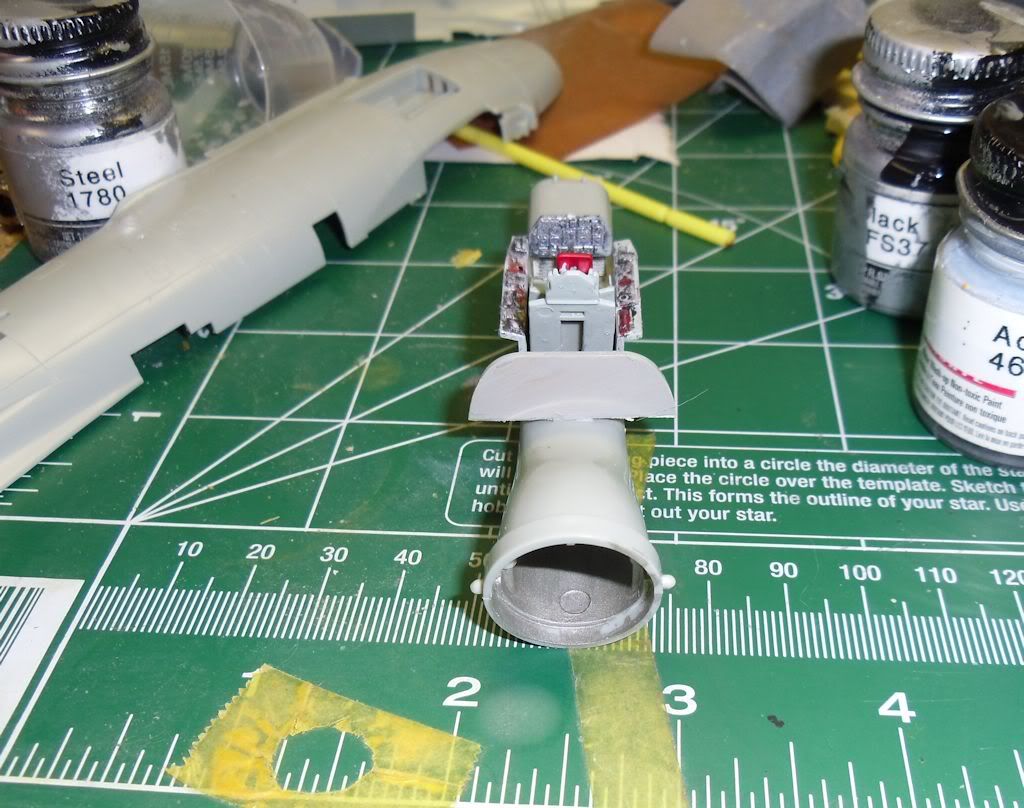
Here is a view from the back showing the instrument panel.

Both fuselage halves with the cockpit/intake module dry fitted to show placement.  I don't know why I bothered to paint the inside parts since I am leaving the fuselage as one piece..  I guess I was bored.. lol
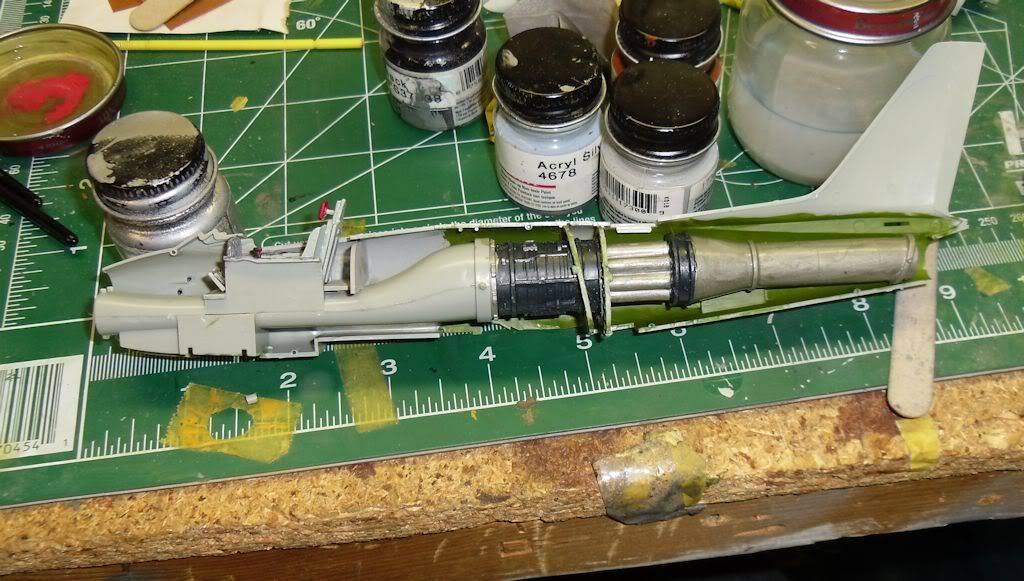
Here is the stbd. fuselage half with the cockpit installed as well as the engine.  Again, I don't know why I painted the engine, since it won't be visible.  Boredom again I guess.
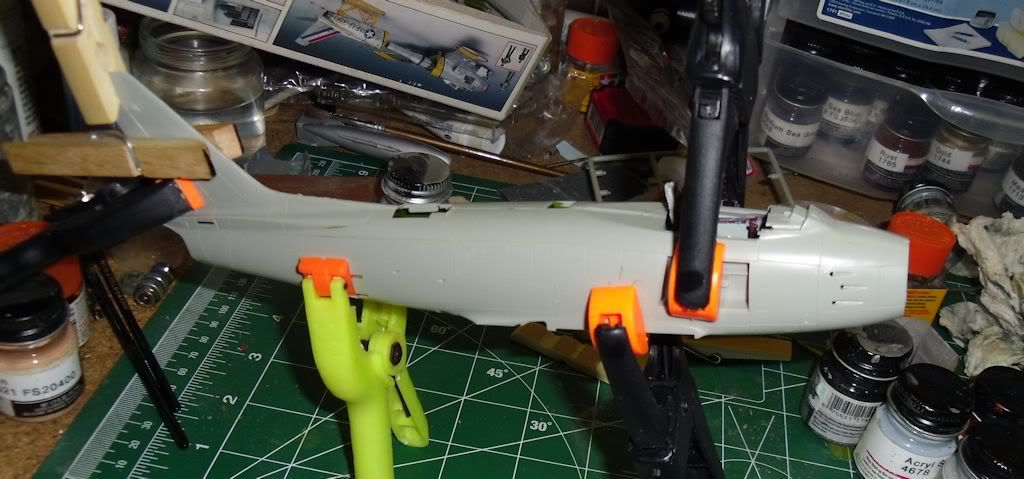
Here is the assembled main fuselage, all clamped up to dry.  I had to do some sanding when it dried.  The seam was too visible and would have looked horrid with the Alclad I am going to use.
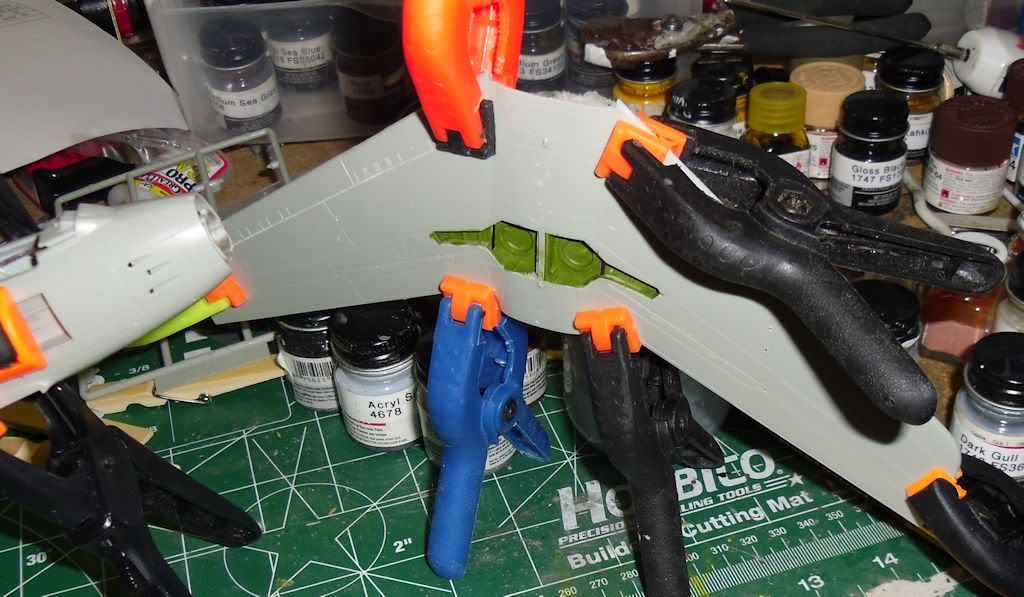
Here is the assembled wing module.  It should be ready to be installed tonight.  And yes, I plan on touching up the interior green.
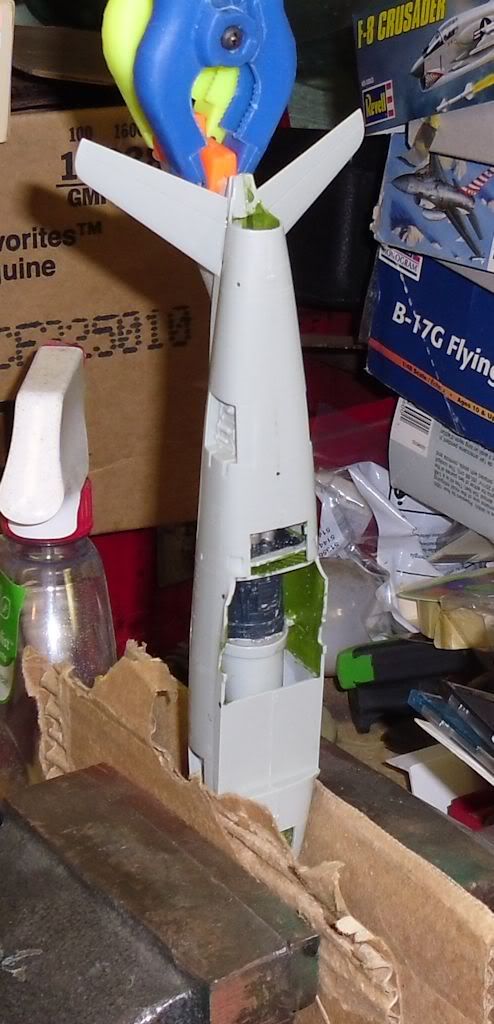
The elevators/horizontal stabs are now drying.  Yes I realigned that misaligned  frame support

That's it for the current images.  I am going to try and do the bird wheels down and clean.  Only fuel tanks (I haven't decided which ones to use yet.)  No bombs or missile pods.  I'm doing her as the dogfighter she was designed to be.  I will be using Alclad Airframe Aluminum for the main finish.  I am a bit concerned about masking with Alclad.  I know that sometimes MM Metalizer will pull up with the masking tape or gel.  I hope the Alclad isn't so touchy.  This is my first time trying it, so hopefully it will work out.

Rich

Son Of Medicine Man

Good job Rich!  That looks pretty definitive to me!

In the Hangar: 1/48 Hobby Boss F/A-18D RAAF Hornet,

On the Tarmac:  F4U-1D RNZAF Corsair 1/48 Scale.

  • Member since
    November 2010
  • From: Lafayette, Indiana
Posted by Son Of Medicine Man on Sunday, June 3, 2012 10:09 AM

Good job Rich!  That looks pretty definitive to me!

  • Member since
    August 2009
  • From: Toledo Area OH
Posted by Sparrowhyperion on Sunday, June 3, 2012 10:02 AM

Here are a couple I found.

First off here is a photo where you can see it sort of.

Now these which show a Corsair with and without the tail hook.  They are both aircraft from New Zealand.

No tail hook on this one.

And one with the tail hook. 


I wish I had a set of these decals.  They look kind of cool.  I could probably design my own though.

Rich


Son Of Medicine Man

Hi Rich,

Did you find photographs of that?  I tried and could not.  If you did, could you provide a link?

SoMM (the other Ken)

In the Hangar: 1/48 Hobby Boss F/A-18D RAAF Hornet,

On the Tarmac:  F4U-1D RNZAF Corsair 1/48 Scale.

  • Member since
    November 2010
  • From: Lafayette, Indiana
Posted by Son Of Medicine Man on Sunday, June 3, 2012 9:27 AM

Hi Rich,

Did you find photographs of that?  I tried and could not.  If you did, could you provide a link?

SoMM (the other Ken)

  • Member since
    August 2009
  • From: Toledo Area OH
Posted by Sparrowhyperion on Sunday, June 3, 2012 9:19 AM

It looks like it's been removed to me.  Normally the end of the hook would be in that empty area just in back of the tail wheel doors.

Rich


Scorpiomikey

Cheers SoMM. Ill keep that in mind.

This is a photo of the real aircraft of what im building. Does it look like the tail hook is missing?

http://static.rcgroups.net/forums/attachments/4/1/0/2/7/a3802958-17-NZ%205255.jpg?d=1297719240

I know some RNZAF corsairs had it removed because it caused wheel jams when it was left up all the time. But i just want to double check before i put lots of work into something that was never there.

In the Hangar: 1/48 Hobby Boss F/A-18D RAAF Hornet,

On the Tarmac:  F4U-1D RNZAF Corsair 1/48 Scale.

  • Member since
    November 2010
  • From: Lafayette, Indiana
Posted by Son Of Medicine Man on Sunday, June 3, 2012 8:48 AM

Hi Mikey,

I sure cannont tell.  I tried to find some pictures to use as a reference but could not tell for sure.  But I did find one website that does have a picture of a Corsair where in its "restored" life time it had the markings like yours and had the tail hook removed.  Here is the link:

http://www.ratomodeling.com/references/f4u_bu17995/ 

SoMM (the other Ken)

  • Member since
    March 2010
  • From: New Zealand
Posted by Scorpiomikey on Saturday, June 2, 2012 11:34 PM

Cheers SoMM. Ill keep that in mind.

This is a photo of the real aircraft of what im building. Does it look like the tail hook is missing?

I know some RNZAF corsairs had it removed because it caused wheel jams when it was left up all the time. But i just want to double check before i put lots of work into something that was never there.

"I am a leaf on the wind, watch how i soar"

Recite the litanies, fire up the Gellar field, a poo storm is coming Hmm 

My signature

Check out my blog here.

  • Member since
    November 2010
  • From: Lafayette, Indiana
Posted by Son Of Medicine Man on Saturday, June 2, 2012 4:51 PM

What I found from my previous attempts was that I had to start off with a much smaller diameter wire since the addition of paint and tape added to the finished diameter.

  • Member since
    November 2010
  • From: Lafayette, Indiana
Posted by Son Of Medicine Man on Saturday, June 2, 2012 4:47 PM

The wire I used was from a stash that was left over from various odd jobs.  I think it was about 16 gauge stranded.  I stripped the insulation off and took out one of the strands.

  • Member since
    March 2010
  • From: New Zealand
Posted by Scorpiomikey on Saturday, June 2, 2012 4:32 PM

Finding the copper wire might be the hard part. Where did you get yours from?


Discovered some music that gets me motivated for modelling. Didnt even realise i liked dubstep till now.


"I am a leaf on the wind, watch how i soar"

Recite the litanies, fire up the Gellar field, a poo storm is coming Hmm 

My signature

Check out my blog here.

  • Member since
    November 2010
  • From: Lafayette, Indiana
Posted by Son Of Medicine Man on Saturday, June 2, 2012 4:25 PM

Scorpiomikey

Cheers Sparrow, you dont often see RNZAF markings, although there is one flying around the US with them on i beleive. Could be the UK.

SoMM hot damn that looks good. I might have to use that technique (or buy some off you lol) when i do my intruders.

Hey thanks Mikey!  I am sure you can master it.  It just takes patience, take it slow, don't stretch the tape too much or it will break.

  • Member since
    March 2010
  • From: New Zealand
Posted by Scorpiomikey on Saturday, June 2, 2012 3:46 PM

Cheers Sparrow, you dont often see RNZAF markings, although there is one flying around the US with them on i beleive. Could be the UK.

SoMM hot damn that looks good. I might have to use that technique (or buy some off you lol) when i do my intruders.

"I am a leaf on the wind, watch how i soar"

Recite the litanies, fire up the Gellar field, a poo storm is coming Hmm 

My signature

Check out my blog here.

  • Member since
    November 2010
  • From: Lafayette, Indiana
Posted by Son Of Medicine Man on Saturday, June 2, 2012 2:36 PM

Greetings everyone,

Okay so maybe the fourth time is the "charm".  Big Smile 

I used copper wire this time and I am very happy with the results.  I would have to say that I am getting very good at this procedure.  I took some more pictures of the process that may help show how I am doing this.  Since the copper wire is very thin it is very pliable.  To help keep tension on the wire while I am twisting it to wrap the tape around it, I use a clamp on each end.  Here is a picture to show what I mean:


As you can see, the tape is cut very thin length wise using the straight edge ruler as I have described before.  While I am twisting the wire and wrapping the tape around the wire, it also pulls on the tape which is stretched to make it even thinner.  Here is a closer look:


And finally, the finished product:


Since it is copper, the wire is very pliable, which will make it much easier to shape it into the loops for the ejection seat handles.

SoMM (the other Ken) Smile

  • Member since
    August 2009
  • From: Toledo Area OH
Posted by Sparrowhyperion on Saturday, June 2, 2012 8:51 AM

She really looks great.  I have never seen markings like those before.  Makes her stand out in the crowd.


Rich


Scorpiomikey

Thanks for the feedback guys.

Heres another shot with markings on. Shes almost done.

Still need to weather the front cowl. Few more decals to go. 

http://i927.photobucket.com/albums/ad113/scorpiomikey/IMG_0234.jpg

Its amazing what the prospect of a 3 day weekend and a lack of computer games will do for a guys motivation lol.

In the Hangar: 1/48 Hobby Boss F/A-18D RAAF Hornet,

On the Tarmac:  F4U-1D RNZAF Corsair 1/48 Scale.

  • Member since
    March 2010
  • From: New Zealand
Posted by Scorpiomikey on Saturday, June 2, 2012 2:20 AM

Cheers. Ive reached the nearly finished but not sure what to do next in case i break something stage lol.

"I am a leaf on the wind, watch how i soar"

Recite the litanies, fire up the Gellar field, a poo storm is coming Hmm 

My signature

Check out my blog here.

  • Member since
    February 2010
  • From: Ontario, Canada
Posted by Bockscar on Saturday, June 2, 2012 1:06 AM

So true.

Odd times indeed.

Nice build, Mikey.

  • Member since
    March 2010
  • From: New Zealand
Posted by Scorpiomikey on Saturday, June 2, 2012 12:57 AM

That was it. I knew it was something odd.

"I am a leaf on the wind, watch how i soar"

Recite the litanies, fire up the Gellar field, a poo storm is coming Hmm 

My signature

Check out my blog here.

  • Member since
    February 2010
  • From: Ontario, Canada
Posted by Bockscar on Saturday, June 2, 2012 12:14 AM

On a restricted piece of real estate, there's another source of liquid that would definitely increase the staining.

"Recite the litanies, fire up the Gellar field, a pee wash is coming"

  • Member since
    March 2010
  • From: New Zealand
Posted by Scorpiomikey on Saturday, June 2, 2012 12:04 AM

Ive heard stories that whatever they washed them with made the staining worse, I want to say seawater, but that doesnt sound right to me.

Oh, i should also mention, this aircraft was based at Bouganville.

"I am a leaf on the wind, watch how i soar"

Recite the litanies, fire up the Gellar field, a poo storm is coming Hmm 

My signature

Check out my blog here.

  • Member since
    February 2010
  • From: Ontario, Canada
Posted by Bockscar on Friday, June 1, 2012 11:50 PM

VooDoo;

How much dust stuck to an aircraft's surface had as many factors as Rich's challenge with paint variables.

Older paint, on surviving aircraft, tends to go dull,  or 'flat', and it naturally picks up more ambient dust, on a coral attol, that means calcium carbonate. i.e., a newer aircraft isn't going to attract or accumulate more dust.

My guess is the guys didn't waste drinking water washing off aircraft on those island landing strips.

maybe Gilligan did.

  • Member since
    November 2009
  • From: SW Virginia
Posted by Gamera on Friday, June 1, 2012 11:41 PM

Mike, she looks really good to me Yes

"I dream in fire but work in clay." -Arthur Machen


  • Member since
    November 2010
  • From: Lafayette, Indiana
Posted by Son Of Medicine Man on Friday, June 1, 2012 11:19 PM

Bockscar

Crushed coral is just a refined form of calcium carbonate, a fine ultra powder in white makes a nice dust finish.

Thank you Dom for answering my question.  That makes sense now.

  • Member since
    February 2010
  • From: Ontario, Canada
Posted by Bockscar on Friday, June 1, 2012 11:14 PM

Crushed coral is just a refined form of calcium carbonate, a fine ultra powder in white makes a nice dust finish.

  • Member since
    November 2010
  • From: Lafayette, Indiana
Posted by Son Of Medicine Man on Friday, June 1, 2012 10:59 PM

Looks really fine Mikey!  Yes  Yes

SoMM (the other Ken)

  • Member since
    March 2010
  • From: New Zealand
Posted by Scorpiomikey on Friday, June 1, 2012 10:53 PM

Thanks for the feedback guys.

Heres another shot with markings on. Shes almost done.

Still need to weather the front cowl. Few more decals to go. 

Its amazing what the prospect of a 3 day weekend and a lack of computer games will do for a guys motivation lol.

"I am a leaf on the wind, watch how i soar"

Recite the litanies, fire up the Gellar field, a poo storm is coming Hmm 

My signature

Check out my blog here.

  • Member since
    March 2010
  • From: New Zealand
Posted by Scorpiomikey on Friday, June 1, 2012 7:31 PM

Heres another shot with the front cowl on. I havent done that yet. Just the main body.

"I am a leaf on the wind, watch how i soar"

Recite the litanies, fire up the Gellar field, a poo storm is coming Hmm 

My signature

Check out my blog here.

JOIN OUR COMMUNITY!

Our community is FREE to join. To participate you must either login or register for an account.

SEARCH FORUMS
FREE NEWSLETTER
By signing up you may also receive reader surveys and occasional special offers. We do not sell, rent or trade our email lists. View our Privacy Policy.