SEARCH FINESCALE.COM

Enter keywords or a search phrase below:

The Official 1943 70th Anniversary Group Build

89083 views
650 replies
1 rating 2 rating 3 rating 4 rating 5 rating
  • Member since
    September 2003
  • From: AandF in the Badger State
Posted by checkmateking02 on Saturday, March 30, 2013 1:37 PM

Final painting of the Kingfishers for Alabama. 

After the interior green paint, I applied white to the undersurfaces (actually it was ModelMaster Camouflage Gray).  When it had dried a day, I pushed the planes and floats into a patch of poster tack for masking. 

The bottle caps help 1:1 hands hang on to 1:700 planes.

Then I decided to apply the sea blue first, even though it's the darkest color.  It seemed that this would make the making easier.  It was still a handful.

Last, I masked the sea blue for putting on the intermediate blue.  The main floats are kind of hidden under the big globs of ticky-tak.  It's not pretty to look at.  After I got done with poster-tack masking, I got some Silly Putty, and will try that next time, instead of the poster-tack.  It's kind of hard to achieve much precision with this method of masking, so I'm hoping the Silly Putty will work better.  I still have a lot of 1/700 planes to do for aircraft carriers.


Currently I'm finishing up decaling, and should get the final flat coat on this weekend, yet--if I don't have to spend too much time hunting for Easter eggs.

Thanks for lookin'.


  • Member since
    September 2003
  • From: AandF in the Badger State
Posted by checkmateking02 on Friday, March 29, 2013 11:25 PM

Moving it right along, there, Ken!  Nice to see a Gabreski plane in an early scheme.


  • Member since
    October 2009
  • From: Oil City, PA
Posted by greentracker98 on Friday, March 29, 2013 12:55 PM

Here are the latest Pics of Major Gabreski's Jug. I did some weathering last night with charcoal

A.K.A. Ken                Making Modeling Great Again

  • Member since
    September 2003
  • From: AandF in the Badger State
Posted by checkmateking02 on Thursday, March 28, 2013 9:23 PM

Thanks, Jack.  Then I guess I'm safe for 1943.


  • Member since
    April 2006
  • From: ON, Canada
Posted by jgeratic on Thursday, March 28, 2013 5:49 PM

Great work everyone.  I've still have a couple GB's to finish before properly joining here.

One might have to look up individual refits on  BB's to see if aircraft were ever deleted.  I know a long ways back I had built the New Jersey, but it must of been a modern version as it had two helicopters on the rear deck.

CMking02 - looks great, and I think you are safe with the Kingfishers for 1943.  A Wikipedia entry still has them aboard in Dec. of 1944 when they were badly damaged beyond use during a rough storm.  

regards,

Jack

  • Member since
    September 2003
  • From: AandF in the Badger State
Posted by checkmateking02 on Thursday, March 28, 2013 4:44 PM

Eric:

here's the photo I used for the Kingfishers on USS Wisconsin.  The caption said it was one of Wisky's planes picking up a pilot from Shangri-La.  The fella in the back (presumably the pilot) looks a bit disheveled.


  • Member since
    February 2010
  • From: Berkeley CA/St. Paul MN
Posted by EBergerud on Thursday, March 28, 2013 4:14 PM

That's interesting trivia. Just checked a picture of Missouri going through the Panama Canal (barely) in October 1945 and I can't see aircraft. As the fast BBs were primarily used as flak platforms for CVs I could see them not wanting to launch and recover float planes during operations. That said, I know the O2SU was widely used for air-sea rescue so someone was using them.  Anyone know?

Eric


A model boat is much cheaper than a real one and won't sink with you in it.

  • Member since
    September 2003
  • From: AandF in the Badger State
Posted by checkmateking02 on Thursday, March 28, 2013 2:41 PM

I've been working on the O2SU Kingfishers that will sit on the catapults of Alabama.  For such little things, they take a whole lot of attention.

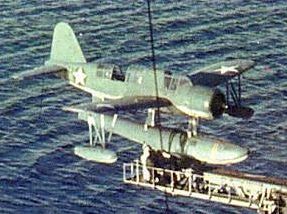
First, here's what I was trying to achieve.  The photo show a Kingfisher being loaded on Alabama in January, 1943--when she was assigned to the Atlantic.  I couldn't find any photos of her floatplanes in later '43 when she moved to the Pacific, so I decided to go with this scheme, changing the national insignia to the star-and-bar that was current at that point in the war.  The absence of photos with Kingfishers, in the PTO, makes me wonder if Alabama even carried them at that point, but they look sharp on a model.
 

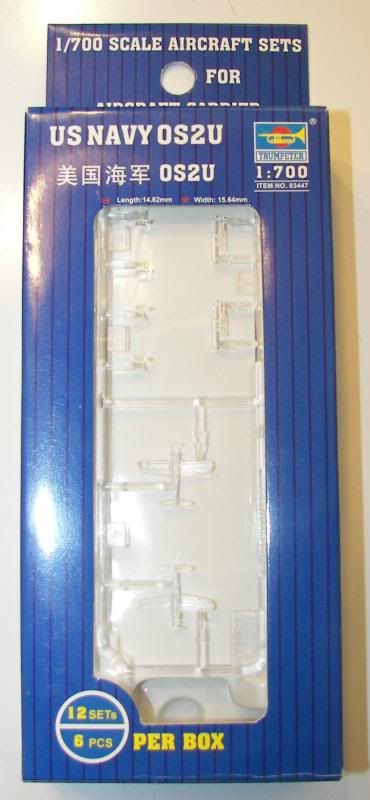
Since I didn't care for the kit-included planes, I am using Trumpeter's Kingfishers.  I used them last year for the USS Wisconsin (Force of Nature GB), so I had some familiarity with the construction.  Everything is molded in clear plastic, so the canopies end up transparent.  But that makes the plastic fragile.  I snapped one of the horizontal stabilizers during painting, but was able to glue it back in place.
 

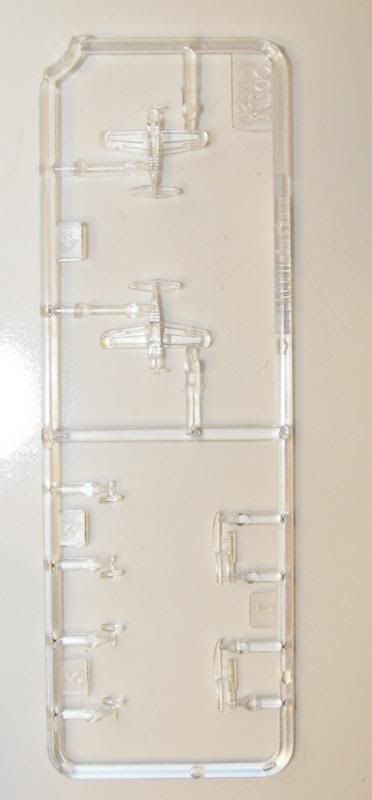
Here's a sprue shot with the pieces still attached.  There are four pieces to each plane:  the fuselage/wings; the main float; two smaller floats, one for each wing.  Detail is pretty remarkable for such tiny planes--engraved lines and even the cockpit framing.
 

The one-cent piece gives some perspective on the size of these little gems.


I masked the cockpit areas with masking tape strips and MicroMask to fill in.  The tape strips were about 1/2 a millimeter wide.  They weren't too hard to put on, but it takes an Optivisor to do it.

Then I painted it with Interior Green, since it really is actually possible to see the interior color, through the clear cockpit "glass" when everything is done.
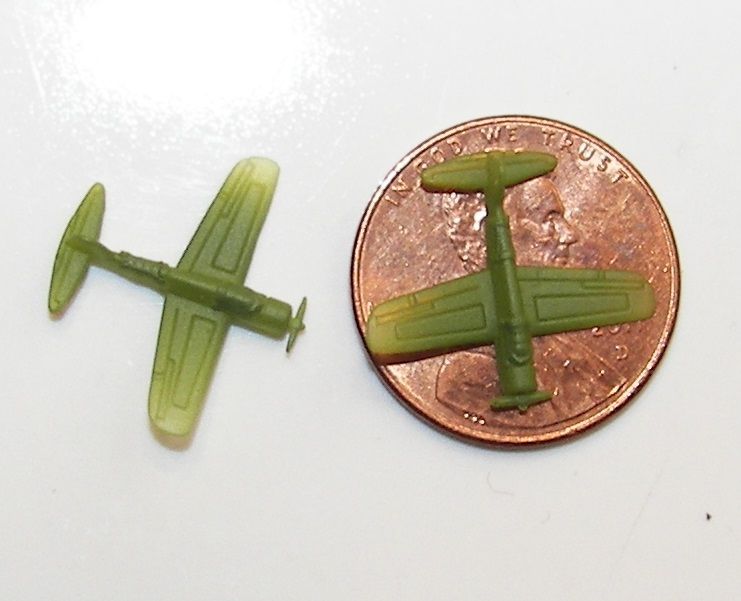
 

Enough for now. 

Thanks for lookin'.Indifferent


  • Member since
    September 2003
  • From: AandF in the Badger State
Posted by checkmateking02 on Wednesday, March 27, 2013 9:36 PM

Thanks, Nathan.  I think that would be interesting.  Ya just don't find slogans like that on Western Allied aircraft.  It makes the plane exceptional.


  • Member since
    March 2010
  • From: MN
Posted by Nathan T on Wednesday, March 27, 2013 8:07 PM

Yeah, I have it somewhere Checkmate. Something about donated from such and such collective farmers from the Saratov region...I'll look it up and post it along with the finished build either tonite or tomorrow.


  • Member since
    September 2003
  • From: AandF in the Badger State
Posted by checkmateking02 on Wednesday, March 27, 2013 7:34 PM

Was there a translation, Nathan?  I'm curious to know what the slogan says.


  • Member since
    March 2010
  • From: MN
Posted by Nathan T on Sunday, March 24, 2013 9:52 PM

Decal from Aeromaster. An old sheet but it turned out pretty good. Thanks!


G-J
  • Member since
    July 2012
Posted by G-J on Sunday, March 24, 2013 8:01 PM

Both the Yak and the Jug are looking sweet!  

NathanT:  How did you do the writing on the side?  Is that a decal, or did you paint that?

On the bench:  Tamyia Mosquito Mk. VI for the '44 group build.  Yes, still.

On deck: 

  • Member since
    December 2002
  • From: Bury St Edmunds, Suffolk, England
Posted by Bish on Sunday, March 24, 2013 4:15 AM

Nice work here guys. The Yak is looking great and the Jug is coming on nicely.

Has anyone heard from our host lately.

I am a Norfolk man and i glory in being so


On the bench: Airfix 1/72nd Harrier GR.3/Fujimi 1/72nd Ju 87D-3

  • Member since
    October 2009
  • From: Oil City, PA
Posted by greentracker98 on Saturday, March 23, 2013 5:24 PM

Thanks Guys and i agree the Yak is looking good

A.K.A. Ken                Making Modeling Great Again

  • Member since
    September 2003
  • From: AandF in the Badger State
Posted by checkmateking02 on Saturday, March 23, 2013 5:00 PM

Yak and Jug are looking good!


  • Member since
    March 2010
  • From: MN
Posted by Nathan T on Saturday, March 23, 2013 3:25 PM

Nice looking Jug. The Monogram kit holds up pretty well.


  • Member since
    October 2009
  • From: Oil City, PA
Posted by greentracker98 on Saturday, March 23, 2013 3:20 PM

Major Gabby Gabreski's Jug update

A.K.A. Ken                Making Modeling Great Again

  • Member since
    March 2010
  • From: MN
Posted by Nathan T on Saturday, March 23, 2013 2:51 PM

Just about done with the Yak. All thats left is to add the resin exhaust, which I covered with some pastels before I cut them off the pour stub. Here's a teaser.


  • Member since
    February 2010
  • From: Berkeley CA/St. Paul MN
Posted by EBergerud on Wednesday, March 20, 2013 11:00 PM

The screw-up made or noticed at the last moment. What would modelling be without them. I just had to re-rig a ship because of monumental driver error. (Wouldn't normally do that, but the situation was insane. I have a "card laid is a card played" attitude toward imperfections I don't catch. I know better modellers are more tenacious, but I'm not sure I'd ever finish a kit if I waited until I was pleased with everything.)

Eric


A model boat is much cheaper than a real one and won't sink with you in it.

  • Member since
    September 2003
  • From: AandF in the Badger State
Posted by checkmateking02 on Wednesday, March 20, 2013 9:04 PM

Thanks, Nathan.  And yes, every normal build has abnormalities.  It's kind of like a law or a principle.


  • Member since
    March 2010
  • From: MN
Posted by Nathan T on Tuesday, March 19, 2013 11:29 PM

Must be stuck in a Sub? He's active duty Navy right? I'm sure that keeps him away from the computer. Hope he hasn't left. Some nice ships being built here. Checkmate your eye for detail and painting the small parts on the Old Alabama is outstanding!

G-J- That kit looks like a winner. I keep trying to get my hands on the Amtech reboxing of that kit with the Hitech resin nose, but they can go for some steep prices on Ebay. Its the only Merlin P-40 kit out there. Looking forward to seeing how it goes together. I just flat coated the Yak tonight. All thats left is to attach the pitot tube, which I made outa .5mm brass rod, but I just noticed the cutout in the wing leading edge is like 10 times too big, so I have to try and fill it with some larger diam. rod and then stick the pitot tube in, without damaging the wing paint. Shoulda filled it in before but, oh well. Wouldnt' be a normal build if stuff like this didn't happen.


  • Member since
    September 2003
  • From: AandF in the Badger State
Posted by checkmateking02 on Tuesday, March 19, 2013 7:36 PM

Thanks, Bish.

Apparently the last time Sub posted was on 4 February.


  • Member since
    December 2002
  • From: Bury St Edmunds, Suffolk, England
Posted by Bish on Tuesday, March 19, 2013 4:04 PM

Nice work on those ships guys.

Has anyone heard from Sub lately, doesn't seem to have posted in a while.

I am a Norfolk man and i glory in being so


On the bench: Airfix 1/72nd Harrier GR.3/Fujimi 1/72nd Ju 87D-3

  • Member since
    February 2010
  • From: Berkeley CA/St. Paul MN
Posted by EBergerud on Monday, March 18, 2013 10:09 PM

The AMT kit will be a step up the food chain from Revell, but not a leap. This kit came out in the late 90s which was a period when Accurate Miniatures, Tamiya and Hasegawa were putting out some very good models and I think this was one of them. Brett Green isn't everyone's cup of tea but he does a very fine airplane to my eyes and here's his take on the Italeri rebox of your kit's first cousin.

http://www.hyperscale.com/2007/reviews/kits/italeri2658reviewbg_1.htm

Eric


A model boat is much cheaper than a real one and won't sink with you in it.

G-J
  • Member since
    July 2012
Posted by G-J on Monday, March 18, 2013 7:27 PM

I finally got my P-40F kit in.  As soon as I finish off the Hellcat (in the back of the picture) I'll be giving this a whirl.  Of course, I opened the box when I got in today...I notice this kit is more detailed than the Revell kits I've been building.  That excites me and worries me a bit.  Anyway, I can't wait to start.

On the bench:  Tamyia Mosquito Mk. VI for the '44 group build.  Yes, still.

On deck: 

  • Member since
    September 2003
  • From: AandF in the Badger State
Posted by checkmateking02 on Tuesday, March 12, 2013 9:49 AM

Good luck!


  • Member since
    February 2010
  • From: Berkeley CA/St. Paul MN
Posted by EBergerud on Tuesday, March 12, 2013 1:30 AM

Thankee for the software tip. I might try using just Aleene's for this rigging. Just as long as I don't stick my thumb in the wrong place.

Eric


A model boat is much cheaper than a real one and won't sink with you in it.

  • Member since
    September 2003
  • From: AandF in the Badger State
Posted by checkmateking02 on Tuesday, March 12, 2013 12:34 AM

Thanks for the suggestions, Eric.  They sound great.  I have been using Aleene's to assemble the components of the superstructure.  It seems to hold as well as CA and gives more working time.  From what you've written, the stuff sounds even more versatile.  I've been using thinned down Elmer's for a lot of the components on Alabama, including the 20mm's.

I appreciate all this advice.  I've got a Tamiya Ticonderoga I plan to build as Shangri-la.  I bought some PE rails and radar.  Figured a carrier wouldn't have too much, and I could get experience that way.

And here's the link to the website that creates flashing GB icons.  No software needed. 

http://picasion.com/


  • Member since
    February 2010
  • From: Berkeley CA/St. Paul MN
Posted by EBergerud on Monday, March 11, 2013 11:18 PM

CheckM

1. The technique I use is courtesy of Jim Baumann who moderates many of the Ship Modeler forums including "tips." In the view of many, Baumann is one of the great ship modelers of the era - and I wouldn't quibble. (Check his gallery postings - amazing.) He uses a very tacky white glue available in the UK. I'm sure that the US equivalent is Aleene's Tacky Glue which is available in every craft store and most hardware stores. Comes in regular, quick-dry and extra-tacky. I use regular usually. If you want to use the stuff as white glue a little water is fine. For attaching PE (or small plastic parts) I'd use it straight. The stuff takes a couple of hours to cure but it begins setting very quickly so you want to apply it and stick the part within two or three minutes. Just put out little blobs and refresh every step - we're talking seconds and a 4 oz bottle ($3) will last about five years. I run a very thin line of Aleene's along the line where railings will go and put a little blob about every inch. Use a paintbrush or toothpick and put glue on the bottom of the rail - just a very thin line. The stuff will take something like a PE railing and hold it like a magnet immediately when you get used to it. Baumann advises against doing lines of rail more than 2" but I let the shape determine length. As soon as Aleene's grabs the piece (no waiting) take the finest applicator possible and slip in some CA (preferably from the rear). As soon as the CA sets take a moistened Q-tip and remove any Aleene's that's accessible. It dries clear but leaves a little smudge if left in quantity. (You'll want to touch up railing with paint anyway.) So you set the part with Aleene's and use CA to hold it. This stuff has become one of my most important bits in the modeling arsenal and I use it on every kit somewhere. I've got Gator Glue around but haven't opened after I met Aleene. Super Tack is tackier but gives you less time and is harder to apply thin and smooth: ditto with quick dry. However, Aleene's acts very differently than any other white glue - it's ability to hold a small part is amazing. And when it does cure, it gives a pretty good join.

Another Ship Modeler wizard is David Griffith who has written the best book out there on modeling plastic ship. One of the hardest things about PE is curving it. He recommends using a mouse pad and take some kind of tube shaped object (pencil, toothpick - depends on what angle you want) and just press where you want the curve. That works very well and if you're careful you can fine tune with tweezers. For basic PE bending a thin, short metal ruler works great. Get a piece of glass or very hard plastic. (Coat it with Saran Wrap if you want a place to glue PE together without gluing it to the table.)  Take the PE and put it under the ruler along the line where you want the bend. Slip a razor  blade or hobby knife under other side and bend up. If it's aligned right, you'll get a very clean bend. (White Ensign has a couple of inexpensive gadgets that I find better than the big and expensive PE bending gizmos - of course they're very poorly documented.) At 700 scale the real trick is getting the stuff off the sprue. WEM suggests using a #11 hobby blade to cut the stuff on top of glass. I think a size 17 or 16 is much better: you never want to cut across PE sprues - always push down. Actually railings and simple ladders are the easiest thing to handle and install. As noted, I would go with Tom's although WEM's generic railings (which have simple ladders) are widely available and very inexpensive. They're also better from a scale viewpoint but more delicate. If you're railing a 350 scale ship get some generic railing made by Verlinden - the stuff is out of scale but tough as nails and very easy to apply and bend. And if you buy PE sets - note that some of the most experienced modelers on the planet will skip some of the parts that are smaller than an ant's eyeball. Sometimes I think the PE guys like to show off. But railings are sweet.

2. What kind of software to you use to get those flasing Group Build icons?

Eric


A model boat is much cheaper than a real one and won't sink with you in it.

JOIN OUR COMMUNITY!

Our community is FREE to join. To participate you must either login or register for an account.

SEARCH FORUMS
FREE NEWSLETTER
By signing up you may also receive reader surveys and occasional special offers. We do not sell, rent or trade our email lists. View our Privacy Policy.