SEARCH FINESCALE.COM

Enter keywords or a search phrase below:

Fw 190 Butcher Bird 2013 (extended to June 2014) Group Build

564931 views
5865 replies
1 rating 2 rating 3 rating 4 rating 5 rating
  • Member since
    December 2006
  • From: N. Georgia
Posted by Jester75 on Thursday, February 14, 2013 2:57 PM

OooOoo, looks like you nailed those cowling stripes Nathan!!

Eric


  • Member since
    March 2010
  • From: MN
Posted by Nathan T on Thursday, February 14, 2013 1:31 PM

Got the RLM 74 on last night. I decided to feehand the A-8, which seems more appropriate for late war, and I used some raised masks on the A-4.

I cut out a pattern on tracing paper and placed some blu tack on the underside:

Then placed on the model:

I only used the masks for the tops of the wings and tail. Everything else is freehand:

Masks removed:

A-8:


  • Member since
    March 2010
  • From: MN
Posted by Nathan T on Thursday, February 14, 2013 12:27 PM

Joe- from what I understand, the armor headrest type on the blown canopy couldn't allow for the taughtning mechanism, so any 190 with the "blown type" would have the antenna slack when opened.

Just remember, most A-8s still had the standard canopy and head armour, while most F-8s and A-9s had the blown type.

Stout- Thanks for the compliment. All main camo is done, now it just needs to dry a bit then I'm ready for gloss, but I still have all the little stuff left, like drybrushing the main gear and wells, masking the tailwheels, painting brake lines and dry-brushing gun barrels...etc...


  • Member since
    August 2009
  • From: MOAB, UTAH
Posted by JOE RIX on Thursday, February 14, 2013 11:43 AM

Doug, Your camo came out simply fantastic. Your patience and practice has definitely paid off.

Hey Nathan, Now you've got me thinking concerning the antenna wire on the blown canopy for the A-8/F-8. And that is are they taught when the canopy is closed and slack when open? Let me know if you have a take on that. In the meantime I'll check some of my references as it may be something I want to address early on.

"Not only do I not know what's going on, I wouldn't know what to do about it if I did". George Carlin

  • Member since
    February 2007
  • From: Brunswick, Ohio
Posted by Buckeye on Thursday, February 14, 2013 11:21 AM

Looks great Stoutfella!

  • Member since
    January 2012
  • From: East Peoria, IL
Posted by stoutfella on Thursday, February 14, 2013 11:14 AM

Thanks, Nathan. I'm pretty pleased so far. And I meant to compliment you on your painting. What you posted looks great. How close are you to finishing?

Cheers,

Stoutfella

On the bench: 1/48 Tamiya Bristol Beaufighter

On deck: 1/48 Tamiya P51-B

  • Member since
    March 2010
  • From: MN
Posted by Nathan T on Thursday, February 14, 2013 11:02 AM

Nice job. I like the looks of those JG 1 badges. Can't wait to put mine on. Painting turned out nice for your first Luftwaffe? Antennas seem hard, but just have some thick CA and accelerator handy. Fw190As are easy, as the wire is always taught. Now the darn Doras with the blown canopy on the other hand...Angry


  • Member since
    December 2006
  • From: N. Georgia
Posted by Jester75 on Thursday, February 14, 2013 10:48 AM

Man your A3 looks fabulous Stout!! I love the finished look of the camo and mottle!!

Eric


  • Member since
    January 2012
  • From: East Peoria, IL
Posted by stoutfella on Thursday, February 14, 2013 10:04 AM

Greetings,

Some wonderful work going on here, with all those PE cockpit parts and brass barrels. And some challenging fit "issues" being battled. I'm also glad to see so much activity here, as the forum in general has gotten quieter the last few months..

For my part, the A3 is nearly done. Here's a teaser:
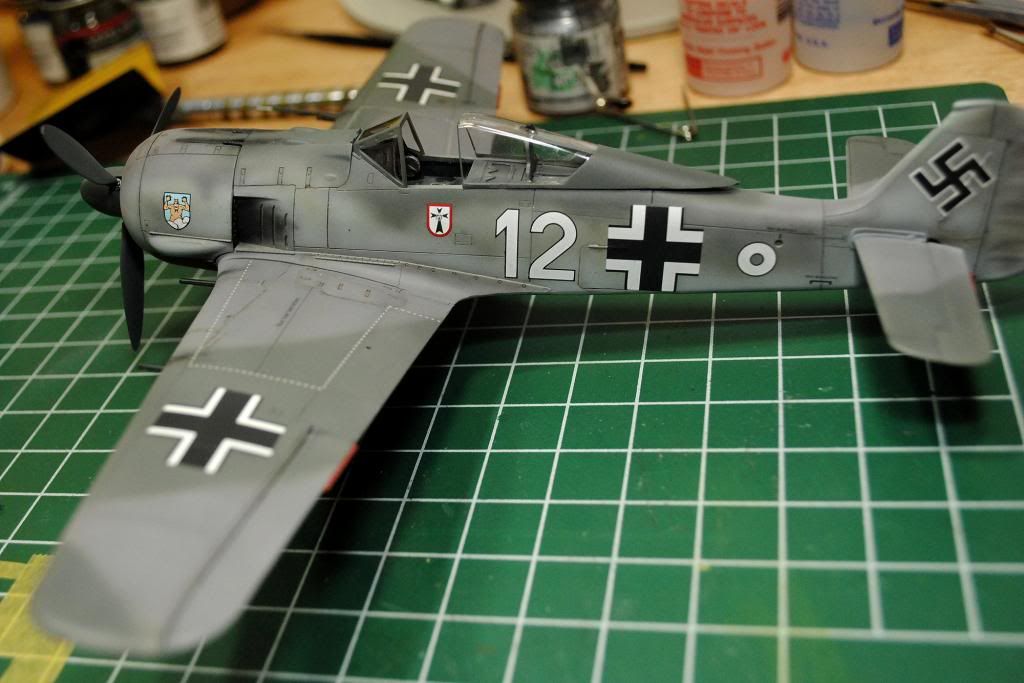
Decals are done. It was an Eagle Strike sheet and they went down almost perfectly, though I've got a couple of tiny spots of silvering on some stencils I may still try to correct. Pinwashed with raw umber, then a flat coat with MM acrylic.

Despite my recent struggles with the MM acrylics, I've usually had pretty good luck thinning the flat with the MM brand of thinner. I did the same this time, but added a few drops of alcohol just because it worked so well on the color coats. Went down nice and smooth. This may have ended up as my cleanest finish, with virtually no dusting or roughness at any point, from primer to flat. The more I use my new Iwata, the more I like it.

I've got most of the fiddly bits accounted for, though, of course, there will still be much gnashing of teeth to come when I start on antenna wires.

Hmm, what else could I have left to do? I know, I could finish the landing gear. Oh wait, I don't have the wheels I ordered two weeks ago and which I thought had been shipped from 70 miles away early last week. I was blaming the Postal Service, but it turns out they hadn't been shipped, after all. I ordered four things, and three of them were in stock. He was waiting for the fourth item to arrive before he shipped it all together. Except he didn't tell me that, and eBay indicated it had already been shipped. I've been promised I'll have it all in a couple of days, but in the meantime, I'm pretty well stuck. Oh well, we've got a death in the family and we'll be tied up with that until the weekend. If I get the wheels in hand by Saturday, I might be able to finish up then. Otherwise, it'll be next week.

I'm trying to be philosophical about the mix-up. Stuff happens and I've had good experiences with this vendor in the past, so it'll work out. Just wish I'd had a heads-up 10 days ago.

Anyway, once I wrap it up, I'll post a bunch more pics.

Cheers,

Stoutfella

On the bench: 1/48 Tamiya Bristol Beaufighter

On deck: 1/48 Tamiya P51-B

  • Member since
    March 2010
  • From: MN
Posted by Nathan T on Thursday, February 14, 2013 7:35 AM

C'mon in Mike. We hope to live up to RD III!


  • Member since
    August 2009
  • From: MOAB, UTAH
Posted by JOE RIX on Thursday, February 14, 2013 6:39 AM

Welcome to the GB Mike! It is great to have you on board with the Big Butcher Bird.

                                                          Joe

"Not only do I not know what's going on, I wouldn't know what to do about it if I did". George Carlin

  • Member since
    March 2012
  • From: Corpus Christi, Tx
Posted by mustang1989 on Thursday, February 14, 2013 4:45 AM

Thunderbolt379

Looking forward to your verdict!

Hey Mike. Sounds like a cool kit to me. So.................whadaya waiting for? Lets start building! Great to have you in here, Joe

I'll enter it on the intro post.


 Forum | Modelers Social Club Forum (proboards.com) 

  • Member since
    April 2005
Posted by Thunderbolt379 on Thursday, February 14, 2013 12:38 AM

Mustang1989 -- I had no idea this GB was on, I tend to live on the GB forum almost exclusively. I spotted the badge on another post and scouted around till I found it at once! Some years ago I was particularly ambitious with 190s during the Reich Defenders III GB, and started four. I finished one, two small projects were ready for paint but the last was Hasegawa's 1:32 Fw 190 A-8 in Bodenplatte markings. I was working in subassemblies, the cockpit is done but for harness and placcards, the engine and cowl are done, and the wing is together. Is that too far along to join up? This GB would be a perfect venue to get this one done. The weather will be cooling down here in Aus before long and I can start spraying without fighting the tip-dry characteristics all the time.

Looking forward to your verdict!

Cheers, Mike/TB379

http://worldinminiature.blogspot.com/

  • Member since
    March 2010
  • From: MN
Posted by Nathan T on Wednesday, February 13, 2013 10:58 PM

Very tasty Jester! Lots of good lookin pits around here.


  • Member since
    August 2009
  • From: MOAB, UTAH
Posted by JOE RIX on Wednesday, February 13, 2013 9:50 PM

Het Look! There's yet another absolutely fantastic FW 190 cockpit. Very, very well done Eric.

"Not only do I not know what's going on, I wouldn't know what to do about it if I did". George Carlin

  • Member since
    March 2012
  • From: Corpus Christi, Tx
Posted by mustang1989 on Wednesday, February 13, 2013 8:43 PM

Looks like it did pretty good to me. Nice job Jester! Nice job


 Forum | Modelers Social Club Forum (proboards.com) 

  • Member since
    December 2006
  • From: N. Georgia
Posted by Jester75 on Wednesday, February 13, 2013 7:56 PM

Finished out the pit and got it and the engine bay/firewall plug inserted. Don't even get me started on the build up/fit of the engine bay areaSuper Angry

I am pretty happy with how the pit turned out though. Mostly pre painted stuff that came with the kit but the washes and drybrushing turned out just right I think.

Hopefully the good ole iPhone caught enough detail to see!

Eric


  • Member since
    March 2010
  • From: MN
Posted by Nathan T on Wednesday, February 13, 2013 7:24 PM

Yikes Man....Goin from a Dragon aircraft kit to an Airfix kit!!????....Good luck. I'm not familiar with that one but I'm sure someone here has built it...Doug???


  • Member since
    October 2006
  • From: Tucson, AZ
Posted by Archangel Shooter on Wednesday, February 13, 2013 7:16 PM

I used the spreader piece as called out in the instructions, had to trim a little bit of that just so the 2 halves of the upper fwd fuselage will mate. Than it threw off the fit of the cowling at the bottom. Even pressing the wings upwards at the root still left a major gap. Of course I could just have it fit snug on one side and take finish pics of only that side Wink. I might revisit the kit when I calm down some and take another look at it.

I thought about just building the Airfix bird straight out of the box since I usually get too bogged down with aftermarket stuff, but being this is an Airfix kit I'm going to order a few aftermarket sets in the morning. Read about the kit problem with fan behind the prop coming out some 5mm from the cowling. Anyone here encounter that? 

Scott 

 Your image is loading...

 On the bench: So many hanger queens.


  • Member since
    March 2012
  • From: Corpus Christi, Tx
Posted by mustang1989 on Wednesday, February 13, 2013 6:24 PM

JOE RIX

Heck Yeah Joe on building a D-9. Why, there's plenty of 1/72 versions available you could tackle.Big Smile

..............................ya know Joe. I've got some choice words for youWhistling

I'll definetely tackle at 48TH SCALE offering. With all the bells and whistles of course.


 Forum | Modelers Social Club Forum (proboards.com) 

  • Member since
    August 2009
  • From: MOAB, UTAH
Posted by JOE RIX on Wednesday, February 13, 2013 6:02 PM

Man, When said to keep bringin' it you all get with the program.

Nathan - Excellent precision on the mottling. Do you mind sharing how you managed that.

Scott - Yikes!! I can tell you that if you went ahead and gave that beast a shot there would not be enough pity left to give Joe and his issues.

Matt - That PE definitely makes your cockpit pop. Indeed, take some credit as it takes some time and effort to put all that together and make look as great as you did.

Heck Yeah Joe on building a D-9. Why, there's plenty of 1/72 versions available you could tackle.Big Smile

"Not only do I not know what's going on, I wouldn't know what to do about it if I did". George Carlin

  • Member since
    October 2008
  • From: Georgia
Posted by Rigidrider on Wednesday, February 13, 2013 3:30 PM

1638159.aspx

Well Joe??? Whats stopping you??? LOL, you know your going to do it... LOL


Blkhwkmatt, Very nice! Following with great interest.

When Life Hands You A Bucket Of Lemons...

Make Lemonade!

Then Sell It Back At $2 Bucks A Glass...

  • Member since
    September 2003
  • From: Northern hemisphere - most of the time-
Posted by blkhwkmatt on Wednesday, February 13, 2013 1:03 PM

Mustang - thanks for the kind words.  All you really need is good lighting and a really steady hand.  All that I really did was add the paint and some drybrushing with light grey and white to bring out the highlights.

Quidquid latine dictum sit, altum videtur!!! - Anything said in Latin sounds profound!


  • Member since
    March 2012
  • From: Corpus Christi, Tx
Posted by mustang1989 on Wednesday, February 13, 2013 12:28 PM

Dang Matt. You can take some of the credit for ASSEMBLING that cockpit. Alot of work and alignment are necessary to pull it off but man those Eduard cockpits look sweet don't they. You guys are making me want to build a D-9 or Ta-152!!!!!!!!!!!!


 Forum | Modelers Social Club Forum (proboards.com) 

  • Member since
    September 2003
  • From: Northern hemisphere - most of the time-
Posted by blkhwkmatt on Wednesday, February 13, 2013 12:02 PM

Nathan T

Nice work Matt, but not doing a scheme with the big tail?Crying White 11 is a good choice too. If you don't have the pics of that bird let me know, I have a few. Real interesting colors on that one.

I know, why have the "late" kit and not build a big tail, white 11 is the scheme that caught my eye first, but now I am thinking about reconsidering the scheme.  Right now I am bidding on a D9 profipack that I will hopefully win, and then I will be able to build the smaller tail.

I think that I might build either Brown 4 or one of the yellow six schemes.   i tihnk that this will be the one now.

Nathan t - would still like to see those pics from White 11 as I might use that scheme for one of my other Dora kits.


Quidquid latine dictum sit, altum videtur!!! - Anything said in Latin sounds profound!


  • Member since
    March 2010
  • From: MN
Posted by Nathan T on Wednesday, February 13, 2013 11:18 AM

Nice work Matt, but not doing a scheme with the big tail?Crying White 11 is a good choice too. If you don't have the pics of that bird let me know, I have a few. Real interesting colors on that one.


  • Member since
    December 2006
  • From: N. Georgia
Posted by Jester75 on Wednesday, February 13, 2013 11:04 AM

Wow Archangel, those are some big gaps. I too wonder if you could attach the upper wings first then the lower or use some type of spreader bar??

Nice pit Matt!! Looks very familiarWhistling

Eric


  • Member since
    December 2006
  • From: N. Georgia
Posted by Jester75 on Wednesday, February 13, 2013 11:02 AM

Paint looks like it went down nice and smooth Nathan!! Mottle looks nice too!

Eric


  • Member since
    February 2007
  • From: Brunswick, Ohio
Posted by Buckeye on Wednesday, February 13, 2013 9:08 AM

Nice looking cockpit Matt.

Mike

  • Member since
    September 2003
  • From: Northern hemisphere - most of the time-
Posted by blkhwkmatt on Wednesday, February 13, 2013 9:00 AM

Some nice work going on here, love that the Group is so active!!  Those brass MG barrels look so nice. 

I have worked a small amount on the Ta152, but also picked up one of the Eduard kits from my stash - the Fw190 D-9 Late.  Here are some pictures of where that kit stands.

I cant take all the credit for the cockpit since i used the color PE that was included in the kit, but it does look pretty good to me.

And here is the scheme that I will be painting this one, once I get to that point. 


I forgot to take pictures of the Ta152, she still has no paint on her, I was going to wait until both kits were to that point before painting.

Thanks for looking,

Matt

Quidquid latine dictum sit, altum videtur!!! - Anything said in Latin sounds profound!


JOIN OUR COMMUNITY!

Our community is FREE to join. To participate you must either login or register for an account.

SEARCH FORUMS
FREE NEWSLETTER
By signing up you may also receive reader surveys and occasional special offers. We do not sell, rent or trade our email lists. View our Privacy Policy.