SEARCH FINESCALE.COM

Enter keywords or a search phrase below:

Fw 190 Butcher Bird 2013 (extended to June 2014) Group Build

564930 views
5865 replies
1 rating 2 rating 3 rating 4 rating 5 rating
  • Member since
    April 2005
Posted by Thunderbolt379 on Sunday, June 29, 2014 7:49 AM

Hi Mustang, Bish and Doug -- it's a syphon feed Paasche VL, and I've had this problem in one form or another for years, it comes and goes, sometimes better, sometimes worse, but typically not visible on the finished model. The paint/thinner mix in general seems to work very nicely, but sometimes the blobs appear. The needle is seated quite tightly/snugly and is always carefully removed/installed. The tip may be slightly bent, if so the bend is too subtle for me to pick up with the old fashioned finger test, but under magnification there could be some deviation. A new needle is an easy check for this problem. The VL has a mid-point seal but it's a major hassle to get to, so much that the technician I use is not game to tackle it if he can help it. The trigger on this model is held in place by the needle passing through it, and reinstalling a removed trigger is a job for a specialist, it was certainly not something I could do one time it fell out... It's a durable model, I've been using this AB coming up on 25 years, and it's mostly still original.

It's always tough adjusting the thinning ratio with temp/humidity in mind, it's mid-winter here and temp in the workshop depends on whether the reverse cycle AC is running or not, so it can be unpredictable. I'm using Tamiya and Acryl paints, the former thins at 50%, the latter at 25% -- I get the problem with both.

Ultimately so long as I have a decent coat of paint on the surface it absorbs the problem, but it makes it less certain doing finer effects. The mottle will be interesting -- I'll use the fine tip and needle and work at high pressure for that phase, and it'll be interesting to see if the problem persists through the reconfiguration.

Onto green tomorrow!

Cheers, Mike/TB379

http://worldinminiature.blogspot.com/

  • Member since
    October 2008
  • From: Georgia
Posted by Rigidrider on Sunday, June 29, 2014 6:51 AM

TB... NOTHING, is worse then doing a beautiful job on o build then having the AB Ef up when applying the finish! Several things will cause a splattering issue. Keeping in mind I dont know what your using and assuming nothing about skill.... Just stating points... First and most common, is paint thinned properly, is the thinner compatible with paint, is pressure at proper level for paint being sprayed.

Less common but still needs mention, is the needle bent, is the needle seat or air horn (nozzle) damaged or worn, is the mixing chamber clean,(the area in the tip of the gun where the paint and air come together).Another thing thats needs to be checked, is the needle seal worn or damaged. Not knowing what type of gun you use, is the needle REAL easy to move when you loosen collet and pull on it, The seal could be loose or worn. If you remove needle and collet w/guide. (the piece that adjusts the trigger spring tension) take trigger out, look down barrel , you should see a piece that looks like a carborator jet. The seal is under this part, and is normally made of viton or a similar nylon type material. If not badly worn, get a small screwdriver and tighten a bit then reinsert needle until you feel a slight drag on the needle. then reassy and try out. This mainly applys to suction and Gravity fed DA guns. With a SA suction gune (like a Paasche "H" gun) splatter is almost always a proper thinning or pressure (or both) problem. And remember , nomatter what you use, Cleanliness is next to... well... you know the rest. Hope this might help and Good Luck!

Doug

When Life Hands You A Bucket Of Lemons...

Make Lemonade!

Then Sell It Back At $2 Bucks A Glass...

  • Member since
    December 2002
  • From: Bury St Edmunds, Suffolk, England
Posted by Bish on Sunday, June 29, 2014 6:38 AM

Mike, sweet work on the build.

When my airbrush has done that, its usually when it hasn't been cleaned properly, but I would be you have thought of that. have you checked the needle.

I am a Norfolk man and i glory in being so


On the bench: Airfix 1/72nd Harrier GR.3/Fujimi 1/72nd Ju 87D-3

  • Member since
    March 2012
  • From: Corpus Christi, Tx
Posted by mustang1989 on Sunday, June 29, 2014 6:02 AM

I wonder what could be causing the AB to be finicky that way. There's  a thread on here somewhere about an AB splattering.  So far I've had good luck with the two that I'm using. Good progress so far.buddy.


 Forum | Modelers Social Club Forum (proboards.com) 

  • Member since
    April 2005
Posted by Thunderbolt379 on Sunday, June 29, 2014 4:42 AM

Thanks, Mustang! Well, I've spent most of today looking at what information is available and pondering what finish I'll use, while masking accordingly. In the end I chose not to cut softmasks, and have used tape to hardmask the wingroots and tail, and the wavy leading edge. My planned approach is to use the factory freehand scheme in 82/83, and to try to do it unmasked. The horizontal surfaces and the top of the fuselage I'll tackle as separate rounds of work, to simplify masking -- possibly using softmasks for the longitudinal demarcation, though I could also hardmask and use the AB to fluff the edges as part of the mottle process.

Here's the current state of masking:

The AB is really spotting these days -- it does for a while, then stops. I sanded away some overspray on the tails. The good news is the solid paint coats look fine.

Fingers crossed, tomorrow I'll get the greens done, certainly on wings and tail, and see if I need to softmask for definition or if I can carry it as-is.

Cheers, Mike/TB379

http://worldinminiature.blogspot.com/

  • Member since
    March 2012
  • From: Corpus Christi, Tx
Posted by mustang1989 on Sunday, June 29, 2014 3:53 AM

Whichever scheme youre gonna go with I'm really looking forward to seeing you execute Thunder.


 Forum | Modelers Social Club Forum (proboards.com) 

  • Member since
    April 2005
Posted by Thunderbolt379 on Saturday, June 28, 2014 10:20 PM

Now I've found Yellow 1 in the splinter scheme, in 82/83!

http://worldinminiature.blogspot.com/

  • Member since
    April 2005
Posted by Thunderbolt379 on Saturday, June 28, 2014 10:10 PM

Okay, now I've spotted Green 1 in 82/83, and it looks good...! Freehand pattern...

http://worldinminiature.blogspot.com/

  • Member since
    April 2005
Posted by Thunderbolt379 on Saturday, June 28, 2014 10:00 PM

Hi guys, today I'm cutting soft masks for the camo. The 152 scheme I'm going with is Green 1, which appears to have been the mount of the commander of JG 301.  I have ben looking at the schemes and there seems to be two -- Italeri offered Green 1 and Yellow 1 on their sheet, with the same scheme for each, which is, strangely, considering the date, a straight-edge, hard mask style, ala the early war years. There were hard edge schemes on some Me 262s, I believe, so that's not out of the question. However, the most common scheme seems to be a soft edge freehand design of a different pattern, and most of the JG 301 birds I've seen built have been in this one. It makes sense that all the planes delivered to Rechlin/Alteno would have been finished in the same general scheme, with individual variation due to being freehand painted. the colours I'm going with are 81/82, both mixed in Tamiya acrylics, and variation seen in models will be due to the difficulty in establishing shades overall.

Still looking at stuff, not cutting yet, though I touched up the 76 earlier.

M/TB379

http://worldinminiature.blogspot.com/

  • Member since
    April 2005
Posted by Thunderbolt379 on Saturday, June 28, 2014 4:05 AM

Progress today -- I got the new cylinder on so have full AB capability again, and my first job was t mask the 23 on the 152, then I reprimed around the DOR bands with flat white, masked the rudder of the lil 109, then blew the undersides of both into 76 (two mixings). I must say, the Acryl paint goes on as a near flawless low gloss, I could decal or accent the panel lines directly onto this finish. I'm thinking I'll use Microscale Flat as the final finish, which is actually a satin, just less bright that their regular satin.

Target for tomorrow: cut the card soft-masks for the topside camo of the 152 and, just maybe, get the mixed 81 on. I'm not sure what to do about the wavy softedge leading edge demarcation... Freehand? All being well, the mixed 82 should go on the following day, then I'm into clearcoats, decals and finishing effects.

I'm also working on the final round of sanding on the engine facia of the A-8, and masking the wheel wells will be coming up soon, so I can prime and get that 04 under the engine.

Obviously these planes are not going to be done by the stroke of midyear, though the 152 will be close.

Cheers, M/TB379

http://worldinminiature.blogspot.com/

  • Member since
    March 2012
  • From: Corpus Christi, Tx
Posted by mustang1989 on Friday, June 27, 2014 5:21 AM

Looking good Thunder. I'm going to have to start temporarily installing my canopies and painting them while I paint the mode like you are doingl. Right now I have "sacrificial"  spare canopies I use as mask off devices to keep the cockpits from getting painted. So wasteful! lol


 Forum | Modelers Social Club Forum (proboards.com) 

  • Member since
    April 2005
Posted by Thunderbolt379 on Friday, June 27, 2014 4:04 AM

Today's progress -- targets achieved on the A-8. I applied the Eduard masks and attached the canopy:

Then filled in with Tamiya tape:

And used up the last air in my tank applying the cockpit interior 66 and the DOR band 24:

The cowl lip is now attached and the fan push-fit, and there are some belly rack parts to add, plus masking the gear bays and flaps. There is a patch of 04 under the nose that I had not spotted, so when I'm satisfied the engine putty work is as good as I can get it, I'll prime that area in white and lay on a few coats of 04. Then with that and the 24 masked, I can proceed to the camo.

Fresh cylinder in the morning, all being well...

M/TB379

http://worldinminiature.blogspot.com/

  • Member since
    March 2012
  • From: Corpus Christi, Tx
Posted by mustang1989 on Thursday, June 26, 2014 4:42 AM

Progress is looking good so far Thunder! There's a reason I don't do 32nd scale stuff as far as display space but if I could , I would! Great looking build buddy and am looking forward to the camo on these models.


 Forum | Modelers Social Club Forum (proboards.com) 

  • Member since
    April 2013
Posted by SchattenSpartan on Thursday, June 26, 2014 3:39 AM

Looking great, Mike! That A-8 sure is one huge model!

  • Member since
    April 2005
Posted by Thunderbolt379 on Thursday, June 26, 2014 3:23 AM

Hi guys, today's work was detailing and prep. I got the DOR band painted in the 152, yesterday I sprayed four coats of Acryl 04, then masked the yellow band, and today I sprayed three coats of Tamiya's equivalent of 23. I'll mask that tomorrow. I didn't take a picture as she looks like a real shaggy dog at this stage.

Then I moved on to the big Hasegawa A-8 and finished up the cockpit details by assembling and mounting the gunsight, painting the behind-head armour plate with padding and decal, fitting the under-canopy hardware, and installing the windscreen. The leather surround of the instrument shroud was also painted. Here's the evidence:
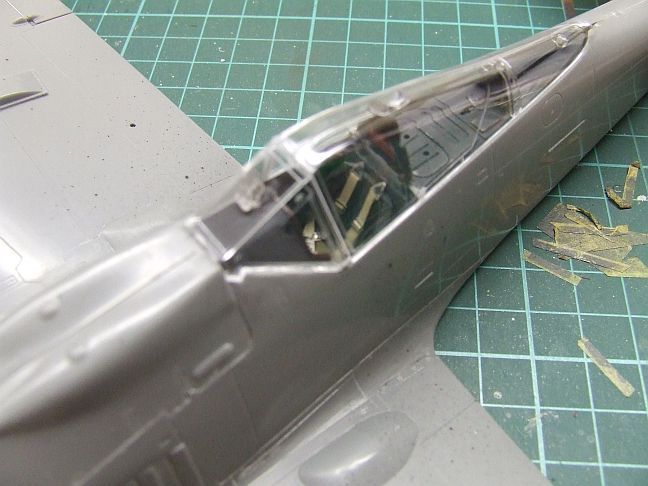
 

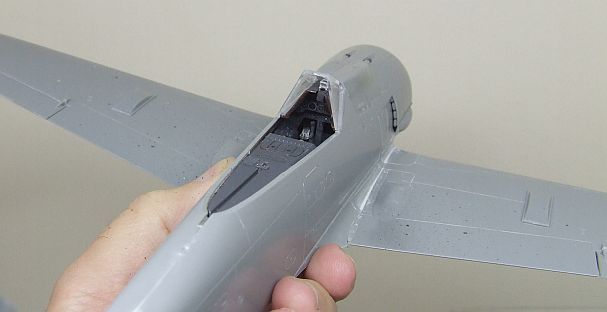
Here's a last look, without the hood, into the cockpit:
 

And here's a size check against the 1:72 109:
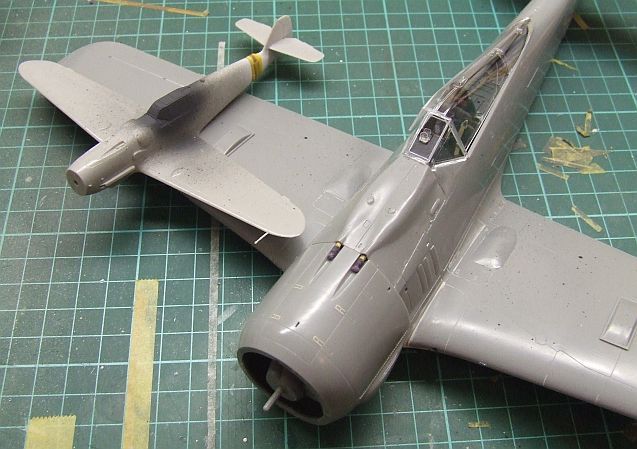
 

This is one big birdie!

I'm just about out of air in my cylinder, there may be enough to do the 66 canopy interior colour on the A-8, and possibly also the RLM 24 DOR band, but that would be it, so I'm hoping to pick up a fresh tank soon and rip into the 152's main camo. Target for tomorrow is the canopy masks on the A-8, mount the main canopy section (possibly non-permanently so I can refix it open), then spray those last elements. Masking the 23 on the 152 is also a target, and continuing with masking the 109 as well, so I can get into the 76 undersides as soon as the new tank is on.

Cheers, M/TB379

http://worldinminiature.blogspot.com/

  • Member since
    April 2013
Posted by SchattenSpartan on Tuesday, June 24, 2014 4:06 PM

Mike: Nice work on the preshading! I can'T wait to see her with some paint on!

Greg: Now that's one very nice looking 190 you got there, mate! It really is a shame that none of the engine detail will be visible.

I won't get any building time untill Sunday because my workbench is getting an upgrade, but once everything is done I'll try to get some nice 190 build updates for you guys...

  • Member since
    April 2005
Posted by Thunderbolt379 on Tuesday, June 24, 2014 8:49 AM

Today's action on the bench was to get some spot spraying done - the interior canopy colour is applied, the airframe is preshaded, and I've primed in white the area of the DOR bands, which will be painted in 04 and a homebrew 25.

Target for tomorrow is to spray the 04 and hopefully mask it and go for the 25 as well, bracketed around work on the big A-8 (cockpit and canopy stuff) and masking on the teensy Bf 109. All being well, I'm hoping to finish the Ta-152 before the end of the calendar month, while pushing along the A-8 to the painting stage. I hope there'll be some some permissible overrun, as I'd like to finish the A-8 and D-9 as well.

M/TB379

http://worldinminiature.blogspot.com/

  • Member since
    May 2013
  • From: Indiana, USA
Posted by Greg on Monday, June 23, 2014 9:00 AM

Thanks, Joe. :)

  • Member since
    August 2009
  • From: MOAB, UTAH
Posted by JOE RIX on Sunday, June 22, 2014 7:51 PM

Greg, That is some marvelous work. I am very proud of you. Not for simply taking on the Eduard kit but also for the perseverance you are demonstrating to complete it. Now, just bring 'er home Greg.

P.S. I've been missing you.Boo Hoo

"Not only do I not know what's going on, I wouldn't know what to do about it if I did". George Carlin

  • Member since
    May 2013
  • From: Indiana, USA
Posted by Greg on Sunday, June 22, 2014 6:48 PM

You got it, Joe. Thanks!

  • Member since
    March 2012
  • From: Corpus Christi, Tx
Posted by mustang1989 on Sunday, June 22, 2014 6:22 PM

It looks great so far Greg! Just keep plugging away and don't worry about the end date. Just concentrate on the finish.


 Forum | Modelers Social Club Forum (proboards.com) 

  • Member since
    May 2013
  • From: Indiana, USA
Posted by Greg on Sunday, June 22, 2014 5:45 PM

Thanks, Doug. Geeked

  • Member since
    October 2008
  • From: Georgia
Posted by Rigidrider on Sunday, June 22, 2014 5:19 PM

Greg, You've done well tackling an Eduard kit and making it look as good as you have after the extended leave... ha... You've done very well! Some people after signing up for what ever reason never returned to try...

Doug

When Life Hands You A Bucket Of Lemons...

Make Lemonade!

Then Sell It Back At $2 Bucks A Glass...

  • Member since
    May 2013
  • From: Indiana, USA
Posted by Greg on Sunday, June 22, 2014 1:34 PM

TB379, good progress. Nice clean build so far.

Finally got my engine mounted, more or less. This is my first Eduard kit, mounting the engine took some talking to myself just to try it.

I'm posting this cuz the neat engine detail will never be seen again. I had aspirations of building this with engine cowlings open, but turns out that is above my pay grade as my third kit back from my 30+ yr hiatus. Sigh.

No particular need to comment as there really isn't anything to comment on. I just feel bad about dropping the ball on my second build in this GB, and wanted to show that I'm trying even though no way will I finish before the end of this GB.

  • Member since
    April 2005
Posted by Thunderbolt379 on Friday, June 20, 2014 5:47 AM

Hi Mustang,

Maskol is a rubber solution masking medium made by Humbrol, you brush it on, it dries fast and you can peel it off easily when you're done. I use it mostly to protect gluing areas, like sockets and tabs.

I know what you mean about the preshade -- it can look great but is very subtle, and when working with more than one top colour it can easily become lost. Some preshade each colour, which is a lot of work, but can be worth it in the effect achieved, so long as you have a light hand and know when enough final colour is juuust enough.

I may be able to get to it tomorrow, but I have a busy weekend and it might be Monday before I can... Days are ticking by, I want these planes done!

M/TB379

http://worldinminiature.blogspot.com/

  • Member since
    March 2012
  • From: Corpus Christi, Tx
Posted by mustang1989 on Friday, June 20, 2014 4:20 AM

I wouldn't sweat missing out on the pre-shading too much there Thunder. I have mixed feelings about it really especially when there's more than one color of camo and especially if there are more than two upper camo colors. Coming along nicely! What is this Maskol you speak of?


 Forum | Modelers Social Club Forum (proboards.com) 

  • Member since
    April 2005
Posted by Thunderbolt379 on Friday, June 20, 2014 3:40 AM

Got some masks on today -- an Eduard set on the canopy, and stuffed the wheel wells with tissue, locked into place with Maskol:

It would have been nice to get the 66 on, then load up and preshade the airframe, but it didn't happen...

M/TB379

http://worldinminiature.blogspot.com/

  • Member since
    April 2005
Posted by Thunderbolt379 on Thursday, June 19, 2014 8:20 AM

Today I got most of the masks onto the 152, just two pieces to go on the canopy, then I can look at the wheel wells. I also masked the instrument shroud for the big A-8, so I'll be applying some 66 to them all tomorrow, and maybe even pre-shading the 152. I've given up on trying to get hold of the missing Acryls in this country, certainly by the end of the month, and will be homebrewing the RLMs from Tamiya. I searched on some recommended mixing ratios and am happy to work with them, so I'll be pressing on with main paint on the 152 when I get a gas bottle change next week.

The Italeri plans quote FS paints which pretty clearly are meant to be RLMs 81, 82 and 83 for the top surface and mottle, but they list a pale grey for the underside. I can do a pale grey, but which RLM would this relate to? I would have assumed RLM 76 would have been standard, but that is not really a grey. Does anyone have any thoughts? I've checked some colour references in books but given the vagaries of printing, they could represent a grey or the pale grey-blue of 76.

I got a package yesterday from China, Hobby Boss's Ta 152 C-1, complete with torpedo and a most unusual maritime scheme. Not for this GB, but it'll be a beauty!

M/TB379

http://worldinminiature.blogspot.com/

  • Member since
    April 2005
Posted by Thunderbolt379 on Wednesday, June 18, 2014 8:39 AM

Mustang -- the 109 is a plain old Hasegawa G-6 I picked up off eBay a way back -- bagged, most bits off their trees, but that's okay as I have two more of these in original packaging (I fancy all three marking options) and I seem to recall I grabbed it for a song. It's one of those kits that just about falls together, so I picked up the Eduard masks and fed it in to the roster alongside the big guys...

M/TB379

http://worldinminiature.blogspot.com/

  • Member since
    July 2011
  • From: minnesota
Posted by handiabled on Wednesday, June 18, 2014 7:46 AM

BD sorry too hear man,, I feel your pain , been thru it too. Best wishes to you to get back to some kind of "normal" again.

JOIN OUR COMMUNITY!

Our community is FREE to join. To participate you must either login or register for an account.

SEARCH FORUMS
FREE NEWSLETTER
By signing up you may also receive reader surveys and occasional special offers. We do not sell, rent or trade our email lists. View our Privacy Policy.