SEARCH FINESCALE.COM

Enter keywords or a search phrase below:

Fw 190 Butcher Bird 2013 (extended to June 2014) Group Build

564930 views
5865 replies
1 rating 2 rating 3 rating 4 rating 5 rating
  • Member since
    December 2006
  • From: N. Georgia
Posted by Jester75 on Friday, February 8, 2013 1:00 PM

Looking good Stout!! That red under the nose looks cool!

Eric


  • Member since
    March 2010
  • From: MN
Posted by Nathan T on Friday, February 8, 2013 1:56 PM

Nice priming job. Careful of the cowl color. I think very few 190s acutally had a red lower cowl vs. a yellow one. Yellow was the documented recognition color, just like 109s. Unless the particular Stafflen colors were red? But then the Call letters on the fuselage as well as the spinners were usually red as well. Red and Yellow are easily confused in blk & white pics. I'm not positive though, and it looks good either way.


  • Member since
    January 2012
  • From: East Peoria, IL
Posted by stoutfella on Friday, February 8, 2013 2:42 PM

Thanks for the heads-up, Nathan, but since I've resprayed and am masking it off now, it looks like it'll be red. A quick Google search yielded this pic showing the area being fairly dark, so between this and the decal illustration, I'm going with red.

http://www.asisbiz.com/il2/Fw-190A/Fw-190A-JG1.10-%28W12+o%29-Rathenow/pages/Fw-190A-10.JG1-%28W12+o%29-Johannes-Rathenow-WNr-437-Holland-May-1942-02.html

Cheers,

Stoutfella

On the bench: 1/48 Tamiya Bristol Beaufighter

On deck: 1/48 Tamiya P51-B

  • Member since
    March 2010
  • From: MN
Posted by Nathan T on Friday, February 8, 2013 4:25 PM

Ahh, what I wouldn't give to be modeling during the daytime....


  • Member since
    August 2008
  • From: Windsor Ontario Canada
Posted by Higgy on Friday, February 8, 2013 9:10 PM

I would like to get in on this GB also. I'm in with Revell's 1/72 FW-190F-8

-------

Born to land hard.

  • Member since
    January 2012
  • From: East Peoria, IL
Posted by stoutfella on Friday, February 8, 2013 10:41 PM

Nathan: I retired from my full-time job last fall, then worked part-time through the holidays. I'm "retired" again for a few months, planning to work part-time through the summer. So right now I'm getting in a fair amount of modeling time, though it's amazing how the day evaporates with other busy-work. Don't know how I ever got anything done when I had to work every day :-)

Cheers,

Stoutfella

On the bench: 1/48 Tamiya Bristol Beaufighter

On deck: 1/48 Tamiya P51-B

  • Member since
    August 2009
  • From: MOAB, UTAH
Posted by JOE RIX on Friday, February 8, 2013 10:43 PM

Alright Higgy! I'm looking forward to having another 1/72 F-8 in the GB.

"Not only do I not know what's going on, I wouldn't know what to do about it if I did". George Carlin

  • Member since
    March 2012
  • From: Corpus Christi, Tx
Posted by mustang1989 on Saturday, February 9, 2013 6:54 AM

Higgy

I would like to get in on this GB also. I'm in with Revell's 1/72 FW-190F-8

Ok Higgy. Youre in! Glad you are here, Joe


 Forum | Modelers Social Club Forum (proboards.com) 

  • Member since
    December 2002
  • From: Bury St Edmunds, Suffolk, England
Posted by Bish on Saturday, February 9, 2013 7:24 AM

Nice to have you opn board Higgy.

Joe, i have finally started on my build. The cockpit is almost done and should have some pics today. The fuselage is together, the pit goes in from undrneath. And i have been cutting and sanding the wings to fit the PE flaps.

I am a Norfolk man and i glory in being so


On the bench: Airfix 1/72nd Harrier GR.3/Fujimi 1/72nd Ju 87D-3

  • Member since
    October 2011
Posted by wjt619 on Saturday, February 9, 2013 7:42 AM

Great work guys! Iwas looking for some advice on which AF cockpit set to add to myTamiya F8.

True Details #48488 that I think only includes the cockpit or the CMK #4024 which includes

a vacform canopy,PE parts,gun sight,instrument panel and a new cockpit?

  • Member since
    December 2002
  • From: Bury St Edmunds, Suffolk, England
Posted by Bish on Saturday, February 9, 2013 7:55 AM

wjt, i haven't used either of those sets. I do have a couple of True details pis and some CMK stuff, and both look very nice. If it was me, given the price differance and the amount of things you get with both sets, i would go for the CMK.

Theres also the Aires set and that seems to have the same items as the CMK minus the canopy.

I am a Norfolk man and i glory in being so


On the bench: Airfix 1/72nd Harrier GR.3/Fujimi 1/72nd Ju 87D-3

  • Member since
    March 2010
  • From: MN
Posted by Nathan T on Saturday, February 9, 2013 11:42 AM

In my experience, Aires tops CMK stuff. Sometimes its cheaper too. But if you really want a good resin fw190 pit, you have to go with the MDC one.


  • Member since
    October 2011
Posted by wjt619 on Saturday, February 9, 2013 7:43 PM

Thanks guys,there is only a dollar difference so I mignht go with the CMK due to so many extras. But I will look into the MDC one!

  • Member since
    December 2006
  • From: N. Georgia
Posted by Jester75 on Saturday, February 9, 2013 10:22 PM

Ok, proof that I am actually participating in this group build. Still not finished with the little recon panzer but waiting on parts so.....

Lots and lots and lots of fitting on this thing especially in the mg cowl area. Also, the exhaust inserts and engine plate are a really really tight fit between the fuse halves and is going to have to be sanded a bit.

I was concerned that the rear of the mg cover was a bit to narrow but it appears there are some longitudinal strips right beneath that make it look like its a bit narrow. Pay no mind to the wash drying in the pit. It will be cleaned up a lot a bit later. This is going to be an interesting buildConfused

Eric


  • Member since
    March 2010
  • From: MN
Posted by Nathan T on Sunday, February 10, 2013 9:03 AM

Nice work Jester. Just remember the MG cowl was not a perfect fit in the real world. If it seems really narrow just add a spreader bar inside it. For the exhaust inserts and engine bulkhead, I don't glue those in. Just let them kinda float inside the fuselage and they will find their own fit as you close up the fuselage.


  • Member since
    October 2008
  • From: Georgia
Posted by Rigidrider on Sunday, February 10, 2013 9:29 AM

Good lookin build so far. My wife always geet a kick out of "fit issues" She asks why I keep building when I get so upset. Well... no comment! lol..Keep up the great work Jester.

When Life Hands You A Bucket Of Lemons...

Make Lemonade!

Then Sell It Back At $2 Bucks A Glass...

  • Member since
    December 2002
  • From: Bury St Edmunds, Suffolk, England
Posted by Bish on Sunday, February 10, 2013 11:06 AM

Time for my first update. This is the kit i am building.

So far its gone together nicely. The only filler is where i over trimmed the front of the cockpit.

The only kit part in the part are the control column and seat, the latter stilkl to be fitted. All the rest is Eduard PE. This is the coloured set so i can't take any credit for it.

The cockpit is inserted into the joined fuselage from underneath. I have to check some more referance pics, but this little buldges around the access panel on the left don't appear to be there on any photo's i have seen so far, so they may need removing. I also need to removed the gun barrels in the fuselage, they are being replaced with metal ones.

While the kit allows you to build both an A-6 and A-8. But its clearly aimed at an A-8 and there are a couple of issues with building an A-6. There's only one decal option, and that's for an 8. The pitot is molded with the wing at the end of the right wing. But this is wrong for a 6, it should be further in. But this is easy to remedy. The main issue is the buldges on toip of the wings. Both A-6 and A-8 had 2 MG 151's in each wing. But from what i can gather, the outer buldges were only introduced on the A-8, which seems odd if they had the same guns. But i have seen some built models of A-6's with these outer buldges. So, because i am not 100% certain, and because to remove them might do more harm than good, i have decided to leave them on. If its wrong, its wrong.

The aircraft i am building is White 5, the top one of this set.

Wings should be on soon, this is coming along quicker than my last build. 

I am a Norfolk man and i glory in being so


On the bench: Airfix 1/72nd Harrier GR.3/Fujimi 1/72nd Ju 87D-3

  • Member since
    March 2012
  • From: Corpus Christi, Tx
Posted by mustang1989 on Sunday, February 10, 2013 12:05 PM

Jester: I'm tellin ya!! The fit, the fit , the fit. That's what its all about with the Eduard kits!! Good job so far.

Bish: Good progress with that thing!! 1/72 nd scale. Gives me chills thinking about working with that scale!! Nice detail.


 Forum | Modelers Social Club Forum (proboards.com) 

  • Member since
    March 2010
  • From: MN
Posted by Nathan T on Sunday, February 10, 2013 12:40 PM

Bish-were the upper wing buldges to occomodate extra ammo for the same type of gun?


  • Member since
    December 2002
  • From: Bury St Edmunds, Suffolk, England
Posted by Bish on Sunday, February 10, 2013 12:53 PM

nathan, i'm not to sure. The books i have don't give a reason for them. The A-6, A-7 and A-8 all had the same wing guns, so if it was to accomodate the guns, then i would think all 3 would have them. The Squadron In Action book just describes them as raised access panel. I have a feeling they shouldn't be there, but in this case, i'm happy to live with it.

Joe, thanks. I guess its down to what your used to. After the detail in that Stuka engine, this is a breeze.

I am a Norfolk man and i glory in being so


On the bench: Airfix 1/72nd Harrier GR.3/Fujimi 1/72nd Ju 87D-3

  • Member since
    March 2010
  • From: MN
Posted by Nathan T on Sunday, February 10, 2013 1:32 PM

Your basically right on the wing guns Bish. With the exception of the Sturmbocks of course. Ill check my refs when I get home, but I'm thinking its to accomodate extra ammo. I'm not advocating you remove them, just curious myself to find out. And nice work on assembly. I too think the radio hatch hinges are too pronounced, and should look more flush with the fuselage.


  • Member since
    August 2009
  • From: MOAB, UTAH
Posted by JOE RIX on Sunday, February 10, 2013 1:44 PM

Jester - Nice start indeed. You know I had sort of the same initial reaction on my cowling gun cover but after I studied my references I saw that the initial fit on the kit was indeed correct.

Bish - Very, very, nice work. The PE set for your Academy is really sweet. In fact, I ordered that set today simply to get the rear deck detail piece and hope I can fit it to my Hasegawa kit. The PE set for the Hasegawa kit does not include that part. As far as those "gun covers" go on the Hasegawa kit they are separate pieces that are to be added for the F-8. It is apparent to me that they are to be omitted if one is building an early A-8. I studied my reference materials prior to installing them to ensure that they were indeed correct. It appears that they were prevalent on late A-8s and F-8s. it seemed odd to me that they remained on the F-8 as the outboard mg 151 was removed on them.  

"Not only do I not know what's going on, I wouldn't know what to do about it if I did". George Carlin

  • Member since
    December 2002
  • From: Bury St Edmunds, Suffolk, England
Posted by Bish on Sunday, February 10, 2013 1:45 PM

Thnaks Nathan. I am all for accuracy, but sometimes its a balance. If i don't think i am able to achieve accuracy with decent results, i would rather leave it be.

Just fitted the wings onto the fuselage and come across the first fit issue. Theres a bit of a gapr on top of the wings where they join the fuselage and its more prominate on one saide than the other. But nothing a little filler hasn't sorted out.

I am a Norfolk man and i glory in being so


On the bench: Airfix 1/72nd Harrier GR.3/Fujimi 1/72nd Ju 87D-3

  • Member since
    December 2002
  • From: Bury St Edmunds, Suffolk, England
Posted by Bish on Sunday, February 10, 2013 1:52 PM

Thanks Joe. I did get an Eduard PE set for my Hase kit, will have to check if that bit is there. If i remember right, you got a different one to me as i think its now OOP.

My referances just say they were first fitted to the A-8. But that is the Squadron In Action book which are not always the most reliable. And the Walk Around mentions the in board gun stations and not the outboard. I do need to up grade my 190 referance books i think.

I am a Norfolk man and i glory in being so


On the bench: Airfix 1/72nd Harrier GR.3/Fujimi 1/72nd Ju 87D-3

  • Member since
    August 2009
  • From: MOAB, UTAH
Posted by JOE RIX on Sunday, February 10, 2013 2:00 PM

Indeed Bish, I too have the Squadron in actions and the Walk Around yet I got better reference on the guns and the hatches from the Aero Detail book. I highly recommend that for your library if you don't already have it. I forgot to ask you if the Academy kit there already had the hole for the gun sight and for the hand holds in the forward shroud or did you need to drill those out like I have to on the Hase kit?

"Not only do I not know what's going on, I wouldn't know what to do about it if I did". George Carlin

  • Member since
    December 2002
  • From: Bury St Edmunds, Suffolk, England
Posted by Bish on Sunday, February 10, 2013 3:40 PM

I don't have any Aero detail books, i will have to look into that.

No, there isn't a hole for the gunsight, in fact there isn't a gun site. That part is replaced by PE and there is a PE site as well. But i got those Quickboost resin ones the other day so will use those. By forward sroud, do you mean the bit at the front of the cockpit. If so, again no the kit didn't have thise but the PE part does.

I am a Norfolk man and i glory in being so


On the bench: Airfix 1/72nd Harrier GR.3/Fujimi 1/72nd Ju 87D-3

  • Member since
    January 2012
  • From: East Peoria, IL
Posted by stoutfella on Sunday, February 10, 2013 4:34 PM

Jester: Keep at it. My last build was the Revellogram P-38. Talk about fit issues Crying. Looking good, though.

Bish: 1/72? Yeah, I'm impressed. After spending a couple of years doing N scale model railroading, my eyes were happy that I came back to 1/48 aircraft. And I still have to take my glasses off and get real close to do almost anything. I don't expect to get anywhere near 1/72 unless it's a big bomber.

Cheers,

Stoutfella

On the bench: 1/48 Tamiya Bristol Beaufighter

On deck: 1/48 Tamiya P51-B

  • Member since
    January 2012
  • From: East Peoria, IL
Posted by stoutfella on Sunday, February 10, 2013 5:08 PM

Greetings,

I've gotten most of my painting done on the Tamiya A3. Started with what I thought was some fairly light preshading.
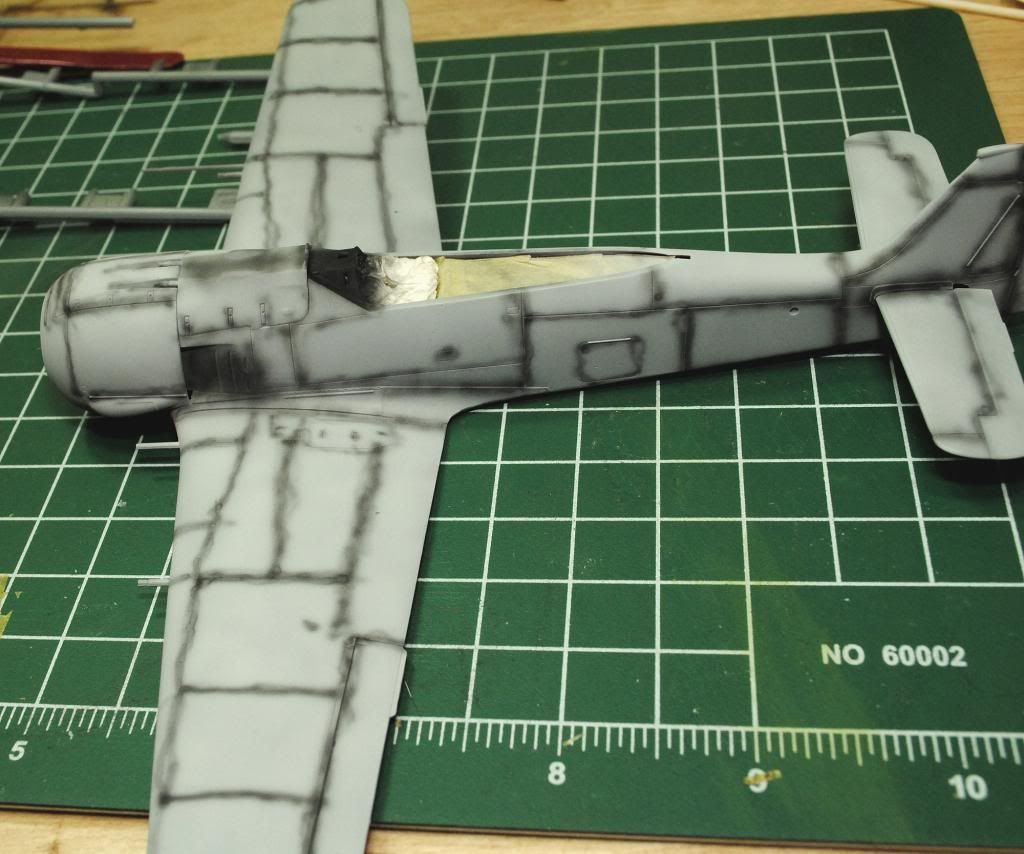
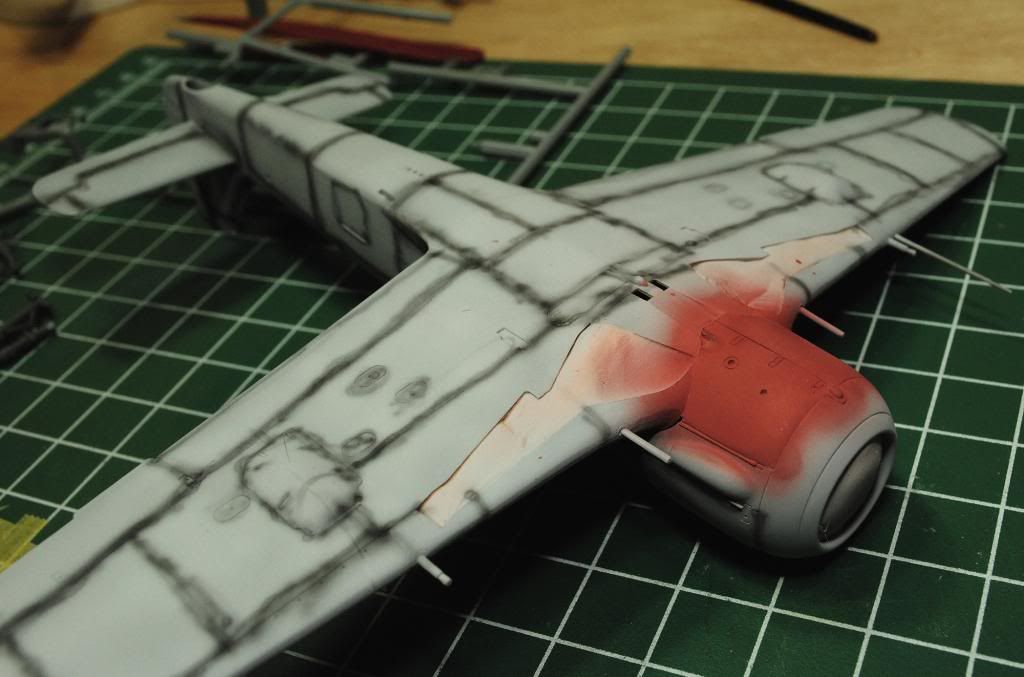
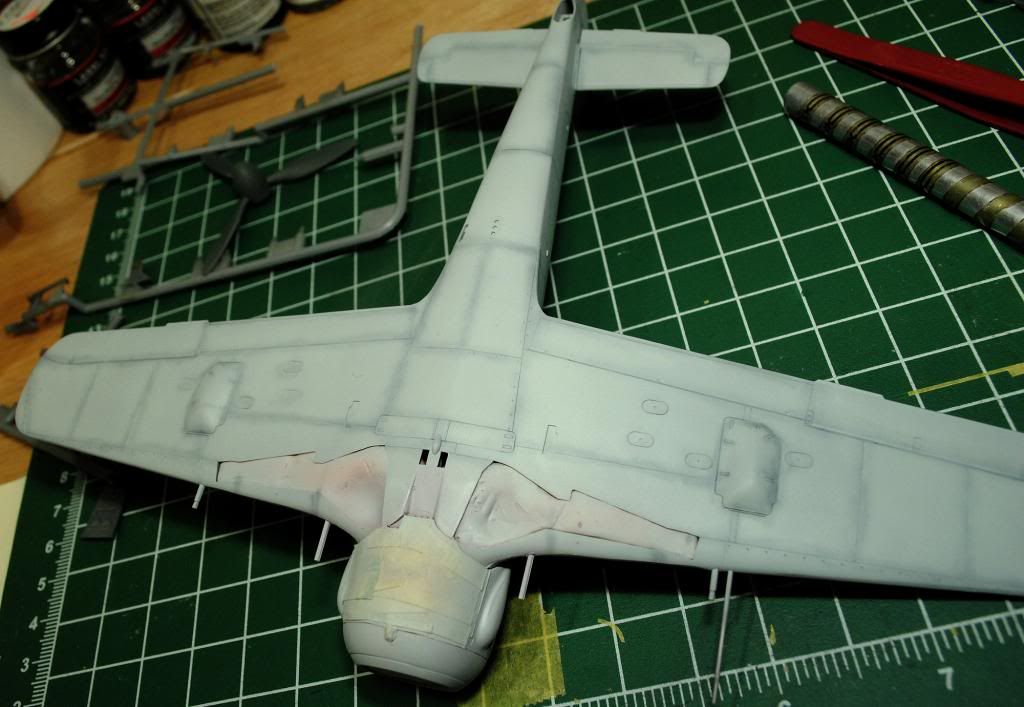
After the preshade, I sprayed MM acrylic RLM 76 on the underside and fuselage sides. In my neverending struggle to find the right paint mix, I thinned it way out with MM's acrylic thinner. Even at low pressure, it was on the verge of watery, but I was able to build up the color VERY gradually, which I think ultimately served me well in controlling how much of the preshade came through. I think I got it about right.
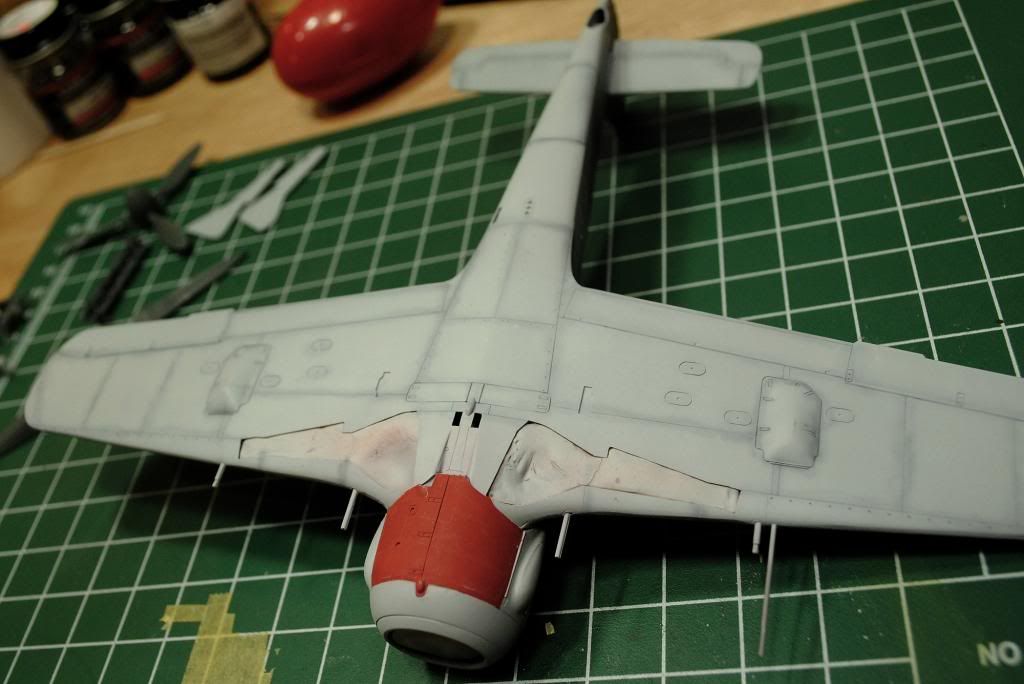
Next, I moved along to RLM 75 on the wings, fuselage spine and sides. This time, the mix was just too thin and runny, and I was getting sick of messing around trying to find exactly the right proportions. I've recently had great luck mixing Tamiya paint with 91 percent alcohol, but hadn't tried it with the MM acrylics. Slightly desperate and about to quit for the night, I mixed up a bit of the MM with alcohol. Lo and behold, I started getting a nice, smooth spray with no spitting, clogging or running.
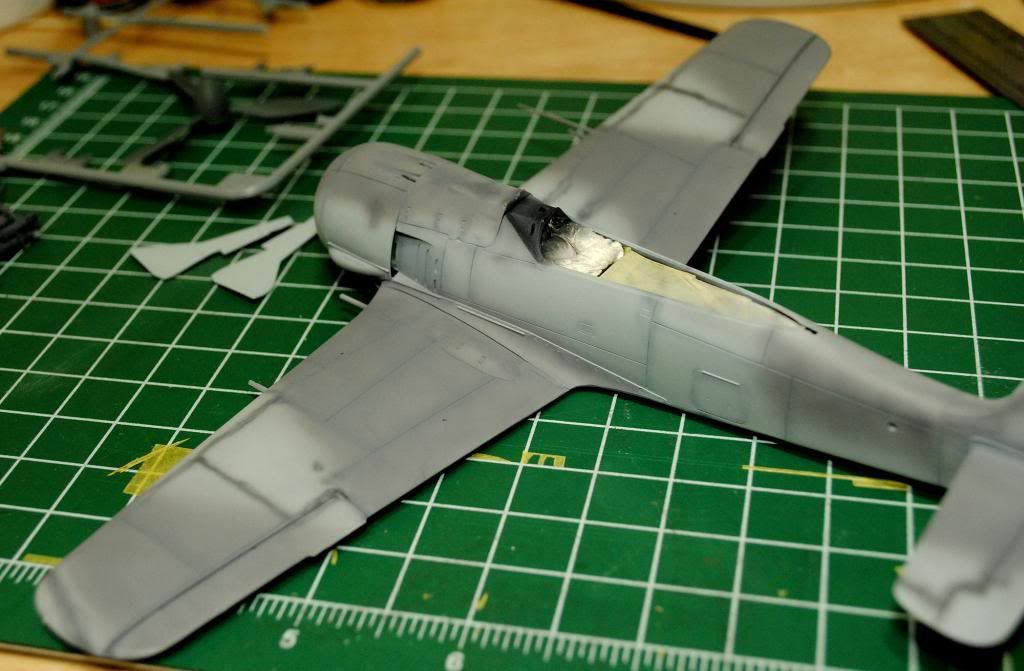
I freehanded the 75, but decided to mask the wings and horizontal stabilizers before spraying the RLM 74. I copied the Tamiya template and cut paper masks, holding them a bit off the surface with Silly Putty.
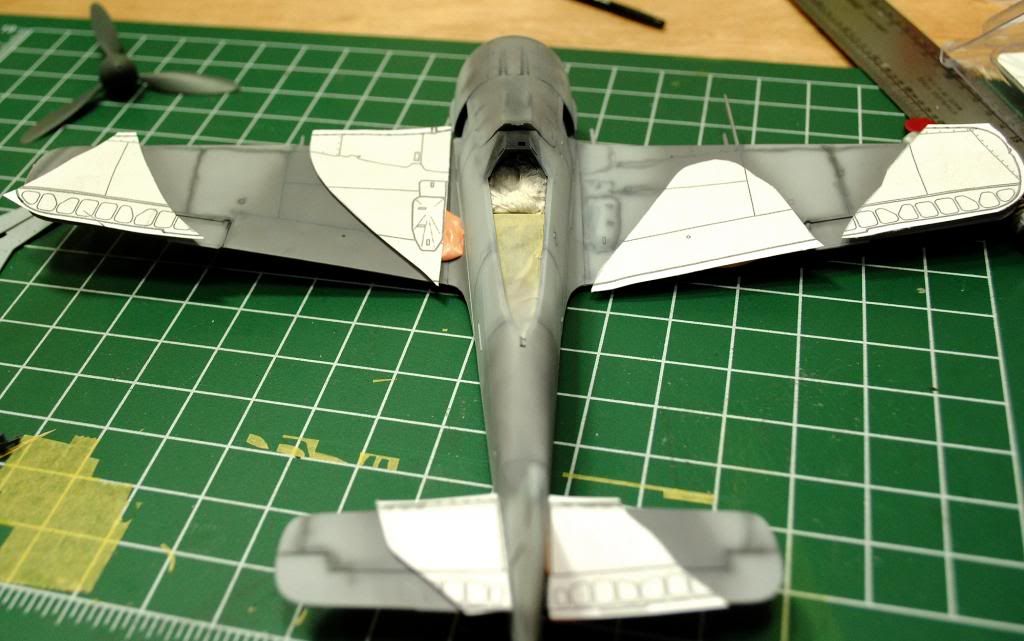
Even with the masks above the surface, I still got a fairly sharp edge on the splinter camo.
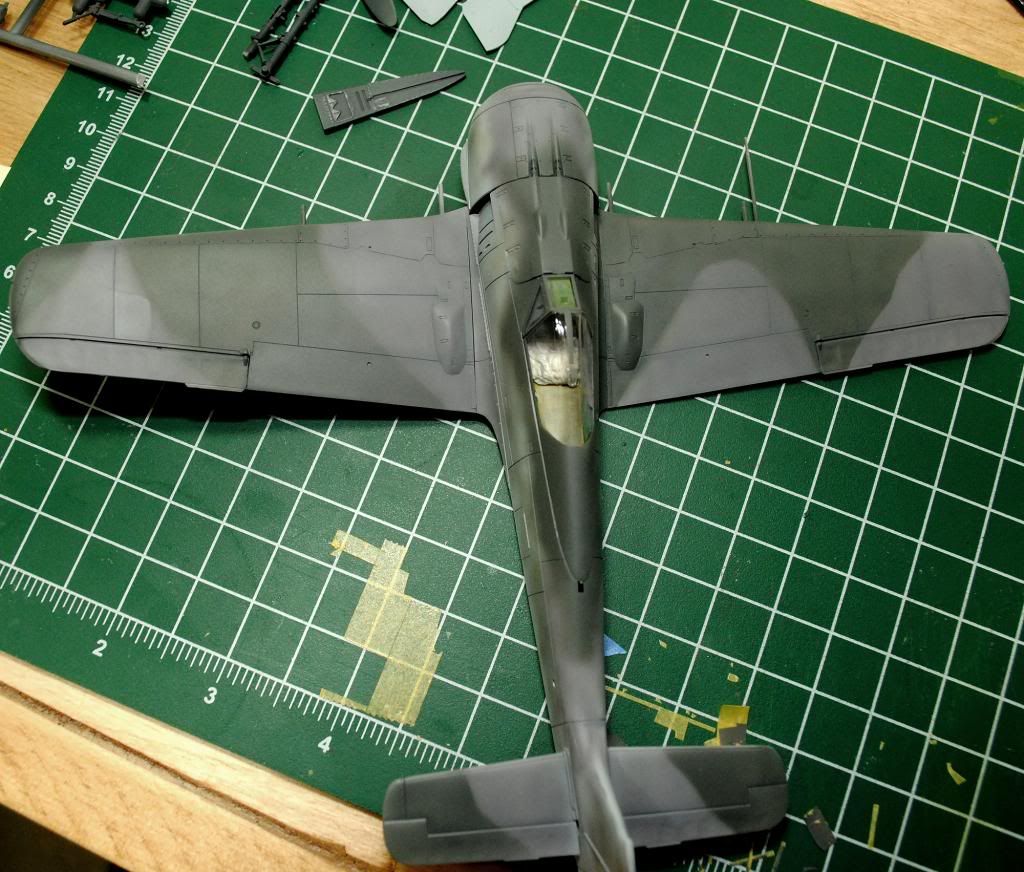
I did freehand the fuselage spine and the mottling on the sides. After diving in and spraying the 74, I realized I'd forgotten to mask the canopy, so I hurried up and did a quick tape job, then sprayed the canopy first with RLM 66, then with the RLM 74 I still had mixed.
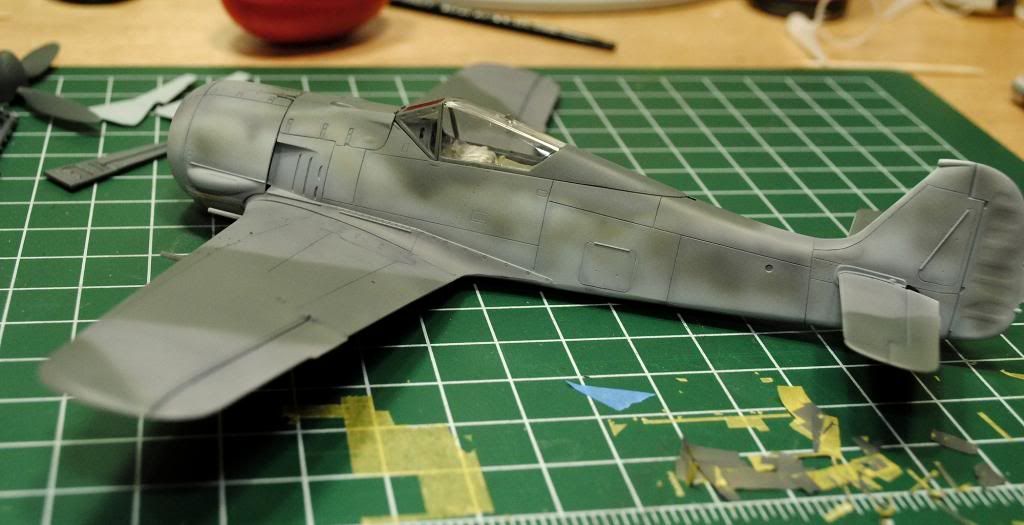
The painting instructions I've found indicate a fairly light mottle on the sides, so I tried not to overdo it. It's a combination of RLM 74, 75 and a bit of 02. I gotta admit, I've been sweating the mottle painting for months now, anticipating that I'd eventually have to tackle it for the 190s and 109s, but not feeling confident at all in my abilities. No matter how much I practiced on paper or scrap plastic, it never looked quite right and I never felt like I had control over the process. Well, imagine my delight when I hit upon the MM/alcohol combination and I suddenly felt as if I had total control over the airbrush. I know it ain't perfect, but I'll tell ya', for my first shot, I'm pretty darn pleased.
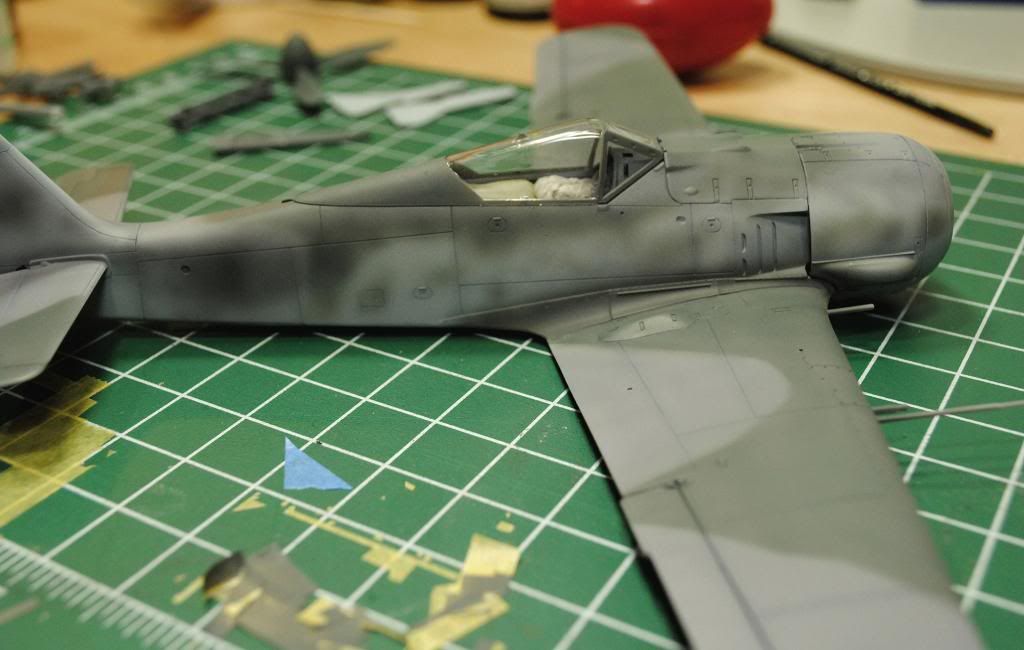
As I've posted previously, I've felt like I've been battling airbrush demons constantly, first with the Paasche Talon, and to some degree with the Iwata HP-CS I got for Christmas. And several people had suggested that the Iwata was great for the broad strokes, but not so good for fine detail work. Well, once I hit the right mix with the paint, I felt like I could do anything with the Iwata. Again, it just seemed like I had total control of the brush, a really nice feeling after so many frustrating battles. I know some paint won't work well with the alcohol mix, but I'm finding that with Tamiya and now MM acrylic, it's a winner.

OK, enough of that. My next challenge with the Iwata will be taking another shot at spraying Future. The one time I tried it with the Paasche, it didn't go well. But I've got a nice smooth surface to start with here, so I may give it another go, after trying it on some scrap, of course.

Cheers,

Stoutfella

On the bench: 1/48 Tamiya Bristol Beaufighter

On deck: 1/48 Tamiya P51-B

  • Member since
    August 2009
  • From: MOAB, UTAH
Posted by JOE RIX on Sunday, February 10, 2013 5:29 PM

Bish - Yes indeed, that is exactly what I am referring to. I do believe you will be quite happy you ordered the quickboost sights. I'm not saying they're easy to work with but, they will look good. Thanks to studying my reference material prior to carving an opening in the forward cockpit shroud for the gun sight I found that the sight is actually off set to the right side of the cockpit/pilot.

Stoufella - An absolutely outstanding effort on your part. That camo and the preshade turned out awesome. Yeah, I too harbor an inner fear of attempting mottling freehand but, I will finally succumb someday.  

"Not only do I not know what's going on, I wouldn't know what to do about it if I did". George Carlin

  • Member since
    December 2006
  • From: N. Georgia
Posted by Jester75 on Sunday, February 10, 2013 5:32 PM

Bish- You guys amaze me with your detail in 72nd!!! I really like the scheme you have picked up, looking forward to seeing that checkerboard on the nose!!

Wow Stout, that is looking very sweet!! I think the preshading is perfect and so is the mottle!!! This GB will also be my first mottle camo scheme and I also have been having difficulty with MM acrylics using their brand of thinner. Will definitely pick up some 91% alcohol tomorrow!! What kind of ratio's are you using with the MM acrylics??

Eric


JOIN OUR COMMUNITY!

Our community is FREE to join. To participate you must either login or register for an account.

SEARCH FORUMS
FREE NEWSLETTER
By signing up you may also receive reader surveys and occasional special offers. We do not sell, rent or trade our email lists. View our Privacy Policy.