SEARCH FINESCALE.COM

Enter keywords or a search phrase below:

Fw 190 Butcher Bird 2013 (extended to June 2014) Group Build

564933 views
5865 replies
1 rating 2 rating 3 rating 4 rating 5 rating
  • Member since
    September 2011
  • From: Milaca, Minnesota
Posted by falconmod on Friday, March 28, 2014 7:48 AM

Thunderbolt,

  is that a dragon kit?  I'm not a fan of there cowling, the four pieces never seem to fit right all the way around the engine.  and that step by the cowling is the hardest to make look right once you've filled it. But I'm sure you'll get it,  just a deep breath and a little added patience.

John

On the Bench: 1/72 Ki-67, 1/48 T-38

1/144 AC-130, 1/72 AV-8A Harrier

  • Member since
    July 2011
  • From: minnesota
Posted by handiabled on Friday, March 28, 2014 7:44 AM

CoolLike a boss !!! Yes

  • Member since
    April 2005
Posted by Thunderbolt379 on Friday, March 28, 2014 7:41 AM

They did say that mounting a radial engine in a fighter was always a challenge -- it looks like a radial in a model is too!

M/TB379

http://worldinminiature.blogspot.com/

  • Member since
    April 2005
Posted by Thunderbolt379 on Friday, March 28, 2014 7:39 AM

Thanks, handi, but these are the 'before' shots, I'm just getting to grips with it. Plastic strip wherever there's a gap, then file the strip until the whole thing is as snug as possible. Superglue for strength, then filler and hope real hard I can cut it back effectively...

M/TB379

http://worldinminiature.blogspot.com/

  • Member since
    July 2011
  • From: minnesota
Posted by handiabled on Friday, March 28, 2014 7:39 AM

Sorry hit reply too soon,, as far as the gap,, hmmm there's no easy one for that one from me,,, Nathan or Joe or Mustang maybe have an answer as they have a firm grip of the 190 kits out there.....

  • Member since
    July 2011
  • From: minnesota
Posted by handiabled on Friday, March 28, 2014 7:34 AM

Good job there!  For some really unknown reason they put seams in the HARDEST placed combinations,,, too many angles coming together with no positive placement. A peg here or there at least would give some reference,, looks like you have it handled really well !!

  • Member since
    April 2005
Posted by Thunderbolt379 on Friday, March 28, 2014 7:29 AM

Today I did some test fitting and measuring of the gaps. Here's what I had to work with:
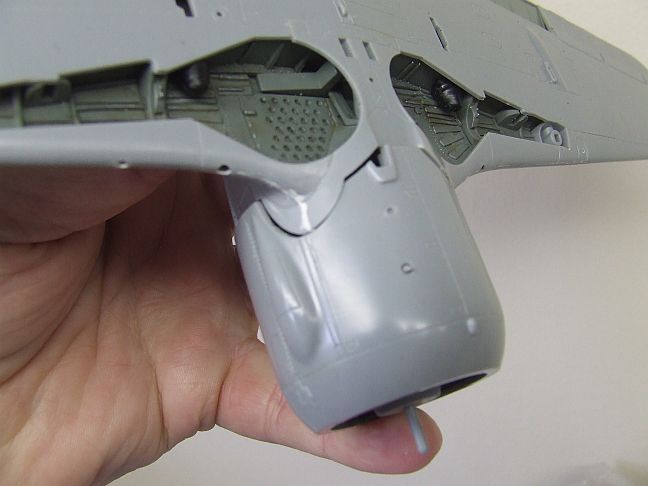
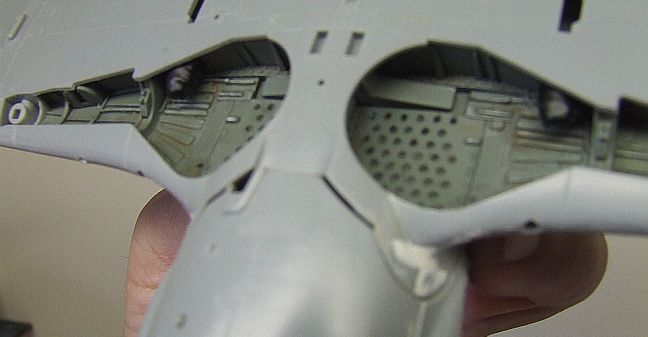
Quite major gaps, but when measured, little more that .020" in width. The step effect is more difficult to do something about. I started by gluing some .020" x .040" strip into the mating areas of the fuselage parts, and the intention is to file and scrape them to a contour that agrees with the corresponding parts. After that, I'm not sure, as there's really only filler work with, and the fact is that the engine housing, which is built up around the perfectly circular engine within, is simply not the same shape as the fuselage to which it is intended to join. It's too wide at about the 4 o'clock and 8 o'clock positions. I thought I might have mis-aligned the casing parts, but they are snuggly joined to each other and the engine, so I'm not sure where the problem could lie.

M/TB379

http://worldinminiature.blogspot.com/

  • Member since
    April 2005
Posted by Thunderbolt379 on Thursday, March 27, 2014 7:52 PM

Thanks Mustang, SS and Greg -- it was a bit of a fiddle but the joints seemed to behave themselves after a while. The next challenge is mating the engine and there are gaps a millimetre or more in width everywhere but across the upper cowl, so I'm presently thinking about building up the mating surfaces with strip plastic to take up the gaps. That might work and provide a firm gluing surface, but then there's the flushing aspect, and the curved wingroot areas have a step a millimetre deep, at least, so it's going to be in interesting exercise. Simply filling it is an option, but the curved joint should be visible... has anyone else encountered this problem with the big Hasegawas before?

M/TB379

http://worldinminiature.blogspot.com/

  • Member since
    May 2013
  • From: Indiana, USA
Posted by Greg on Thursday, March 27, 2014 7:15 PM

Handi, I thought scratch build version I was good. V2 is amazing!

Thunderbolt, looking like an FW indeed. Reminds me I need to start at my wing joins soon. Yours surely look good.

  • Member since
    April 2013
Posted by SchattenSpartan on Thursday, March 27, 2014 1:49 PM

Handi: Fantastic scratchbuilding! It's looking really busy behind that access hatch.

John: Very nice work on the camo and decals!

Mike: Looks like you got all your wingroot problems sorted out!

  • Member since
    September 2011
  • From: Milaca, Minnesota
Posted by falconmod on Thursday, March 27, 2014 7:25 AM

Well no pictures this morning I forgot the camera at work.   But I got the snake decal on the port side,  what a pain,  the Eagle cal decals I'm finding are a little fragile,  the front portion of the snake broke into about 3 pieces when I put it on,  but it's all together now,  only panicked for a few minutes.

  I may give the rest of them a coat of the Microscale liquid decal film to strengthen them up.

John  

P.S.   and thanks for all the comments on my build

On the Bench: 1/72 Ki-67, 1/48 T-38

1/144 AC-130, 1/72 AV-8A Harrier

  • Member since
    March 2012
  • From: Corpus Christi, Tx
Posted by mustang1989 on Thursday, March 27, 2014 4:33 AM

Good progress Thunderbolt!! Looks like you have your wing root gaps way under control there!


 Forum | Modelers Social Club Forum (proboards.com) 

  • Member since
    July 2011
  • From: minnesota
Posted by handiabled on Wednesday, March 26, 2014 7:07 AM

Looking good Sir!! Yes

  • Member since
    April 2005
Posted by Thunderbolt379 on Wednesday, March 26, 2014 6:37 AM

A tiny bit of progress, I installed the guns in the cowling, painted and masked them, and inmstalled the cowling. She's just starting to look like a FW now. I also zapped some tire black onto the landing gear today.

M/TB379

http://worldinminiature.blogspot.com/

  • Member since
    March 2012
  • From: Corpus Christi, Tx
Posted by mustang1989 on Tuesday, March 25, 2014 8:38 PM

Good grief handi! You sure you didn't forget an extra pair of pilots gloves and a roll of toilet paper????? Good detail!!


 Forum | Modelers Social Club Forum (proboards.com) 

  • Member since
    August 2009
  • From: MOAB, UTAH
Posted by JOE RIX on Tuesday, March 25, 2014 8:17 PM

Handi: Wow! Very cool! That is amazing looking.

Flavonoids??..I like it.Big Smile

"Not only do I not know what's going on, I wouldn't know what to do about it if I did". George Carlin

  • Member since
    September 2011
  • From: Milaca, Minnesota
Posted by falconmod on Tuesday, March 25, 2014 7:46 PM

Blackdog

  It's RLM 74 and RLM 75  on the top  the bottom is RLM 76

John

On the Bench: 1/72 Ki-67, 1/48 T-38

1/144 AC-130, 1/72 AV-8A Harrier

  • Member since
    September 2013
Posted by blackdog62 on Tuesday, March 25, 2014 7:11 PM

Falconmod.    that  question about the camo used on your wings was for you. Sry my tablet  is using its own words.

  • Member since
    September 2013
Posted by blackdog62 on Tuesday, March 25, 2014 7:07 PM

Flavonoids. Can you tell me what your camp colors are on top the wings ?

  • Member since
    September 2013
Posted by blackdog62 on Tuesday, March 25, 2014 6:24 PM

Handi  That's really somthing. Great job.

  • Member since
    July 2011
  • From: minnesota
Posted by handiabled on Tuesday, March 25, 2014 5:19 PM

Many thanks !  I wasn't happy with the inside detail so ripped it out and redid,, started putting things inside so I can't change my mind again,, pleased but not super happy with it.


  • Member since
    May 2013
  • From: Indiana, USA
Posted by Greg on Tuesday, March 25, 2014 10:37 AM

Handi, that is some very nice scratch building, mate.

John, she's looking great. That scheme is really starting to come together.

  • Member since
    July 2011
  • From: minnesota
Posted by handiabled on Tuesday, March 25, 2014 6:24 AM

Looks great already,, waiting to see weathering and what other finishing touches on!

  • Member since
    March 2012
  • From: Corpus Christi, Tx
Posted by mustang1989 on Monday, March 24, 2014 8:24 PM

I love this part of a build John and this one's really coming alive with the cals man. Lookin' good!


 Forum | Modelers Social Club Forum (proboards.com) 

  • Member since
    August 2009
  • From: MOAB, UTAH
Posted by JOE RIX on Monday, March 24, 2014 5:40 PM

Sure looking good John. Nice solid progress.

"Not only do I not know what's going on, I wouldn't know what to do about it if I did". George Carlin

  • Member since
    September 2011
  • From: Milaca, Minnesota
Posted by falconmod on Monday, March 24, 2014 1:22 PM

I started putting on decals!  can't wait to get some flat coat on it and put on some weathering to get rid of that just off the assembly line look.

John

On the Bench: 1/72 Ki-67, 1/48 T-38

1/144 AC-130, 1/72 AV-8A Harrier

  • Member since
    July 2011
  • From: minnesota
Posted by handiabled on Sunday, March 23, 2014 3:04 PM

Thanks Joe R and Mustang !!   Herman was probably bored with my fumbling's and took a nap.....

  • Member since
    August 2009
  • From: MOAB, UTAH
Posted by JOE RIX on Sunday, March 23, 2014 2:34 PM

Great stuff Handi! Appears to me, from that first pic, that Herman is down with exhaustion. Sure he doesn't need a Red Bull?

"Not only do I not know what's going on, I wouldn't know what to do about it if I did". George Carlin

  • Member since
    March 2012
  • From: Corpus Christi, Tx
Posted by mustang1989 on Sunday, March 23, 2014 12:38 PM

Keep it coming handi!!! This is coming along nicely!!


 Forum | Modelers Social Club Forum (proboards.com) 

  • Member since
    July 2011
  • From: minnesota
Posted by handiabled on Sunday, March 23, 2014 12:31 PM

Thanks for the kind words all around ! thunder hope that you have the wing root handled,, it still amazes me the fit of some of the kits out there.... Herman fashioned a remote compass and other components with left over hunks of resin and sheet styrene, and a left over o2 tank from a previous build,,, thusly the yellow,, lots to do yet...as always Thanks for lookin!


JOIN OUR COMMUNITY!

Our community is FREE to join. To participate you must either login or register for an account.

SEARCH FORUMS
FREE NEWSLETTER
By signing up you may also receive reader surveys and occasional special offers. We do not sell, rent or trade our email lists. View our Privacy Policy.