SEARCH FINESCALE.COM

Enter keywords or a search phrase below:

Fw 190 Butcher Bird 2013 (extended to June 2014) Group Build

564932 views
5865 replies
1 rating 2 rating 3 rating 4 rating 5 rating
  • Member since
    April 2013
Posted by SchattenSpartan on Sunday, March 23, 2014 5:51 AM

Mike: I'm glad to hear that you got those wingroot fit issues sorted out. Looking very good so far!

Handi: I love the work you did on that access hatch!

I had the same problems while trying to access the site...

  • Member since
    April 2005
Posted by Thunderbolt379 on Saturday, March 22, 2014 11:07 PM

Maybe there's some work going on behind the scenes with the site...

Just doing a few small jobs, exhausts mounted, wheels assembled and masked, and continuing to scratch and fret at the wing joints...

M/TB379

http://worldinminiature.blogspot.com/

  • Member since
    August 2009
  • From: MOAB, UTAH
Posted by JOE RIX on Saturday, March 22, 2014 10:54 PM

Handi: Nicely executed surgery and scratch building. Excellent attention to detail.

Yeah, I've experienced the same inability to access the site the past two mornings. It's all cleared up by the time I get on on my lunch break though.

"Not only do I not know what's going on, I wouldn't know what to do about it if I did". George Carlin

  • Member since
    March 2012
  • From: Corpus Christi, Tx
Posted by mustang1989 on Saturday, March 22, 2014 7:16 PM

Bish

Mike, I had the same issue the last two mornings I have tried to log on.

I think we are coming out of the funk now guys. Its been a helluva lot better today.


 Forum | Modelers Social Club Forum (proboards.com) 

  • Member since
    December 2002
  • From: Bury St Edmunds, Suffolk, England
Posted by Bish on Saturday, March 22, 2014 6:43 PM

Nice work there guys, I like what your doing with that panel Handi.

Mike, I had the same issue the last two mornings I have tried to log on.

I am a Norfolk man and i glory in being so


On the bench: Airfix 1/72nd Harrier GR.3/Fujimi 1/72nd Ju 87D-3

  • Member since
    March 2012
  • From: Corpus Christi, Tx
Posted by mustang1989 on Saturday, March 22, 2014 6:32 PM

Beautiful cut up job Handi!!! Just love all those open panels!!!


 Forum | Modelers Social Club Forum (proboards.com) 

  • Member since
    July 2011
  • From: minnesota
Posted by handiabled on Saturday, March 22, 2014 3:49 PM

Thunder I am looking forward to color on your bird!  Herman and I clearance the wings for the pe flaps and resin gun bays and opened the top wings for viewing.  Herman hacked an access door open so all the detail inside is next. Hopefully tomorrow the floor trusses fashion some fuel tanks and the rest of the interior ..

Thanks for looking and all the kind words!


  • Member since
    April 2005
Posted by Thunderbolt379 on Friday, March 21, 2014 9:33 PM

Joe -- the left root is actually pretty good, it was just a  case of smoothing the canon bay panel, but the other side is never going to be what it should be and that's a matter of minimising the noticeability...

Cheers, M/TB379

http://worldinminiature.blogspot.com/

  • Member since
    August 2009
  • From: MOAB, UTAH
Posted by JOE RIX on Friday, March 21, 2014 9:07 PM

Handi: Beautiful detailing job. That just looks fantastic.

Mike: Yikes, That is a nasty step you have there at the wing root. I am sure you'll get 'er licked though. Otherwise everything is looking very nice.

"Not only do I not know what's going on, I wouldn't know what to do about it if I did". George Carlin

  • Member since
    April 2005
Posted by Thunderbolt379 on Friday, March 21, 2014 5:14 PM

Thanks, guys, it's great to be appreciated, especially by the multi-talented artists in this crew!

SS - thanks for putting me onto Miracle Masks, I shall have to follow that lead up as there are certainly some custom mask projects that have had me wondering what to do. If they can cut adhesive masks to order, that solves everything!

I tried posting last night but couldn't get onto the forums, my computer was refusing to come here, something about a security certificate error! It seems to have cleared today. Here's the A-8 as she stands right now:

I'm doing battle with the area where the wing roots mates up to the engine housing -- or not. The fit is atrocious and is going to call for scratchbuilding of some sort. I'm trying to see how it should look on the real plane and so far the bare fit of the kit looks nothing like reality. I foresee a great deal of putty...

Mike/TB379

http://worldinminiature.blogspot.com/

  • Member since
    March 2012
  • From: Corpus Christi, Tx
Posted by mustang1989 on Friday, March 21, 2014 5:02 PM

John: I'm loving that paint job man!! Good job on the mottle effect!

Mike:That's some good work on that pit brother!!!

Handi:I like how your handling that detail. Hermann's gotta love it.(no slap today!!).


 Forum | Modelers Social Club Forum (proboards.com) 

  • Member since
    September 2013
Posted by blackdog62 on Friday, March 21, 2014 4:04 PM

This is going back a few pages

GREG.   Thank you yes I'm proud of how my kit turns out. Surprised my self on that.  :)

RIGIDRIDER.    Thank you.

BISH. Thank you in the last 2 yrs I work on a revell 109 in 1/48  and 2 tamyia flavoring and a pack 40 I remembered them from childhood as being easy so I used to get my modeling legs back but I never finished any of them. Modeling seams to be like bike riding you never forget LOL I did have my problems on this build.

NATHAN.    Thank you I remembered the info you sent me on this a/c being blue 12 I just used the decals from the kit. The left wing root was the biggest problem then I cracked my filler on the front of the wings then I didn't fix before photos. Me being lazy :) but I did use your info for primer spots I did look at the black &white photo wrong then did it wrong on the legs they should have bin much smaller.

JOERIX.    thank you the paint job was the reason I chose this kit. when I was a kid builder  it seemed anything german was painted dark grey and or light grey. Like all the old war movies. LOL

SHATENSPARTAN.  Thank you.  A lot of the things I did on this kit I learned on this GB LIKE the brake lines.

  • Member since
    July 2011
  • From: minnesota
Posted by handiabled on Thursday, March 20, 2014 7:20 PM

Good info to know!  Herman made what was visible from the wheel bays a bit busier by adding some different sized lines, scratching some linkage and filling the empty side of a tank just in case it is seeable. More to come and Thanks  for the kind words all!


  • Member since
    April 2013
Posted by SchattenSpartan on Thursday, March 20, 2014 2:31 PM

Joe: She looks absolutely gorgeous! I love the streaking! Would you mind telling me how you get that nice effect.

John: Excellent work on that camo pattern!

Mike: Looking damn fine there! I highly recommend Miracle Masks. Mal is a great guy and can cut you just about any mask you need. He is even able to cut me masks for the nose art for Eileen:

Mal is really busy though ATM, so you might consider ordering from Joe at Scale Precision Masks. He can't cut maks for nose-arts, but slightly less complex things are no problem for him. I ordered masks for Eileen's Fuselage codes, serial number and national insignia and they look great.

Another very good option is Maketar Masks. They ran out of Kabuki (that yellow tape) so all their vinyl masks are 20% off right now. I didn't order anything from their site yet, but I'll do so this weekend.

Joe and the guys at Maketar have generic stencilling and insignia masks available, but you can order custom stuff via email. Mal only makes custom mask sets afaik...


  • Member since
    August 2009
  • From: MOAB, UTAH
Posted by JOE RIX on Thursday, March 20, 2014 9:16 AM

John: Great work on the camo and mottling. It's all looking excellent.

Mike: Very nice progress. Outstanding stuff from you so far.

"Not only do I not know what's going on, I wouldn't know what to do about it if I did". George Carlin

  • Member since
    April 2005
Posted by Thunderbolt379 on Thursday, March 20, 2014 8:16 AM

Thanks! Montex, that's a name I've heard -- I did a search and found a supplier here in Aus, they have sets for the A-8 in stock. Looks like I'll be giving them a whirl!

M/TB379

http://worldinminiature.blogspot.com/

  • Member since
    July 2011
  • From: minnesota
Posted by handiabled on Thursday, March 20, 2014 7:53 AM

If I recall correctly Montex has a set with a variety of them,, I've used Montex before and wasn't disappointed

  • Member since
    April 2005
Posted by Thunderbolt379 on Thursday, March 20, 2014 7:45 AM

Lawdog, very sweet! Is this the Tamiya A-3? I like to paint the bands too, and mix my own RLMs. I like the 76 mix, I've used it several times now and it never fails. The streaking is good -- not a technique I've used so far, but it comes out looking great. I look forward to seeing how you handle this element over the final camo shade.

The A-8 is moving along, I've mated the fuselage halves, done some joint work, and seated the wing into place. It took a fair bit of pushing and pulling, scraping of mating surfaces and such, but I was finally happy with it. Now more joint work, the gunbay panels which cross the wing root will need some careful attention.

Here's the cockpit installed in the right half:
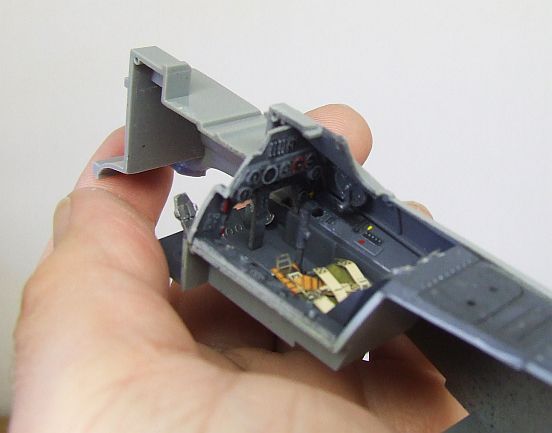
Pity is, you can't see much of this now the fuselage is together. I'm considering at open canopy to show the harness, at least.

I've also picked up the recent Italeri boxing of the 1:48 Trimaster D-9, if I can get it through from the US in decent time, leaving at least a month before the end of this GB, I'll be most interested in whacking it together, and maybe dressing it up with some AM decals.

Speaking of decals, I'm thinking masks might be the way to go for the open white crosses, to avoid the whole issue of carrier film. Can anyone recommend 1:32 masks that would be appropriate for the Hasegawa A-8?

Cheers, Mike/TB379

http://worldinminiature.blogspot.com/

  • Member since
    July 2011
  • From: minnesota
Posted by handiabled on Thursday, March 20, 2014 7:36 AM

Stunning work Gents!  

  • Member since
    September 2011
  • From: Milaca, Minnesota
Posted by falconmod on Thursday, March 20, 2014 7:32 AM

well I managed to get the next color on it, at about midnight.

now on to the yellow panels under the nose and the exhaust....

John

On the Bench: 1/72 Ki-67, 1/48 T-38

1/144 AC-130, 1/72 AV-8A Harrier

  • Member since
    August 2009
  • From: MOAB, UTAH
Posted by JOE RIX on Thursday, March 20, 2014 7:25 AM

Excellent work Joe. Your condensation streaking really adds to the realistic weathering. Certainly a choice technique that you execute extremely well.

"Not only do I not know what's going on, I wouldn't know what to do about it if I did". George Carlin

  • Member since
    March 2012
  • From: Corpus Christi, Tx
Posted by mustang1989 on Thursday, March 20, 2014 4:18 AM

This looks great lawdog!! I really enjoy watching you paint one up, and I hear you loud and clear about not using decals to replicate the Defense bands! I have tried the black first and then the white but I can never get the white to cover the black as well as the other way around. Good job so far here!


 Forum | Modelers Social Club Forum (proboards.com) 

  • Member since
    February 2012
  • From: Olmsted Township, Ohio
Posted by lawdog114 on Thursday, March 20, 2014 3:56 AM

I was getting caught up in here (haven't had much bench time lately).  John, Sweet mottling. That's looking fantastic and you have nailed those RLM colors so far.  Handi and Mike, those cockpits look fantastic.  Blackdog, congrats on finishing you Dora.  It looks great!.   Schatten, congrats on your trophy.  From the looks of that Tiger it deserved it. 

I did manage to get some work in last night.  I started with the BMW 801.  I would normally detail a radial with ignition wires, but in the 190 there is no point due to the cooling fan blocking everything.  I just gave it a quick Alclad paint job and a wash.  Its nothing fancy, I suppose you could paint it pink and nobody would really know the better.  Once done it got a burst of Tamiya Smoke X-19.  I like this because it gives it a nice dirty look. 

I decided to paint in the fuselage band and black panel on the side in lieu of the decals.  For the band, I painted the general area black and taped off the two borders.  I used the decal as a width reference.  I then sprayed the middle section white and the thin white border on the side panel.  These were then taped off and I sprayed everything XF-1 Flat Black.

Mayer's 190 appeared to be the standard dayfighter scheme of RLM 74/75 over 76.  I have two profiles of the plane and neither show any side mottling (bummer..I actually enjoy this part).  There appeared to be a little on the tail fin.  I started by painting the lower cowling and rudder XF-3 Yellow with a touch of XF-7 Red, then I taped them off.  I them mixed up a recommended recipe of XF-23 Light Blue, XF-66 Light Grey and XF-2 White.  I eyeballed it until it looked like an old Model Master bottle I had on hand.  I then added more XF-2 and did my normal process of condensation streaking and postshading to grime it up.  This looks about right to me but I will probably do more later.

After I sprayed the sides with the RLM 76.  I turned my attention to the RLM 75.  I used Gunze Aqueous for this and sprayed the upper wings and fuselage freehand.  I then lightened this with XF-2 Flat White and added condensation streaks. 

Well thats where I left off.  I should get to the RLM 74 fairly soon.  It appears me and John are at the same spot...lol...

Joe


 "Can you fly this plane and land it?...Surely you can't be serious....I am serious, and don't call me Shirley"


  • Member since
    March 2012
  • From: Corpus Christi, Tx
Posted by mustang1989 on Thursday, March 20, 2014 3:41 AM

Go for it John!! Can't wait to see the progress!!


 Forum | Modelers Social Club Forum (proboards.com) 

  • Member since
    September 2011
  • From: Milaca, Minnesota
Posted by falconmod on Wednesday, March 19, 2014 2:21 PM

Thanks guys,    I hope to get the second color on her tonight,  it's not snowing anymore so maybe I'll get home at a decent hour! Bang Head

John

On the Bench: 1/72 Ki-67, 1/48 T-38

1/144 AC-130, 1/72 AV-8A Harrier

  • Member since
    April 2013
Posted by SchattenSpartan on Wednesday, March 19, 2014 8:57 AM

Handi & Mike: Great work on those cockpits, both of you!

John: Nice to see some paint on her. Looking really nice so far!

  • Member since
    April 2005
Posted by Thunderbolt379 on Wednesday, March 19, 2014 6:52 AM

Thanks, Mustang! I've done a little adjusting with the sharp tools and she's closer now, it'll probably take less than I expected... I've also test-fitted the engine and I'm not hugely impressed with the way it seats against the fuselage, especially the wingroot bulge. I'll have to look at photos of the real aircraft to see what it's supposed to look like. Anyway, one step at a time, and that's to get the two major assemblies to mate up properly, seal them up with liquid glue by capillary action, deal with joints, then move on...

Cheers, Mike/TB379

http://worldinminiature.blogspot.com/

  • Member since
    March 2012
  • From: Corpus Christi, Tx
Posted by mustang1989 on Wednesday, March 19, 2014 3:21 AM

Thunderbolt379
I had hoped to have the wing on in this session, but that's not going to happen!

Been there , done that ........................................many times!! Hang in there Mike, you'll get through it pal.


 Forum | Modelers Social Club Forum (proboards.com) 

  • Member since
    April 2005
Posted by Thunderbolt379 on Wednesday, March 19, 2014 12:02 AM

Thanks, guys! I just closed up the fuselage. In test-fitting to the pre-built wing, it seems there is about a 1mm mismatch in the fit, so I'll be filing and scraping the wing roots until I can get the fuselage to drop in. I could have scraped/filed the fit of the fuselage halves as well, but the underside behind the wingroots is part of the lower wing part and is an exact fit to the fuselage, so go figure... I had hoped to have the wing on in this session, but that's not going to happen!

Mike/TB379

http://worldinminiature.blogspot.com/

  • Member since
    August 2009
  • From: MOAB, UTAH
Posted by JOE RIX on Tuesday, March 18, 2014 11:50 PM

Handi and Mike, Boy, you both have turned out some sweet looking cockpits. Great work indeed.

"Not only do I not know what's going on, I wouldn't know what to do about it if I did". George Carlin

JOIN OUR COMMUNITY!

Our community is FREE to join. To participate you must either login or register for an account.

SEARCH FORUMS
FREE NEWSLETTER
By signing up you may also receive reader surveys and occasional special offers. We do not sell, rent or trade our email lists. View our Privacy Policy.