SEARCH FINESCALE.COM

Enter keywords or a search phrase below:

Fw 190 Butcher Bird 2013 (extended to June 2014) Group Build

564933 views
5865 replies
1 rating 2 rating 3 rating 4 rating 5 rating
  • Member since
    August 2009
  • From: MOAB, UTAH
Posted by JOE RIX on Saturday, March 23, 2013 12:03 PM

Beautifully done Matt! I too am impressed with your engine and gun detail. Really well done. you've also done a remarkable job on the camo painting. It's clean and sharp. Do you have plans for another one for us?

"Not only do I not know what's going on, I wouldn't know what to do about it if I did". George Carlin

  • Member since
    March 2010
  • From: MN
Posted by Nathan T on Saturday, March 23, 2013 2:02 PM

Done, and Done! Had some time to add some pastels to the gear and wing roots last night. I also did a little bit of chipping with a silver pencil.

Here's Hasegawa's A8/R2, the boxing that includes photo etch side armor, which looks killer. I used Quickboost pitot tube, Master gun barrels, Ultracast tires, Eagle Cal decals, some spare Eduard pe in the cockpit, and I robbed a rear canopy from an Eduard kit so it would fit when posed open. I also had to rob a large blade prop from a Dora, as this aircraft featured the larger wooden prop. The fuselage was riveted with a riveter from RB. Weathering was done with a Flory's wash and some pin washes with oils, followed by post-shading with the airbrush:


  • Member since
    March 2010
  • From: MN
Posted by Nathan T on Saturday, March 23, 2013 2:09 PM

...And the Hasegawa A-4. This kit got a True details resin seat, Ultracast wheels, Master barrels, and the markings are a mix of kit decals with the stripes and crosses painted on. Same weathering and riveting/painting techniques as the A-8:


  • Member since
    March 2010
  • From: MN
Posted by Nathan T on Saturday, March 23, 2013 2:15 PM

...And the 2 mandatory menacing head on shots:

Mustang, thanks for this sweet group build. Hard to believe I'm all finished up. I know I'll do a third, I'm thinking of Eduard's A-9 with a few goodies, but I'm off to build some VVS stuff first. I probably won't start another 190 til this fall, but I'll definitely be stayin on board here to see the sweet builds being churned out. Hope you guys like finished models. I can't say enough good about these 48 scale Hase 190 kits, Except through every other kit away and just build these! Unless you want open panels, then its the Eduard one. These Hase kits need no filler work, they are 99% accurate, and the OOB detail in and out is great, but also plenty of AM out there for guys like me...only thing is the earlier kits such as the A-3s and -4s have some crappier decals, but they work out in the end...

See you guys later.


  • Member since
    December 2006
  • From: N. Georgia
Posted by Jester75 on Saturday, March 23, 2013 9:04 PM

Matt-both of those are very fine looking builds to be proud of!! I think I like the 152 better just because of those long wings and the panels just look cool opened like that!

Nathan-cant say enough about both of those birds!! Not sure if I like either better than the other. Going to have to pick up one of those Hase kits and see for myself. The clarity on the canopies is superb! The detail underneath them looks just as plain and clear as it would have if you'd just left them off.

What VVS stuff are you looking to build? I just picked up the new Zvezda Yak-3 and have the La-5 and the older ICM Mig-3 in the stash that look really really neat.

Eric


  • Member since
    December 2003
  • From: Charleston, SC
Posted by sanderson_91 on Saturday, March 23, 2013 9:45 PM

Nathan,

Very nice 190's!  I really like your paint work!

Steve


  • Member since
    August 2009
  • From: MOAB, UTAH
Posted by JOE RIX on Saturday, March 23, 2013 10:22 PM

Nathan, Your 190s are absolutely stellar. It has indeed been a pleasure to watch you demonstrate your  skills which, I might say are certainly top notch. I'm glad to hear you still be monitoring and I do hope you continue to offer your knowledge and tips.

I made a trip over to the nearest LHS to me last week and they had a Hasegawa FW 190 A-8 in their clearance stack for $25.00. I debated with myself yet decided it would only be another kit in my stash that would sit for a long while. Yet, hearing your accolades of the Hasegawa kits I will pick it up if it remains as I will be back over on Monday.

Take Care Nathan.

Joe

"Not only do I not know what's going on, I wouldn't know what to do about it if I did". George Carlin

  • Member since
    March 2010
  • From: MN
Posted by Nathan T on Saturday, March 23, 2013 11:11 PM

Steve, Joe Rix- Thanks for the good words. I'm glad you guys like them. Joe, glad you're learning from my mistakes, haha! Its good to know the wip helps others out. That sounds like a sweet deal at your LHS for only 25.00 bucks, especially if its 48 scale. Better grab it quick.

Jester- Thanks alot. I'd have to say, the Sturmbock is probably my favorite, even though I dig the striped cowling. I just love the looks of that weathered side armor. What matters is I'm happy with how they both turned out. And you know, you're right on my cockpit shots. They don't look that great in real life, but for once the camera makes it look pretty clear. As far as my VVS projects, I'm building Zvezda's Yak 3 right now, I just finished the cockpit tonite. I also got their La-5fn and an AM Yak 1b I'm just finishing up for the '43 gb, and have an Eduard Limited edition of the same kit on deck. After those I'm sure I'll be itching for another Wurger though.


  • Member since
    February 2011
  • From: Bent River, IA
Posted by Reasoned on Sunday, March 24, 2013 1:20 PM

Very sweet Nathan, a true show stopper.  BTW, that is a boat load of fire power on that bugger.

Science is the pursiut of knowledge, faith is the pursuit of wisdom.  Peace be with you.

On the Tarmac: 1/48 Revell P-38

In the Hanger: A bunch of kits

  • Member since
    December 2002
  • From: Bury St Edmunds, Suffolk, England
Posted by Bish on Sunday, March 24, 2013 2:54 PM

Nathan, stunning builds the pair. Deffinatly a pleasure building along side you. Some great talent in this GB and we already have some great finished builds.

I am a Norfolk man and i glory in being so


On the bench: Airfix 1/72nd Harrier GR.3/Fujimi 1/72nd Ju 87D-3

  • Member since
    October 2008
  • From: Georgia
Posted by Rigidrider on Sunday, March 24, 2013 3:04 PM

Nathan... Both your Birds are just EXCELLENT! Nicely done and finished... Hats off to ya!

Doug

When Life Hands You A Bucket Of Lemons...

Make Lemonade!

Then Sell It Back At $2 Bucks A Glass...

  • Member since
    March 2012
  • From: Corpus Christi, Tx
Posted by mustang1989 on Sunday, March 24, 2013 5:57 PM

Matt: Long nose birdies are friggin awesome looking and your's are no exception. You and Doug are really inspiring me to build a D-9 when I finish with this A-8/ R-2. I really like the photos with both displayed together. Really lets you see the contrast between the two. I enjoy your input and good work here and thank you for being a part of this build. Don't be a stranger. Will post your pics in the opening post, Joe

Nathan T; Knocked em dead with those two. Really like the weathering effect you applied. Great detail and awesome paint. I got back on mine yesterday morning and this morning trying to get the paint right. I think I'm headed in the right direction. While I'm fighting to get just one out you and Matt have managed to finish two!  Great goin guys. Hang around Nathan. It's great to have you here, Joe

I'll post yours in the opening post soon also.


 Forum | Modelers Social Club Forum (proboards.com) 

  • Member since
    March 2012
  • From: Corpus Christi, Tx
Posted by mustang1989 on Sunday, March 24, 2013 6:01 PM

Ok everybody. It's now official. This group build will be moved to the Group Build section (where it should have been in the first place) on Friday 29 March. Tim will be moving the whole build there so it will appear as it is here but in the correct section. It will still be accessible from "Your Discussions" so you will have no problem finding it. Just putting this out so that everyone is aware of the change. Thanks for everybodys participation, Joe


 Forum | Modelers Social Club Forum (proboards.com) 

  • Member since
    February 2003
  • From: Cameron, Texas
Posted by Texgunner on Sunday, March 24, 2013 6:04 PM

Although I'm not a member of this group build, all the beautiful builds have inspired me to take a few pics of my one and only FW.  I hope you don't mind if I post a couple pics of my 1/48 Fujima FW-190D-9 "Black 10", built several years ago.    If I'm offending some, please just let me know and I'll take them down.  Thanks, and tally-ho!

Gary


"All you mugs need to get busy building, and post pics!"

  • Member since
    March 2012
  • From: Corpus Christi, Tx
Posted by mustang1989 on Sunday, March 24, 2013 6:46 PM

Great job Texgunner! Thank you for sharing that with us! Wanna join????Come on......you know you wanna!!!!!


 Forum | Modelers Social Club Forum (proboards.com) 

  • Member since
    March 2010
  • From: MN
Posted by Nathan T on Sunday, March 24, 2013 7:20 PM

Reasoned, Bish, and Doug- Thanks for looking and glad you like them. Reasoned I agree about all that firepower, specially on the Sturmbock with the 30mm. Too bad they were most often removed along with the cowl Mg's to lighten them up to just keep up with the Allied fighters.

Mustang, can't wait to see your paint job, its been too long since we've seen your progress. No doubt it will turn out great. I'd love to build another, but not for a while yet. I'll still be here though, to make sure you don't screw anything up, lol!


  • Member since
    December 2006
  • From: N. Georgia
Posted by Jester75 on Sunday, March 24, 2013 7:57 PM

Gary, that is a sharp 190. Your photography is really good too. The only thing that might offend me is that your pictures look so much better than mine!!!Stick out tongue

Eric


  • Member since
    March 2012
  • From: Corpus Christi, Tx
Posted by mustang1989 on Monday, March 25, 2013 12:13 PM

Hey guys. Just a quick update. Playing around with the camoflage and think I have the system down a little bit. Have a couple of corrections to make but will be doing these when I get back from Dallas on either Wed or Thursday this week. A little blurry but here goes:


 Forum | Modelers Social Club Forum (proboards.com) 

  • Member since
    March 2010
  • From: MN
Posted by Nathan T on Monday, March 25, 2013 12:30 PM

Holy check out that camo! Is it all free hand? You captured that dense, heavy mottled look perfect I think.


  • Member since
    October 2006
  • From: Tucson, AZ
Posted by Archangel Shooter on Monday, March 25, 2013 2:02 PM

Between out of state friends visiting and battling a nasty sinus head cold for the last week, I haven't done much other than to research FW pics on the web.  Going to attempt some work on the kit today. Have been in awe of the previous posted pics of the in-work and completed birds, truely some beautiful work being accomplished here.

Scott

 Your image is loading...

 On the bench: So many hanger queens.


  • Member since
    March 2012
  • From: Corpus Christi, Tx
Posted by mustang1989 on Monday, March 25, 2013 4:40 PM

Nathan: Thanks for the comments. Yes it is free hand but I think I have the secret (at least well for myself) to accomplishing this soft edge mottle stuff. This is my third attempt at this. I applied the 76 over the sides and started out appyling the 74 in a irregular mottle pattern on the sides. I tried thin paint with low air pressure and got sloppy results................twice! The second attempt was less sloppy than the first but a light bulb came on in my head to apply a REALLY thinned out coat of 76 over the mottle pattern to get rid of the paint splatters that were a part of the 74 mottle application and WALLA! This is the end result. I have to soften up the edges of the upper camo pattern on the fuselage so what my plans are is to apply a thinned out coat of 76 along the border of the upper camo pattern to sofen up the demarkation line. Still working that issue in my head but for now thats what I have come up with.


 Forum | Modelers Social Club Forum (proboards.com) 

  • Member since
    March 2012
  • From: Corpus Christi, Tx
Posted by mustang1989 on Monday, March 25, 2013 4:43 PM

Archangel:Good to see you back around again. Looking forward to seeing you building again. Don't feel like the lone ranger! I've been movin like pondwater on my build.


 Forum | Modelers Social Club Forum (proboards.com) 

  • Member since
    March 2010
  • From: MN
Posted by Nathan T on Monday, March 25, 2013 5:22 PM

Wonder why such trouble with paint splatter Mustang? Is Vallejo just hard to use for up-close fine lines and spots? On thing I've learned: thinner isn't always better. Maybe thicker paint next time? You still have to spray the 75? I'm glad the overspraying worked and things are looking good. Practice makes perfect and sounds like you've been putting in the overtime on this kit.


  • Member since
    March 2012
  • From: Corpus Christi, Tx
Posted by mustang1989 on Monday, March 25, 2013 5:38 PM

Hey Nathan. Well I look at it this way. I started this thing and I'm going to finish it. One way or the other it will turn out the way I have envisioned it (or really friggin close!) I would use enamel paint as I know that goes on alot easier but I work in the house so I keep fumes to an absolute minimum. As far as paint brand...MM lifts really easy and so far Vallejo is working out fairly well. My experience with an airbrush on a more advanced level is what I think the problem is....or has been. The  75 is already on the upper pattern on the fuselage.


 Forum | Modelers Social Club Forum (proboards.com) 

  • Member since
    October 2008
  • From: Georgia
Posted by Rigidrider on Monday, March 25, 2013 6:37 PM

Not sure what your using, but when trying such a complex paint scheme, I thin the paint just a slight bit thinner then normal and crank the pressure up not down, to about 40 to 45 psi. Get fairly close and work in slight bursts. If your gun has a trigger, set to stop the travel of the trigger, play around a bit to find out where the pattern is best and stop the trigger travel at that point. Then like you said turn pressure back down and set back about 6 inches and paint like your going over pre shading. Just try on samples befor your birdie. Just my 2cents... What you have shown is looking great!

Take care

Doug

When Life Hands You A Bucket Of Lemons...

Make Lemonade!

Then Sell It Back At $2 Bucks A Glass...

  • Member since
    March 2012
  • From: Corpus Christi, Tx
Posted by mustang1989 on Monday, March 25, 2013 6:54 PM

Hey Doug. Thanks for the input man. That was actually my next step. I have two Badger 200 AB and a Badger Renegade Velocity AB. The Velocity is being finicky with me. Got a weird spray/ trigger reaction. The 200's have been working out for me for a while now and give reliable results so thats the brush I'm working with. I have a compressor with a moisture trap and the regulator so thats not an issue. The pressure settings you had in mind were what I was going to go with. Just gotta wait until I get back from Dallas. I'll probably work with it on Thursday morning.


 Forum | Modelers Social Club Forum (proboards.com) 

  • Member since
    March 2012
  • From: Corpus Christi, Tx
Posted by mustang1989 on Monday, March 25, 2013 6:57 PM

Ok everybody. It's now official. This group build will be moved to the Group Build section (where it should have been in the first place) on Friday 29 March. Tim will be moving the whole build there so it will appear as it is here but in the correct section. It will still be accessible from "Your Discussions" so you will have no problem finding it. Just putting this out so that everyone is aware of the change. Thanks for everybodys participation, Joe

I will continue to post this once a day until Thursday. After that this build will be in the Group Build Section.


 Forum | Modelers Social Club Forum (proboards.com) 

  • Member since
    October 2006
  • From: Tucson, AZ
Posted by Archangel Shooter on Monday, March 25, 2013 7:18 PM

 Your image is loading...

 On the bench: So many hanger queens.


  • Member since
    December 2006
  • From: N. Georgia
Posted by Jester75 on Monday, March 25, 2013 8:17 PM

Mustang, that mottle is looking super!! Whatever your doing ,keep it up!!

Got my Dora glossed and decaled tonight. I decided to leave most of the stenciling off as according to Dortenmanns memoir, the aircraft had just been repainted in the 82/83 scheme so I am going with they didnt spend the extra time to reapply all the stencils.
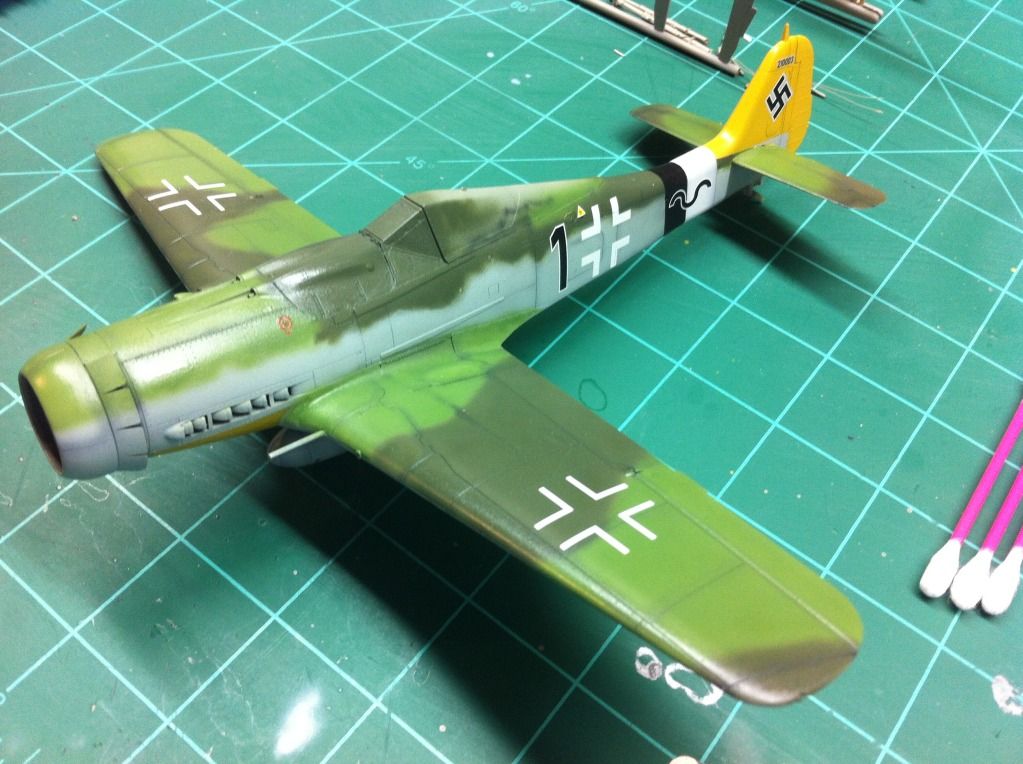
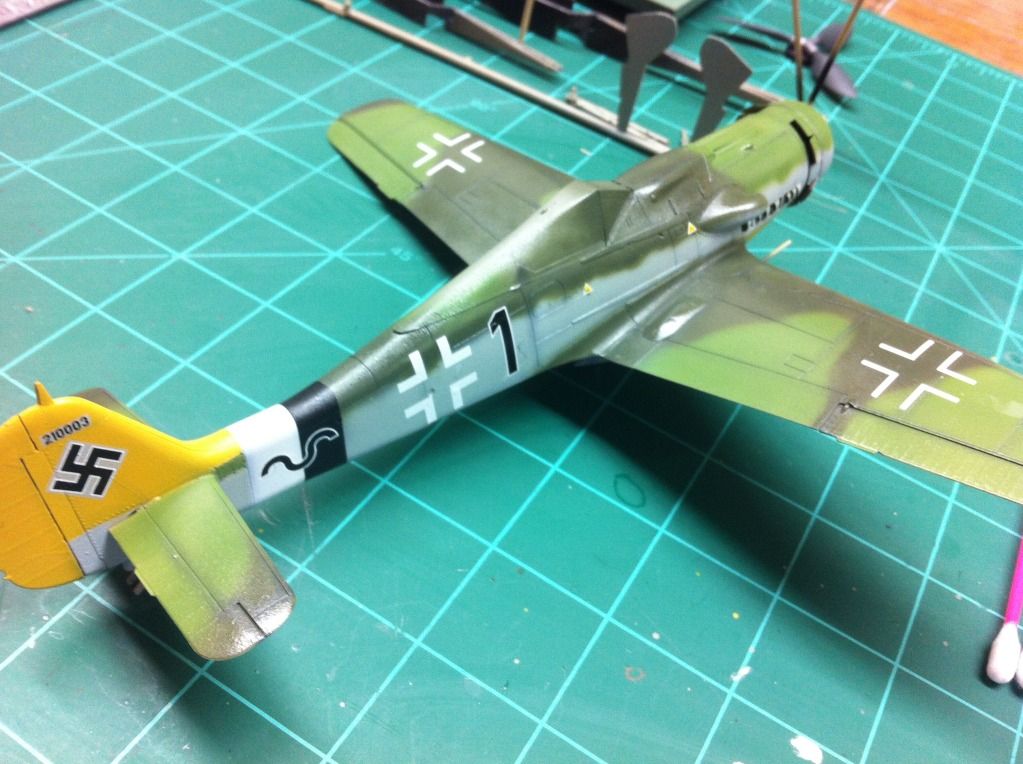
And the dreaded spinner spiral decal. Its not evenly spaced and quite frankly I dont care as long as it lays down smooth!! These spirals (along with 1/700 pe ship railings) are the bane of my existence, lol.

Letting them cure over night, another light clearcoat tomorrow and then on with the wash.

PS Oh yeah, got to fill in the black insides on the fuselage crosses, thanks Eduard???Confused

Eric


  • Member since
    March 2012
  • From: Corpus Christi, Tx
Posted by mustang1989 on Monday, March 25, 2013 9:50 PM

Jeeeeez! Out of the wood work this guy comes!! Great work Eric. Man I'm trying to get that good with an airbrush. What the hey are you talking about with that spinner? That looks terrific! Go to bed and get up and look at that thing again buddy! I've got a D-9 in the works . Should be here by Saturday!!


 Forum | Modelers Social Club Forum (proboards.com) 

JOIN OUR COMMUNITY!

Our community is FREE to join. To participate you must either login or register for an account.

SEARCH FORUMS
FREE NEWSLETTER
By signing up you may also receive reader surveys and occasional special offers. We do not sell, rent or trade our email lists. View our Privacy Policy.