SEARCH FINESCALE.COM

Enter keywords or a search phrase below:

Fw 190 Butcher Bird 2013 (extended to June 2014) Group Build

564934 views
5865 replies
1 rating 2 rating 3 rating 4 rating 5 rating
  • Member since
    April 2013
Posted by SchattenSpartan on Tuesday, February 18, 2014 8:54 AM

Nathan: Thanks for posting those reference pics of the bulkhead. I didn't know there were 190s with RLM66 in that area. Just out of curiosity: All the Pictures Show Doras, were there some A-models painted like that as well?

Joe: Using shrink tubing is a great idea! It would be great if you could build that Eduard kit as well. come on, we both know you want to do it...

  • Member since
    March 2012
  • From: Corpus Christi, Tx
Posted by mustang1989 on Tuesday, February 18, 2014 4:49 AM

Just like the real bird in the war...........It came all too little, too late for the GB!!!


 Forum | Modelers Social Club Forum (proboards.com) 

  • Member since
    March 2012
  • From: Corpus Christi, Tx
Posted by mustang1989 on Tuesday, February 18, 2014 4:14 AM

Hey Greg you could always mask em off the way I've done the last two Eduard builds with Master Models gun barrels. A little electrical wire heat shrink tube. Whan you're ready to take em off theres just a little touch up where the tubes meet the fuselage....................

 By the way.....your build looks great so far Greg!!


 Forum | Modelers Social Club Forum (proboards.com) 

  • Member since
    April 2013
Posted by SchattenSpartan on Tuesday, February 18, 2014 12:50 AM

Joe: Looking very nice!

Greg: Thanks for that pic! The paint job on your barrels looks great indeed!

Nathan: I was actually planning on glueing the barrel tips in at the end of the build, but my approach would've been way more tricky then what you suggested. Greg is using those 2 piece Master barrels BTW.

  • Member since
    March 2010
  • From: MN
Posted by Nathan T on Monday, February 17, 2014 9:48 PM

Heck I was just gonna comment how I liked the metallic drybrushing on them. Are these Master? The ones I use the barrel tip comes as a separate piece anyway.


  • Member since
    May 2013
  • From: Indiana, USA
Posted by Greg on Monday, February 17, 2014 9:06 PM

Live and learn, Nathan. I really didn't want the barrels sticking out for the rest of the build. Too late now, but I'll know next time. :) BTW, these are brass barrels, with a paint job I'm not very happy with.

  • Member since
    March 2010
  • From: MN
Posted by Nathan T on Monday, February 17, 2014 7:41 PM

Thats how you have to do it Greg/Clemens, if you don't want the barrels sticking out during the whole build. I usually use Master Barrels, and have to sandwich the rear part in between the wing halves, then attach the barrels at the end of the build.


  • Member since
    May 2013
  • From: Indiana, USA
Posted by Greg on Monday, February 17, 2014 7:33 PM

Clemens, from what I can see sliding the rear section of M151 in through the gear bay won't work. Hopefully this shot shows why....


I suppose you could install those rear sections (and kit parts J12 and J13 (if memory serves, the Eduard parts that attach to the gun bay rear bulkhead), then press the barrel ends in after the wing halves are joined. That'd scare me a little, might not bother you a bit. Smile

  • Member since
    May 2013
  • From: Indiana, USA
Posted by Greg on Monday, February 17, 2014 10:45 AM

Nathan, thanks for the additional color info and the reference pics!

Joe, your stuff looks better in process than mine does after all done. Smile

  • Member since
    March 2012
  • From: Corpus Christi, Tx
Posted by mustang1989 on Monday, February 17, 2014 4:30 AM

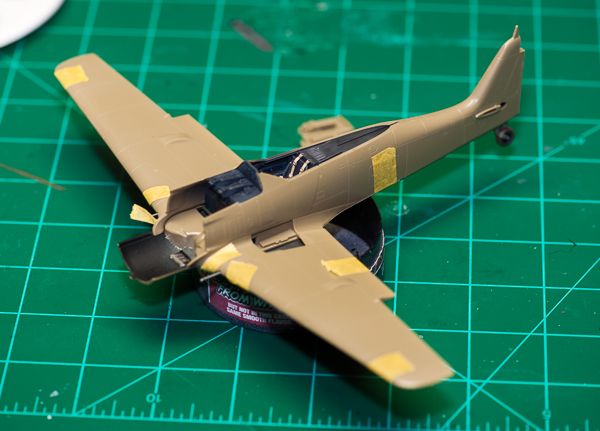
Speaking of panels this is where I'm at with those. Still have to re-work the weathering on the inside of them but the outside is coming along. That air intake is two pieces and not along the seam either. The intake ring is a separate piece that still has a few gliches in it.


 Forum | Modelers Social Club Forum (proboards.com) 

  • Member since
    March 2012
  • From: Corpus Christi, Tx
Posted by mustang1989 on Monday, February 17, 2014 4:23 AM

Now THAT makes sense. I was wondering about that! Thanks Nathan!


 Forum | Modelers Social Club Forum (proboards.com) 

  • Member since
    March 2010
  • From: MN
Posted by Nathan T on Sunday, February 16, 2014 11:30 PM

Hey Mustang- awhile back you asked me how the top cowling on the Dora was fastened down, because the side peices that attach to it all hinge upwards. It seems as though it is just "floating" above the engine. Well, take a look at these pics: ...I know its too late, but have these for future reference(others here too). It looks like there was some type of bracket right on top the engine that it bolted to, but is well hidden underneath the cowling. Scratch building something similar would give you something to attach that top cowl piece to.

Notice the 3 studs sticking out of the bracket, and how on this pic below they are puttied over. On the pics in my last post to Greg, you can see the 3 holes in the cowling for these studs, they are still open:

I know I'm usually too late with these things, haha!, but here it is anyway...


  • Member since
    March 2010
  • From: MN
Posted by Nathan T on Sunday, February 16, 2014 11:22 PM

Nice work Greg. On some later war 190s the upper gun bay was painted 66 just like the cockpit:

...and possible this photo, but its hard to tell because it was just pulled out of a lake and is covered in sand/silt:


  • Member since
    May 2013
  • From: Indiana, USA
Posted by Greg on Sunday, February 16, 2014 10:35 PM

Clemens, I already have the MG-151's fastened together and glued in place at the rear gear bay bulkhead. I say fastened cuz I soldered one of them for fun and CA'd the other. I'll take a look tomorrow and see how feasible it looks to do what you want.

JR, thanks, Mate! Probably premature to hope for good fits throughout, just looking ahead as best I can. :)

I also have quite a stash of cleaned skoal plastic tins for whatever purpose. Only unhealthy vice I have left, just haven't gotten motivated to knock it off quite yet. They are handy little small part containers, et al.

  • Member since
    August 2009
  • From: MOAB, UTAH
Posted by JOE RIX on Sunday, February 16, 2014 6:49 PM

Greg, It is indeed terrific to see you back in here swinging. Appears to me that you are making great progress. May you be the one modeler here to pull off an Eduard 190 without encountering any hair pulling fit issues. You Can Do It!! I really like your chew stand there. Yea, It's a bad habit but I find all sorts of uses for my empty Skoal tins.

"Not only do I not know what's going on, I wouldn't know what to do about it if I did". George Carlin

  • Member since
    April 2013
Posted by SchattenSpartan on Sunday, February 16, 2014 5:11 PM

Could you do me a favor and try something out (provided it's not too late)? If the 2-part inner MG 151 barrels are not glued together yet, can you have a look if it's possible to slide the thicker part (at the back) in through the gear bay opening? That would save me qite some problems on my 190s when I get to glueing the wings together.

  • Member since
    May 2013
  • From: Indiana, USA
Posted by Greg on Sunday, February 16, 2014 5:06 PM

Clemens, thanks mate! I was hoping someone would comment on the inside of the nose. I don't remember why I painted it black. Was going to ask about the right color later, you saved me the trouble.

You'll note I got those beautiful gun barrels in ok, and I'm all predrilled for the two outboard ones.

  • Member since
    April 2013
Posted by SchattenSpartan on Sunday, February 16, 2014 4:56 PM

Wonderful looking work, my friend! I'm almost as far as you are, but I still have to wait for the exhaust stacks for the Doras (Quickboost parts) to glue the fuselage halves on those 4 suckers together. That and the fact that I have to finish my P-47 first (almost there though).

Just one little suggestion: Everything except the cockpit was painted RLM 02, so you might want to repaint the cowl gun bay if you plan on opening that one up as well.

I'm going to build my A-8 (the normal one, not the /R2) completely opened up as well.

  • Member since
    May 2013
  • From: Indiana, USA
Posted by Greg on Sunday, February 16, 2014 4:47 PM

Mike, sorry to hear of your moving losses, but looks like you're all set again.

Everyone, one thing I've learned by watching you guys is test fitting ahead. So here's where I'm at and don't see anything that scares me .....yet!!!

Not looking for comments cuz there's nothing to comment on, just a bad snapshot in the interest of participation. Smile


Thinking of doing both gun bays open, so some pre-painting, glue 'em to the wing top sections and make sure the wings still fit together, and should be good to button this part of her up.

It's gonna be tight to get this finished prior to the end of this wonderful GB, I'm trying.....

  • Member since
    August 2009
  • From: MOAB, UTAH
Posted by JOE RIX on Sunday, February 16, 2014 12:48 PM

Hey Fantacmet, Good to see your back in business. Will be standing by for results on your test run.

"Not only do I not know what's going on, I wouldn't know what to do about it if I did". George Carlin

  • Member since
    January 2005
  • From: Portland, Oregon
Posted by fantacmet on Sunday, February 16, 2014 12:16 PM

This one is a Harbor Freight model.  Though I have noticed that about 80% of the airbrush compressors are made int he same factory with the same materials, at the same location.  Even the high end American or European ones even say Taiwan or China.  I've seen this EXACT same compressor with a higher end name that I can't remember selling for 280 bucks.  YIKES.  So for 67 for the compressor and 60 for the airbrush, can't go wrong.  I'm going to do a bit of painting here within about 10-15 minutes.  See how she flows.


  • Member since
    March 2012
  • From: Corpus Christi, Tx
Posted by mustang1989 on Sunday, February 16, 2014 7:33 AM

Hey Mike, I've got the Badger Windstorm and it looks fairly similar to what you have. ......and it is very quiet!!! Happy for you on both aquisitions!!


 Forum | Modelers Social Club Forum (proboards.com) 

  • Member since
    September 2003
  • From: Northern hemisphere - most of the time-
Posted by blkhwkmatt on Sunday, February 16, 2014 12:18 AM

What type of compressor is that?  I have the old testors compressor in the black case that is louder than my TV and is very basic.  I am looking at upgrading and am looking for any input.

Thanks, Matt

Quidquid latine dictum sit, altum videtur!!! - Anything said in Latin sounds profound!


  • Member since
    January 2005
  • From: Portland, Oregon
Posted by fantacmet on Saturday, February 15, 2014 8:05 PM

So yet another hiccup overcome today.  So before my move my youngest son did something with my REAL Iwata HP-C.  GRRRR  Also somethign happened during the move to my Precisionaire XPS Pro.  Man that thing could spray  fine line.  Width of a human hair.  Both of my gravity feeds DONE.  I still have my badger 150, but not so good for doing camo.  I do my camo freehand.  Also I have my 2 gallon Campbell Hausfield, compressor, but now I live in an Apartment.  A little on the loud side, definitely ALOT louder then the milling machine, and my maintenance guy(who lives below me) says he can deal with the milling machine noise, but the compressor no, so....................................

I got these today.  No it's not a REAL Iwata but should work fine.  And the compressor is so darn quiet.  I had the previous version of this compressor from harbor freight once before, and gave it to my uncle when I upgraded to a compressor with a tank.  So back to one of these.  It's MUCH nicer then the original one I bought in 07, which is still working perfectly despite being stored in the leaky bathroom of a trailer for years and years.


  • Member since
    October 2008
  • From: Georgia
Posted by Rigidrider on Friday, February 14, 2014 8:19 PM

Joe... Beautiful my friend... Just beautiful!

Yes sir, I'm gearing up for the Stuka Build my self, and even though it doesn't start till July, I'm really stoked and starting to gather material for the WWI 100th anniv. GB. I'm also going to do 1 last 190 before  this GB closes. Yes you picked a great subject , and there were some killer builds and we even managed to corrupt, Oh sorry I mean convert some new members and friends to the ways of  the styrene worship but it was you who kept (IMHO)  the most amazing of all GBs in the lime light and drove it to be the most sucessful and just plain fun GB I have seen.

Thank you again for the opportunity to join in and to be able to display my megar skills along side everyone elses.

Doug

When Life Hands You A Bucket Of Lemons...

Make Lemonade!

Then Sell It Back At $2 Bucks A Glass...

  • Member since
    March 2012
  • From: Corpus Christi, Tx
Posted by mustang1989 on Friday, February 14, 2014 4:14 PM

Dont think I don't want to but I would have to extend this build again and that can't happen. I'll host it by devoting my time and attention to it and the rest of the builders with constant input and encouragement. I do have another 190 kit but I'm ready to sit back for a bit and enjoy the good builds that are ongoing here.


 Forum | Modelers Social Club Forum (proboards.com) 

  • Member since
    August 2009
  • From: MOAB, UTAH
Posted by JOE RIX on Friday, February 14, 2014 4:14 PM

Yea Joe, John's got an excellent point. You know you could easily knock out a 1/72 FW 190 that was OOB and not all opened up. Come On Man!!!Wink

"Not only do I not know what's going on, I wouldn't know what to do about it if I did". George Carlin

  • Member since
    September 2011
  • From: Milaca, Minnesota
Posted by falconmod on Friday, February 14, 2014 3:20 PM

What!  no 190 on the boardCrying  But the stuka build doesn't start until April 1st,  surely you have time to start another 190Confused  Lol

John

On the Bench: 1/72 Ki-67, 1/48 T-38

1/144 AC-130, 1/72 AV-8A Harrier

  • Member since
    March 2012
  • From: Corpus Christi, Tx
Posted by mustang1989 on Friday, February 14, 2014 2:58 PM

John:Thanks man! And the answer to the "whats next" question.............that's easy! A 1/48th scale Hasegawa Stuka for Bish's Stuka GB!!

Clemens:Thanks Clemens!! Ive been looking forward to finally getting these two pieces together.


 Forum | Modelers Social Club Forum (proboards.com) 

  • Member since
    April 2013
Posted by SchattenSpartan on Friday, February 14, 2014 2:54 PM

Oh my! Joe, she's looking absolutely stunning!

JOIN OUR COMMUNITY!

Our community is FREE to join. To participate you must either login or register for an account.

SEARCH FORUMS
FREE NEWSLETTER
By signing up you may also receive reader surveys and occasional special offers. We do not sell, rent or trade our email lists. View our Privacy Policy.