SEARCH FINESCALE.COM

Enter keywords or a search phrase below:

FineScale Modeler WWI Aeroplane Group Build 2013

139886 views
1262 replies
1 rating 2 rating 3 rating 4 rating 5 rating
  • Member since
    February 2006
  • From: Smithers, BC, Canada
Posted by ruddratt on Friday, May 10, 2013 6:50 PM

Another excellent vlog entry Aaron & Tim, and that base looks sweet! Very nice work. Yes


Here's where the E.III sits at the moment.- the fuselage markings are on, it's weathered up with the help of some Tamiya weathering powders, and the main gear struts are attached and rigged in with the Gaspatch buckles & eyelets, EZ line, some fine twisted wire, and painted with Reaper metallics.

Work on the E.III will be on hold for a while as a few outdoor landscaping projects will be taking priority, like a new roof for the greenhouse and a new walkway to one of our outside decks. That, plus the fact that my wife is going out of town for about a 10 days and taking my camera with her.

Mike

 "We have our own ammunition. It's filled with paint. When we fire it, it makes pretty pictures....scares the hell outta people."


Moderator
  • Member since
    September 2011
Posted by Tim Kidwell on Friday, May 10, 2013 4:33 PM

--

Timothy Kidwell
tkidwell@firecrown.com
Editor
Scale Model Brands
Firecrown Media


  • Member since
    December 2002
  • From: Bury St Edmunds, Suffolk, England
Posted by Bish on Friday, May 10, 2013 2:24 PM

Ssasho, wow, that's amazing. And after doing your that, your fighting the decals. Can they relaly be that bad.

GM, really nice. Those red and white schemes you two are doing are some impressive work.

Greg, great work on the tail. Mine looks easy compared to that. I like the paint work there as well.

I am a Norfolk man and i glory in being so


On the bench: Airfix 1/72nd Harrier GR.3/Fujimi 1/72nd Ju 87D-3

  • Member since
    September 2012
Posted by GMorrison on Friday, May 10, 2013 1:30 PM

Tim Kidwell

GMorrison

I'm about to tackle the same area and I will give it a go. All the little brace wires that run from the horns back to the surfaces.

GM - I happened upon this earlier today and thought of you and the splicing question from last week. I don't know if it will help, but, hopefully, it'll give you some ideas at least.

Thats a good link, Tim and it makes reference to a really good earlier one that unfortunately is no longer linked to it's pictures, by Scalephantomphixer.

The Felixstowes came in a wild assortment of schemes, some of which are shown here

There's quite a few on the back cover of Windsock #82 which unfortunately I cannot reproduce here.

Camouflage seems to have been secondary to visibility for air-sea rescue, and also for identification during operations.

There's a detail that I won't be including as my ship didn't have it, but these things didn't seem to have any wireless sets, and they signaled each other in some cases with an arm semaphore assemble just like a railroad would have, mounted on a pole standing above the upper wing over the fuselage.

You'll see soon enough, if you can't guess from my pictures, why that wouldn't work on mine, N4543.

 Modeling is an excuse to buy books.


  • Member since
    March 2003
  • From: Towson MD
Posted by gregbale on Thursday, May 9, 2013 9:49 PM

ruddratt

sasho - that is just mind-blowing! The see-thru effect on the wings is a great touch, and you pulled it off with perfection! Very very impressive!

I agree 100%. That's a pretty amazing effect, very neatly done.

Greg

George Lewis:

"Every time you correct me on my grammar I love you a little fewer."
 
  • Member since
    February 2006
  • From: Smithers, BC, Canada
Posted by ruddratt on Thursday, May 9, 2013 8:55 PM

Greg - the Baby is really shaping up nicely. Excellent job on the rigging - looks very convincing! Yes

sasho - that is just mind-blowing! The see-thru effect on the wings is a great touch, and you pulled it off with perfection! Very very impressive! Bow Down

Work has been progressing steadily on the E.III. I'll be attaching the main gear, rigging and all, tonight and hope to have some pics up as well.

Mike

 "We have our own ammunition. It's filled with paint. When we fire it, it makes pretty pictures....scares the hell outta people."


Moderator
  • Member since
    September 2011
Posted by Tim Kidwell on Thursday, May 9, 2013 1:28 PM

GMorrison

I'm about to tackle the same area and I will give it a go. All the little brace wires that run from the horns back to the surfaces.

GM - I happened upon this earlier today and thought of you and the splicing question from last week. I don't know if it will help, but, hopefully, it'll give you some ideas at least.

--

Timothy Kidwell
tkidwell@firecrown.com
Editor
Scale Model Brands
Firecrown Media


Moderator
  • Member since
    September 2011
Posted by Tim Kidwell on Thursday, May 9, 2013 1:25 PM

GM - OH YEAH! Now, it's all coming together!

Greg - I think the rigging looks quite good. The glue does an effective job of hinting at turnbuckles.

Sascho - Outstanding! I particularly like the work you've done on the underside of the upper wing. What's the story there? In service, was it painted the check and then covered again, or was that particular coloration planned?

--

Timothy Kidwell
tkidwell@firecrown.com
Editor
Scale Model Brands
Firecrown Media


  • Member since
    September 2012
Posted by GMorrison on Thursday, May 9, 2013 1:25 PM

GregBale:

Great idea on the stretched sprue. I'm about to tackle the same area and I will give it a go. All the little brace wires that run from the horns back to the surfaces.

 Modeling is an excuse to buy books.


  • Member since
    September 2012
Posted by GMorrison on Thursday, May 9, 2013 1:16 PM

SsashoO

Bow DownBow DownBow DownBow DownBow DownBow Down

 Modeling is an excuse to buy books.


  • Member since
    March 2013
Posted by Ssasho0 on Thursday, May 9, 2013 11:04 AM

well another finished entry...I'm lagging behind, damn!

I also like this red and white stripes of the filixstowe, looking damn awesome, I liked it that much that I even ordered one!

Well during this time I was working a little bit on my model also and here is the update: I finished the red and white checkerboard and now I'm fighting with the decals, including the ones on the nose of the fuselage. Fo now just one of the sides is decalled. I tried to achieve a see through effect on the wings, but the wing ribs are not pronounced enough...well I'm not redoing it! It will stay like that. I will know better for the next attempt.

Here are the pics:

  • Member since
    March 2003
  • From: Towson MD
Posted by gregbale on Thursday, May 9, 2013 10:31 AM

I'm calling my tail assembly done (so to speak). Though I'll use EZ-Line for the main rigging, I decided to do the rats-nest of brace and control wires on the empennage with good old stretched sprue, since the runs are short, stress is minimal, and it's a lot easier on my shaky-to-begin-with sanity. I did the "turnbuckles" on the float stays with painted dabs of white glue. (A long perusal of period photos show the turnbuckles highly visible on the float wires, but virtually invisible on the rest of the tail wires, so that's how I left it.)

Still working on wing struts and such--I'll have to make a jig to get the wings squared up, since the kit-supplied cabane struts are conveniently "cut to length needed." (I suppose that's better than having them molded .5mm too short....)

Hoping we get a vlog this week.Big Smile Rock on, everybody!

Greg

George Lewis:

"Every time you correct me on my grammar I love you a little fewer."
 
  • Member since
    February 2006
  • From: Smithers, BC, Canada
Posted by ruddratt on Thursday, May 9, 2013 9:26 AM

GMorrison

I spent an hour this morning clearing off the model building table, and rearranged everything for the "Night of 1000 Details".

I put on the Optivisor, pointed a dozen little brushes, opened the jars of paint and went to work.

Oh yeah! Looking forward to this!!! Yes

Mike

 "We have our own ammunition. It's filled with paint. When we fire it, it makes pretty pictures....scares the hell outta people."


  • Member since
    November 2009
  • From: SW Virginia
Posted by Gamera on Thursday, May 9, 2013 9:13 AM

GM: Wow, that's some nice work!!!

Gee, you think I could finish a tiny 1/48th Nieuport which is painted in A ONE COLOUR SCHEME if GM can do all that........

"I dream in fire but work in clay." -Arthur Machen


  • Member since
    March 2003
  • From: Towson MD
Posted by gregbale on Thursday, May 9, 2013 6:40 AM

GMorrison

Tonight was an old ship builders pleasure.

I spent an hour this morning clearing off the model building table, and rearranged everything for the "Night of 1000 Details".

I put on the Optivisor, pointed a dozen little brushes, opened the jars of paint and went to work.

A sight to gladden the heart of any modeler---a forest of fiddly bits! Great job, really salivating to see this one come together! (It's okay, I'm wearing my bib....)

Greg

George Lewis:

"Every time you correct me on my grammar I love you a little fewer."
 
  • Member since
    September 2012
Posted by GMorrison on Thursday, May 9, 2013 1:12 AM

Thank you kind friends for the encouragement. It means a lot.

Chuck- I know how that goes. Strangest one- found an exhaust manifold on my pillow. Parts in pant cuffs, decals 350 days later in Christmas ornament boxes: all par for the course!

Tonight was an old ship builders pleasure.

I spent an hour this morning clearing off the model building table, and rearranged everything for the "Night of 1000 Details".

I put on the Optivisor, pointed a dozen little brushes, opened the jars of paint and went to work.

Here's a general overview of the scene.

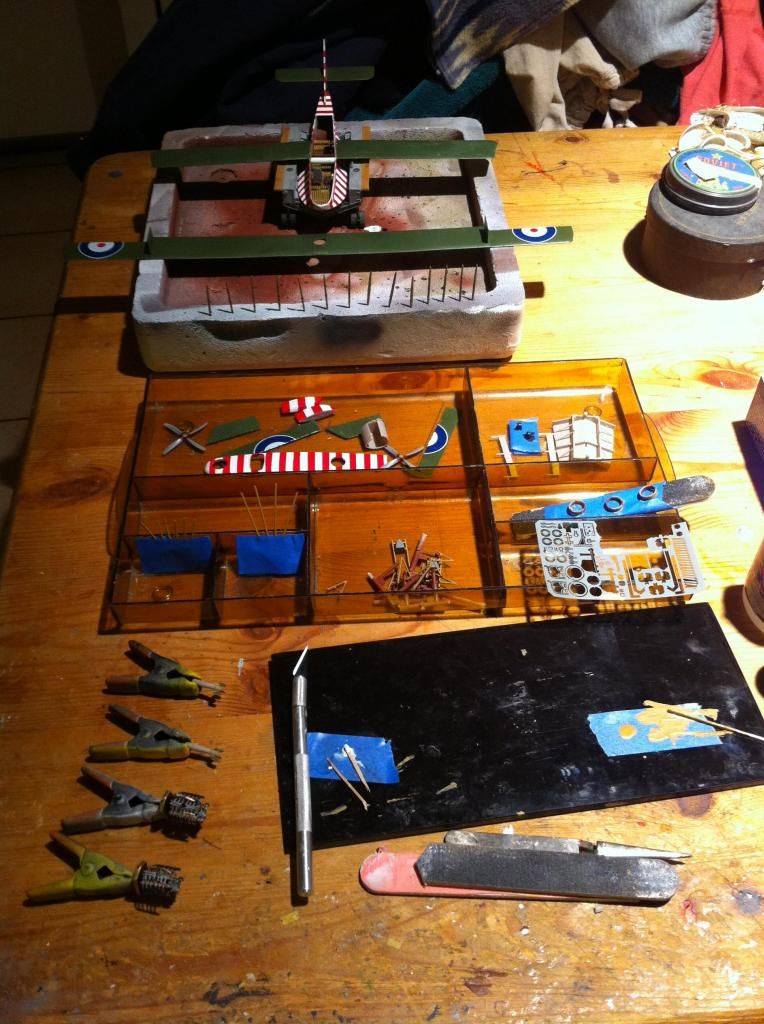
General airframe, and 14 interplane struts in the foreground.

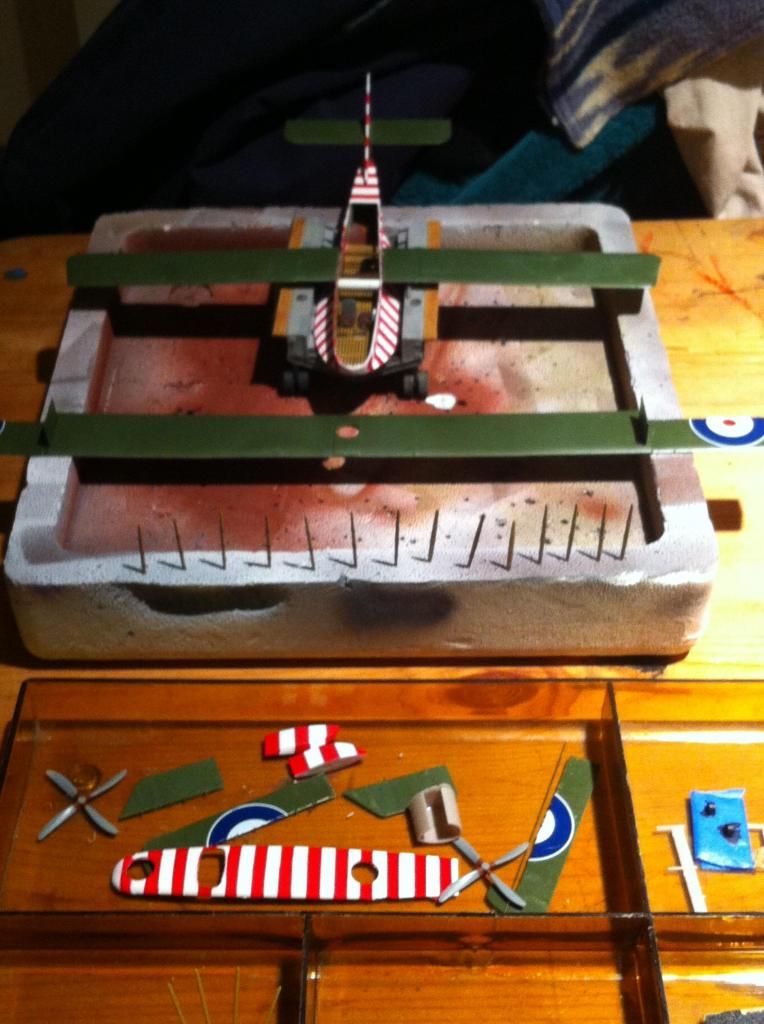
Left to right; top to bottom:

Ailerons, elevators, fuselage top, wing tip floats and props.

Trolley parts.

Tail braces.

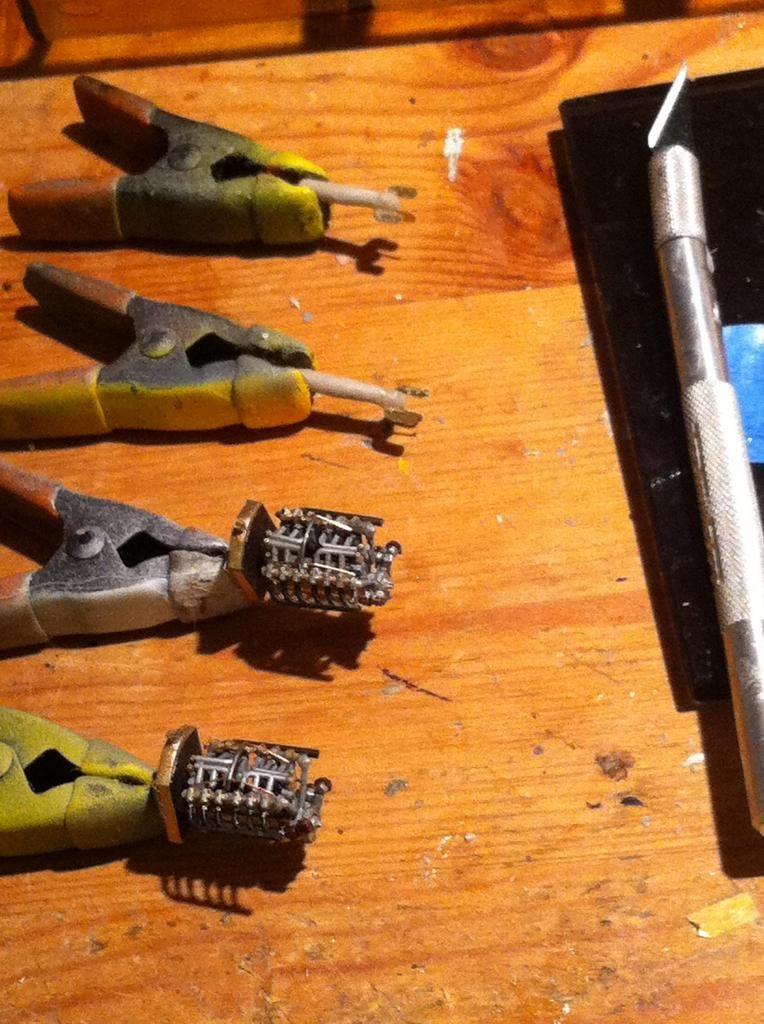
Engine bearer assemblies.

Gun position rings and PE fret.
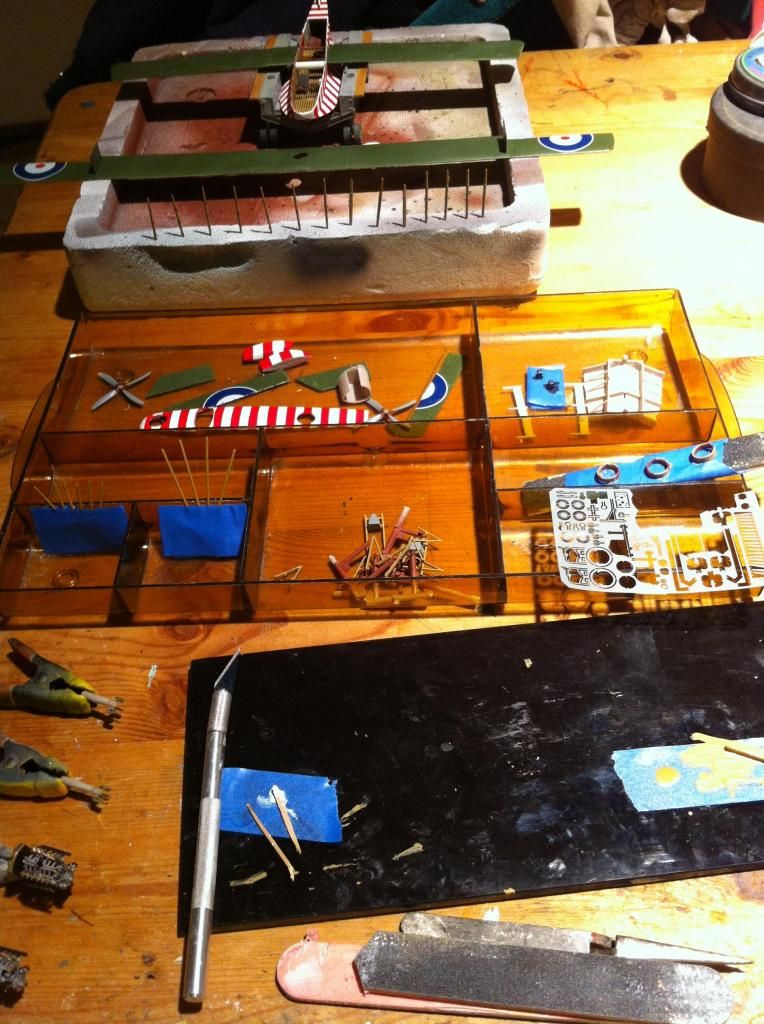
Engines and bombs.

 Modeling is an excuse to buy books.


Moderator
  • Member since
    September 2011
Posted by Tim Kidwell on Wednesday, May 8, 2013 1:51 PM

Chuck Davis

Tim - I think that voice in your head worked - I think you nailed the fit.  Maybe on my next D.VII I'll succeed as well

Thanks, Chuck, for the warning and encouragement.

--

Timothy Kidwell
tkidwell@firecrown.com
Editor
Scale Model Brands
Firecrown Media


  • Member since
    October 2011
  • From: Lake Villa, Illinois
Posted by Chuck Davis on Wednesday, May 8, 2013 12:29 PM

Greg/Jack/GM (in no particular order) - great job, guys - wonderful stuff!

Tim - I think that voice in your head worked - I think you nailed the fit.  Maybe on my next D.VII I'll succeed as well

Sooooo...guess what I found last night?  Yup.  My missing gear spreader.  My Pfalz D.III kit apparently ate it.  This is good news - while I had a CAD drawing and 3-D solid model ready, my printer purchase fell thru and I am running out of time, 'cause I have deadlines that will be approaching soon (ahem...Aaron...).  While it would have been fun scratch building the part, I'm good with using my already modified one.  It is now taped into the box, not to reappear until I'm ready to paint.  The triplane has the undercoat and gloss on - I hope to start streaking tomorrow.  The paint, that is. Embarrassed

Hope everyone is doing well...

Chuck Davis

Moderator
  • Member since
    September 2011
Posted by Tim Kidwell on Tuesday, May 7, 2013 11:24 AM

Hi guys,

Sorry I've been absent. Lots of web work yesterday, and it's not showing any signs of letting up today.

Jack and GMorrison - Great stuff, both of you!

Greg - Nice wood finish on the rear float.

Ruddratt - That's it exactly. Because it's cloth, it needs to blend, but I want to make sure that all those "metal" parts fit correctly with the radiator. My problem is I tend to over think these things.

To give myself a breather, I've started on the base. Nice light stain and some poly today, some paint and more clear tomorrow. Then markings and more clear, and then some pics for you guys. At least, that's the plan.

--

Timothy Kidwell
tkidwell@firecrown.com
Editor
Scale Model Brands
Firecrown Media


  • Member since
    November 2009
  • From: SW Virginia
Posted by Gamera on Tuesday, May 7, 2013 7:31 AM

Mike: Thanks, I need to get my butt back in gear, haven't gotten much of anything done lately.

"I dream in fire but work in clay." -Arthur Machen


  • Member since
    April 2005
  • From: Piscataway, NJ!
Posted by wing_nut on Tuesday, May 7, 2013 7:25 AM

Jeez guys… you’re killing me!  It’s bad enough I can’t get any bench time.  Crying  Then to come in here and see what you guys are doing.  All of it is really awesome stuff.


And yesterday I got another “no bench time slap in the face”  Surprise… my Gaspatch turnbuckles show up in my mail box.  The ones I got seem to be a little rough on the surface and not quite the definition of what is seen online… but they are going to look pretty Hotel Sierra when installed.

Marc  

  • Member since
    February 2006
  • From: Smithers, BC, Canada
Posted by ruddratt on Tuesday, May 7, 2013 12:01 AM

shiv - that Roland is a real looker! Very happy you went with that color scheme. Really a fine build! Yes

Greg - the Baby is coming along quite nicely. Excellent paint work, and those markings really give it that extra pop!

Tim - I'm very much liking how the D.VII is progressing. Mine (which is currently on hold behind the E.III) ran into the same issues fitting those side panels - there was some filling involved, but I worked front to back, not minding the gaps between those two triangular parts and the main fuselage, since the line where they join needed to be eliminated to show them as one continuous piece.

GM - man, that thing looks better with every update! Been enjoying watching that one come together. Yes

Jack - sweet work on that seat cushion. Once painting, I'd never have guessed it was PE. Your build is looking very sharp!

Cliff - how 'bout some pics of that Nieuport? Would love to see how it's shaping up. Yes

Mike

 "We have our own ammunition. It's filled with paint. When we fire it, it makes pretty pictures....scares the hell outta people."


  • Member since
    March 2003
  • From: Towson MD
Posted by gregbale on Monday, May 6, 2013 3:47 PM

jgeratic  Beautiful seat work there, Jack. The finished cushion looks like it's resin. I use an eraser all the time for rolling and curving PE, but never for a 3D effect like that. Neat technique.

Greg

George Lewis:

"Every time you correct me on my grammar I love you a little fewer."
 
  • Member since
    September 2012
Posted by GMorrison on Monday, May 6, 2013 3:09 PM

I know it's too late to add, but I am going to build a Hansa Brandenburg W29 floater to go with Felix. Just seemed right to give her an adversary. It's a simple (I hope) little build that comes with hexagon decals, from Eastern express. I could not find the MPM kit with the resin and PE, but probably just as well from the point of time.

I'll post pictures when it arrives, and I am looking for the Windsock 55 as well.

 Modeling is an excuse to buy books.


  • Member since
    November 2009
  • From: SW Virginia
Posted by Gamera on Sunday, May 5, 2013 9:50 PM

GM: Love those stripes - I was thinking killer kandy kane or flying barber! The wood underbelly looks great too.

Jack: Good idea there on the raised dials. And the leather seat and wooden interior looks terrific.

"I dream in fire but work in clay." -Arthur Machen


  • Member since
    April 2006
  • From: ON, Canada
Posted by jgeratic on Sunday, May 5, 2013 5:15 PM

Greg - very brave with the dry brushing detail, but looking great.

GMorrison - with the green top wing, you really got the xmas colours going.  Very spiffy I say.

----------------------

Making good progress this weekend, could possibly have the fuselage closed tomorrow.  

The seat detail is provided as a flat PE piece with raised buttons(?).  So I placed it on an erasure, and using the dull end of a drill bit of an appropriate size, applied pressure at those points to create a more 3D look.  The exterior all around then had to be crimped down, using my finger nails.

... painted and installed:

regards,

Jack

  • Member since
    September 2012
Posted by GMorrison on Sunday, May 5, 2013 2:08 AM

 I've attached the horizontal flying surfaces (except the upper wing).

 Modeling is an excuse to buy books.


  • Member since
    April 2003
Posted by shivinigh on Saturday, May 4, 2013 9:32 AM

JG thanks for the nice words. The red stripe was a faux pas on my part I had the decal to far forward on the fuselage

Gregbale Loving how the Baby is coming along, especially the way you made the stitching pop out. anxious to see the final results

Tim the D Vll is shaping up beautifully


  • Member since
    April 2006
  • From: ON, Canada
Posted by jgeratic on Friday, May 3, 2013 10:40 PM

Shiv - a very nice build, and I dig the faux curtains and crazy mauve camou. Yes  No  doubt the Germans did some experimentation to include this colour in their inventory.  Only hiccup I see is the red fuselage band.  Could it be wrongly orientated, causing  it to come up short on the underside?  Older  kits though are known for ill fitting decals such as this.  Many builders opt to mask and spray this particular type of marking.  If you do try this method, it is a good idea to spray the fuselage colour first to seal in the mask.  This avoids any paint of the chosen band colour from creeping underneath the mask.

Tim - coming along nicely, work looks really crisp.

regards,

Jack

  • Member since
    November 2009
  • From: SW Virginia
Posted by Gamera on Friday, May 3, 2013 6:35 PM

Shiv: Beautiful job there! Love the paint scheme and the great job you did on the rigging.

Greg and Tim: Nice work, you guys are moving right along!

"I dream in fire but work in clay." -Arthur Machen


JOIN OUR COMMUNITY!

Our community is FREE to join. To participate you must either login or register for an account.

SEARCH FORUMS
FREE NEWSLETTER
By signing up you may also receive reader surveys and occasional special offers. We do not sell, rent or trade our email lists. View our Privacy Policy.