SEARCH FINESCALE.COM

Enter keywords or a search phrase below:

FineScale Modeler WWI Aeroplane Group Build 2013

139886 views
1262 replies
1 rating 2 rating 3 rating 4 rating 5 rating
  • Member since
    March 2003
  • From: Towson MD
Posted by gregbale on Friday, May 3, 2013 5:23 PM

Tan would be correct for virtually any of the RNAS/RFC bombs, with a combination of green, red and white stripes indicating bomb type. Great resource photos here.

Greg

George Lewis:

"Every time you correct me on my grammar I love you a little fewer."
 
  • Member since
    September 2012
Posted by GMorrison on Friday, May 3, 2013 3:42 PM

Does anyone know the appropriate color for Royal Naval Air Service/ Royal Air Force 230 lb. bombs in 1918?

I found a color photo of one that recently washed up on the beach at Felixstowe, but it was kind of rusty...

I was thinking a tan Khaki?

 Modeling is an excuse to buy books.


Moderator
  • Member since
    September 2011
Posted by Tim Kidwell on Friday, May 3, 2013 3:13 PM

Hi guys,

OK, it's been a while since I've done an update with photos, so I'm taking a break from the vlog to show you some shots of where I'm at. 

Right now, I'm in the process of buttoning up the front end. As I have been warned by multiple parties (Chuck Davis haunts me in my sleep, calmly telling me to test-fit everything), I am test-fitting everything and proceeding at a pace that would make a snail cast its eyestalks down in shame. 

I attached the chin and radiator today, and I was able to get the water pipe from the radiator to the water pump in back. However, I haven't glued the chin cowl to the radiator yet. In this pic I'm test-fitting the cloth panel that I'm using for Otto Creutzmann's D.VII. Because it is supposed to be an extension of the cloth covering the rest of the airframe, the gap will be filled and smoothed over.


I've glued the panel behind the chin in place. I'm a little concerned about the gap between it and the cloth panel on the side. I haven't been able to find any references to show me how pronounced it was on the actual aircraft.

Here I'm just showing the water pipe running to the water pump. Also, you can see that I have added the cover over the fuel tank and magazine. That was a very tight fit, and there is the tiniest gap made more pronounced in the pic by some black paint. I was using rubber bands to hold the panel in place and the liquid cement followed it due to capillary action. Needless to say, I have some clean up to do there.

So, the plan is to fit the sides on working forward. I'll finish and attach the muffler before gluing the starboard forward panel in place. Then, when the sides are where they need to be, glue the radiator, chin cowl and upper covers in place.

Who knows? Maybe next week, I'll get paint on her.

You guys have been doing a great job. Again, congrats to Shiv--I can't tell you how cool it is to see that badge in your sig line!

You guys have a great weekend. I'm going to see Ironman 3!

--

Timothy Kidwell
tkidwell@firecrown.com
Editor
Scale Model Brands
Firecrown Media


  • Member since
    March 2003
  • From: Towson MD
Posted by gregbale on Friday, May 3, 2013 3:01 PM

GMorrison - Absolutely splendid "barber pole" scheme on your Felixstowe. Also love the bombs. It's all shaping up beautifully.
Marc - Beautiful job on the plywood, and thanks for the useful tutorial on the "carbon paper" technique. Never would have thought of that, but will be trying it soon.
Shiv - High praise on the Roland. Really, really nice. Anxious to see how the Gotha goes--I've got the old Rareplanes vac version, but never had the guts to start it yet.

Some headway on the Baby: paint on, some decals on, starting to connect a few bits. Still plotting, planning and drilling holes for rigging, made a batch of my own turnbuckle loops from wire and found it much easier than I anticipated. Still some "blend together" weathering to do. The current look:

Have a great weekend everybody. love what everybody's doing.

Greg

George Lewis:

"Every time you correct me on my grammar I love you a little fewer."
 
  • Member since
    October 2011
  • From: Lake Villa, Illinois
Posted by Chuck Davis on Friday, May 3, 2013 11:47 AM

Shiv - beautiful job!  She looks great.  Have fun with the Gotha...I've built the Wing Nuts kit, and that's hard enough...can't imagine tackling it in 1/72!

Have a good weekend everyone!

Chuck Davis

  • Member since
    April 2003
Posted by shivinigh on Friday, May 3, 2013 8:45 AM

No it's a 1/72 scale kit from Roden


  • Member since
    October 2008
  • From: England
Posted by P mitch on Friday, May 3, 2013 2:35 AM

Shiv

Is that the Wingnut Gotha? I think it will look amazing and I wish you luck with your therapy after too

Phil

"If anybody ever tells you anything about an aeroplane which is so bloody complicated you can't understand it, take it from me: it's all balls." R J Mitchell


  • Member since
    October 2008
  • From: England
Posted by P mitch on Friday, May 3, 2013 2:33 AM

Eric

The buckles really depend on how close to the real thing you want to get. Most people will use the "One End" ones and be perfectly happy, I know I am. For 100% accuracy you would need a mixture but from what I've seen the mixture can vary depending on the individual aircraft.

I honestly dont think there a more than a few people world wide who could work at that level and its a vanity thing at that point.

Phil

"If anybody ever tells you anything about an aeroplane which is so bloody complicated you can't understand it, take it from me: it's all balls." R J Mitchell


  • Member since
    April 2003
Posted by shivinigh on Friday, May 3, 2013 2:29 AM

thanks Tim, thanks Gmorrison. I never thought that I would put any shade of purple on an aircraft.

I still got some time, going to try and get that Gotha bomber done


Moderator
  • Member since
    September 2011
Posted by Tim Kidwell on Thursday, May 2, 2013 9:29 PM

Congratulations, Shiv, that is a beautiful Rolland! Collect your ribbon (badge) and kick back with a stein of your favorite brew!

I think the rigging turned out quite well, and the colors really pop. Way to go!

--

Timothy Kidwell
tkidwell@firecrown.com
Editor
Scale Model Brands
Firecrown Media


  • Member since
    September 2012
Posted by GMorrison on Thursday, May 2, 2013 8:26 PM

Congratulations, Shivinigh! Another completed build, and a beauty.

Well done!

Give that man a Schnapps and a badge!

 Modeling is an excuse to buy books.


  • Member since
    February 2010
  • From: Berkeley CA/St. Paul MN
Posted by EBergerud on Thursday, May 2, 2013 7:51 PM

Congrats to all on a wonderful GB. Should have watched the dates closer - I have a WNW Pfalz sitting in it's box and it would have been tempting to rearrange the build schedule and join in.

But I've got a question instead. I've checked out the Gaspatch site ( www.gaspatchmodels.com/.../metal-turnbuckles-32.html ) and checked out their metal buckles. Using them might simplify the rigging if you didn't have to mess with tubing. However $18 or so a pop isn't free and buying multiple varieties (think there are six choices - three are elaborate and come 30 per pack - the others are simpler and are 60) would run up a bill for an item that's neat up close but probably wouldn't be that much better from any distance. (Des Delatorre builds his own buckles and tubes and I'd be most happy to make a model anywhere near as good as his. I listen in on the WWI group and some of their stuff is likewise stunning and they make their own or buy Bob's.) Anyway, would one type take you most of the way? I was thinking the "one end." Or is this something that only makes sense if you go in with both feet and buy several types? I've never seen these things in the flesh from six feet away so it's a little hard to assess them.

Advice welcomed.

Curse you Baron!

Eric


A model boat is much cheaper than a real one and won't sink with you in it.

  • Member since
    April 2003
Posted by shivinigh on Thursday, May 2, 2013 6:42 PM

Well got the rigging done and put the last couple of pieces on so for you viewing pleasure my completed Rolland c.ll


  • Member since
    April 2003
Posted by shivinigh on Thursday, May 2, 2013 1:27 PM
Thanks for the help guys. So my rigging is staying green. Haha and also the last thing I need is paint ruining my finished job. Once was enough for that.


Moderator
  • Member since
    September 2011
Posted by Tim Kidwell on Thursday, May 2, 2013 8:26 AM

shivinigh

Almost done the rigging on my Roland. Using a braided fishing line called spider wire but it is in moss green and was wonder if I should paint them a steel colour or a grey. Or should I just leave them they way they are?

I think someone else may have suggested this already: I used a chisel tip Sharpie permanent marker to make my rigging line black. I figure, at that scale, it's more about seeing it that getting the exact color match. And, as Phil says, paint could cause runs.

--

Timothy Kidwell
tkidwell@firecrown.com
Editor
Scale Model Brands
Firecrown Media


  • Member since
    October 2008
  • From: England
Posted by P mitch on Thursday, May 2, 2013 8:20 AM

I've had a good look at various fishing lines in realtion to rigging and most don't want to hold a colour that well. If its monofilament they really don't want to hold colour, if it already has a colour leave it alone unless you hate it.

The biggest problem you will have is getting enough paint on it to stick and the possibility of paint running is very high. I did have a long look to try to find a line with the right colour but gave up and I'm using clear.

Phil

"If anybody ever tells you anything about an aeroplane which is so bloody complicated you can't understand it, take it from me: it's all balls." R J Mitchell


  • Member since
    April 2003
Posted by shivinigh on Thursday, May 2, 2013 7:53 AM

Almost done the rigging on my Roland. Using a braided fishing line called spider wire but it is in moss green and was wonder if I should paint them a steel colour or a grey. Or should I just leave them they way they are?


  • Member since
    December 2002
  • From: Northern California
Posted by jeaton01 on Wednesday, May 1, 2013 8:11 PM

Lots of nice work going on, and nice try Marc, but I know you photoshopped that plywood!  As some may have noticed I have been a bit absent, I started a project to replace the deck on the back of my house and also a new workshop/storage shed.  But I shall return, as soon as I get some more concrete work done.  Wish me none of those Italian cement shoes!

Nice stripes on the Felixstowe!

John

To see build logs for my models:  http://goldeneramodel.com/mymodels/mymodels.html


Moderator
  • Member since
    September 2011
Posted by Tim Kidwell on Wednesday, May 1, 2013 4:18 PM

Awesome tutorial, Marc. I believe I'll use that on my next build!

--

Timothy Kidwell
tkidwell@firecrown.com
Editor
Scale Model Brands
Firecrown Media


  • Member since
    December 2002
  • From: Bury St Edmunds, Suffolk, England
Posted by Bish on Wednesday, May 1, 2013 1:05 PM

ruddratt

Tim Kidwell

GMorrison - I think you're gonna win the prize for the most exotic looking plane in this build. SPECTACULAR!

Hard to argue with that, Tim, (that paint scheme is mind-blowing!) but I believe that Bish's 0/400 can still give it a run for it's money. Wink

Not even close. If I was doing that paint scheme on top of the rigging, I think you would find me in a corner with underpants on my need, a pencil up each nostril and shouting wibble.

I am a Norfolk man and i glory in being so


On the bench: Airfix 1/72nd Harrier GR.3/Fujimi 1/72nd Ju 87D-3

  • Member since
    October 2011
  • From: Lake Villa, Illinois
Posted by Chuck Davis on Wednesday, May 1, 2013 9:35 AM

GMorrison - Yikes man!  That looks fantastic!  Excellent job...

Marc - if you move that little piece of plywood out of the way, we could let you know how your wood grain job turned out.  LOL!  Excellent, sir.  You could get a job doing faux finishes for houses with that...

Chuck Davis

  • Member since
    April 2005
  • From: Piscataway, NJ!
Posted by wing_nut on Wednesday, May 1, 2013 9:29 AM

Jack thanks for the info on the pipes.

GM… OH LAWDY MOMMA !  Nice stripes.  It has the added benefit of reminding me to make a haircut appointment.

Bish… that’s looking just fine indeed.


After many color combos and application techniques I think I’ve got wood.  Plywood actually.    Pretty much the same as I did on my other Albatros (link below) just some color and pattern changes. What do you think?    

Does someone make a paler transparent yellow than the one from Tamiya?


http://wingnutmodels.com/DvaPaint.html


Marc  

  • Member since
    September 2012
Posted by GMorrison on Tuesday, April 30, 2013 7:38 PM

Thanks for the info, Bish.

Thanks everybody for the props. I had that striping as the thing I feared most, and it went pretty well so it's fun from here.

I'm a ship modeler mostly, so the rigging should go smoothly. I am putting in a query over in ships about splicing eyes in the ends of lines. I'll tell you what I learn. That was a great link, Tim.

One small mishap, but lesson learned. Tamiya primer and Humbrol enamel do NOT like each other. I had painted all of the PE with Humbrol as that's the color of most of those little bitty things. But there's a pair of, for lack of a better term, gun ports on the sides back towards the tail that have sliding doors. I overcoated those with Tamiya white primer and it wrinkled on me immediately. Strip and repaint straight with the white. i just hope when I mask the red stripe the tape doesn't lift off the primer.

 Modeling is an excuse to buy books.


  • Member since
    February 2006
  • From: Smithers, BC, Canada
Posted by ruddratt on Tuesday, April 30, 2013 7:36 PM

Tim Kidwell

GMorrison - I think you're gonna win the prize for the most exotic looking plane in this build. SPECTACULAR!

Hard to argue with that, Tim, (that paint scheme is mind-blowing!) but I believe that Bish's 0/400 can still give it a run for it's money. Wink

Mike

 "We have our own ammunition. It's filled with paint. When we fire it, it makes pretty pictures....scares the hell outta people."


  • Member since
    December 2002
  • From: Bury St Edmunds, Suffolk, England
Posted by Bish on Tuesday, April 30, 2013 1:02 PM

GM, the rigging holes are actually in the inner sections of the wing. I painted the area that would be rigged first as i didn't want the paint clogging the rigging. Once it was rigged, i then had to add the outer wing sections. The holes on top are for bracing. I will fill the larger holes and then touch them up.

Now that is some paint scheme. You certainly wouldn't miss that one. Great work.

Mike, thanks. Though i am still very impressed with the metal on yours.

I am a Norfolk man and i glory in being so


On the bench: Airfix 1/72nd Harrier GR.3/Fujimi 1/72nd Ju 87D-3

Moderator
  • Member since
    September 2011
Posted by Tim Kidwell on Tuesday, April 30, 2013 11:13 AM

GMorrison - I think you're gonna win the prize for the most exotic looking plane in this build. SPECTACULAR!

--

Timothy Kidwell
tkidwell@firecrown.com
Editor
Scale Model Brands
Firecrown Media


  • Member since
    September 2012
Posted by GMorrison on Tuesday, April 30, 2013 10:44 AM

GMorrison

Bish- that's great work. Why haven't you painted the wing? Is that because you are going to patch the rigging holes first? Wish I'd thought of that...

Everyone this is looking great. Mike the metal bat is a real looker.

Great vlog, fellas. Real Amos n' Andy routine too. Aaron, any progress? The kid is on a roll with that D7.

My props are strange. They were wrapped in sailcloth and painted "battleship grey" as is everything else on this thing that's not varnished or doped. Humbrol 165. Sure they have neato brass tips and leading edges, but the only wood is right at the hub. Also, and I spent a LONG time looking at photos, but the "paddle" edge is the leading edge, not the straight edge. And to make things fun, some aircraft counter rotate and some aircraft are same handed. I have no reference which were which and the only pic I could find of mine doesn't show the props, so I am correct by default (same handed).

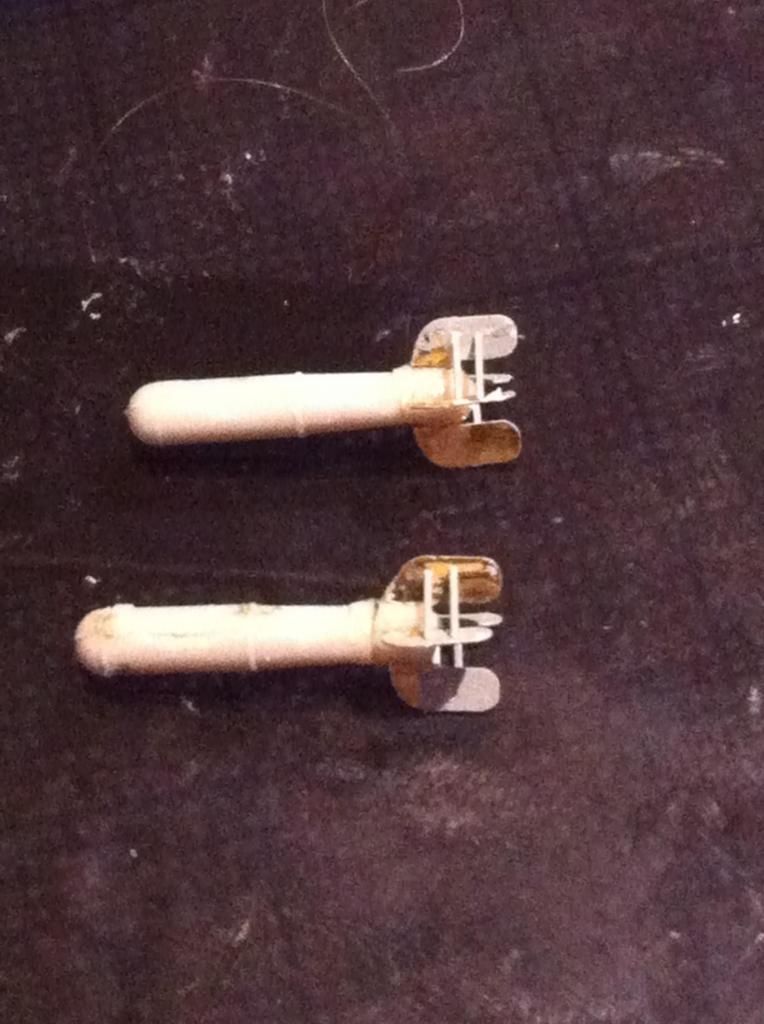
Finished the bomb construction. What seemed simple... Each bomb has it's fin assemblies made of eight micro PE parts each. looks great though.
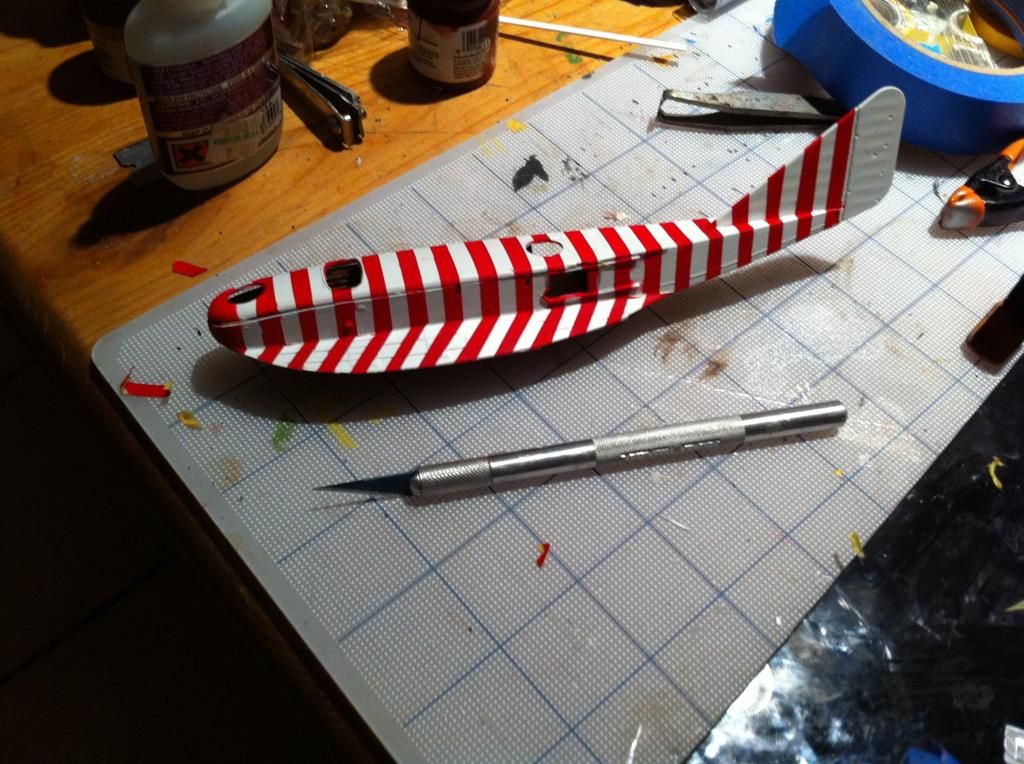
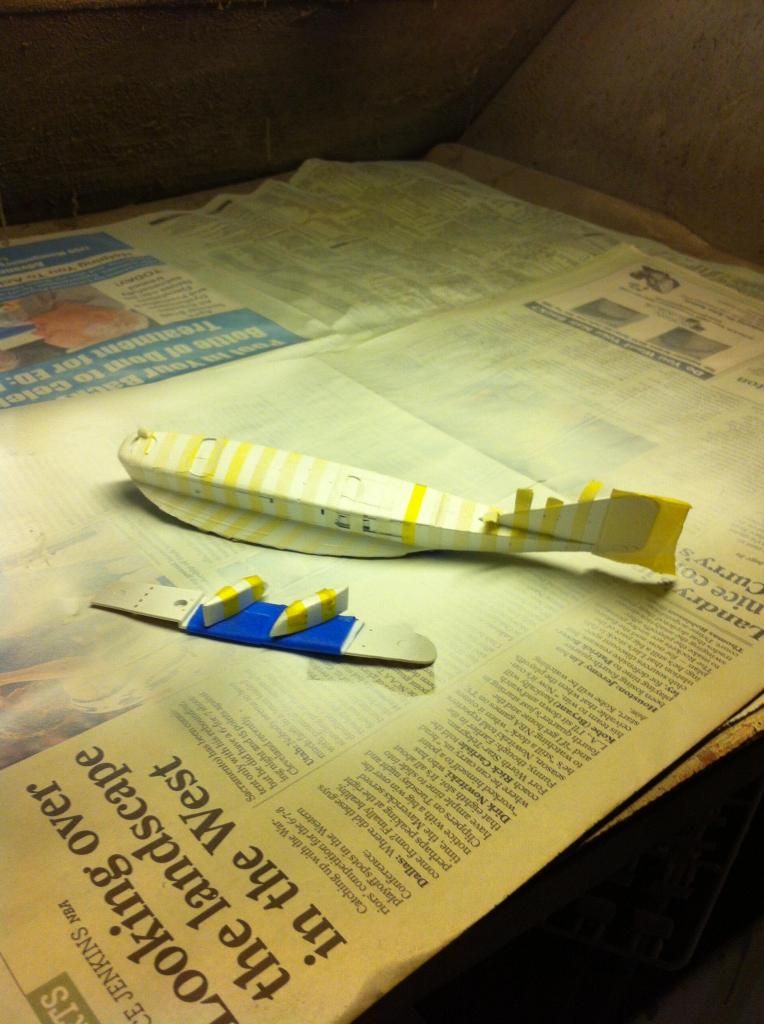
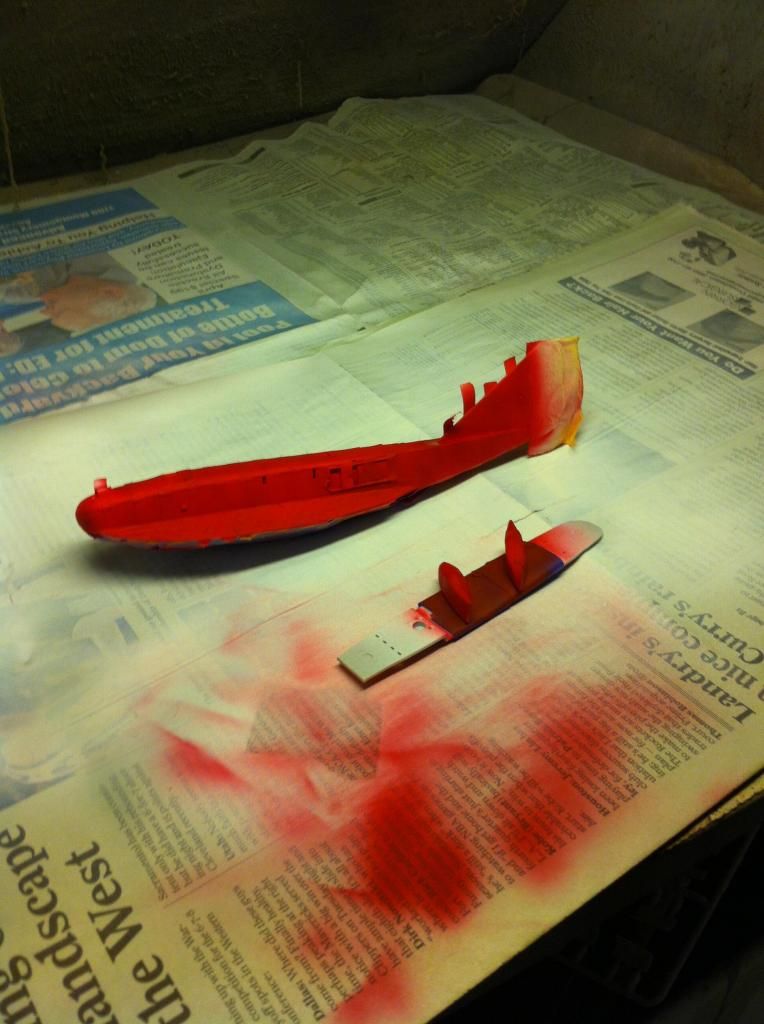
Masked the hull and sealed the tape with a light overspray of more white before shooting on the red. That Bristol really inspired me to take my time. I could do D-Day stripes in my sleep after this!
Might take a break from airframe construction and start putting together Lewis Mk.2's. Ten of them!

I'll need a gun sorting tray from the HMS Victory build.

I've a question. A lot of the control wires esp. to the tail have a "split" near the control surface end. In other words the single wire becomes two before it connects to a pair of control horns at each end of the elevator/ rudder/ aileron. Like about 6 feet before. A knot seems clunky.  As these were maintained by the Royal Navy I'd guess the real world solution involved a marlinspike, rum and a beautiful detail where they were "turned in with a splice".

What do you bugs-in-the -teeth aviators suggest?

Speaking of rum as so as not to offend the Dark Force, time to repair to my cabin for a bit of solitude and attitude adjustment. Perhaps the Admiral will join me for a bit of figgy pudding.

With pictures...

 Modeling is an excuse to buy books.


Moderator
  • Member since
    September 2011
Posted by Tim Kidwell on Monday, April 29, 2013 9:11 PM

GMorrison
Also, this has to work at 1/72.

Dear God, man! I was offering reference, not a miracle!

But, I wonder ... what is the diameter of the line you're using and is it heat sensitive? There is some very small diameter heat-shrink tubing on the market (.2mm) that might tighten down enough (usually about 20%) to look like a splice rather than a knot. I'm not sure if it's viable or not ... I've been at the grog ...

--

Timothy Kidwell
tkidwell@firecrown.com
Editor
Scale Model Brands
Firecrown Media


  • Member since
    September 2012
Posted by GMorrison on Monday, April 29, 2013 8:42 PM

dead link, Admiral. Please try again.

Also, this has to work at 1/72.

 Modeling is an excuse to buy books.


Moderator
  • Member since
    September 2011
Posted by Tim Kidwell on Monday, April 29, 2013 8:39 PM

GMorrison

I've a question. A lot of the control wires esp. to the tail have a "split" near the control surface end. In other words the single wire becomes two before it connects to a pair of control horns at each end of the elevator/ rudder/ aileron. Like about 6 feet before. A knot seems clunky.  As these were maintained by the Royal Navy I'd guess the real world solution involved a marlinspike, rum and a beautiful detail where they were "turned in with a splice".

What do you bugs-in-the -teeth aviators suggest?

A splice is what came to my mind. Something like this, I assume. (Link fixed.)

As for some grog and figgy pudding, I believe I'm up for it if you have a mind to invite the rest of the gun room. A madeira wouldn't be bad either.  

--

Timothy Kidwell
tkidwell@firecrown.com
Editor
Scale Model Brands
Firecrown Media


JOIN OUR COMMUNITY!

Our community is FREE to join. To participate you must either login or register for an account.

SEARCH FORUMS
FREE NEWSLETTER
By signing up you may also receive reader surveys and occasional special offers. We do not sell, rent or trade our email lists. View our Privacy Policy.