SEARCH FINESCALE.COM

Enter keywords or a search phrase below:

FineScale Modeler WWI Aeroplane Group Build 2013

139886 views
1262 replies
1 rating 2 rating 3 rating 4 rating 5 rating
  • Member since
    September 2012
Posted by GMorrison on Monday, April 29, 2013 7:58 PM

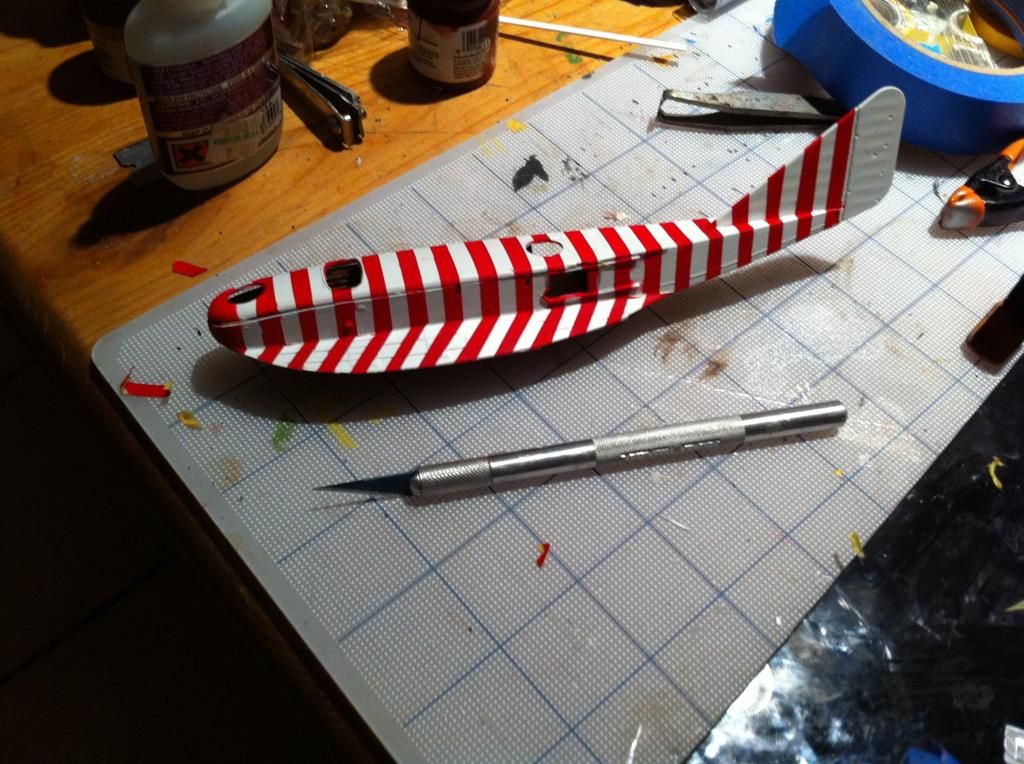
Bish- that's great work. Why haven't you painted the wing? Is that because you are going to patch the rigging holes first? Wish I'd thought of that...

Everyone this is looking great. Mike the metal bat is a real looker.

Great vlog, fellas. Real Amos n' Andy routine too. Aaron, any progress? The kid is on a roll with that D7.

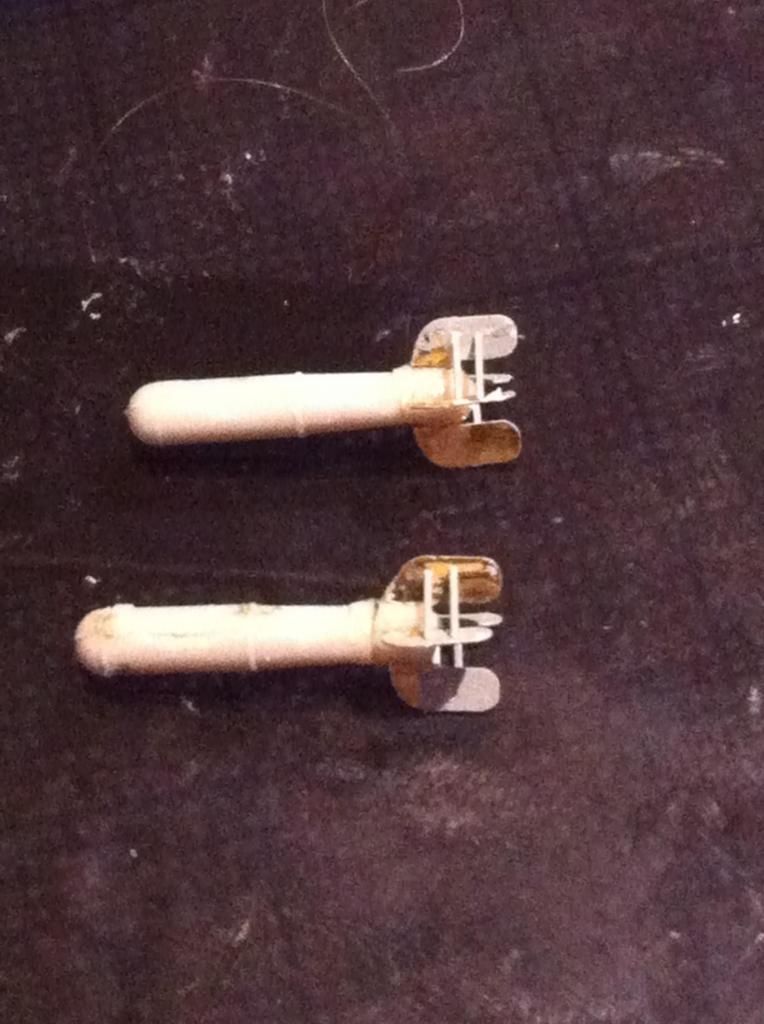
My props are strange. They were wrapped in sailcloth and painted "battleship grey" as is everything else on this thing that's not varnished or doped. Humbrol 165. Sure they have neato brass tips and leading edges, but the only wood is right at the hub. Also, and I spent a LONG time looking at photos, but the "paddle" edge is the leading edge, not the straight edge. And to make things fun, some aircraft counter rotate and some aircraft are same handed. I have no reference which were which and the only pic I could find of mine doesn't show the props, so I am correct by default (same handed).

Finished the bomb construction. What seemed simple... Each bomb has it's fin assemblies made of eight micro PE parts each. looks great though.

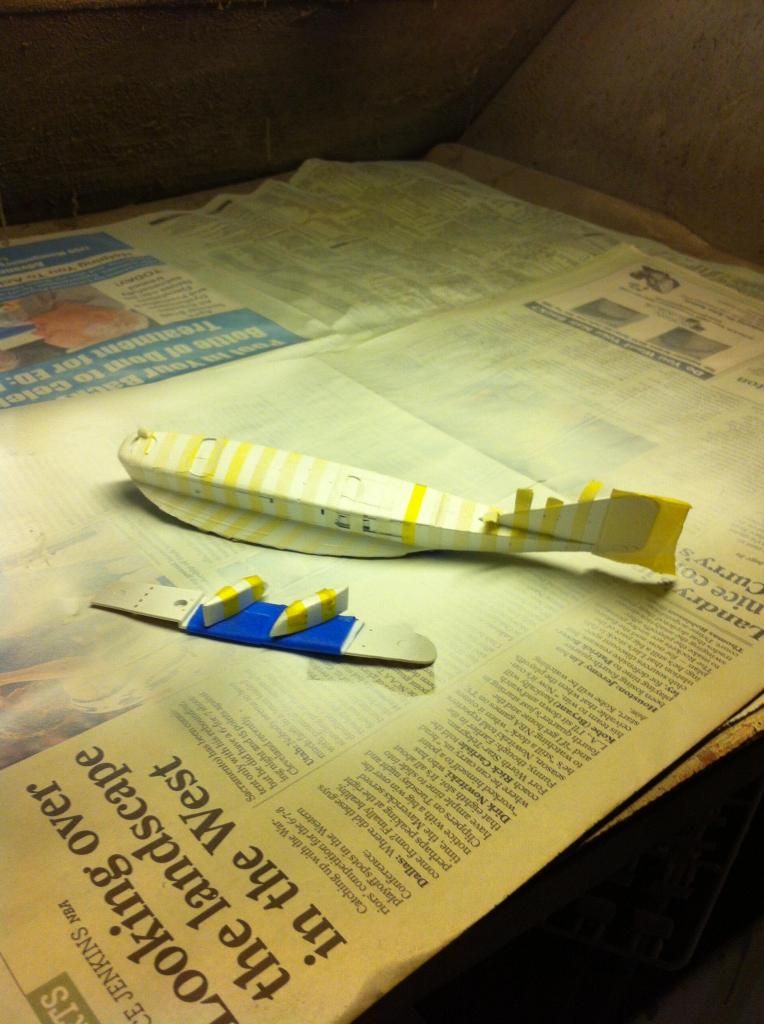
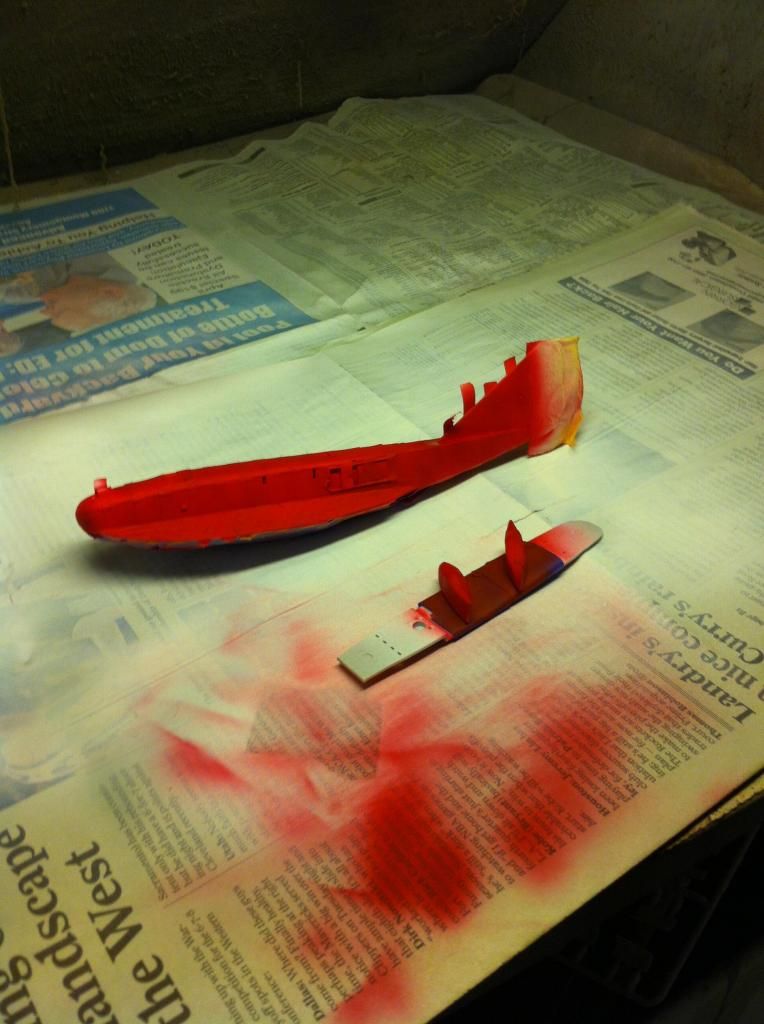
Masked the hull and sealed the tape with a light overspray of more white before shooting on the red. That Bristol really inspired me to take my time. I could do D-Day stripes in my sleep after this!

Might take a break from airframe construction and start putting together Lewis Mk.2's. Ten of them!

I'll need a gun sorting tray from the HMS Victory build.

I've a question. A lot of the control wires esp. to the tail have a "split" near the control surface end. In other words the single wire becomes two before it connects to a pair of control horns at each end of the elevator/ rudder/ aileron. Like about 6 feet before. A knot seems clunky.  As these were maintained by the Royal Navy I'd guess the real world solution involved a marlinspike, rum and a beautiful detail where they were "turned in with a splice".

What do you bugs-in-the -teeth aviators suggest?

Speaking of rum as so as not to offend the Dark Force, time to repair to my cabin for a bit of solitude and attitude adjustment. Perhaps the Admiral will join me for a bit of figgy pudding.

 Modeling is an excuse to buy books.


  • Member since
    February 2006
  • From: Smithers, BC, Canada
Posted by ruddratt on Monday, April 29, 2013 7:34 PM

Oh heck yeah Bish! That's looks flippin' amazing! For your first rigging attempt, you picked one heck of a subject, but man oh man, you're knocking this one outa the park! Yes

wing_nut
I started playing around with the RB PE trunbuckles.  Fairly nice looking but OMG what a PITA trying to see and fold them.  Just ordered gasp[acth tb's.

Marc, my reaction to the PE buckles was identical, and so was my solution. You're going to LOVE those Gaspatch buckles. They are incredibly strong (not a soft metal by any means), so do not be deceived by their size - they're tough little buggers!

....and, sweet work on the Albatros! I always enjoy watching your builds come together. Your attention to detail really is unparalleled. Yes (....and I have to add, that was a great bit of researching there, Jack!)

Mike

 "We have our own ammunition. It's filled with paint. When we fire it, it makes pretty pictures....scares the hell outta people."


  • Member since
    December 2002
  • From: Bury St Edmunds, Suffolk, England
Posted by Bish on Monday, April 29, 2013 3:14 PM

After several days doing a bit at a time, i finally have the 0/400 rigged up. I also have all the wing sections on. I still have a bit of sanding a filling to do and a few other bits to add before i finish off the paint job. I am not sure how accurate the rigging is, but most of the models i have seen seem to be like this.

So here she is so far.

I still have a little rigging to do on top of the wings, that will wait until the paint job is done.  

I am a Norfolk man and i glory in being so


On the bench: Airfix 1/72nd Harrier GR.3/Fujimi 1/72nd Ju 87D-3

  • Member since
    April 2005
  • From: Piscataway, NJ!
Posted by wing_nut on Monday, April 29, 2013 2:22 PM

Thanks jack.  If I had to guess I think that would have been it, makes sense being where there start and end up.  I have to re-rill those drain holes.  I have some amoeba sized metal washers that will be perfect for those holes.  I’ll try to get some pics of the little washers.  Just need to find my electron microscope.Whistling

I started playing around with the RB PE trunbuckles.  Fairly nice looking but OMG what a PITA trying to see and fold them.  Just ordered gasp[acth tb's.

Marc  

  • Member since
    April 2006
  • From: ON, Canada
Posted by jgeratic on Monday, April 29, 2013 1:53 PM

Marc - as per usual, great work!  Since I too am building an Albatros, I looked into those two pipes on the underside of the fuselage.   Again, kudos to the members of the Aerodrome forum:

There is a line of drain holes down the center under the fuselage, plus there are two cartridge ejection chutes which look like a sidewise 8, slightly to the port of the center line.

regards,

Jack

Moderator
  • Member since
    September 2011
Posted by Tim Kidwell on Monday, April 29, 2013 8:59 AM

Happy Monday, everyone!

Holy cow! This must have been the weekend for gettin' it done. I had gardening and lawn work to do, but I'll get some work done around the office when I can.

Ruddratt - Everything that can be said has been said about that cowl. Thumbs way up!

Sascho - Great looking checkerboard. It seems we're all recovering from small dings and dents. You can't even tell.

Wing_nut - Looking good. As to the pipes, I haven't a clue. I wonder if Mike, Jack, or John might have an opinion.

I am sweating the front end of the D.VII. I think I've located the problem that Chuck and couple of other modelers have run into, and I'm test-fitting over and over. I just need to bite the bullet and put everything together. Truth be told, I can't wait to start putting some paint on it.

Give yourselves a big hand, gentlemen. This was a huge weekend. Lots done, but still lots to do! I'll be in with some pics in the next couple of days to show you some progress.

--

Timothy Kidwell
tkidwell@firecrown.com
Editor
Scale Model Brands
Firecrown Media


  • Member since
    April 2005
  • From: Piscataway, NJ!
Posted by wing_nut on Monday, April 29, 2013 8:18 AM

Hi Men.

Sorry but not much time for the hobby lately.  But I am building up a nice reserve to spend on the hobby down the road.Wink

I have been lurking all along though.

Shiv that’s a nice recovery

GM.  Couldn’t think of the righting to say so I’ll keep it simple.  WOW!

Sasho. All that work is going to pay… already is.

Mike. That looks so nice.  I had conversation recently about techniques used in one facet of the hobby that can be transferred to another.  Looking at that metal I am already thinking of way that will transfer to application in armor.

A slight pause in the work load has allowed me at least a little bit of bench time.

The guns are ready to go.  I used the Master set but replace toe front piece with the one from the kit PE fret.  That has the sight and front as one piece.  No way was the Master sight going to survive.  Cockpit and engine bearers all inside and fuselage buttoned up.  Holy crap that was tedious.  The WNEW tolerances make for some tricky work.  And I still needed a shim on the bottom.  Not sure what the pipes under the guns are but I added some brass tube to the bottom of the fuselage where they exit and the panel lines rescribed.

Marc  

  • Member since
    April 2006
  • From: ON, Canada
Posted by jgeratic on Sunday, April 28, 2013 11:33 PM

Mike - interesting question about the Eindecker cowl (I've also a kit on this subject ... Eduard 1/48), so did some digging at the Aerodrome forum.  From what I gather stated over there, we are both correct.  Pure aluminum was machined, spun or "engine turned"  being the more technical term, but jeweling is also mentioned.  This process was applied to both sides of lower grade aluminum sheet metal.  The result was the swirl patterns, and this is what provided the corrosion protection.  

Here is the thread:

http://www.theaerodrome.com/forum/camouflage-markings/33076-fokker-engine-turned-cowls-2.html

regards,

Jack

  • Member since
    February 2006
  • From: Smithers, BC, Canada
Posted by ruddratt on Sunday, April 28, 2013 9:42 PM

Thanks guys! Yes

Chuck - I'll admit I had some reservations about attaching it at this juncture. Gonna have to be very careful from hereon in - those attachment points are small indeed! (and I also found out how difficult 'random' is to replicate - thanks again for that tip!)

Bish, Jack - my understanding on the metal finish has been that the pattern is a result of residue from an anti-corrosion process the metal undergoes, but I may have to look further into that now. Also makes me wonder why it's not seen on other aircraft of that era with natural metal surfaces showing. Jack, the paint scheme is for E. Udet's mount, but I'm not sure if that was an Austrian unit or not.

Mike

 "We have our own ammunition. It's filled with paint. When we fire it, it makes pretty pictures....scares the hell outta people."


  • Member since
    April 2006
  • From: ON, Canada
Posted by jgeratic on Sunday, April 28, 2013 7:00 PM

Ssasho0 - great execution on the red/white checkerboard.  This is going to be a very colourful bird.

Mike - the Eindecker is looking awesome, judging by the green shade it must be one of those units used by the Austrians?   Regards the cowel, this probably is one of the more difficult finishes to simulate - btw, I think on the bottom section you have  best captured what we see in period photos. 

I can only describe it as a disorganized pattern of swirls.   I'm not sure if this created by hammering the metal or is from some type of grinder procedure during the metal working.

regards,

Jack

  • Member since
    December 2002
  • From: Bury St Edmunds, Suffolk, England
Posted by Bish on Sunday, April 28, 2013 6:20 PM

Ssasho0, now thats a great job, thats some patient work.

Mike, that metal looks brilliant. You say that was unique to this aircraft. Was this just down to the way they worked the metal.

I am a Norfolk man and i glory in being so


On the bench: Airfix 1/72nd Harrier GR.3/Fujimi 1/72nd Ju 87D-3

  • Member since
    October 2011
  • From: Lake Villa, Illinois
Posted by Chuck Davis on Sunday, April 28, 2013 6:15 PM

Ssasho0 - Nice!  I love that scheme...great job so far

Mike - awesome metal work...this will be an outstanding model.  You have more guts than I had attaching the elevator...


Hope everyone's having a good weekend.  It's finally nice weather here, so I just came in from measuring the porch for new railings.  There's a lot of that going around, I guess...

Chuck Davis

  • Member since
    March 2003
  • From: Towson MD
Posted by gregbale on Sunday, April 28, 2013 5:25 PM

Wow, Mike, that is some seriously impressive metalwork, The whole thing is shaping up beautifully!

Greg

George Lewis:

"Every time you correct me on my grammar I love you a little fewer."
 
  • Member since
    February 2006
  • From: Smithers, BC, Canada
Posted by ruddratt on Sunday, April 28, 2013 5:14 PM

sasho - man, that is some serious masking! Very nice! Ya gotta love how colorful these birds can be. Yes

shiv - very nice recovery on that paint mishap. She's lookin' real good! Nice work on scratching those eyelets too. I copped out on mine and am going with the Gaspatch ones this time 'round. Having done a ton of bipes over the years, if I scratch any more of those little buggers, I'll be seeing them in my sleep!

GM - really nice work so far! I had no idea what kit the trolley in the pic was from, but it looks cool! Can't wait to see what you come up with for the correct one!

It's been a while, but I'm happy to say that enough progress has been made on the E.III to finally post a few more pics. I'm sticking with the origional plan of completing the entire fuselage assembly before the wings are added. She's still got a ways to go before that happens, but here's where it stands so far.....


The fuselage was painted with Tamiya XF-22, lightened a bit with white and reapplied in a random pattern, and finished with a random splotching of Tamiya smoke. The metal on the cowling is a base coat of Alclad II dark aluminum and dabbed with Reaper blackened steel using a foam sponge (thanks for that tip Chuck!) to replicate the metal finish that is so unique to the Eindecker. The decals are next,along with the main gear, the rudder, the gun, and the control and bracing wires/turnbuckles in the appropriate locations. This kit has been a dream to build so far - I can't recommend it enough!

Mike

 "We have our own ammunition. It's filled with paint. When we fire it, it makes pretty pictures....scares the hell outta people."


  • Member since
    March 2003
  • From: Towson MD
Posted by gregbale on Saturday, April 27, 2013 6:51 PM

Nice work, Ssasho0! Thats a first-rate masking job.

Greg

George Lewis:

"Every time you correct me on my grammar I love you a little fewer."
 
  • Member since
    March 2013
Posted by Ssasho0 on Saturday, April 27, 2013 12:41 PM

I was able to complete my cockpit and closed the fuselage. Then I started to play with putty and sanding sticks. Did 3 putty/sanding cycles as there was a step on her belly where the fuselage halves joined. When I was just thinking about the priming I dropped her on the floor :-(. There was some nasty damage, but northing beyond repair. The engine and 2 other parts located in the engine compartment unglued, so I had to get the fuselage separated again, glue them and redo the puty/sanding phase. 

After that I did a fast priemer (Mr. Surfacer 1200), polished it with Tamiya polishing compound. Then followed  green, some masking, white, polishing again ( I wanted to be sure that the paint won't leak so I made sure that the masks will stick nicely), A LOT of masking, then came teh RED :) . I finished  it with decals :).  As it is visible the green requires quite a lot of touch-ups and after them, there will be decals all over the nose.

At the moment the wings are undergoing the same sequence (brushed them white today)

Here are few pics

  • Member since
    April 2003
Posted by shivinigh on Saturday, April 27, 2013 10:51 AM

Well doing some cleaning today and found my missing engines for the Gotha bomber that I have so when I finish the Rolland i can get started on it. Always amazes me what you might find under the couch.


  • Member since
    March 2003
  • From: Towson MD
Posted by gregbale on Saturday, April 27, 2013 10:21 AM

Another great vlog, Aaron and Tim. You guys are almost like a vaudville act, part of what makes this GB so much fun.

Tim   As much as I appreciate your comments on my wicker seat, it may have taken me about the same time to build it as it took you to wrap your turnbuckles. The frame is styrene rod and sheet, the "wicker" is a piece of brass screen with a few strands teased out to mimic the typical Sopwith weave pattern. Maybe 25 minutes total.

shivinigh  Great save on the Roland paint job. I'm also glad you went with the mauve & green instead of the brown and green--it just looks so cool for a warplane.

GMorrison  I'm gobsmacked by your work on the Felixstowe so far, really getting inspired since I've got one waiting in the pile. And the CMK trolley looks perfect with it.

freem  Look forward to seeing the progress on the E.IV.

Love all the stuff so far. Hope everybody has a great weekend.

Greg

George Lewis:

"Every time you correct me on my grammar I love you a little fewer."
 
  • Member since
    September 2005
  • From: Central Nebraska
Posted by freem on Friday, April 26, 2013 9:20 PM

I finally got back to my E IV last night.  Since all the interior came out I was able to fish control cables for the rudder and elevators through exit holes in the back of the fuse and glued the rudder cables to the rudder bar.  Had a splitting headache after staring through magnifying specs for an hour. Pics did not show what I wanted in enough detail.  Heck if I can barely see it how can my iphone camera???

Anyway great work everybody!!

freem

Chris Christenson


  • Member since
    September 2012
Posted by GMorrison on Friday, April 26, 2013 6:40 PM

Chuck Davis

GM - I just had a thought while showing your trolley to a colleague - is that the CMK beaching gear for the Revell BV.222?  If so, it fits like a glove!  Take care...

Clever bunch. That is indeed the CMK resin kit designed specifically for the giant Revell BV-222. That model is long gone, but the trolley was given to me by a friend who built it and is the "werks" trolley on my own bench.

The kit came with one which is kind of a sad looking affair. After the model is finished I'll need to either make something or improve Roden's.

 Modeling is an excuse to buy books.


Moderator
  • Member since
    September 2011
Posted by Tim Kidwell on Friday, April 26, 2013 5:35 PM

Hey guys,

Just got home from the office and wanted to reiterate what Aaron and I said in the vlog: You're all doing amazing work and deserve a huge round of applause.

Chuck - Thanks for the pat on the back for the turnbuckle covers. I think they turned out all right.

Have a great weekend!

--

Timothy Kidwell
tkidwell@firecrown.com
Editor
Scale Model Brands
Firecrown Media


Moderator
  • Member since
    September 2011
Posted by Tim Kidwell on Friday, April 26, 2013 4:30 PM

As promised! Here's the latest vlog! 

Enjoy and have a great weekend, everyone!

--

Timothy Kidwell
tkidwell@firecrown.com
Editor
Scale Model Brands
Firecrown Media


  • Member since
    October 2011
  • From: Lake Villa, Illinois
Posted by Chuck Davis on Friday, April 26, 2013 4:13 PM

Fair enough.  That will make Monday a little more tolerable, then...

Chuck Davis

Moderator
  • Member since
    September 2011
Posted by Tim Kidwell on Friday, April 26, 2013 4:10 PM

Chuck Davis
And HEY...Tim and Aaron...are ya done with the latest vlog installment yet?

Yes, Aaron and I filmed the latest vlog, but the boys in production are backed up and won't have it out until Monday morning. I will get it out to you guys ASAP, I promise!

Update: Looks like they're putting a special rush on it just for us! Still will be out today!

--

Timothy Kidwell
tkidwell@firecrown.com
Editor
Scale Model Brands
Firecrown Media


  • Member since
    October 2011
  • From: Lake Villa, Illinois
Posted by Chuck Davis on Friday, April 26, 2013 1:23 PM

GM - I just had a thought while showing your trolley to a colleague - is that the CMK beaching gear for the Revell BV.222?  If so, it fits like a glove!  Take care...

Chuck Davis

  • Member since
    October 2011
  • From: Lake Villa, Illinois
Posted by Chuck Davis on Friday, April 26, 2013 1:13 PM

Bish - excellent rigging job sir - I echo the amazement that this is your first time out for rigging.

Greg -  beautiful interior work - and we have the pictures to prove it, even after it's closed up!

Tim - you sir, are continuing to impress for your first bipe as well.  Keep up the good work - I love the wraps

GM - Wow.  I can't ever build my Fellixstowe now.  Beautiful!  I'd also like to know where the trolley came from...scratch?

Shiv - nicely played, sir - excellent recovery

As for my F.1, a milestone has been reached: the fuselage is stuck together - intentionally, I might add.  I have been reminded yet again that this is not a WnW kit.  I had to add filler to the fuselage seam just to keep it from being slightly concave.  But I will overcome...

I have drawings and 3-D model ready for my gear spreader adventure, but a possible snag has developed in my case for work purchase...stay tuned.

Have a fun, safe, productive weekend everyone.  And HEY...Tim and Aaron...are ya done with the latest vlog installment yet?

Chuck Davis

  • Member since
    December 2002
  • From: Bury St Edmunds, Suffolk, England
Posted by Bish on Friday, April 26, 2013 3:13 AM

GM, thats very nice. Does the trolley come with the kit.

I am a Norfolk man and i glory in being so


On the bench: Airfix 1/72nd Harrier GR.3/Fujimi 1/72nd Ju 87D-3

  • Member since
    September 2012
Posted by GMorrison on Friday, April 26, 2013 2:56 AM

 Here's a better daylight picture.http://i295.

 Modeling is an excuse to buy books.


  • Member since
    December 2002
  • From: Bury St Edmunds, Suffolk, England
Posted by Bish on Friday, April 26, 2013 12:25 AM

shiv, nice recovery. And thats some detailed scratchbuilding.

I am a Norfolk man and i glory in being so


On the bench: Airfix 1/72nd Harrier GR.3/Fujimi 1/72nd Ju 87D-3

  • Member since
    March 2012
  • From: Corpus Christi, Tx
Posted by mustang1989 on Thursday, April 25, 2013 10:16 PM

This stuff looks good!! I'm not much into the First World War stuff but I can sure respect all of you who build this kind of model and pull it off.......well! Really good job you all, Joe


 Forum | Modelers Social Club Forum (proboards.com) 

JOIN OUR COMMUNITY!

Our community is FREE to join. To participate you must either login or register for an account.

SEARCH FORUMS
FREE NEWSLETTER
By signing up you may also receive reader surveys and occasional special offers. We do not sell, rent or trade our email lists. View our Privacy Policy.