SEARCH FINESCALE.COM

Enter keywords or a search phrase below:

Longest Day GB

265282 views
2863 replies
1 rating 2 rating 3 rating 4 rating 5 rating
  • Member since
    November 2010
  • From: Florida-West Central
Posted by Eagle90 on Wednesday, May 14, 2014 5:24 AM

CodyJ

Eagle90- Looks really great! Cant wait to see some dirt!

Thank you!  Oh yeah, dirt is on the way!

Eagle90


  • Member since
    December 2002
  • From: Bury St Edmunds, Suffolk, England
Posted by Bish on Wednesday, May 14, 2014 2:45 AM

Really nice work on both of those Eagle, now to finish off the set.

Gary, maybe not but the name sounds good, a paper panzer build maybe.Smile

I am a Norfolk man and i glory in being so


On the bench: Airfix 1/72nd Harrier GR.3/Fujimi 1/72nd Ju 87D-3

GAF
  • Member since
    June 2012
  • From: Anniston, AL
Posted by GAF on Tuesday, May 13, 2014 10:14 PM

Eagle90

stikpusher

Eagle, tnose look good... now they need... DIRT!

Hey Stik!  Tha means a lot coming from one of the great armor guys!  Thank you!

Oh yeah, dirt is on the way!  I plan on muddin' her up and making her look like she has been there and back!

Eagle90

Well, there's something to be said for the clean, polished look of German vehicles.  Did you know the Germans had a dedicated unit for cleaning their vehicles?  The 1st SS Panzervasher Abteilung?  The unit served on the western front, fanatically cleaning any vehicle they could get their hands on...

Okay, maybe not...  Wink

Gary

  • Member since
    July 2004
  • From: Sonora Desert
Posted by stikpusher on Tuesday, May 13, 2014 9:58 PM

You have such a dirty mind BB...


F is for FIRE, That burns down the whole town!

U is for URANIUM... BOMBS!

N is for NO SURVIVORS...

       - Plankton

LSM


  • Member since
    July 2013
  • From: Talent, OR
Posted by bitbite on Tuesday, May 13, 2014 8:58 PM

Agreed.  More dirt!  Toast

"Resist the urge to greedily fondle the parts . . ." - Sheperd Paine "Modeling Tanks and Military Vehicles" Page 5

  • Member since
    December 2013
Posted by CodyJ on Tuesday, May 13, 2014 8:08 PM

Eagle90- Looks really great! Cant wait to see some dirt!

  • Member since
    November 2010
  • From: Florida-West Central
Posted by Eagle90 on Tuesday, May 13, 2014 7:14 PM

stikpusher

Eagle, tnose look good... now they need... DIRT!

Hey Stik!  Tha means a lot coming from one of the great armor guys!  Thank you!

Oh yeah, dirt is on the way!  I plan on muddin' her up and making her look like she has been there and back!

Eagle90


  • Member since
    November 2010
  • From: Florida-West Central
Posted by Eagle90 on Tuesday, May 13, 2014 7:12 PM

Gamera

CMK02: Actually you should be ok with the epoxy, just carefully brace it and check on it every now and again. I sorta halfway braced the model and then walked off to play computer games and checked it the next morning- ok I guess it was all my own stupid fault!!! Good luck with the panel lines- another thing I've never been good at.

Eagle: Hey wow both look great! Nice clean builds and the camo lookd terrific! You did a fantastic job on the anti-grenade screens on the turret of the second car.

Hey Gamera.  Thank you!  The gernade screen was probably the hardest thing so far!  It had a little pioece of screen with the kit and I tried to lay the piece on the screen to cut it, but that just didn't work.  But it turned out alright.  I'm really having a fun time with the armor right now!  Oh, and teh antenna on the /1 is an old guitar string!  Of course I forgot to paint it!  Thanks again for the kind words!

Eagle90


  • Member since
    July 2004
  • From: Sonora Desert
Posted by stikpusher on Tuesday, May 13, 2014 12:37 PM

Eagle, tnose look good... now they need... DIRT!


F is for FIRE, That burns down the whole town!

U is for URANIUM... BOMBS!

N is for NO SURVIVORS...

       - Plankton

LSM


  • Member since
    November 2009
  • From: SW Virginia
Posted by Gamera on Tuesday, May 13, 2014 12:00 PM

CMK02: Actually you should be ok with the epoxy, just carefully brace it and check on it every now and again. I sorta halfway braced the model and then walked off to play computer games and checked it the next morning- ok I guess it was all my own stupid fault!!! Good luck with the panel lines- another thing I've never been good at.

Eagle: Hey wow both look great! Nice clean builds and the camo lookd terrific! You did a fantastic job on the anti-grenade screens on the turret of the second car.

"I dream in fire but work in clay." -Arthur Machen


  • Member since
    November 2010
  • From: Florida-West Central
Posted by Eagle90 on Tuesday, May 13, 2014 11:10 AM

Hey everyone!  Awesome work going on!  And I must admit, I am really getting into this armor thing!  I have another pic of the Puma.  I added a few small parts and did a wash/spray someone told me about (thanks Prof. Bish!) that really blended the camo together and gave it a little something extra.  Speaking of something extra Whistling  I have a little surprise.  I was secretly building a 234/1 along with the /2!  Now, initially I was using it as a test bed to try techniques out before doing anything to the Puma, but as time went on, it went from test bed to D%$#, that looks pretty good!  So, I have been doing different things with each one now.  Putting some things on one and not the other, leaving parts off.  Like the front tube bumper on the Puma.........got damaged and thrown out during a little skirmish with some pesky British recon team!  And the fuel cans.  I wouldn't run around with a bunch of flammable liquid strapped to my recon vehicle....but that's just me.  Huh?  Anyway, I did a little different camo pattern too on the /1.  Now I know you guys and gals will see the tires and laugh....but I'll add some dark grey (thanks again Bish!) and then take her mudding!  Devil

So here they are Thing one and Thing two!

Eagle90


  • Member since
    September 2003
  • From: AandF in the Badger State
Posted by checkmateking02 on Tuesday, May 13, 2014 11:02 AM

Thanks, Bish.  If I hurry too much, there's likely to be a disaster in the making.

Gamera:  that's horrible to contemplate!  Surprise  I was considering using slow drying epoxy to attach the nose, since I'll need time to position the nose to the fuselage, and CA's dry too fast--even the gel type that I have on hand. 

Last night I got most of the fuselage seam eliminated; now I'll have to rescribe panel lines.


  • Member since
    November 2009
  • From: SW Virginia
Posted by Gamera on Tuesday, May 13, 2014 10:39 AM

checkmateking02

But then, I've noticed that test-fitting can go perfectly--and the minute you apply glue, nothing lines up.

It must be a kind of principle for modeling.

Very true- also if you position the part perfectly and then apply something slow drying like epoxy as soon as you walk away it will slip and end up glued in the wrong position.... Bang Head 

"I dream in fire but work in clay." -Arthur Machen


  • Member since
    December 2002
  • From: Bury St Edmunds, Suffolk, England
Posted by Bish on Tuesday, May 13, 2014 10:24 AM

MMM, on thinking about it, I don't think this would work on the hase kits. You mentioning the bulkhead reminded me there is one at the front of the fuselage right where the nose section joins it. But next time I do one, I will give the idea some thought.

And no worries, I know you have been busy with the Enterprise. For this GB, my usual rule applies. As long as progress pics have been posted before the deadline, then people are free to carry on and claim the badge. So your good.

I am a Norfolk man and i glory in being so


On the bench: Airfix 1/72nd Harrier GR.3/Fujimi 1/72nd Ju 87D-3

  • Member since
    September 2003
  • From: AandF in the Badger State
Posted by checkmateking02 on Monday, May 12, 2014 7:11 PM

Thanks, Gamera.  Looking at the bomb racks, I was concerned the pin heads might be too evident, but with the racks in place and the narrow bay openings, they aren't very noticeable.

Maybe some round plastic rod would work just as well.

Tonight I'm working on gluing the fuselage together and sanding the seams.  I've dry-fitted the nose several times, and it seems to match up pretty well.

But then, I've noticed that test-fitting can go perfectly--and the minute you apply glue, nothing lines up.

It must be a kind of principle for modeling.


  • Member since
    September 2003
  • From: AandF in the Badger State
Posted by checkmateking02 on Monday, May 12, 2014 7:06 PM

Thanks, Bish.

Yeah, I thought about the location of those tabs, but the problem is a bulkhead for the front nose wheel that takes up about 1/3 of the inside diameter of the fuselage.  Academy didn't leave much space to locate the tabs.

If I hadn't spent so much time on USS Enterprise, I'd be a lot farther on this project.  

Always a pleasure to be in one of your hosted GB's.


  • Member since
    September 2003
  • From: AandF in the Badger State
Posted by checkmateking02 on Monday, May 12, 2014 7:03 PM

Thanks, Barrett.  It's just a fiddly kit, a kind of attention-seeker in a plasticky sort of way.  The color of zinc chromate yellow wouldn't be my first choice for room décor!


  • Member since
    September 2003
  • From: AandF in the Badger State
Posted by checkmateking02 on Monday, May 12, 2014 7:01 PM

Thanks for that suggestion about painting rings, Gary.  I'll have to give it a try.

I checked the Michaels store for some round hole punches; thought I could use them to punch out concentric circles and--thus!--make a ring.

They were out of the round stuff, and only had:  hearts!  Broken Heart


  • Member since
    November 2009
  • From: SW Virginia
Posted by Gamera on Monday, May 12, 2014 7:33 AM

Cody & Gary: Those look great guys!

eah

CMK02: Looks good! I did the same kit some years back and just glued the bombs in- yeah a few have popped lose and fell out over the years. Very good idea on pinning them in place- think I'll steal your idea there!

"I dream in fire but work in clay." -Arthur Machen


  • Member since
    March 2014
Posted by BarrettDuke on Monday, May 12, 2014 4:55 AM

Shiv, the stuff sure comes in handy for masking, doesn't it? Before I got back into models, I never would have thought I would ever buy any silly putty again.

  • Member since
    December 2002
  • From: Bury St Edmunds, Suffolk, England
Posted by Bish on Monday, May 12, 2014 4:15 AM

CMK, glad to see you didn't forget us, I know you have been really busy. Nice work on this, always a pleasure seeing your builds. Bomb rings, the eternal dilemma. As to the nose, I have had the same issue with both the Hase kits I have build, 1 D and 1 H. Though I think much of that was down to the Eduard PE, the later D certainly looks better than the H. Your idea is a good one, but maybe a strip running right round the edge rather than the tabs would be more secure.

GAF, nice work there. Looking forward to see it finished.

I am a Norfolk man and i glory in being so


On the bench: Airfix 1/72nd Harrier GR.3/Fujimi 1/72nd Ju 87D-3

  • Member since
    April 2003
Posted by shivinigh on Sunday, May 11, 2014 6:52 PM

hey Barrret. Yes I used silly putty


  • Member since
    March 2014
Posted by BarrettDuke on Sunday, May 11, 2014 6:28 PM

Hey, Checkmate. Thanks for posting some pics. Sorry to hear of your troubles. I hope you can hang in there. Gluing on your own guide tabs was a great idea. I need to remember that little trick. That certainly is an interesting yellow. Hard to believe anyone thought their airmen would want to stare at that for hours at a time!

GAF
  • Member since
    June 2012
  • From: Anniston, AL
Posted by GAF on Sunday, May 11, 2014 6:24 PM

CMK02, Shiv,

Glad to see I'm not the only one racing to the finish line.  Smile    As to bomb rings, I've used a small piece of tubing (such as the ones that come over paint brushes) and dipped them in yellow and carefully (carefully) applied rings on the bomb noses.  Sometimes it works... sometimes it doesn't.  A steady hand helps (wish I knew where I could buy one of those).

As for the C-47, I've got the base colors down and now need to touch up the paint in a few places... well, a LOT of places, actually.  But it's getting there.

I took more photos than this, but I didn't have that "Steady Hand" and they were rather blurry.  Next up, masking off for Invasion Stripes.

Gary

  • Member since
    March 2014
Posted by BarrettDuke on Sunday, May 11, 2014 6:23 PM

Thanks much, Shiv. Your plane's coming along very nicely, too. Did you use silly putty for the camo masking or some other technique? The lines look nice and sharp.

  • Member since
    September 2003
  • From: AandF in the Badger State
Posted by checkmateking02 on Sunday, May 11, 2014 4:29 PM

While I was tinkering around with some of the other futzy stuff, I did some work on the bomb bay, which I plan on leaving open. 


First, Academy doesn't provide enough bombs to fill it out, so I robbed the part box again until I had twelve bombs.

Then, from previous experience, the way Academy has them attached to the bomb racks makes them very easy to knock off during assembly; I did that on one of the previous builds.  There's just a little slot in the bomb and a shallow tab on the rack.  And of course, you can't get back up into the bay to replace them once they fall off.

So I drilled holes through each of the locations, then cut off a portion of a straight pin.  I glued the straight pin into the bomb rack, and drilled a corresponding hole in the bomb.  Then I superglued the bombs to the racks and hopefully they will stay there.

I forgot to take photos of the bombs and racks before I glued them in, but here's a shot with the fuselage halves test fitted together.

I painted the bomb with Model Master OD, and cut yellow stripes from an old sheet of RAF roundels with yellow surrounds.  I tried to make some yellow circles for the bomb noses, but this defied my efforts.


  • Member since
    September 2003
  • From: AandF in the Badger State
Posted by checkmateking02 on Sunday, May 11, 2014 4:18 PM

I haven't posted any progress photos yet, since the going has been slow; but I've looked in at the going's on and there is some excellent work finished already. 

Hope I can get mine done by the deadline!

My contribution is the old Academy B-24H, in the markings of "Aries" from the Zodiac Squadron, 486th Bomb Group, 834th Bomb Squadron, 8th AAF.

I build Academy's B-24D and -J years ago, and forgot how fussy the kits are:  lots of sink holes and ejector pin marks, ill-fitting parts, so things have gone kind of slow.

Academy chose to mold the nose and the rear fuselage in separate pieces, to make it easier to release different versions of the Liberator.  Since I had difficulties lining these up last time I built one, I thought I'd be smart and glue some help tabs in place to help alignment and stabilize the assembly.  The result is below.
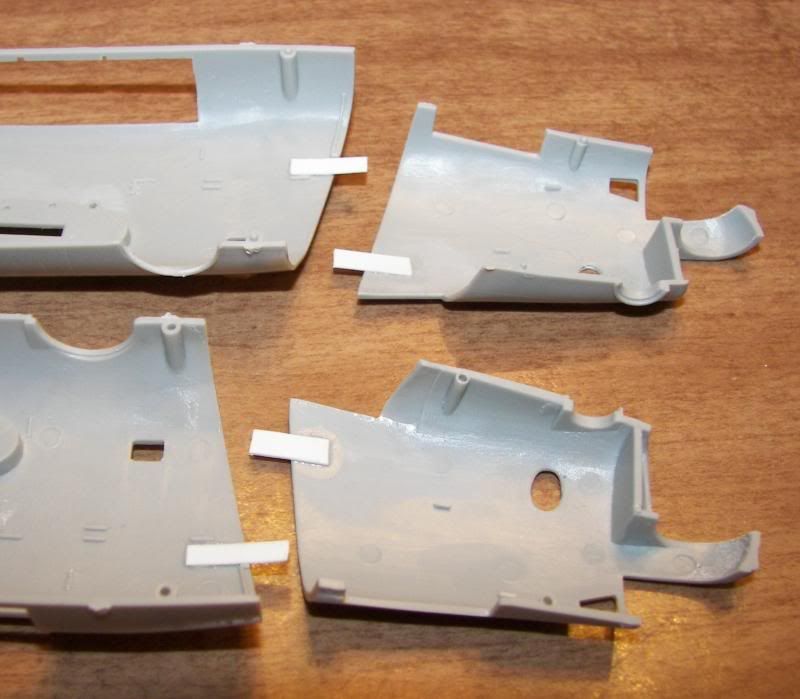
It worked fine until they broke loose when I was fiddling around with test fitting.

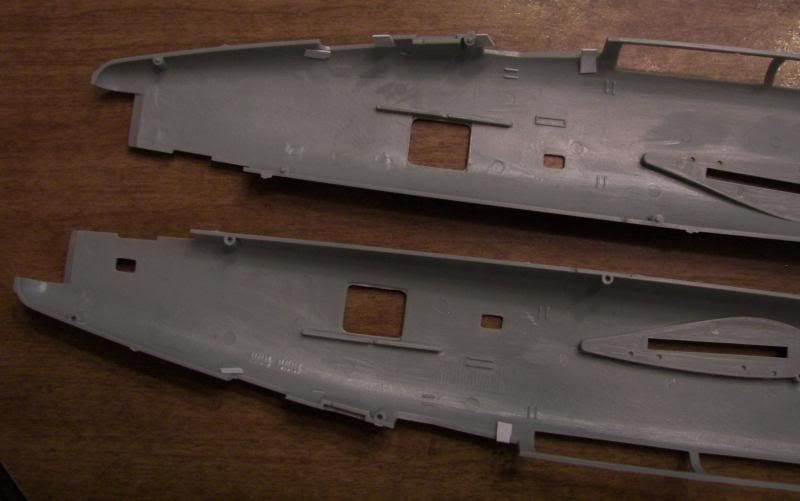
I also glued in some tabs to help place a couple of panels in the rear fuselage.  These pieces just drop in place, with nothing to hold them there.  Fortunately, the tabs I put in here didn't fall off.
The first assembly step calls for putting together the waist gunners station.  The zinc chromate yellow is WEM Colourcoats interpretation.  It has a nice pleasant, sickly greenish-yellowy cast to it, that doesn't quite come through in the photos.  It is markedly different from the Testors in the little square bottles.
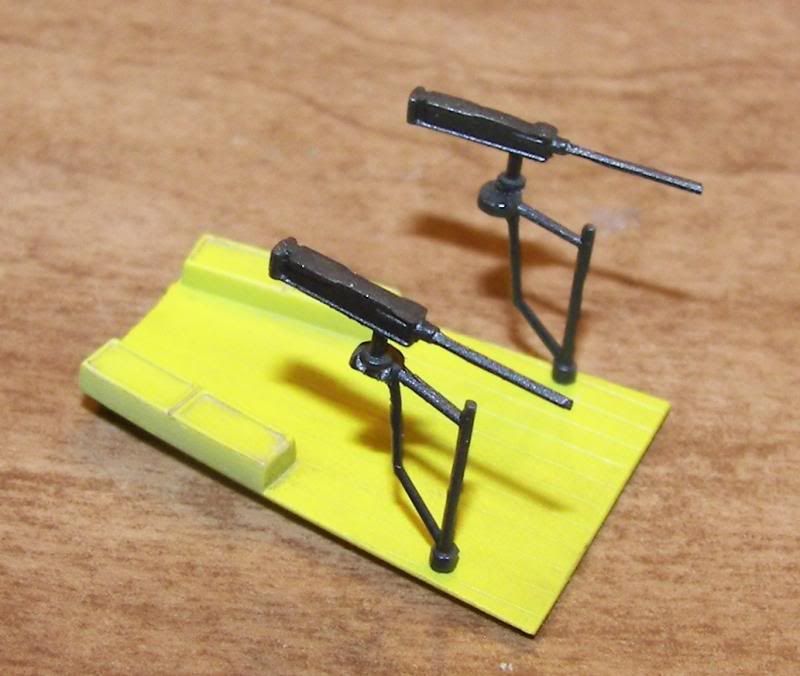
Anyway, they won't be very visible, since I plan on closing up the waist windows anyway. 

Next the instructions want the cockpit assembled.  When I applied the instrument panel decal, it shattered into tiny pieces.  So did the seat belt decals, so I scrounged some from the parts box.  Of course, that means the rest of the decals are undoubtedly bad too.  I'll try coating them with a decal preserver from MicroScale when (if) I get that far.
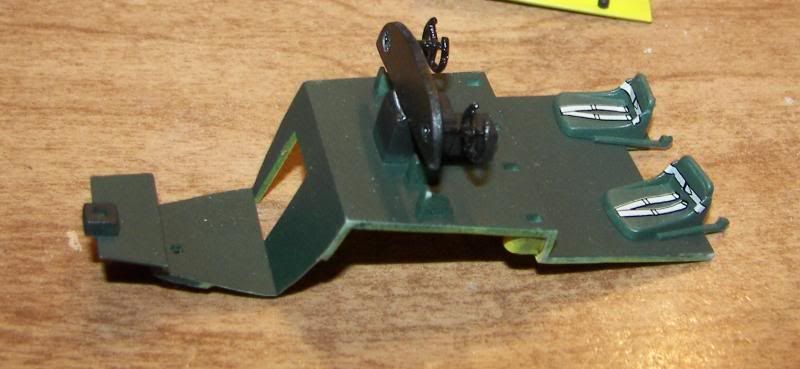
I didn't finish the cockpit, cuz I'm planning to put that into the rear fuselage, then glue the nose pieces around it--and hope everything lines up and hold together.


  • Member since
    April 2003
Posted by shivinigh on Sunday, May 11, 2014 12:32 PM

nice work on the camo there Barret. The interior work looks great.

Cody- love the 910.

got some work on my 190 done. Got the primer and base camo colours finished


  • Member since
    March 2014
Posted by BarrettDuke on Sunday, May 11, 2014 7:12 AM

Waynec, I know what you mean. I am actually moving more toward combining paint colors but not mixing them together thoroughly so that I can get the natural variation in shading within a single layer without applying multiple layers, which can often look too grainy and superimposed. Probably requires application by daubing rather than by brushing to prevent the colors from mxing too much or creating streaks of color.

  • Member since
    April 2006
  • From: Denver, Colorado
Posted by waynec on Sunday, May 11, 2014 5:47 AM
BarrettDuke

Waynec, Thanks for that info. I have read a bunch of conflicting opinions on the color to paint tracks. In the end, I think they're probably just mostly going to be earth colored. So, it sounds like what the judge said. Now, I just have to get that effect on my tracks that I have already painted rust colored! From now on, I think I'm going to start with a brown black base coat. And then I'll lighten it up with lighter dirt and dust colors and some exposed steel spots. Pretty much as you suggested.

The tracks will look fine. Sometimes realism gets in the way of artistic display. Im still trying to figure out the best color mix for modern war truck chassis grime, kinda dark grayish with a hint of brown.

Никто не Забыт    (No one is Forgotten)
Ничто не Забыто  (Nothing is Forgotten)


JOIN OUR COMMUNITY!

Our community is FREE to join. To participate you must either login or register for an account.

SEARCH FORUMS
FREE NEWSLETTER
By signing up you may also receive reader surveys and occasional special offers. We do not sell, rent or trade our email lists. View our Privacy Policy.