SEARCH FINESCALE.COM

Enter keywords or a search phrase below:

Latin American Aircraft Group Build

45635 views
462 replies
1 rating 2 rating 3 rating 4 rating 5 rating
  • Member since
    November 2009
  • From: SW Virginia
Posted by Gamera on Monday, February 3, 2014 11:32 AM

Looking forward to it SP! Funny raining cats and dogs here this morning too, tampered off now though.

It's not a big deal with the Corsair, just want to make sure everything is straight and there are no major glue spots before I put the canopy on. And yes I've had to rip half-dried canopies off before after getting in a rush to get done!

"I dream in fire but work in clay." -Arthur Machen


  • Member since
    July 2004
  • From: Sonora Desert
Posted by stikpusher on Tuesday, February 4, 2014 7:50 PM

There is possibly another storm due in here on Thursday, so today was a good day for more airbrushing. I can probably get the touch up work needed done tomorrow.

Today I added the 34079 Dark Green to my Tigershark. Boy do I really like those "wraparound" camo schemes. They make a plane look like it is supposed to be down in the weeds taking care of business!


F is for FIRE, That burns down the whole town!

U is for URANIUM... BOMBS!

N is for NO SURVIVORS...

       - Plankton

LSM


  • Member since
    December 2009
  • From: West Chester,Ohio
Posted by roger_wilco on Wednesday, February 5, 2014 6:51 AM

Looking really good SP.How's the build quality been for this kit so far?

"Build what YOU want, the way YOU want, and above all have fun!" - RIP Modeler Al. 

  • Member since
    February 2003
  • From: Rothesay, NB Canada
Posted by VanceCrozier on Wednesday, February 5, 2014 7:12 AM

Looking good Stik, nice transition between colours too.

On the bench: Airfix 1/72 Wildcat; Airfix 1/72 Vampire T11; Airfix 1/72 Fouga Magister

  • Member since
    July 2004
  • From: Sonora Desert
Posted by stikpusher on Wednesday, February 5, 2014 10:18 AM

Thank you guys. Today's plan is to do some overspray touch up and then mask off and paint the top of the vertical stabilizer. I need to do a few image searches to see the proper color on that.

Roger, overall the fit is decent-typical Monogram of that era. Nothing a little careful test fitting and gluing will not fix in most areas. The only areas that needed any filler were the fit of the intakes/LEXs to the fuselage & wings. My kit had just the slightest warpage on one side that really amplified that there. If I did not have SO many other kits to build and serious lack of display space in my home I would be tempted to go get another one of these and build it using lessons learned here. The Gray Demonstrator bird could be done in a weekend really. I am just taking my time on this one.


F is for FIRE, That burns down the whole town!

U is for URANIUM... BOMBS!

N is for NO SURVIVORS...

       - Plankton

LSM


  • Member since
    November 2009
  • From: SW Virginia
Posted by Gamera on Wednesday, February 5, 2014 11:09 AM

Yeah, looks great SP! The wrap-around camo is quite sexy!

"I dream in fire but work in clay." -Arthur Machen


  • Member since
    July 2004
  • From: Sonora Desert
Posted by stikpusher on Wednesday, February 5, 2014 6:52 PM

Yes it is my friend. I did some image searching this morning to look for a shade of gray for the tail top and found this gorgeous shot, with a weapons load out I liked...

Based on that photo I decided to go with Humbrol's Dark Gray 36081 for the fin tip. Then I went back and touched up overspray colors with my airbrush, darkest to lightest, and removed some masking after everything was dry. Unfortunately the Tamiya colors that I used to prime and base the rudder flash chipped a bit on each side when I removed the masking tape- Tamiya at that!! A first for both, so I need to go back and touch up next week...

out of my spares box came the appropriate rocket pods, which I airbrushed with Humbrol OD 34087


F is for FIRE, That burns down the whole town!

U is for URANIUM... BOMBS!

N is for NO SURVIVORS...

       - Plankton

LSM


  • Member since
    September 2012
Posted by GMorrison on Wednesday, February 5, 2014 7:10 PM

Thats a really well done paint job. Did you freehand the camo?

Are those USAF SEA colors?

 Modeling is an excuse to buy books.


  • Member since
    July 2004
  • From: Sonora Desert
Posted by stikpusher on Wednesday, February 5, 2014 7:15 PM

Thank you GM. Yes that is freehand, and yes those are the SEA colors: 34079, 34102, and 30219. I used Humbrol enamels. I can smell the paint curing in my garage when I was just in there...


F is for FIRE, That burns down the whole town!

U is for URANIUM... BOMBS!

N is for NO SURVIVORS...

       - Plankton

LSM


  • Member since
    March 2010
  • From: MN
Posted by Nathan T on Wednesday, February 5, 2014 10:23 PM

Nice freehand camo work Stik. Looks like you used masks. I hope I can do that good on my Mig.


  • Member since
    September 2012
Posted by GMorrison on Thursday, February 6, 2014 1:41 AM

My Freightdog box came in today.

I'll lay it out and post it tomorrow. One interesting item are the Matra R550 missiles in 1/72. Hi Planes did the nose and tail sections in 3D printing, connected by a section of rod, all for less than 10 dollars the pair, and clean as a whistle.

I'm also happy to find that the A-4Q, the Navy (Armada) one, is Light Gull Gray over White. Like a cup of cocoa on a cold winter night.

 Modeling is an excuse to buy books.


  • Member since
    February 2003
  • From: Rothesay, NB Canada
Posted by VanceCrozier on Thursday, February 6, 2014 6:53 AM

GMorrison

My Freightdog box came in today.

I'll lay it out and post it tomorrow. One interesting item are the Matra R550 missiles in 1/72. Hi Planes did the nose and tail sections in 3D printing, connected by a section of rod, all for less than 10 dollars the pair, and clean as a whistle.

I'm also happy to find that the A-4Q, the Navy (Armada) one, is Light Gull Gray over White. Like a cup of cocoa on a cold winter night.

Interesting. I've been wondering for awhile now why manufacturers haven't been running missiles etc like that. I'd rather fiddle with keeping those parts aligned instead of the typical "sanding a compound curve while trying to maintain its shape" scenario.

On the bench: Airfix 1/72 Wildcat; Airfix 1/72 Vampire T11; Airfix 1/72 Fouga Magister

  • Member since
    November 2009
  • From: SW Virginia
Posted by Gamera on Thursday, February 6, 2014 9:48 AM

Again looks good SP! Just a nice looking plane with sharp camo - ya can't beat that by much.

GM: Sounds cool, looking forward to the photos.

Well, the Corsair is done except for one landing light I still need to add. Didn't get the gun-sight perfectly straight but it's close enough for me. Hopefully photos this weekend.  

"I dream in fire but work in clay." -Arthur Machen


  • Member since
    July 2004
  • From: Sonora Desert
Posted by stikpusher on Thursday, February 6, 2014 11:33 AM

GM, those missiles sound like how the real ones are built- sectional. I am curious to see them! Kinda gives me an idea here if need be.

GM and Gamera, I am looking forward to more photos of your work on your builds!

and thank you guys for the kind words on the Tigershark's camo. I was working on that and a Vietnam F-104 together so two birds at the bench simultaneously really upped the work load. It's over in the Vietnam Air War GB if any of you want to take a peek.


F is for FIRE, That burns down the whole town!

U is for URANIUM... BOMBS!

N is for NO SURVIVORS...

       - Plankton

LSM


  • Member since
    November 2009
  • From: SW Virginia
Posted by Gamera on Friday, February 7, 2014 11:23 AM

Hey SP, nice work there on the F-104 too. You're on a camo roll right now!

"I dream in fire but work in clay." -Arthur Machen


  • Member since
    September 2012
Posted by GMorrison on Friday, February 7, 2014 11:44 AM

Here's the missile. I am actually not sure how they assembled it, if it's all one 3D print, two or three?

What's neat though is that the nose dome comes clear, which it should be.

 Modeling is an excuse to buy books.


  • Member since
    July 2004
  • From: Sonora Desert
Posted by stikpusher on Friday, February 7, 2014 12:09 PM

The early models had a clear seeker head. The later all aspect Magic had a mirror looking coating on the seeker head. And yes those look VERY nice!


F is for FIRE, That burns down the whole town!

U is for URANIUM... BOMBS!

N is for NO SURVIVORS...

       - Plankton

LSM


  • Member since
    July 2004
  • From: Sonora Desert
Posted by stikpusher on Monday, February 10, 2014 9:14 PM

Page 2? Oh this will not do!

Well today I touched up the rudder flash tri color. Photos coming tomorrow. All ready for a coat of Future now...


F is for FIRE, That burns down the whole town!

U is for URANIUM... BOMBS!

N is for NO SURVIVORS...

       - Plankton

LSM


  • Member since
    November 2009
  • From: SW Virginia
Posted by Gamera on Tuesday, February 11, 2014 7:41 AM

Cool, looking forward to the photos!

The Corsair is done and I took some photos Sunday afternoon. It was a bit cloudy and I'm not sure how well they'll look blown up. Just need to set aside some time to post them.

"I dream in fire but work in clay." -Arthur Machen


  • Member since
    November 2009
  • From: SW Virginia
Posted by Gamera on Wednesday, February 12, 2014 8:11 PM

Ok here are the photos, kinda cloudy all week so they're not the best but they should serve. Maybe I can post better ones if the sun ever comes out again:

"I dream in fire but work in clay." -Arthur Machen


  • Member since
    July 2004
  • From: Sonora Desert
Posted by stikpusher on Wednesday, February 12, 2014 8:14 PM

Oh that looks sweet.  But again, kinda oddball in wraparound land camo colors... Certainly unique!  What are the camo colors used by the Salvadorans?

And go claim your Latin Aircraft GB Badge with pride


F is for FIRE, That burns down the whole town!

U is for URANIUM... BOMBS!

N is for NO SURVIVORS...

       - Plankton

LSM


  • Member since
    July 2004
  • From: Sonora Desert
Posted by stikpusher on Wednesday, February 12, 2014 8:22 PM

OK, my turn for a photo update. I did two main things today- get the base decals applied (some are two parters and need an "upper" decal applied such as the national and squadron insignia), and work on the engine exhaust interior detail painting. I still need to do another external coat on the afterburner petal exterior due to paint damage that occured the first time... me getting too impatient...Whistling

overall photos of the gloss coated and base decalled exterior

and close ups of the paint touched up and decalled tail- the burner nozzle is not glued in yet and just placed in there for a look of how it will look when finished

I will get the rest of the decals on tomorrow or Friday depending upon life circumstances


F is for FIRE, That burns down the whole town!

U is for URANIUM... BOMBS!

N is for NO SURVIVORS...

       - Plankton

LSM


  • Member since
    November 2009
  • From: SW Virginia
Posted by Gamera on Wednesday, February 12, 2014 8:30 PM

Hey SP, that looks great! Don't see the damage on the afterburner though, looks fine to me, maybe it's the photo?

I have no idea what colours the Salvadorians used, I just grabbed the paint bottles that matched the closest to the few good photos I could find. I sprayed a couple of coats of thinned down buff over her to blend things together, I think I may have over done it, the buff looks stronger in person.

Thanks, I'm hoping to finish up my build for the Heroes and Villains GB and I'll update my sig line with this badge and that one at the same time.  

"I dream in fire but work in clay." -Arthur Machen


  • Member since
    July 2004
  • From: Sonora Desert
Posted by stikpusher on Wednesday, February 12, 2014 9:03 PM

Thank you G. I rotated the damaged paint side of the afterburner away from the camera in each photo ;-) It is bad and quite noticable on a couple petals. I had to sand them out down to bare plastic.

OK, what colors did you use? it looks like OD, a medium bright green, and some kind of khaki/tan. I think the Buff coat looks perfect to blend it all together!


F is for FIRE, That burns down the whole town!

U is for URANIUM... BOMBS!

N is for NO SURVIVORS...

       - Plankton

LSM


  • Member since
    November 2009
  • From: SW Virginia
Posted by Gamera on Wednesday, February 12, 2014 10:23 PM

SP: I hate to say this but honestly I can't remember what I used now. The paint bottles were in the box when I was building her but I've returned them to the paint drawer now. The tan was Tamiya Buff, the light green was something Japanese from the MM Acrylic line, and the dark green was something Tamiya too.

Sorry :(

"I dream in fire but work in clay." -Arthur Machen


  • Member since
    July 2004
  • From: Sonora Desert
Posted by stikpusher on Wednesday, February 12, 2014 11:49 PM

LOL! No worries my friend. Whatever you used looks great!


F is for FIRE, That burns down the whole town!

U is for URANIUM... BOMBS!

N is for NO SURVIVORS...

       - Plankton

LSM


  • Member since
    March 2010
  • From: MN
Posted by Nathan T on Friday, February 14, 2014 8:29 AM

Gamera- Lovely looking Corsair. Great camo and decal work. It sure looks real nice in that scheme. Very nice outdoor pics too!!

Stik- Great airbrushing! Thats a smooth gloss coat. Decals really like nice as well. I wish I was at that stage in my build.

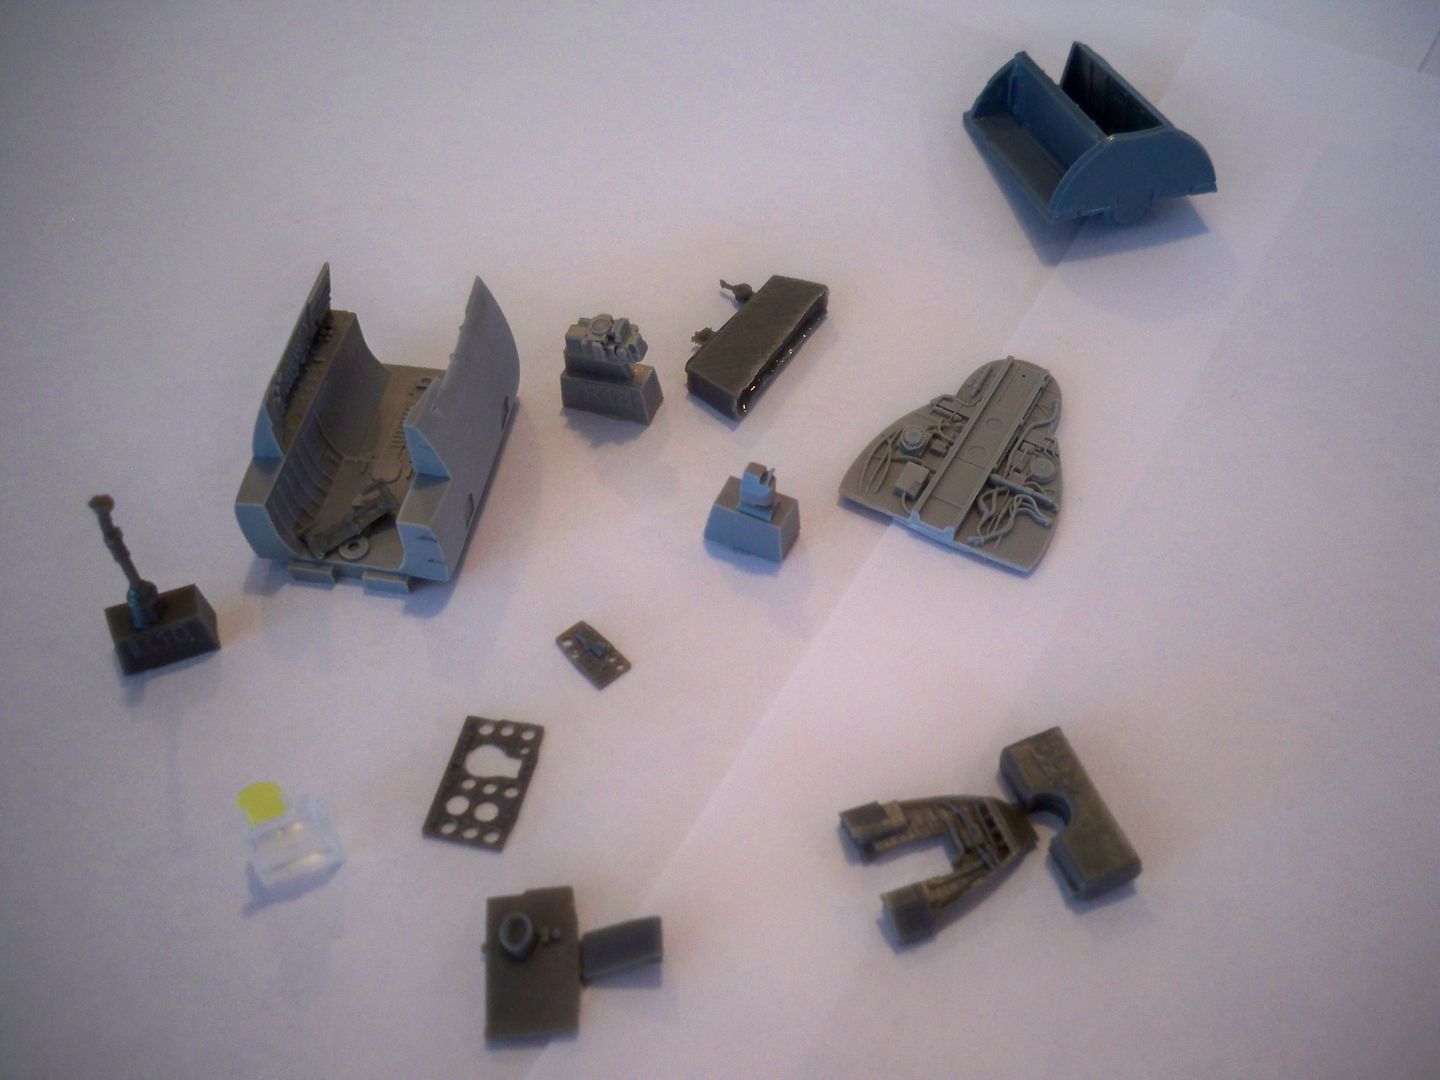
Speaking of my build, I got back to working on the Mig-21, and now am focused on the resin cockpit and nozzle, which all need to be completed before closing up the fuselage. Here's the cockpit parts:
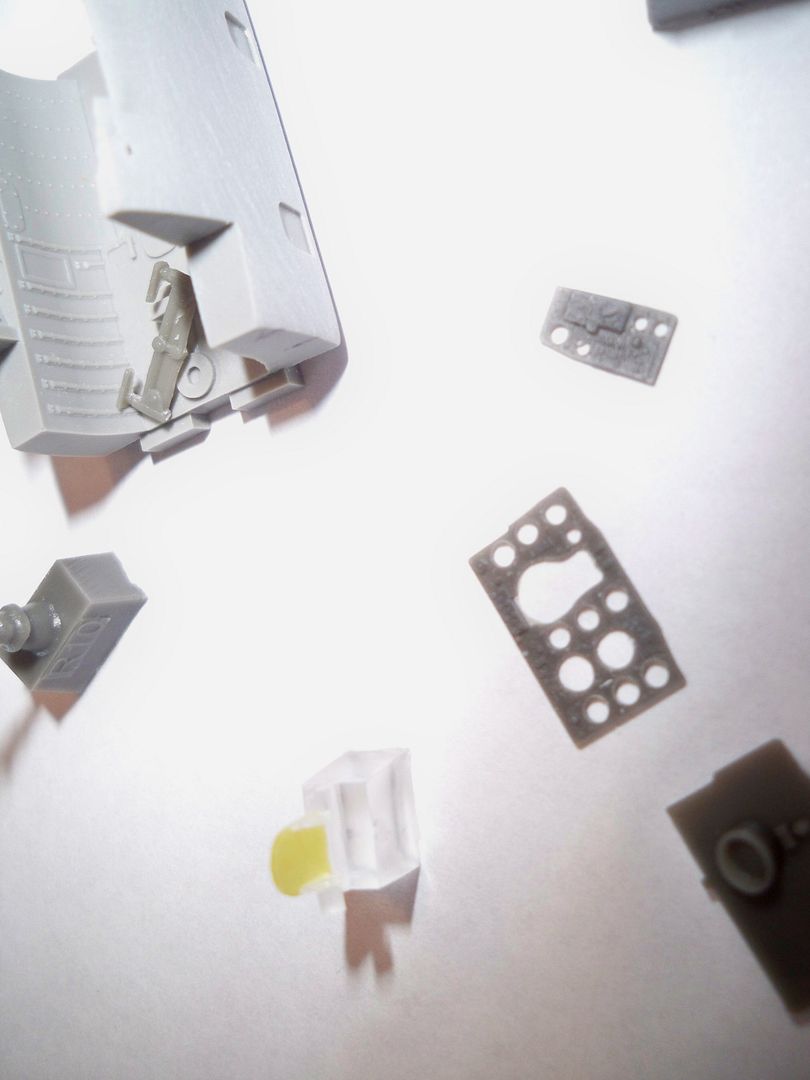
I chose to build up the panel using resin and pe dials, which means drilling out all the instrument holes, and thinning down the panel parts. 
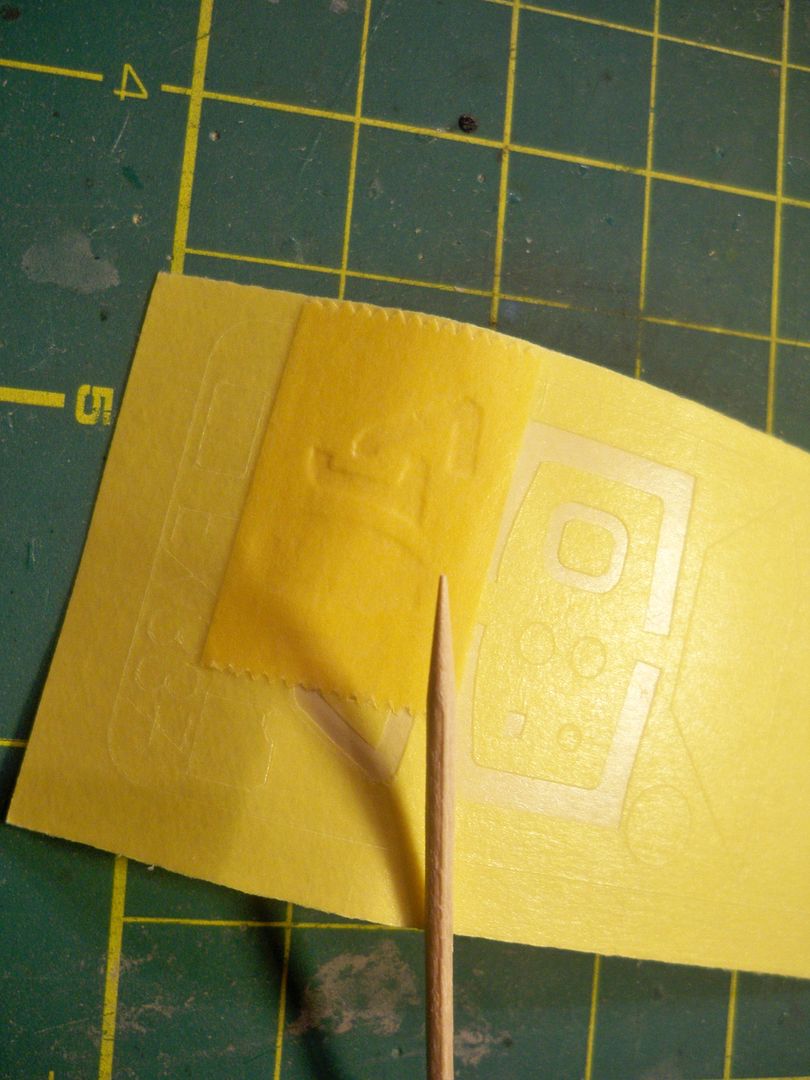
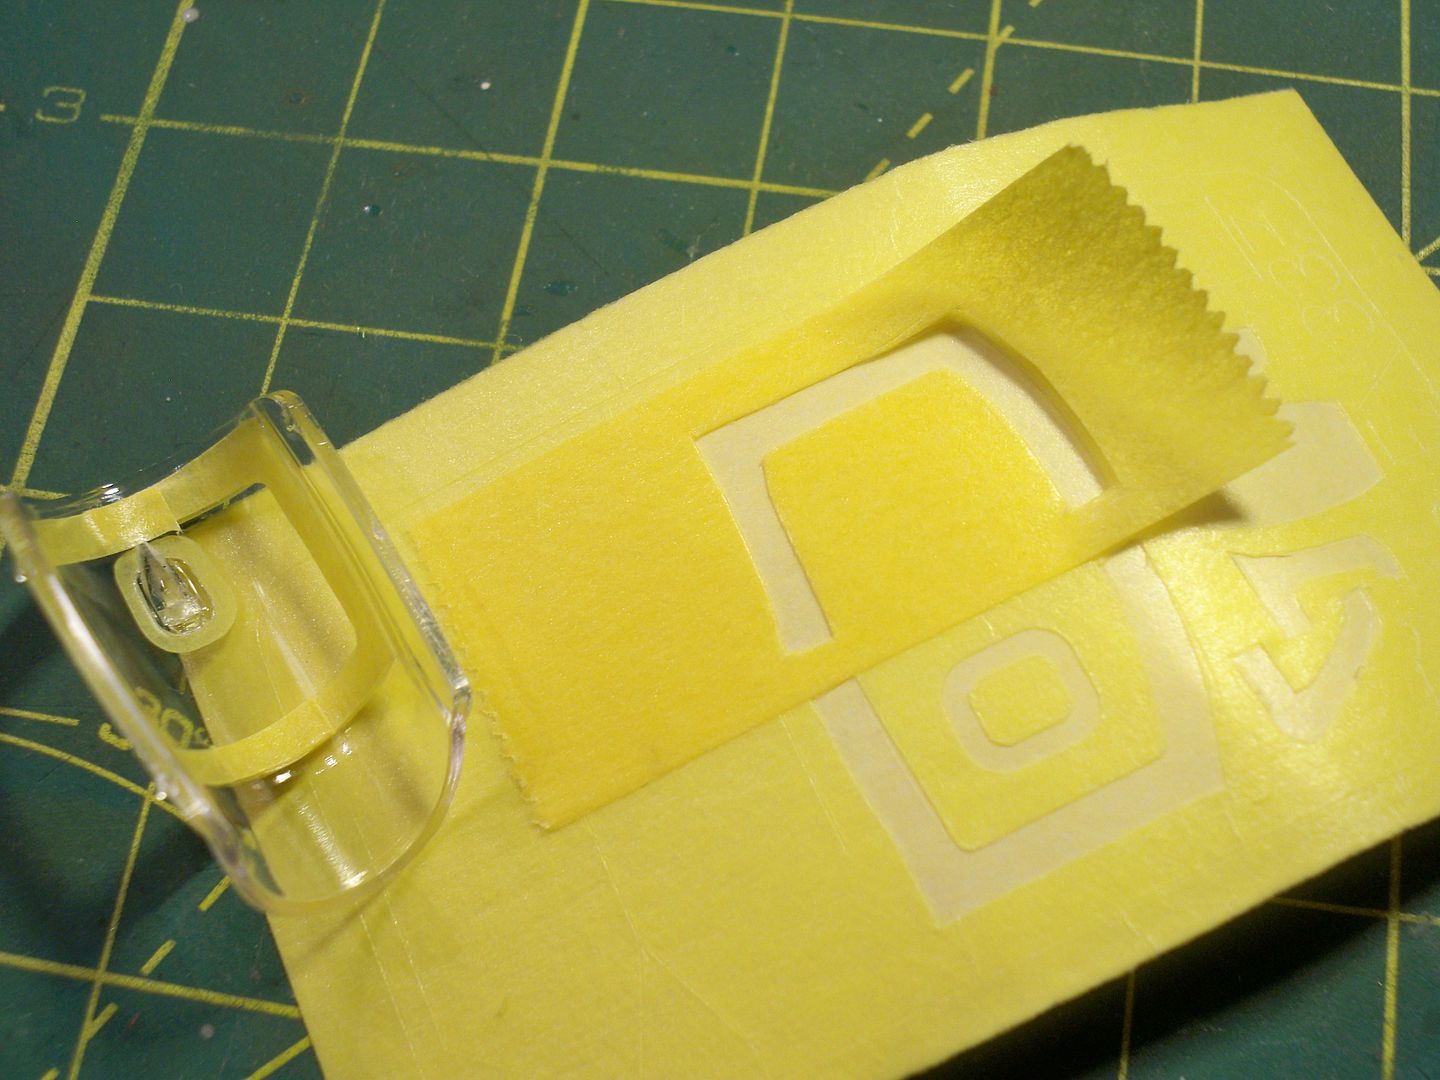
The gunsight was masked and will be painted before its attached, so I can pull the masks off. There are resin parts that need to be glued to the windscreen and canopy, so this meant masking the canopies now. I decided to mask the inside as well, for a better overall look. I masked the outside first, then used the mask sheet as a template. I layed Tamiya tape over it, burnished it down with a toothpick, put on my optivisor, and cut. Some parts took a few tries, but I think I got it:
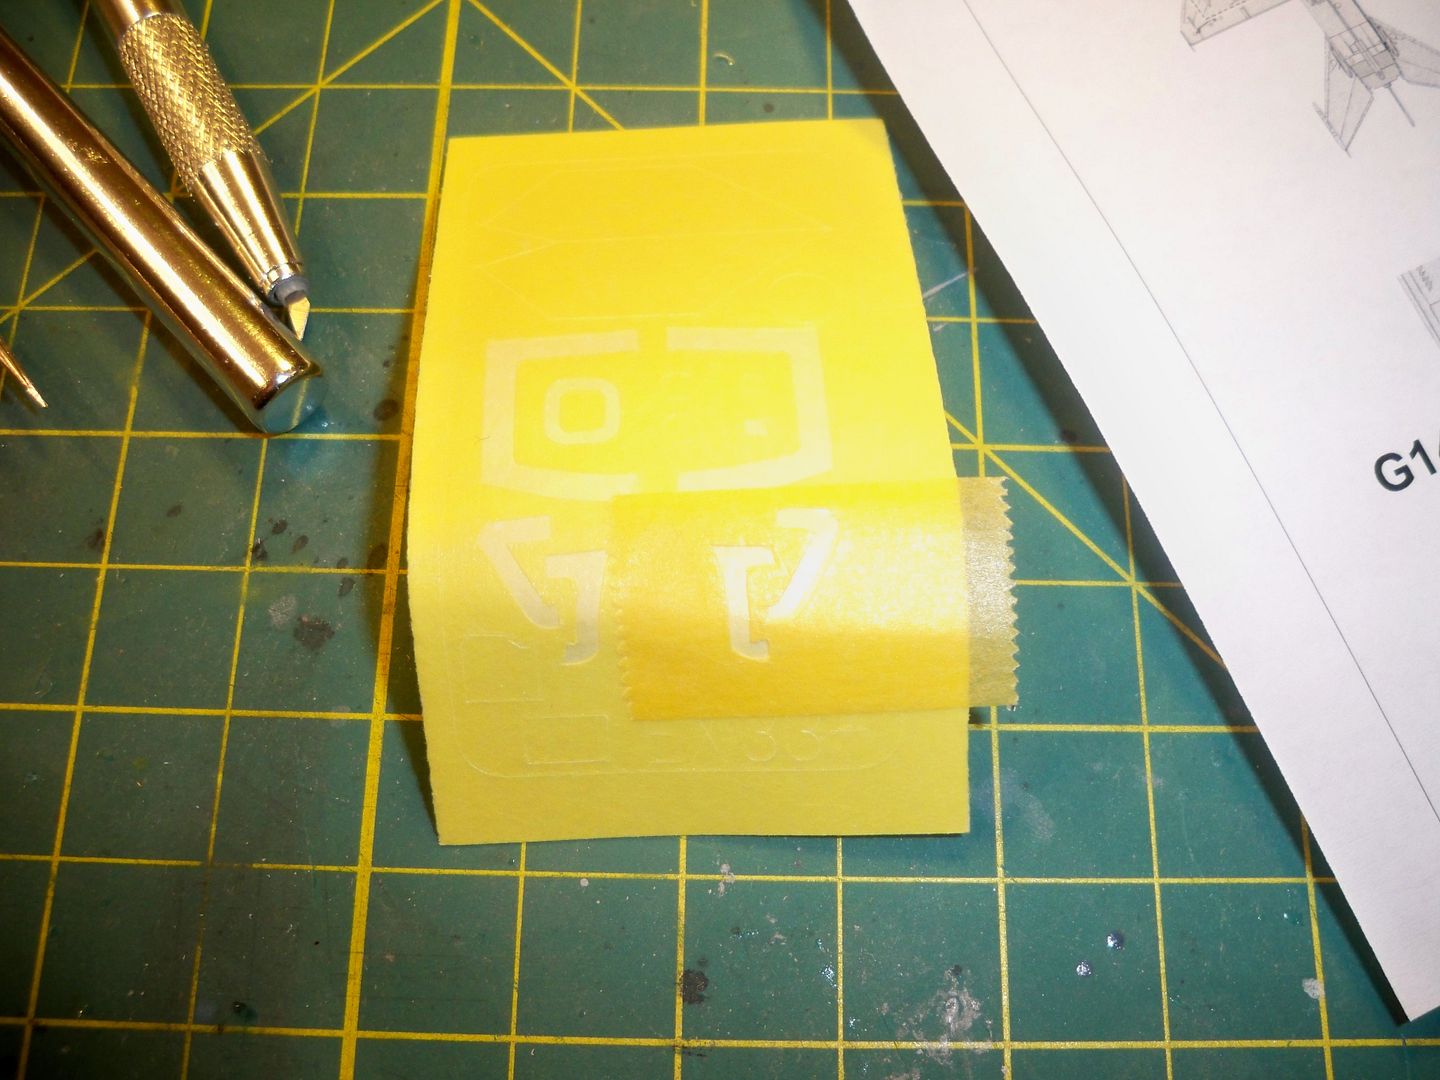
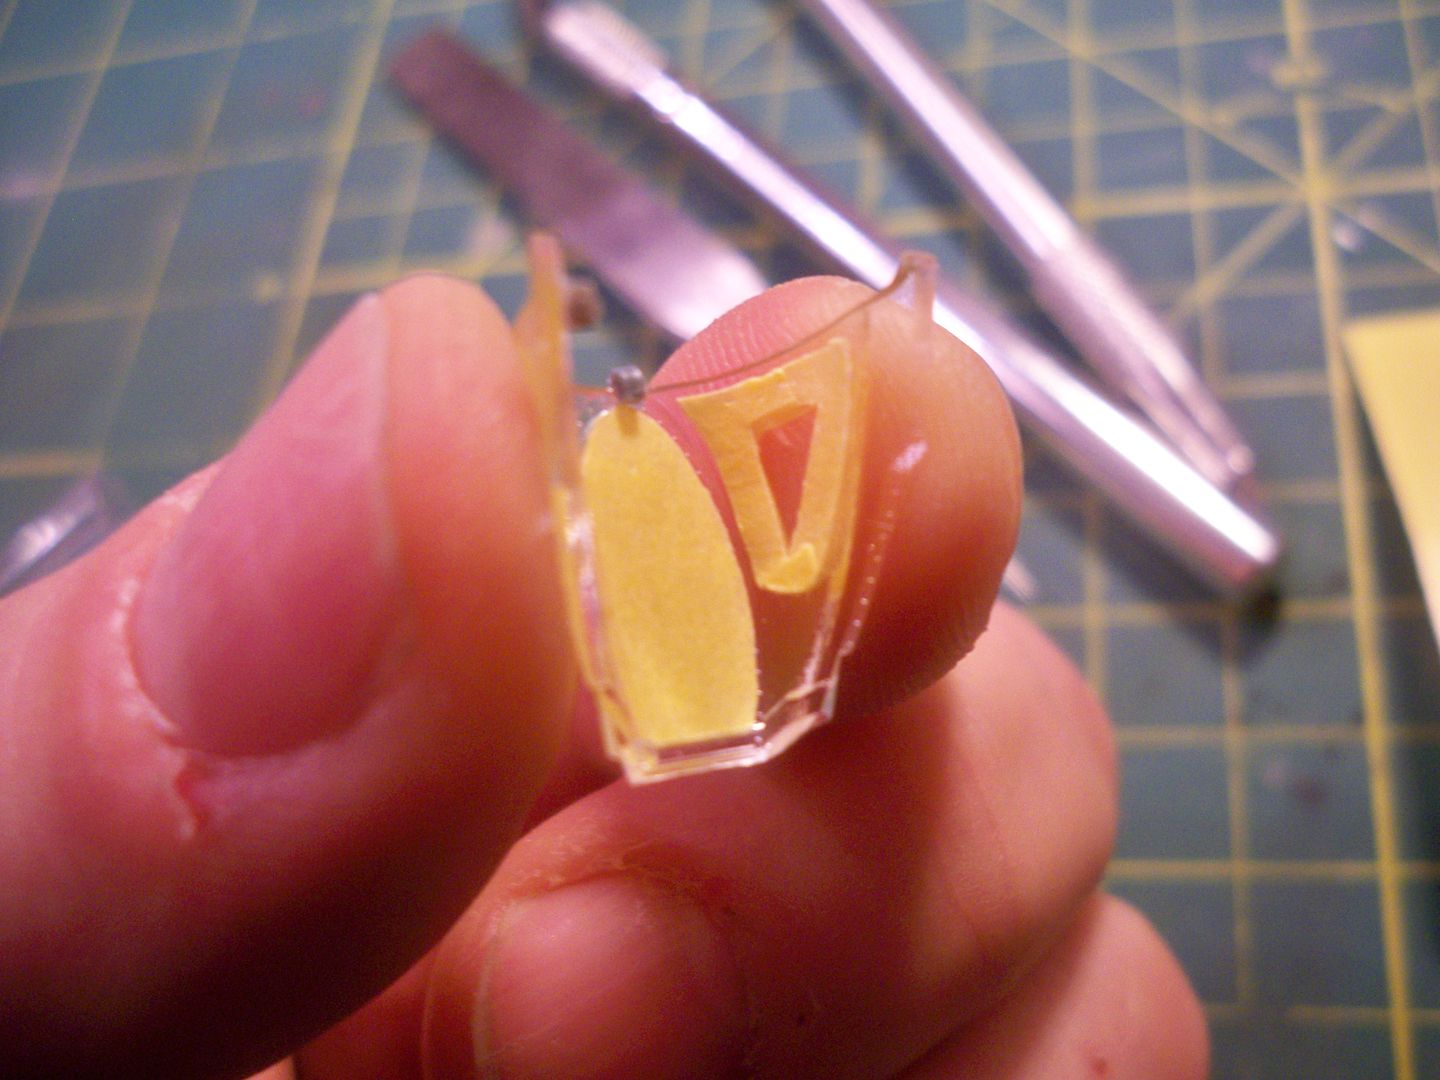
Then I started on the nozzle. I hope at least some of this resin beauty can be seen in the end?!:
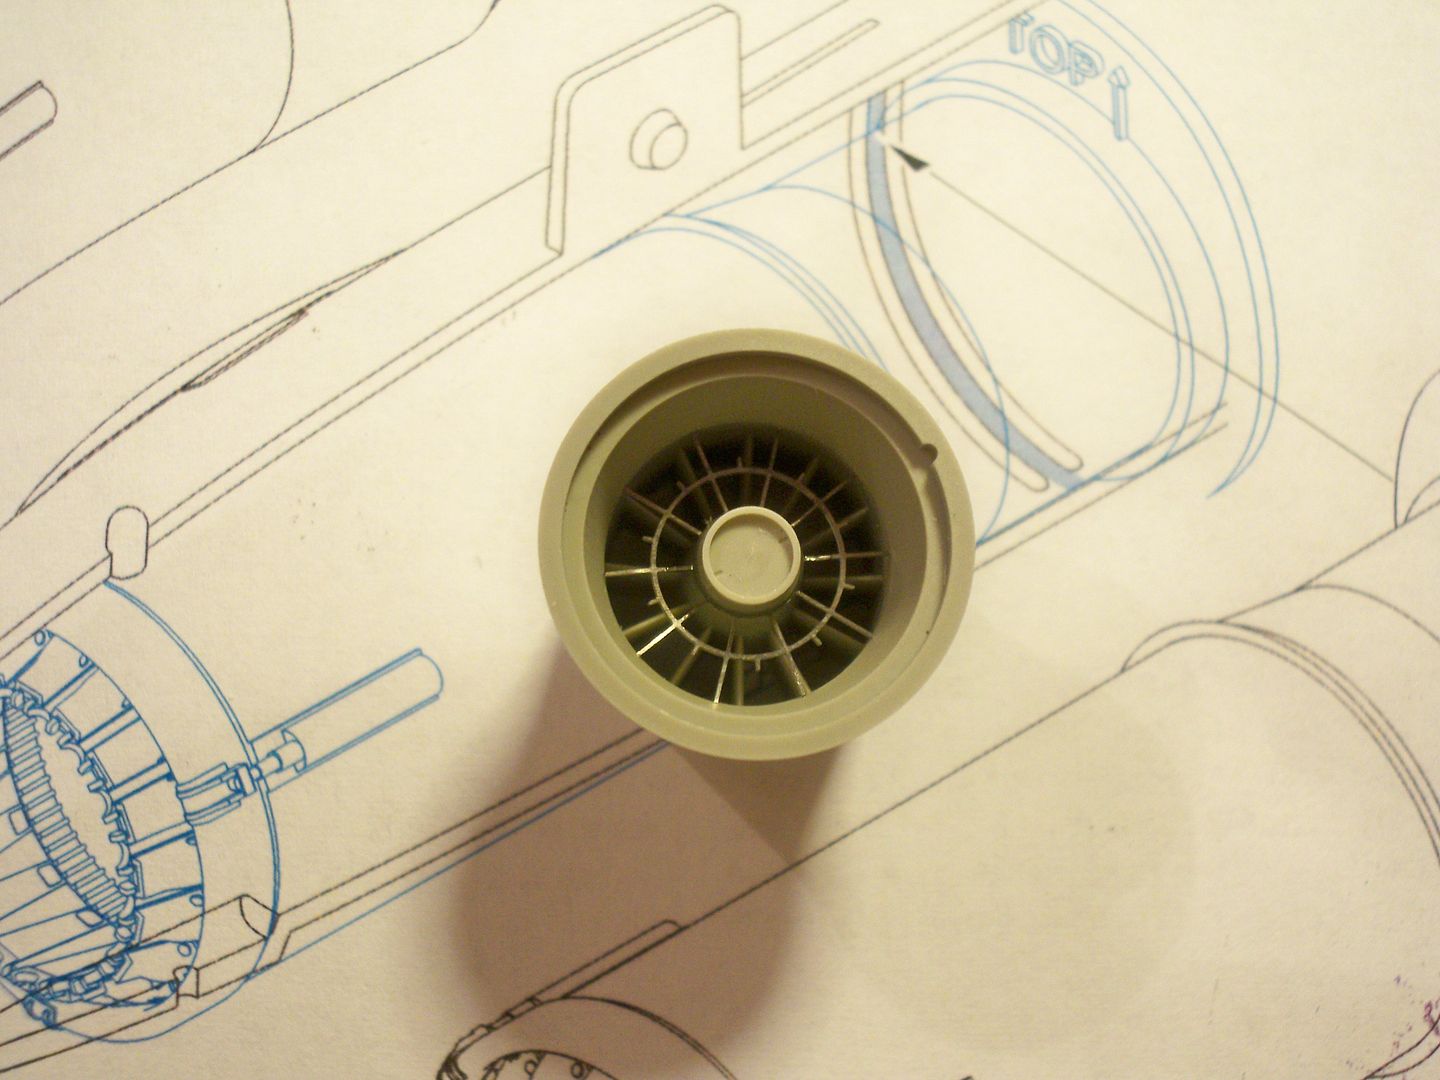
The inside is supposed to be green, trust me:

Then a primer coat followed by silver, so I can do some chipping later on:

Thats it for now. No modeling this weekend as I'll be gone...just when the fun was starting...Sad


  • Member since
    July 2004
  • From: Sonora Desert
Posted by stikpusher on Friday, February 14, 2014 11:02 AM

Wow!!!! Those parts are beautifully detailed! That green inside the burner is sure different. I have never seen that before. Plenty of off white ceramic on US engines in there, but I suppose the Rooskies could have gone with a green ceramic.


F is for FIRE, That burns down the whole town!

U is for URANIUM... BOMBS!

N is for NO SURVIVORS...

       - Plankton

LSM


  • Member since
    November 2009
  • From: SW Virginia
Posted by Gamera on Friday, February 14, 2014 11:47 AM

Yeah, that looks great! Really impressed with the way you're drilling out the instrument panel there.

"I dream in fire but work in clay." -Arthur Machen


  • Member since
    December 2006
  • From: Phoenix, AZ
Posted by Fly-n-hi on Friday, February 14, 2014 12:23 PM

Nice work on the F-20 Stik.  You're makin' me want to get another one!

JOIN OUR COMMUNITY!

Our community is FREE to join. To participate you must either login or register for an account.

SEARCH FORUMS
FREE NEWSLETTER
By signing up you may also receive reader surveys and occasional special offers. We do not sell, rent or trade our email lists. View our Privacy Policy.