SEARCH FINESCALE.COM

Enter keywords or a search phrase below:

2015 Messerschmitt Bf 109 Group Build

181140 views
2798 replies
1 rating 2 rating 3 rating 4 rating 5 rating
  • Member since
    October 2008
  • From: Georgia
Posted by Rigidrider on Saturday, January 24, 2015 4:32 PM

Like the applicator tool Tom!

Jubya... I actually found out how far one could fly one time after a PE session. LOL... (not very far nor is that action recommended)

Doug

When Life Hands You A Bucket Of Lemons...

Make Lemonade!

Then Sell It Back At $2 Bucks A Glass...

  • Member since
    December 2004
  • From: Houston, Texas
Posted by panzerpilot on Saturday, January 24, 2015 3:42 PM

jubya70

Oh I am so bumbed! I have never worked with photoetch before. Well I finally got my cockpit assembled and its total fubar! Super glue everywhere, parts falling off and ate up by the carpet and my fingers stuck together. Does a 109 that smacked the ground after being shot down count as a build? Because that's what mine is gonna look like if I keep this up. Oh well! Can't expect perfection the first time out. I did get all the old paint off the fuselage and I am going to try detailed panel lines, which I have never done either. The cockpit maybe fubar hopefully the rest will turn out good.

I think we've all been there (and sometimes still are). Hang in there! Greg is right. Try to use white glue where you can. Also, try making a little homemade super glue adapter. I took a small needle, stuck it in a pencil eraser, then cut the eye of the needle in half. It gives you much more control of the super glue. You could try a 'thicker' super glue, which they sell at hobby lobby and other places. Also, a little PE bending tool is invaluable.

-Tom

  • Member since
    May 2013
  • From: Indiana, USA
Posted by Greg on Saturday, January 24, 2015 3:24 PM

FWIW, I like to use dilute white acrylic glue (I prefer Gator's grip) for cockpit PE.

I know a lot of folks use CA with PE, but the unforgiving nature of boo-boos and too-fast-for-me set time makes it my last resort.

In the meantime, ain't PE fun? Stick out tongue (it actually kinda is once you get the hang of it, and you will)

  • Member since
    July 2014
Posted by jubya70 on Saturday, January 24, 2015 2:32 PM

Oh I am so bumbed! I have never worked with photoetch before. Well I finally got my cockpit assembled and its total fubar! Super glue everywhere, parts falling off and ate up by the carpet and my fingers stuck together. Does a 109 that smacked the ground after being shot down count as a build? Because that's what mine is gonna look like if I keep this up. Oh well! Can't expect perfection the first time out. I did get all the old paint off the fuselage and I am going to try detailed panel lines, which I have never done either. The cockpit maybe fubar hopefully the rest will turn out good.

Jubya70

  • Member since
    September 2011
Posted by fightnjoe on Friday, January 23, 2015 8:33 PM

Many thanks for the kind words.

To be honest there are some very very talented people in this build.  

Joe

Veterans,

Thank You For Your Sacrifices,

Never To Be Forgotten

Where you can find me:

Workbench on FaceBook  Google Plus  YouTube

  • Member since
    December 2009
  • From: Laurel, MD
Posted by Tucohoward on Friday, January 23, 2015 7:53 PM

Moving along to the smaller parts. They always seem to take as long as the whole rest of the build. Various items including the Eagle Parts spinner and G-factor gear legs which have had an oil wash applied and are drying. This plane the gear doors removed for winter so the G-factor parts will be fairly visible, and definitely stronger. The exhaust shields have been sanded down on the edges for a more scale appearance. The kit exhaust for the F is better than the G and K kits, but still not great, so I am going with Quickboost there.

Jay

The Mighty Mo says no.

  • Member since
    October 2008
  • From: Georgia
Posted by Rigidrider on Friday, January 23, 2015 7:08 PM

By the By... 3 weeks into the GB and its over 900 replies and at 61 pages! Joe does Great GB!!! LOLOL...

When Life Hands You A Bucket Of Lemons...

Make Lemonade!

Then Sell It Back At $2 Bucks A Glass...

  • Member since
    October 2008
  • From: Georgia
Posted by Rigidrider on Friday, January 23, 2015 7:06 PM

Thanks MC... Still a ways to go buy I'm sure I will be starting decals this weekend. (rainy weekend predicted)

Fighting Joe... I have watched a few of your builds and you always amaze! Definitely watching this one take shape.

Joe (Mustang) Found the Great Book of WWII Aircraft on Amazon, and ordered! Cant wait to get it! Thanks for tip!

Doug

When Life Hands You A Bucket Of Lemons...

Make Lemonade!

Then Sell It Back At $2 Bucks A Glass...

  • Member since
    September 2011
Posted by fightnjoe on Friday, January 23, 2015 5:55 PM

Many thanks for the kind words.  

So much left to do.

Joe

Veterans,

Thank You For Your Sacrifices,

Never To Be Forgotten

Where you can find me:

Workbench on FaceBook  Google Plus  YouTube

  • Member since
    July 2014
Posted by modelcrazy on Friday, January 23, 2015 5:35 PM

That's a fantastic paint job Doug.

Steve

Building a kit from your stash is like cutting a head off a Hydra, two more take it's place.


http://www.spamodeler.com/forum/

  • Member since
    October 2008
  • From: Georgia
Posted by Rigidrider on Friday, January 23, 2015 5:33 PM

Silent Bob... thanks my friend! Hope to see you building here,

Bish, I think that's the same book I have, #6? but it originally caught my eye in a book called "Flying Colors" There are hundreds of different aircraft in this book in various camo schemes.

TJ... LOL... Still some fine looking fish!

Thanks Clemens... Just trying to keep up with you my friend!

Thanks all... More later... Take care!

Doug

When Life Hands You A Bucket Of Lemons...

Make Lemonade!

Then Sell It Back At $2 Bucks A Glass...

  • Member since
    December 2002
  • From: Bury St Edmunds, Suffolk, England
Posted by Bish on Friday, January 23, 2015 3:38 PM

Doug, thanks for the heads up. I found an aircraft in a similar scheme in the Osprey Elite Unit book on JG 54. Seems it was a common scheme for the I Gruppe.

I am a Norfolk man and i glory in being so


On the bench: Airfix 1/72nd Harrier GR.3/Fujimi 1/72nd Ju 87D-3

  • Member since
    October 2008
  • From: Georgia
Posted by Rigidrider on Friday, January 23, 2015 1:54 PM

Thanks Greg!  I have a way to go yet but I'm pleased thus far. I tried this paint one time before, but with less then acceptable results, this one , so far so good.

Bish , thank you too, look in perticular at 2/Jg54 (Green Hearts) Balkan campaign 1941.

Joe... very cool book, I will begin a search for that one when I get home!.

When Life Hands You A Bucket Of Lemons...

Make Lemonade!

Then Sell It Back At $2 Bucks A Glass...

  • Member since
    May 2013
  • From: Indiana, USA
Posted by Greg on Friday, January 23, 2015 11:49 AM

Joe, having never seen one of your builds before, I gotta say you certainly have my attention! That's some fine work, and am looking forward to watching this one for sure.

Vance, good to see you here!

  • Member since
    December 2002
  • From: Bury St Edmunds, Suffolk, England
Posted by Bish on Friday, January 23, 2015 11:30 AM

Rigidrider

Tom... That is a great upgrade! Never seen one quite like that...Very nice.

Well my repair kit showed up today for the AB, and I was going to wait till Saturday to install... BUT, no can do. Gotta paint! Cleaned her out real good and installed new seals and I'm back in business. Did a bit more trying it out and here they are...
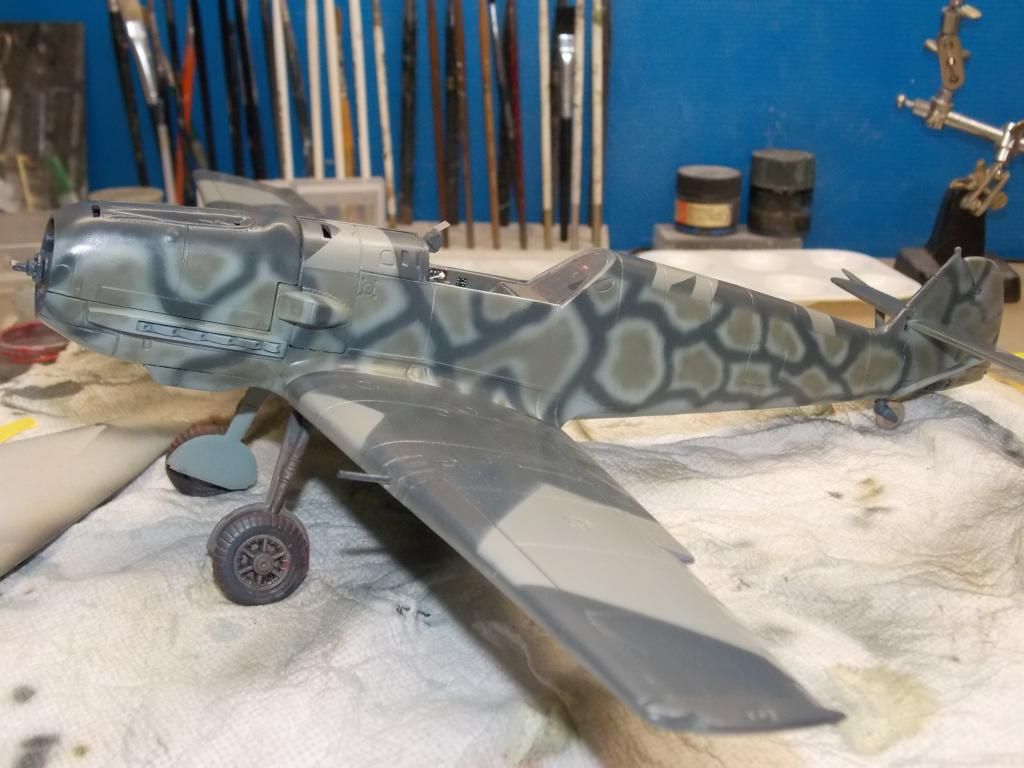
I used 02 to do the fill in... I never found an actual color mentioned other then the standard colors of the time. and 2 was one of them, by the looks of the pictures I think 2 will do just fine.
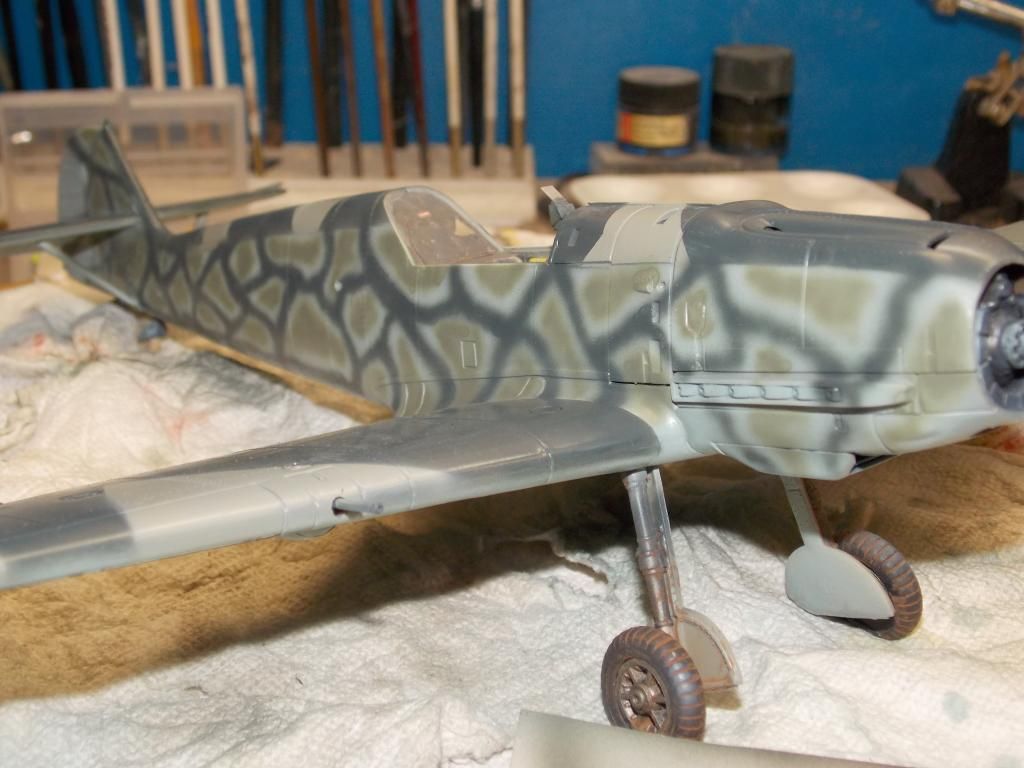
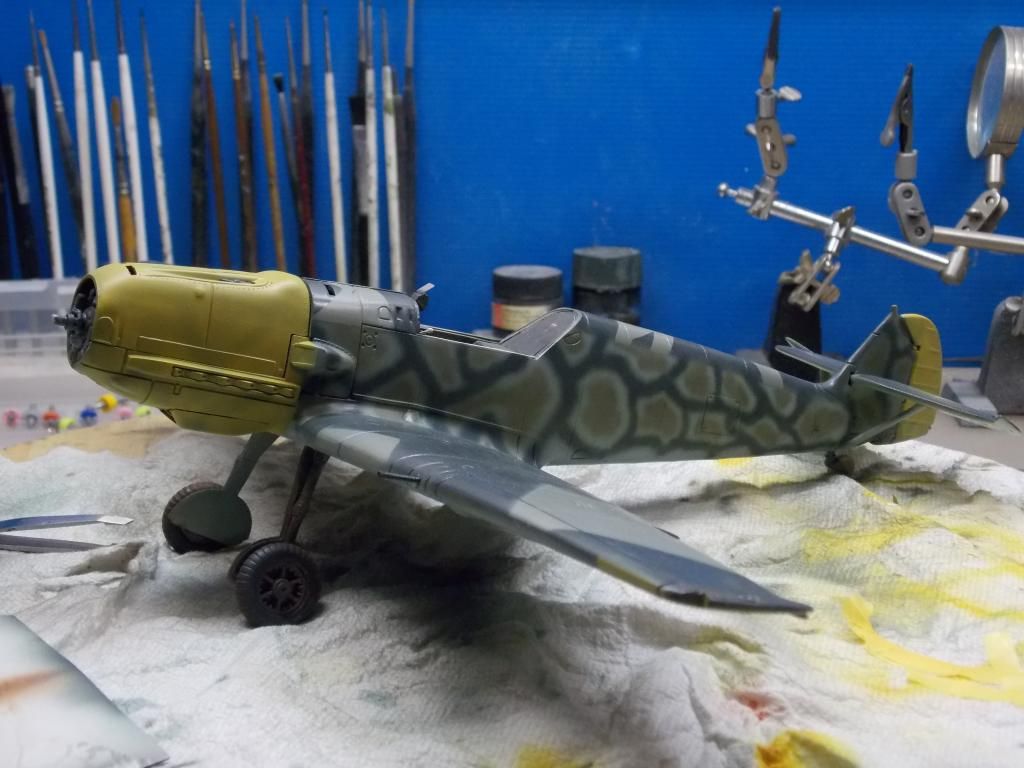
And lastly the yellow os the nose, tail and the underside wing tips. Decals this weekend! WOOHOO!!!

Take care all...

Doug 


Now that looks nice, and now I think I may have seen this scheme before, going to have to check the books tonight. Great job on it.

I am a Norfolk man and i glory in being so


On the bench: Airfix 1/72nd Harrier GR.3/Fujimi 1/72nd Ju 87D-3

  • Member since
    May 2013
  • From: Indiana, USA
Posted by Greg on Friday, January 23, 2015 10:19 AM

Doug, I'm in awe of your paint job. Truly excellent work, my friend.

Tom, good progress. And the aftermarket radiator is very cool.

  • Member since
    February 2003
  • From: Rothesay, NB Canada
Posted by VanceCrozier on Friday, January 23, 2015 7:59 AM

Hey gents, getting a kick out of all the Messerschmitt goodness going on in here, hoping to add one to the mix before too long as well. In the meantime, just thought I'd post a related pic for you, recently completed:

(more pics here if you're interested: http://cs.finescale.com/fsm/modeling_subjects/f/2/t/163851.aspx?sort=ASC&pi240=1 )

On the bench: Airfix 1/72 Wildcat; Airfix 1/72 Vampire T11; Airfix 1/72 Fouga Magister

  • Member since
    March 2012
  • From: Corpus Christi, Tx
Posted by mustang1989 on Friday, January 23, 2015 7:53 AM

Rigidrider
Joe, by the way, On Amazon, I found another book by Robert Grinslee like the FW190 book. Its Messerschmitt Bf109. Its set up and lid out just like the 190 book. Just thought you might like to know.

 Hey Doug! You know what's funny about that Robert Grinsell book is that I already have it ....but wait ..there's more. I have a multitude of these books. A friend of mine from church gave me this thick book that has all of these books(I'm talking like whole sections that have the exact content as the individual books)  included in one big azz book! Here is a list of the aircraft that are covered in this book and I'll just let the table of contents speak for themselves:

This is the book(the paper cover is all but destroyed!):


 Forum | Modelers Social Club Forum (proboards.com) 

  • Member since
    April 2013
Posted by SchattenSpartan on Friday, January 23, 2015 7:22 AM

Doug: That camo scheme looks way cool! Very well executed!

Tom: Nice work on the readiators. The wing joint looks good from here!

Joe: Aww man, that's just awesome! I love the control panel on the cockpit side.

  • Member since
    November 2003
  • From: Naples, FL
Posted by tempestjohnny on Friday, January 23, 2015 5:42 AM

Doug didn't eat em. It was during a tournament. Slid them right back into the lake. Catch n release


  • Member since
    October 2008
  • From: Georgia
Posted by Rigidrider on Friday, January 23, 2015 4:54 AM

Thanks Joe...LOL... I was commenting on tempest johnny' avatar. Yeah I love to paint, and am lways looking for new and interesting schemes. Joe, by the way, On Amazon, I found another book by Robert Grinslee like the FW190 book. Its Messerschmitt Bf109. Its set up and lid out just like the 190 book. Just thought you might like to know.

Take care all

Doug

When Life Hands You A Bucket Of Lemons...

Make Lemonade!

Then Sell It Back At $2 Bucks A Glass...

  • Member since
    March 2012
  • From: Corpus Christi, Tx
Posted by mustang1989 on Friday, January 23, 2015 3:46 AM

Tom: Nice touch on the radiators! CoolI hope the wing mounting comes out good for you.

Doug: Well what tha hell do we have here? Where do your AB skills end? That one is outta the park for sure!!! YesWhat's this with the fish? Did I miss something in all this excitement here? lol

Johnny: Atta boy Cheecho! That's a smart man right there to pick a wife with the same B-day as you!Big Smile

Joe: You never cease to amaze me with the time and effort that you put into your builds. The first time I saw something like this from you was with your P-40 build. Good stuff dude! Yes


 Forum | Modelers Social Club Forum (proboards.com) 

  • Member since
    April 2005
Posted by Thunderbolt379 on Friday, January 23, 2015 1:21 AM

RR -- thanks for the outline, that was pretty much my thinking! Ah, 76 rather than 65, yes. I have a set of markings for one of these schemes, in fact maybe two or three, but in 1:48, and as you day, the AB would have to be working perfectly to pull it off!

Just about to unmask the -D and tackle any touch-ups that may be needed, not sure if I'll get to the first clear coat this evening -- if I can I may be able to get the panel accents done and sealed in the morning.

M/TB379

http://worldinminiature.blogspot.com/

  • Member since
    September 2011
Posted by fightnjoe on Thursday, January 22, 2015 10:42 PM

Well another brief update.

I could not wait, I began to work on the major components of the pit. I began with the sides as I needed to fabricate the framework. I did that and then began to mock up the different components. 

The Starboard side.


And the Port....


And the vent for the Port, the Starboard side is gone with the opening.


I still need to finish off the plumbing for the aft section and I need to fabricate the plumbing for the sides of the pit. The floor part should be pretty straitforward. 

Another thing I am learning is I am going through my stock of white stock very quickly.

All comments, critiques, and criticism are encouraged.


Joe

Veterans,

Thank You For Your Sacrifices,

Never To Be Forgotten

Where you can find me:

Workbench on FaceBook  Google Plus  YouTube

  • Member since
    February 2014
  • From: Michigan
Posted by silentbob33 on Thursday, January 22, 2015 8:45 PM

That looks truly awesome Doug!  Very impressive

On my bench: Academy 1/35 UH-60L Black Hawk

  • Member since
    December 2009
  • From: Laurel, MD
Posted by Tucohoward on Thursday, January 22, 2015 8:38 PM

Very nicely done, Doug. Great result.

Jay

The Mighty Mo says no.

  • Member since
    December 2004
  • From: Houston, Texas
Posted by panzerpilot on Thursday, January 22, 2015 8:38 PM

I got the wings on.

What I did was glue only the upper wing root connection. Then, as you can see, the blue tape to hold the dihedral up, keeping the wings flush against the fuselage. I'll let this dry overnight, then glue the bottom section of the wings to the lower fuselage, pulling it back the other way.

Also, I keep as much 'slack' in the middle fuselage area as possible by not gluing certain parts, etc. This helps eliminate wing-fuselage gaps.

-Tom

  • Member since
    October 2008
  • From: Georgia
Posted by Rigidrider on Thursday, January 22, 2015 7:39 PM

Thank you kindly friends... I personally am enjoying seeing the many different models from Ds to Ks, the various scales and the different schemes. it never fails to amaze.

Yes TB, The "crazy roadmap" is 75. I hope that's the correct name. I read it in one of my books and just accepted it as the name. In order it went, 76 for the underbelly and fuse sides, 75 for the upper surfaces, 74 for the splinter pattern, then 75 again to lay out the road map, then 2 to accent them. And yes sir, I am about at the point where 32nd is about the only thing I do any more (almost) and would try on a 48th but air brush and paint would have to be working perfectly!

Thanks again guys.

OH, Johnny... Those are some fine looking fish! Id almost be too proud of them to eatem! LOL...

Doug

When Life Hands You A Bucket Of Lemons...

Make Lemonade!

Then Sell It Back At $2 Bucks A Glass...

  • Member since
    November 2003
  • From: Naples, FL
Posted by tempestjohnny on Thursday, January 22, 2015 7:37 PM

My wife and I just took each other out for our birthday dinner.  Nice sharing my birthday with her. I never forget


  • Member since
    November 2003
  • From: Naples, FL
Posted by tempestjohnny on Thursday, January 22, 2015 7:35 PM

SchattenSpartan

Since we are on the subject of mug designs already, I have to apologize to you guys. I sent out the latest batch of designs to everyone who didn't get theirs earlier and screwed it up big time. I intended to send a group PM to all of you, but I just noticed I did something wrong and the only one who recieved it was Mike. I'm in Germany right now (just arrived), so I don't have access to my PC. I'll send them to you again as soon as I come back (Monday evening

no problem thanks again


JOIN OUR COMMUNITY!

Our community is FREE to join. To participate you must either login or register for an account.

SEARCH FORUMS
FREE NEWSLETTER
By signing up you may also receive reader surveys and occasional special offers. We do not sell, rent or trade our email lists. View our Privacy Policy.