SEARCH FINESCALE.COM

Enter keywords or a search phrase below:

2015 Messerschmitt Bf 109 Group Build

181140 views
2798 replies
1 rating 2 rating 3 rating 4 rating 5 rating
  • Member since
    July 2014
Posted by modelcrazy on Saturday, January 10, 2015 11:07 AM

Yeah, it looks fantastic.

I'm afraid that when I post some more pics of my Avia later today, it will look like a child's toy compared to the work that's going on in here.

I really like Rall, by the way.

Steve

Building a kit from your stash is like cutting a head off a Hydra, two more take it's place.


http://www.spamodeler.com/forum/

  • Member since
    October 2008
  • From: Georgia
Posted by Rigidrider on Saturday, January 10, 2015 11:03 AM

Thank  you MC,,, Yeah I like well used, LOL... I read somewhere once in an interview with the German ace Gunther Rall that when asked about what he felt the good points of the captured P51 Mustang he had just flown were, he told his superior ... They don't leak fuel and oil all over you!.  So I just picture German aircraft, given the amount of flying they did and the very harsh environments and use they received, would well used!

Thanks again!

Doug

When Life Hands You A Bucket Of Lemons...

Make Lemonade!

Then Sell It Back At $2 Bucks A Glass...

  • Member since
    July 2014
Posted by modelcrazy on Saturday, January 10, 2015 10:43 AM

Doug,

That's a fantastic looking pit and engine, well used.
Great job  Yes 

Steve

Building a kit from your stash is like cutting a head off a Hydra, two more take it's place.


http://www.spamodeler.com/forum/

  • Member since
    December 2004
  • From: Houston, Texas
Posted by panzerpilot on Saturday, January 10, 2015 10:31 AM

Rivets? Fine job, Tucho. Now, that's above and beyond the call!

Coming along nicely, Doug. I like the powerplant. I know what you mean about PE. At least with the cyberhobby I am doing, the kit parts looks nicer than some of the PE. I used less than half of it, with most of it going to the panel and the belts.

-Tom

  • Member since
    October 2008
  • From: Georgia
Posted by Rigidrider on Saturday, January 10, 2015 8:42 AM

Morning fellow builders! Got some more done this past week on the pit and Fuselage. I had bought a pe set for this but so far have not used it. I have built a few if these kits in the past and while it may dress up the build some, I just like for the most part, the way it was made without too much PE. Any way, heres what I have thus far...

I know I skipped ahead a bit but some times when I get into the :Build Zone" I tend to forget to take pictures... Sorry.

Well that's about all for now. I'm doing something I don't usually do and that's trying to do two builds at once. Gets a tad confusing at times, but so far so good. The seat belts are trimmed and cut down strips of Tamiya masking tape with some left over buckles and scratch made accessories (small shaped and flattened pieces if wire). Most of the levers and cranks are scratch made with white glue knobs. The hydraulic lines of the foot pedals and assorted bits of cable and control wiring are just that, bits of wire and coated wire. I also picked up a sheet of Air Scale  placards and instrument dials and they are the most helpful items I've found yet for dressing up the cabin and cockpit.

Thanks all and more later... Man, there is some awesome work going on here and I'll say again... EPIC build coming over all!

Doug

When Life Hands You A Bucket Of Lemons...

Make Lemonade!

Then Sell It Back At $2 Bucks A Glass...

  • Member since
    December 2002
  • From: Bury St Edmunds, Suffolk, England
Posted by Bish on Saturday, January 10, 2015 8:12 AM

Thanks for the info jay. I will be doing a 32nd Hase F as well, and given the scale I am thinking detail like this is important, I am more use to 72nd so adding rivets is not so much of an issue. Just looking at the drawings on that site, o boy, lots of rivets.

I am a Norfolk man and i glory in being so


On the bench: Airfix 1/72nd Harrier GR.3/Fujimi 1/72nd Ju 87D-3

  • Member since
    December 2012
Posted by flyerduke on Saturday, January 10, 2015 7:29 AM

Lookin' good Thunder.  Jay, that rivet work is crazy.  Looks great.  No worries Joe.  I'm building this thing on the fly.  The instructions are vague when it comes to painting.  That's why I'm constantly asking questions about paint.  Any and all input is appreciated.  I hope to find some time to work on the 109 this weekend.  However, if the weather is nice, I need to start working in my vineyard.

Craig  

  • Member since
    March 2012
  • From: Corpus Christi, Tx
Posted by mustang1989 on Saturday, January 10, 2015 6:44 AM

One at a time........................Wow! Now that's some dedication to build right there! Outstanding Jay!


 Forum | Modelers Social Club Forum (proboards.com) 

  • Member since
    December 2009
  • From: Laurel, MD
Posted by Tucohoward on Saturday, January 10, 2015 6:09 AM

I use a beading tool to do the rivets, one at a time. About an hour and a half per wing. It gets pretty tedious. The fuselage is probably three hours worth. If anyone needs rivet patterns, there are some excellent drawings at the 109 Lair as well as much other useful information. Great site.

Jay

The Mighty Mo says no.

  • Member since
    March 2012
  • From: Corpus Christi, Tx
Posted by mustang1989 on Saturday, January 10, 2015 5:58 AM

tempestjohnny

Jeez mustang (Joe) what time to you get up.  Says you're last post was at 5:15 my time.  Aren't you two hours behind east coast time

Lol!! Funny you should ask. Every morning I wake up between 2 a.m. and 3:45 a.m.   The latter is my normal wake up time. Any time before that is when Idiot 1 and Idiot 2 (aka my dogs) get up and start roaming the house. Idiot 1 (aka Sweet Pea, my 17 year old dachshund) is the trouble dog. She's a good ol' girl but can't distinguish between the outside and inside when it comes to the bladder relief or "booty duty" so we have to get up and put her outside. She's turned from pet into full time job!! lol 

This picture was taken 6 years ago but here's Sweet Pea at age 11:


 Forum | Modelers Social Club Forum (proboards.com) 

  • Member since
    December 2002
  • From: Bury St Edmunds, Suffolk, England
Posted by Bish on Saturday, January 10, 2015 5:46 AM

Mike, the pit is looking really good, some nice detail paiting there.

Jay, now that's a lt of riveting. Sorry if I missed it before, what are you using to do those.

I am a Norfolk man and i glory in being so


On the bench: Airfix 1/72nd Harrier GR.3/Fujimi 1/72nd Ju 87D-3

  • Member since
    November 2003
  • From: Naples, FL
Posted by tempestjohnny on Saturday, January 10, 2015 5:46 AM

Jeez mustang (Joe) what time to you get up.  Says you're last post was at 5:15 my time.  Aren't you two hours behind east coast time


  • Member since
    December 2002
  • From: Bury St Edmunds, Suffolk, England
Posted by Bish on Saturday, January 10, 2015 5:44 AM

Craig, nice work on the engine, I like the colour you have come up with.

I am a Norfolk man and i glory in being so


On the bench: Airfix 1/72nd Harrier GR.3/Fujimi 1/72nd Ju 87D-3

  • Member since
    March 2012
  • From: Corpus Christi, Tx
Posted by mustang1989 on Saturday, January 10, 2015 4:15 AM

Craig: Cool dude! Hope you don't think I was trying to get all picky, just trying to help you out with the finer engine detail. Lookin' forward to the progress!Cool

U2 Milo: Thanks bud. Say........grab a kit and jump in here.Big Smile

Jay: Man that is some real detail you've got there. Surprise What's the riveting technique and tool?

Thunder: Very good progress and scratchbuilding!Yes


 Forum | Modelers Social Club Forum (proboards.com) 

  • Member since
    January 2014
  • From: Nampa, Idaho
Posted by jelliott523 on Friday, January 9, 2015 11:55 PM

I finally received my kit today.  Went to the LHS and picked up a few RLM paints to get me started and see how this goes.  I hope to have some pictures of my progress up tomorrow.

On the Bench:  Lots of unfinished projects!  Smile

  • Member since
    April 2005
Posted by Thunderbolt379 on Friday, January 9, 2015 11:35 PM

Looking amazing, Jay, very fine-scale work!

Some progress today, I've got these cockpits nearly ready. I'm happy to say the Airfix control stick separated from the sprue okay, unlike that of the Mustang I did recently, and is now installed. Moulded harness has been highlighted and washed with oils on both kits and awaits only a speck of silver to suggest hardware.

Gunsights are installed, though the Hobbycraft item called for scratch building. I cannot imagine any other company attaching a gunsight unit to the sprue by the very optical glass itself, and it was carved away in the belief the part went the other way up. Ahem, clear sheet to the rescue...

Airfix first:
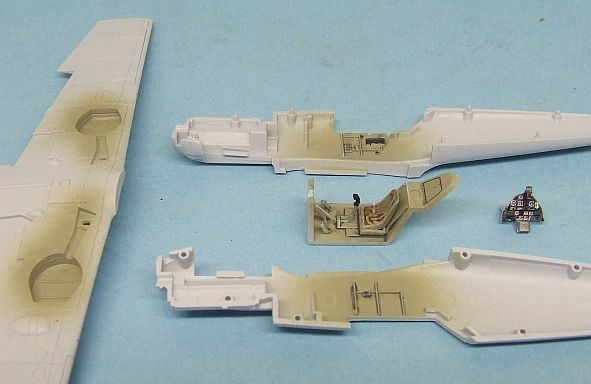
The instrument decals were, as usual, much too large for the panels they go on, so I did my standard trick of locating the decals more or less centrally, then when they were dry slicing away the excess with a blade. Now Hobbycraft:
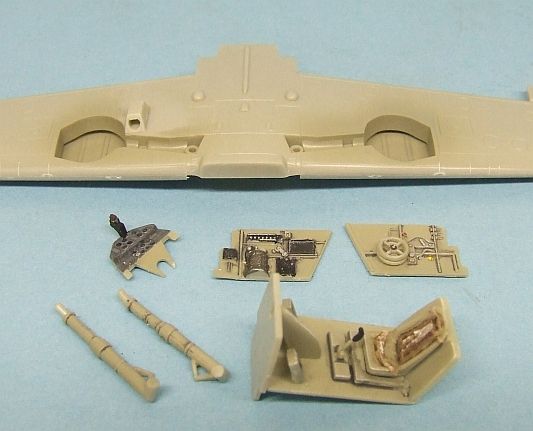
My next task is the buckles, then I can start getting them together -- mounting the cockpit walls to the tub for the big one, and mounting the panel to the tub in the small, then closing the fuselage. I'm aiming to have the Airfix item assembled completely to the pre-painting stage tomorrow.

Cheers, M/TB379

http://worldinminiature.blogspot.com/

  • Member since
    December 2009
  • From: Laurel, MD
Posted by Tucohoward on Friday, January 9, 2015 6:20 PM

Thanks, Milo. Was able to finish the riveting on the wings today. Fuselage is next.

Jay

The Mighty Mo says no.

  • Member since
    September 2014
Posted by U2 Milo on Friday, January 9, 2015 5:17 PM

Wow.  That cockpit is stunning, tucohoward.

Lot's of great work here in this thread.  Thanks for sharing.  Keep it coming!

  • Member since
    October 2008
  • From: Georgia
Posted by Rigidrider on Friday, January 9, 2015 7:44 AM

Yes sir it looks good!

Doug

When Life Hands You A Bucket Of Lemons...

Make Lemonade!

Then Sell It Back At $2 Bucks A Glass...

  • Member since
    December 2012
Posted by flyerduke on Friday, January 9, 2015 7:27 AM

You are right Joe.  I hit the block with some MM semi-gloss.  It has a slight sheen to it now.

Very nice cockpit Tom.

  • Member since
    March 2012
  • From: Corpus Christi, Tx
Posted by mustang1989 on Friday, January 9, 2015 3:53 AM

Lookin good so far Tom! Nice and "used".


 Forum | Modelers Social Club Forum (proboards.com) 

  • Member since
    December 2004
  • From: Houston, Texas
Posted by panzerpilot on Thursday, January 8, 2015 11:04 PM

Ready to close up the halves now...

-Tom

  • Member since
    March 2012
  • From: Corpus Christi, Tx
Posted by mustang1989 on Thursday, January 8, 2015 8:59 PM

Heya Craig. Good start so far on the engine. If I remember right and somebody correct me if I'm wrong, I think the engine block black paint had a small amount of shine to it.


 Forum | Modelers Social Club Forum (proboards.com) 

  • Member since
    December 2004
  • From: Houston, Texas
Posted by panzerpilot on Thursday, January 8, 2015 8:41 PM

Looking good. Sounds like you have a good plan!

-Tom

  • Member since
    December 2012
Posted by flyerduke on Thursday, January 8, 2015 8:21 PM

I finally received the PE set for the cockpit.  So I can get moving on that.  I also completely assembled the engine and painted it.  I used 90% RLM 66 and 10% flat black (both Vallejo).  It's not quite black, but it's not gray either.  Now I'm going to shoot the engine with Vallejo Satin Varnish.  See what kind of finish I get.  Then apply a wash and dry brush.

Craig

  • Member since
    April 2005
Posted by Thunderbolt379 on Thursday, January 8, 2015 4:30 PM

Okay, glad to report I found both the sheet above and an Eduard E data sheet in stock at a firm here in Aus and ordered both at once, so I'll have my options in hand before long!

M/TB379

http://worldinminiature.blogspot.com/

  • Member since
    April 2005
Posted by Thunderbolt379 on Thursday, January 8, 2015 4:17 PM

Thanks, Jack! This reinforces my own observations -- the D stencilling looks very close to that of the E, close enough perhaps to get by with E, which is more commonly available, however I'll certainly try for that sheet, it looks excellent. I guess with the early marks only really addressed by Hobbycraft there has been little call for them, but as Hobbycraft does not include stencils, and Academy barely included any on its sheet, you would think that stencils for this family of aircraft were worth a production run by some manufacturer out there.

I have also observed that profile art, typically based on good research, sometimes depicts the aircraft without data at all, which raises the question of whether in the late 30s data was always carried. My own understanding was that things were simplified over time, in the late 30s things were at their most complex and wasteful of resources, so I would have expected more data, not less...

It's a most interesting point! I have some time to make a decision on how to proceed -- I've ordered replacement wheels for the D and they'll no doubt take their sweet time finding their way to me, so I can expect the model to sit a month after completion of building before I can get to the paintwork. Hopefully I can either source a sheet featuring stencils, or go with E data. I'll go look for both right away!

Cheers, hope to have progress pics over the weekend,

Mike/TB379

http://worldinminiature.blogspot.com/

  • Member since
    December 2002
  • From: Bury St Edmunds, Suffolk, England
Posted by Bish on Thursday, January 8, 2015 1:26 PM

Some great work there guys. This is getting off to a great start.

I am a Norfolk man and i glory in being so


On the bench: Airfix 1/72nd Harrier GR.3/Fujimi 1/72nd Ju 87D-3

  • Member since
    April 2006
  • From: ON, Canada
Posted by jgeratic on Thursday, January 8, 2015 11:17 AM

Guys, impressive work - keep it going! Beer

---------------------------------------------

M/TB379 - good question about the 109D stencils.  I had to look at some profiles and what the decal manufacturers have available.  After some comparison, I'd say there are some differences, on the assumption that everyone's research is on the ball.

Here's what I noticed:

On the fuselage side, the 109D has the octane 87 stencil in another location (below the canopy) and it looks a bit larger too.  There is also another triangular stencil more forward (behind the port intake on the Emil) which is similar size, but slightly different  location.  On the wing tops, there are prominent lines in red, but are segmented or dotted?  Emil decals have these solid, either red or black.

I did not come across any 109D decal sets that has just stencils.  So if you are looking to purchase a set, it will have to include the balkenkreuz, etc.

regards,

Jack

  • Member since
    December 2009
  • From: Laurel, MD
Posted by Tucohoward on Thursday, January 8, 2015 11:16 AM

There was supposed to be a picture.

The Mighty Mo says no.

JOIN OUR COMMUNITY!

Our community is FREE to join. To participate you must either login or register for an account.

SEARCH FORUMS
FREE NEWSLETTER
By signing up you may also receive reader surveys and occasional special offers. We do not sell, rent or trade our email lists. View our Privacy Policy.