SEARCH FINESCALE.COM

Enter keywords or a search phrase below:

The 2015 /16 Red Hot and Rollin Automotive Group Build--Ended

121084 views
2225 replies
1 rating 2 rating 3 rating 4 rating 5 rating
  • Member since
    January 2015
Posted by taaron76 on Tuesday, March 31, 2015 7:44 PM

Shot some base coat tonight... I over-thinned it (that's a first) and ran out of paint (that's not a first).  Oh well, I'll pick some more up tomorrow and throw a couple of more coats on it.  That will give me the chance to get rid of a couple of specs of dust.  Don't mid the orange peel... it won't be there after the clear and wetsand and polish.

Tim

BaseCoat-vi.jpg

  • Member since
    January 2015
Posted by MOPAR - D on Tuesday, March 31, 2015 8:12 PM

Joe - Nice progress. Here's something else to think about ..... Flip hood. One of the MPC issued kits had that set up makes for a different look and allows you to show off all your great detailing  

  • Member since
    January 2015
Posted by MOPAR - D on Tuesday, March 31, 2015 8:19 PM

Tim - Your paint looks good so far yea just hate it when you run out of paint in the middle of spraying.

  • Member since
    January 2015
Posted by taaron76 on Tuesday, March 31, 2015 8:30 PM

Dan - just means another day of base coat/clear coat.  That's the byproduct of over-thinning.  Coverage sucks!

Tim

  • Member since
    March 2012
  • From: Corpus Christi, Tx
Posted by mustang1989 on Tuesday, March 31, 2015 8:45 PM

Yeah but I know you're gonna get past all this Tim! This things gonna look like a million bucks!!

I got the gloss on the 429 long block tonight and will be ready for a light wash in the morning.


 Forum | Modelers Social Club Forum (proboards.com) 

  • Member since
    January 2015
Posted by taaron76 on Wednesday, April 1, 2015 8:29 PM

Thanks Joe.  I made more progress today.  About 3.5 hours of base coat/clear coat.

I picked up some more paint today after running a little short yesterday.  I love this color, but thought it would look better lightened up a little bit.  I added some silver to lighten it up and give it a little more metallic.  Now I really like the color.  2 more base coats followed 6-7 coats of clear on this one.  Base color is Model Master Teal Metallic (mixed with silver) and the clear coat is Tamiya, as usual.  This thing is VERY WET and will need a good week to dry out.  Just in time to relax on Easter weekend, I wish...

Tim

Shaved tailgate...

  • Member since
    March 2012
  • From: Corpus Christi, Tx
Posted by mustang1989 on Wednesday, April 1, 2015 8:32 PM

Mister...........................I only hope I can come halfway close to this!


 Forum | Modelers Social Club Forum (proboards.com) 

  • Member since
    January 2015
Posted by taaron76 on Wednesday, April 1, 2015 8:47 PM

You'll knock it out of the park, Joe!  I'm sure of it.  Thanks!!!

Tim

  • Member since
    October 2008
  • From: Georgia
Posted by Rigidrider on Thursday, April 2, 2015 11:07 AM

Joe, (Mustang) Very nice work going on in this one! Wish I wasn't so far along with the one I've already started.

Doug

When Life Hands You A Bucket Of Lemons...

Make Lemonade!

Then Sell It Back At $2 Bucks A Glass...

  • Member since
    January 2015
Posted by MOPAR - D on Thursday, April 2, 2015 6:34 PM

Tim that shine look fantastic

  • Member since
    March 2012
  • From: Corpus Christi, Tx
Posted by mustang1989 on Thursday, April 2, 2015 8:46 PM

Rigidrider

Joe, (Mustang) Very nice work going on in this one! Wish I wasn't so far along with the one I've already started.

Doug

There's always room for another build in here Doug! Big Smile


 Forum | Modelers Social Club Forum (proboards.com) 

  • Member since
    January 2012
  • From: Hatfield
Posted by Misty on Friday, April 3, 2015 4:29 AM

Tarron you certainly sorted that finish beautifully

  • Member since
    January 2015
Posted by MOPAR - D on Friday, April 3, 2015 11:38 AM

My progress dose not show how much time I worked today as I wet sanded every thing and re sprayed everything. I think I have my front bumper now I cut a section out of the middle of the Ford bumper. I'm open for comments on the bumper. I'm waiting for some parts to finish painting the red and yellow. Here's todays paint job.

  • Member since
    January 2015
Posted by taaron76 on Friday, April 3, 2015 11:13 PM

Dan - I don't have enough experience with those rigs to give you any guidance on the bumper, but I think it looks good like that.  If you could find one that was a little deeper, that'd be cool, but I have no idea where to find one.

Tim

  • Member since
    January 2015
Posted by taaron76 on Friday, April 3, 2015 11:13 PM

More progress finished up tonight, just some of the hidden details and chassis for the most part.  I still want the clear coat to clear for a few more days before I started to wet sand and buff.  That gives me time to focus on the little things.  Chassis and suspension is complete and most of the engine bay details.  The only major thing left is the interior...

ChassisComplete1-vi.jpg

ChassisComplete2-vi.jpg

I wanted to use the NASCAR exhaust pipes, but they went right over the top of the fuel tank... figured that wasn't the best idea, so I made some exhaust for another kit.

ChassisComplete3-vi.jpg

ChassisComplete4-vi.jpg

ChassisComplete5-vi.jpg

ChassisComplete6-vi.jpg

  • Member since
    January 2015
Posted by taaron76 on Friday, April 3, 2015 11:13 PM

Details inside the engine bay...

EBayDetail1-vi.jpg

EBayDetail2-vi.jpg

EBayDetail3-vi.jpg

EBayDetail4-vi.jpg

This kit had 3 options to choose from for the grill, but I liked this one the best.  It's not mounted yet, just mocked up.

FrontGrill-vi.jpg

  • Member since
    October 2008
  • From: Georgia
Posted by Rigidrider on Saturday, April 4, 2015 7:39 AM

Beautiful work! A friend of mine has one of these , highly customized, has been working on for 10 yrs now. Looking forward to seeing this one completed.

Doug

When Life Hands You A Bucket Of Lemons...

Make Lemonade!

Then Sell It Back At $2 Bucks A Glass...

  • Member since
    January 2015
Posted by MOPAR - D on Saturday, April 4, 2015 11:48 AM

Tamarin - I like your grill choose

Misty - nice clear coating

Built the ladder for the viewing deck and sprayed the base coat for the chrome spray. I'm also going to make some removable hand rails for the viewing deck.

  • Member since
    January 2015
Posted by taaron76 on Saturday, April 4, 2015 6:40 PM

Looking good, Misty!  That decal and paintwork is awesome, and those wheels look great!

Tim

  • Member since
    January 2015
Posted by taaron76 on Saturday, April 4, 2015 6:40 PM

Dan - It looks like it is coming along great.  Can't wait to see more pics!

Tim

  • Member since
    January 2015
Posted by taaron76 on Saturday, April 4, 2015 6:41 PM

Where's Joe at? Haven't seen him with any updates lately.

Tim

  • Member since
    January 2015
Posted by MOPAR - D on Sunday, April 5, 2015 7:29 AM

Joe said he was going away for the Easter holiday.

  • Member since
    January 2015
Posted by MOPAR - D on Sunday, April 5, 2015 10:41 AM

Just a little update today painted and BMF on the rear bumper and thinking maybe adding a lower section to the front bumper.

  • Member since
    April 2005
  • From: Australia
Posted by taxtp on Sunday, April 5, 2015 4:14 PM

Fantastic updates again everyone, thanks for sharing them. Tim your are amazingly quick, and the quality of detail work and finish is spot on again.

Dan, your truck looks really good, and the hard work on the finish really shows.

Misty, your MP4/13 looks exceptional too. The wheels are really crisp looking.

Cheers

Tony

I'm just taking it one GB at a time.

  • Member since
    January 2012
  • From: Hatfield
Posted by Misty on Monday, April 6, 2015 4:35 PM

this is all still only dry fitted. All the bodywork had to be done first as ....... the tub needs to be in place to fit the sidepods...which have to be in place to fit the extra coolant pipes... which have to be in place before the engine can be put in ... so all the paintwork and decals had to be done all over to make sure they all line up... Still, it  had to be done sometime anyway, ill just have to be careful when drilling it and gluing it all together.

with and without the cowl fitted.

all the extra pipes and hoseclamps are on the rads. 

the pipes line up ok this side, the other side will need one removing and relocating thoiugh as its a bit out. 

the rear brakes, OOB except for the discs and calipers and spindle and cf decals. there will be a couple of wires to add later too.

front brakes. nothing from the kit is used, again it will have at least two wires of each side added later.

  • Member since
    November 2003
  • From: Nashville, TN area
Posted by bobbaily on Monday, April 6, 2015 6:04 PM

Hey all-first, I apologize for not commenting more on the fantastic builds that have been going on here-all of the work is outstanding and everyone's attention to detail is making me rethink of joining in....hopefully it will make my up my game.

Getting settled in to our new residence so hopefully I'll have everything setup soon and be able to find all of my supplies-

I did get started on my build-the Monogram Slingster-I was able to get the chassis complete along with the engine block & transmission.  All of the chrome parts are soaking to remove the plating-will try some Krylon Chome and see how that works.

Hope to get some primer on the chassis this weekend and maybe even some paint-no plan of action yet regarding colors & such-but I am committed to the Competition Coupe version-a chopped body on top of an obsolete dragster, making it competitive in a new class at the strip.  Also, the Slingster will take a back seat once all of the extras for my Monogram F-100 Super Sabre arrive-that one will be a cross-over for the Monogram Mafia and the 50th Anniversary Vietnam GB-won't make the deadline but I'm going to give it a shot.

The Slingster surprised me with the ease that the chassis went together-thought alignment would be more of a challenge.  And the flash isn't bad-only down side is the chrome plating, but that's the case n most auto kits.

As I consider myself a novice amongst Masters, I am open to criticism and suggestions.
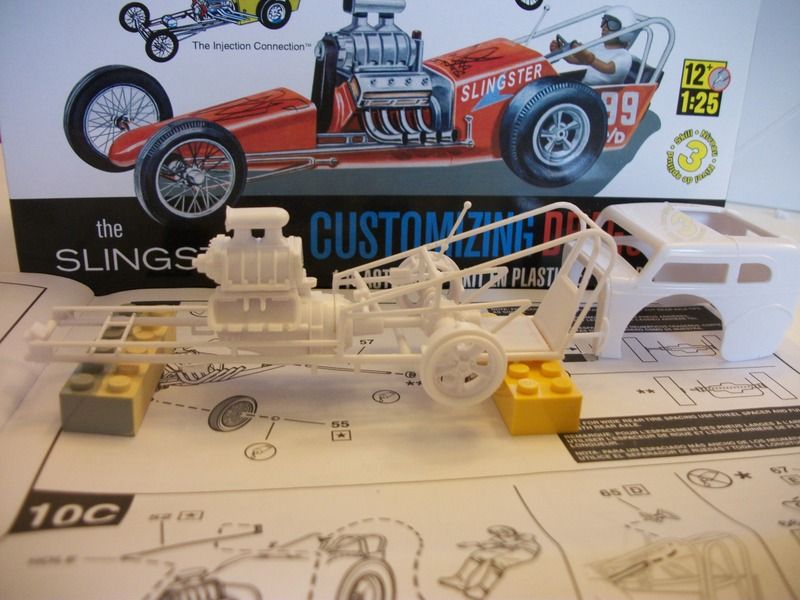
Bob


  • Member since
    March 2012
  • From: Corpus Christi, Tx
Posted by mustang1989 on Monday, April 6, 2015 7:00 PM

Tim: Man that engine detail is nice and clean!! The details really pop out at you, and that finish on that body is second to none bud.

Dan: This thing gets better and better every time I see it. I really like the ingenuity you're putting into this build!

Misty: Hang in there bubba!!! All of that finish and decal work you are doing is really paying off and those tires/ wheels look superb!!!

Bob: You've got everything laid out for the makings of a really cool build. Looking forward to the progress here.

As far as my updates go: They will be slow for the time being as I'm splitting the engine portion of this build up with the engine from my 109 for my Bf109 GB. Hang tight ....I'll get there!!


 Forum | Modelers Social Club Forum (proboards.com) 

  • Member since
    February 2013
  • From: Podunkville, USA
Posted by rommelkiste on Monday, April 6, 2015 7:13 PM

Had a few minutes tonight to check in and see what you guys have been doing.  Man, this crew is cranking out the killer builds!  ALL of you guys are doing some really nice work and you should be proud!  I will get to jump back in soon, just as soon as I get everything caught up.  The life of a sod buster is not easy.

Nothing ever fits……..and when it does, its the wrong scale.

To make mistakes is human.  To blame it on someone else shows management potential. 


  • Member since
    March 2012
  • From: Corpus Christi, Tx
Posted by mustang1989 on Wednesday, April 8, 2015 2:05 PM

Looking forward to seeing you in here rommelkiste!

Ok folks we're back in the swing of things now. My camera was acting weird this morning  and not at all like the low battery that it was. Here's with the engine block pretty much done. I still have some weathering to do to the exhausts and I have the intake and rocker covers just resting on the engine. I also have some touch up to do to the rocker covers and the intake but I've gotta show some progress to show that I'm still active in this WIP. The funny thing is that this pic does not show the weathering that I've done. I didn't go overboard with that but wanted to at least make the truck look like it had been driven.


Still a long ways to go but I'm gonna get there:


 Forum | Modelers Social Club Forum (proboards.com) 

JOIN OUR COMMUNITY!

Our community is FREE to join. To participate you must either login or register for an account.

SEARCH FORUMS
FREE NEWSLETTER
By signing up you may also receive reader surveys and occasional special offers. We do not sell, rent or trade our email lists. View our Privacy Policy.