SEARCH FINESCALE.COM

Enter keywords or a search phrase below:

The 2015 /16 Red Hot and Rollin Automotive Group Build--Ended

121084 views
2225 replies
1 rating 2 rating 3 rating 4 rating 5 rating
  • Member since
    January 2015
Posted by MOPAR - D on Saturday, April 18, 2015 10:15 PM

I'm calling this one done!

  • Member since
    January 2015
Posted by MOPAR - D on Saturday, April 18, 2015 10:33 PM

Joe. Use the fifth picture for the cover page. Thanks

And for my next build I'm calling it L'il Roll Back "C".

This is a build I've been planning for some time now and I've been on a car hauler building run and have one more to add. I'm starting with the old AMT Li'L Gasser and a roll back deck from a guy on eBay. Here's a mock up of what I'm planning. It will have a HEMI and be painted with HEMI Orange. I have not decided on what will be on the deck yet.

i98.photobucket.com/.../fe9a98e6d94cca646bfd3f3a2e488727.jpg

i98.photobucket.com/.../53abe19c8245cfb991ec8adb9a49bdd8.jpg

  • Member since
    January 2015
Posted by MOPAR - D on Saturday, April 18, 2015 10:34 PM
  • Member since
    January 2015
Posted by MOPAR - D on Sunday, April 19, 2015 11:42 AM

I finished my 39 Dodge custom hauler and now have this one on the bench to start making some progress. Not to much so far I've glued the cab sections together and working on cleaning up the glue joints. (It comes in 5 pieces ) still test fitting and working on ideas to add to it. I'm looking at turning the exhaust in to stacks going up right before the bed. I received the tool boxes this is where I'm looking at putting them at.

  • Member since
    January 2012
  • From: Hatfield
Posted by Misty on Sunday, April 19, 2015 7:07 PM

Mopar - that rig turned out beautiful! Cool

  • Member since
    September 2013
Posted by Raven728 on Sunday, April 19, 2015 7:49 PM

Hey guys, not much time for modeling lately for various reasons but I'm hoping to get back to being more active in here. Loving all the builds, it's been a great GB so far!

I got some time alone with the Challenger this weekend. The kit is well designed and goes together really well. The main problem I've been having has been with the paint. I've been clearcoating the body but have some orange peel and dust to sand out, and when I sprayed the chassis this evening I discovered that not all of the mold release agent came off when I washed the parts. I never seem to have much luck with semigloss black for some reason. No pics for now as everything is looking pretty butt-ugly at the moment, but I should have something worth posting soon I hope.

- Steve

  • Member since
    March 2012
  • From: Corpus Christi, Tx
Posted by mustang1989 on Sunday, April 19, 2015 8:54 PM

Good to see you Steve!!!Big Smile Shoot post it no matter how bad you think it is bubba!!! Hope everything's goin' ok for you. I haven't been on a whole helluva lot this weekend as a SEVERE stomach bug hit our house this weekend. Me, my wife and son were all sick at the same time. Better now thank God!!!

  Take care good buddy and look forward to progress shots.


 Forum | Modelers Social Club Forum (proboards.com) 

  • Member since
    January 2015
Posted by taaron76 on Monday, April 20, 2015 6:19 PM

Most of the engine plumbing is complete.  I had to add a couple of small details here and there, like an alternator bracket, but it is complete for the most part.  Next up is running the brake lines, e-brake lines and fuel lines on the chassis.  I'll  be sure to drink my cup of patience prior to starting on that. lol

Tim

Last pic with the breather on.

  • Member since
    January 2015
Posted by taaron76 on Monday, April 20, 2015 6:20 PM

Dan - That hauler is A-FREAKING-MAZING!!!!  Great work buddy!!!

Tim

  • Member since
    March 2012
  • From: Corpus Christi, Tx
Posted by mustang1989 on Monday, April 20, 2015 7:25 PM

Tim: You sir are definitely getting better at engine building. Great work!!


 Forum | Modelers Social Club Forum (proboards.com) 

  • Member since
    January 2015
Posted by MOPAR - D on Monday, April 20, 2015 7:59 PM

Tim thanks   Your engine looks like it's ready to be started up.

  • Member since
    March 2012
  • From: Corpus Christi, Tx
Posted by mustang1989 on Monday, April 20, 2015 9:17 PM

MOPAR - D
Your engine looks like it's ready to be started up

A set of jumper cables and we're off to the races!!Big Smile


 Forum | Modelers Social Club Forum (proboards.com) 

  • Member since
    January 2012
  • From: Hatfield
Posted by Misty on Monday, April 20, 2015 11:58 PM

Tarron '- great job on the lump! I was trying to figure out what the rear part of the gearbox casing was, it took me until the last pic to realise it was a peg Embarrassed

  • Member since
    January 2014
Posted by Seabe on Tuesday, April 21, 2015 3:17 PM

Mopar-D - that is looking brilliant! 

Tim, that engine is rockin' it! And great photography as well...  

Just to show some progress from my side.

The little Lotus has been hammered into place - wel, the start of it... I lost the other 49 shades, but here it is - in one shade of gray. Already know this is going to be a challenge to get a smooth black... but here's to trying! 

Also threw me a completely unexpected curveball. Taking some other stuff out, my jaw hit the ground when I noticed... SLICK tyres! For the downpour in which Senna won?! At least I found some '84 season wets in another kit which I hope will be close enough... 

Onto the P34:
If you'll excuse the messy wiring, still to be nailed down (again - it got loosened when I had to break the engine in two to add some stuff, as reported earlier) - here's the engine mounted on the floor:

Next up, still in initial phases - Jody's helmet starting to look more colorful.


And last but not least - some progress on the decalling of the body. Rear wing decalling done, somehow I did not take a pic...

Not quite motivated for the P34 after that engine mishap, but will get there... 

  • Member since
    January 2015
Posted by taaron76 on Wednesday, April 22, 2015 7:30 PM

Just a small update... been hectic around here lately.

I ran the brake line to the rear and the initial cabling for the e-brake.  Still pondering how/if I'm going to run the fuel lines.  This chassis is difficult to find the natural path the factory would use, so I might have to make my own route and live with it.  It's not perfect, but its my first try at running these lines. 

Tim

ChassisAC1-vi.jpg

  • Member since
    January 2012
  • From: Hatfield
Posted by Misty on Wednesday, April 22, 2015 11:06 PM

Never seen anyone bother to run those lines before! Nice, I'll have to bear that in mind in future.

  • Member since
    May 2009
  • From: Poland
Posted by Pawel on Thursday, April 23, 2015 5:36 PM

Dan - nice builds, man - the machines you're building are getting more wicked with each build!

Tim - I just love that plumbing, it gives the model a wholly new dimension!

I'll post the update on my Volkswagen bus soon - good luck with your builds and have a nice day

Paweł

All comments and critique welcomed. Thanks for your honest opinions!

www.vietnam.net.pl

  • Member since
    January 2015
Posted by taaron76 on Thursday, April 23, 2015 6:27 PM

Thanks fellas!  I appreciate the comments... motivates me to be better.  :)

Tim

  • Member since
    January 2015
Posted by taaron76 on Thursday, April 23, 2015 6:27 PM

Fuel lines and exhaust in place.  I'll tidy it up a little tomorrow and give the gas tank some aluminum paint.  Not perfect, but presentable.

Tim

  • Member since
    September 2013
Posted by Raven728 on Thursday, April 23, 2015 8:00 PM

Wow, nice work Tim - looks really good!

I finished the interior tonight. The gauges, etc are all decals - painstaking but worth it in the end I think. Also in the photo is the messed up paint on the chassis (I'm planning to touch it up with primer and paint this weekend), as well as the half-completed engine. Very nice kit, enjoyable build so far.

- Steve

  • Member since
    January 2015
Posted by taaron76 on Thursday, April 23, 2015 8:22 PM

Steve - That interior looks amazing!!!

Tim

  • Member since
    April 2015
Posted by Scarecrow Joe on Thursday, April 23, 2015 9:00 PM

These are all very good! Nice thread.

  • Member since
    March 2012
  • From: Corpus Christi, Tx
Posted by mustang1989 on Thursday, April 23, 2015 9:46 PM

Tim: The bottomsides of that car freekin rock!! Love all the plumbing! Yes

Steve: Man what a progress report!!! This sir looks to be some great work!Yes

Joe (Scarecrow): Thanks! Jump on in here with yo bad self and build somethin' brutha!Big Smile


 Forum | Modelers Social Club Forum (proboards.com) 

  • Member since
    January 2015
Posted by MOPAR - D on Friday, April 24, 2015 12:22 PM

Tim - nice work on the chassis

Small update added rear license plate and some red and white refector tape.

  • Member since
    April 2005
  • From: Australia
Posted by taxtp on Friday, April 24, 2015 8:36 PM

Dan - that hauler looks fantastic, I love the flames and the whole co ncept, well done.

Tim - The Chev is looking really good as always, and the color is brilliant. THe chassis looks much better now.

Misty - Your Mclaren looks really detailed and realistic. I liked the plank too, but some of the other details are just as good.

Steve - that is coming along really well. I'll enjoy seeing it done.

Seabe - I love those 1/43 F1 cars. Good work on the challenges it will be worth it.

I've been a bit slow to update, I'll try to get some photos today and post them.

Cheers

Tony

I'm just taking it one GB at a time.

  • Member since
    April 2005
  • From: Australia
Posted by taxtp on Friday, April 24, 2015 8:52 PM

I'm still going on the Williams FW-13B, hopefully photos later today.

It's time to add my next build. I was sorting through my stash, and I have three Tamiya Alfa 155TIV6 racing cars. Two are the Jagermeister livery, and are unopened. The third is the Martini livery, which was started when I bought it second hand a few years ago.

I didn't realise it was started until I got it home (I've subsequently learned to check these things), and found that the original builder had messed up the body paint and decals, and hadn't cleaned up the parts prior to painting them. I stripped it all off, cleaned it up, shelved it and forgot about it completely.

Since I seem to be on a campaign to eradicate these part builds from my stash, upon rediscovering it, I've decided to build it. Unfortunately I didn't photograph it before I stripped it.

My plan is to use the chassis, engine and cockpit as is, with a few tidy ups and some repainting, but largely as it was originally done.

The body will have to be reprimed and sprayed and decalled. The rims and tyres need ot be done too.

My plan is just to build a decent looking shelf model, and depict another racing car scheme on my shelf.

I've got several aftermarket decals for these Alfas, but not a set of Martini decals that match the kit box art. I've decided to use a set of DMC decals for a car driven by Fisichella in 1994.

I'll take photos of the model itself later today.

This kit is the starting point:
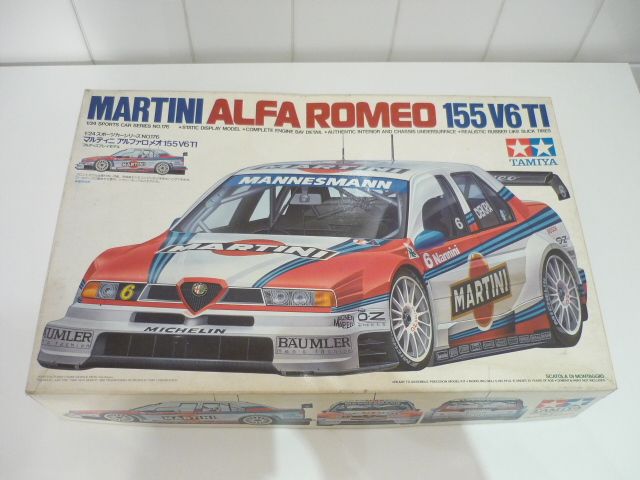
This is the car I want to do. You get this photo with the decals.

Cheers

Tony

I'm just taking it one GB at a time.

  • Member since
    April 2005
  • From: Australia
Posted by taxtp on Saturday, April 25, 2015 7:52 AM

Ok , here's the progress report on the Williams FW-13B.

Chassis. engine and rear suspension assembly. If you look closely, you might see a couple of ejection pin marks, but they all get buried under the cockpit and fuel tank assembly.

 Seat,  :

The engine cover still needs te interior done, and decaling, of course. Then a clear coat. There is a slight raised lip in the yellow to white demarcation, so I will sand it. It will be under the blue decal anyway. BTW, I am using Indycals decals for this,I  really like them so far.

Still masking this bit, and decalling etc to go too. It's tricky, because there are karge areas of decals, then a combination of full gloss and semi gloss finishes, and different types of paint.

Front and rear wings ready to assemble

I'll try to be more diligent on posting progress on this build. It's got away from me a little bit :)

Cheers

Tony

I'm just taking it one GB at a time.

  • Member since
    April 2005
  • From: Australia
Posted by taxtp on Saturday, April 25, 2015 7:59 AM

Might as well update on the Alfa Romeo 155TIV6 too.

I got enthusiastic and sprayed the front bumper and hood today.

but not the body yet, here it is after it's been stripped.

Rims sprayed white, tyres cleaned up, love the low profile. Both need more work.

Chassis, I haven't done anything to it yet, needs some stuff sorted out though. The more I look, the more work it needs.

The roll cage isn't a bad base, I'll probably just do a wash.

Assorted pieces I need to strip and re-work.

Cheers

Tony

I'm just taking it one GB at a time.

  • Member since
    September 2013
Posted by Raven728 on Saturday, April 25, 2015 9:34 AM

Looks good so far, Tony. I haven't done a Tamiya race car kit yet, but it's on my "to do" list.

Group photo! I wasn't planning to add the stripe decals to the seats but I changed my mind; I like how they look in the 1:1 car. Interior/engine bay got paint & decals, engine is almost done, chassis paint is touched up, and the body parts are back from the paint shop (aka the basement). The final coat of clear looks better than the previous coat, I might be able to get away with just some light sanding and polishing.

- Steve

  • Member since
    January 2015
Posted by taaron76 on Saturday, April 25, 2015 5:13 PM

Some interior updates...

Tim

JOIN OUR COMMUNITY!

Our community is FREE to join. To participate you must either login or register for an account.

SEARCH FORUMS
FREE NEWSLETTER
By signing up you may also receive reader surveys and occasional special offers. We do not sell, rent or trade our email lists. View our Privacy Policy.