SEARCH FINESCALE.COM

Enter keywords or a search phrase below:

The 2015 /16 Red Hot and Rollin Automotive Group Build--Ended

121084 views
2225 replies
1 rating 2 rating 3 rating 4 rating 5 rating
  • Member since
    October 2008
  • From: Georgia
Posted by Rigidrider on Tuesday, May 19, 2015 5:50 PM

Misty... This one has the stock hub caps on it but other then that , this is the car I was describing... Should I ever be fortunate enough to come into the funds to be able to afford one, This would be my dream car...

(sigh) Big Smile

Take care...

Doug 

When Life Hands You A Bucket Of Lemons...

Make Lemonade!

Then Sell It Back At $2 Bucks A Glass...

  • Member since
    January 2015
Posted by taaron76 on Tuesday, May 19, 2015 9:37 PM

This thread is filled with all kinds of awesomeness.  You guys and gals are turning out some incredible builds and I love sitting back and taking notes!  Good stuff!!!

Tim

  • Member since
    January 2015
Posted by taaron76 on Tuesday, May 19, 2015 9:37 PM

Finally got started on the engine today and got a few thing done.  I'm still waiting on a couple of parts I ordered to come in.  Pulleys, carb, oil filter and a few other things for the engine.  Got some paint work done today and started some of the assembly.

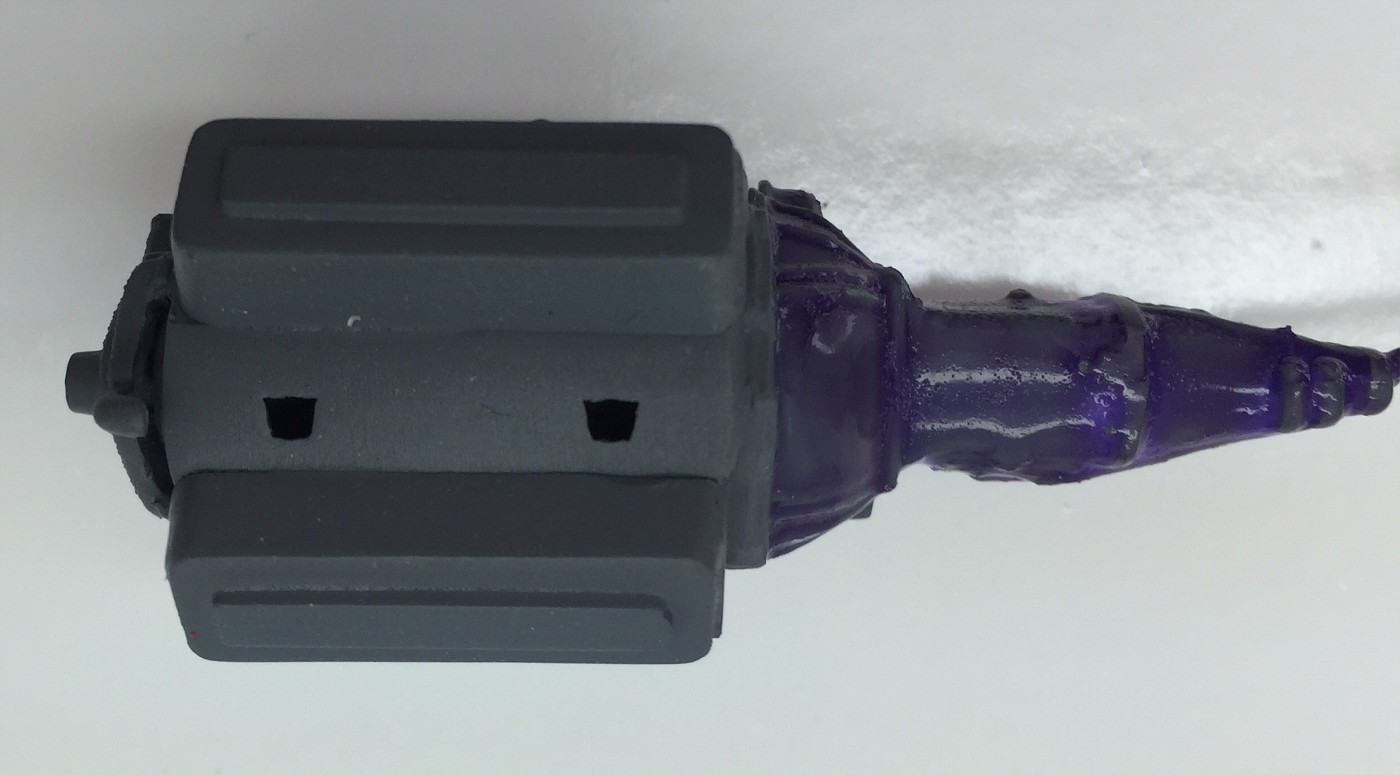
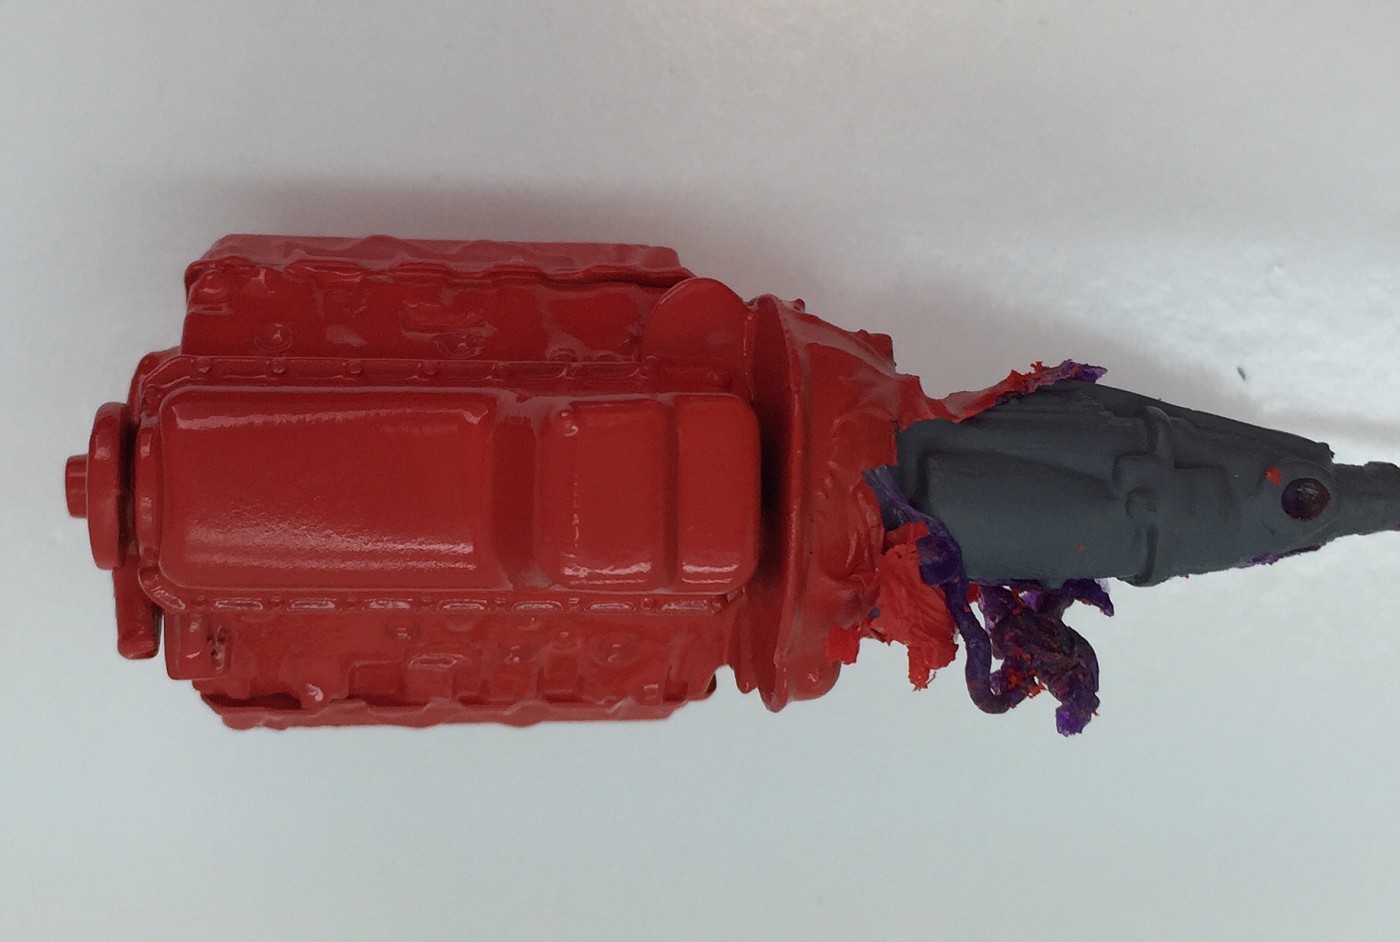
I've been using Maskol by Humbrol instead of taping up areas that might be sensitive to paint that hasn't cured all the way.  I primed the engine pieces yesterday, painted them and assembled them today.  Maskol really creates a great tape line without worrying about pulling up any of the paint.  Here a few pics to show you what it looks like.

Engine primed and the transmissions covered in Maskol with a paint brush.  It takes about 10-15 minutes to dry:
FullSizeRender1-vi.jpg

This is what it looks like after two coats of Chevy engine red acrylic.  I peeled off the Maskol about 10 minutes after it was painted.  Acrylics dry to the touch pretty fast, so that helps, but it peels off really easy and won't permanently stick :
FullSizeRender3-vi.jpg

Maskol peeled off:

FullSizeRender-vi.jpg

After letting the Chevy engine red dry for another ten minutes or so (20 minutes total), I painted Maskol on the entire motor, except the transmission and painted it with Model Master Metalizer aluminum and sealer, then let it dry for 10 minutes or so and then peeled the Maskol off:
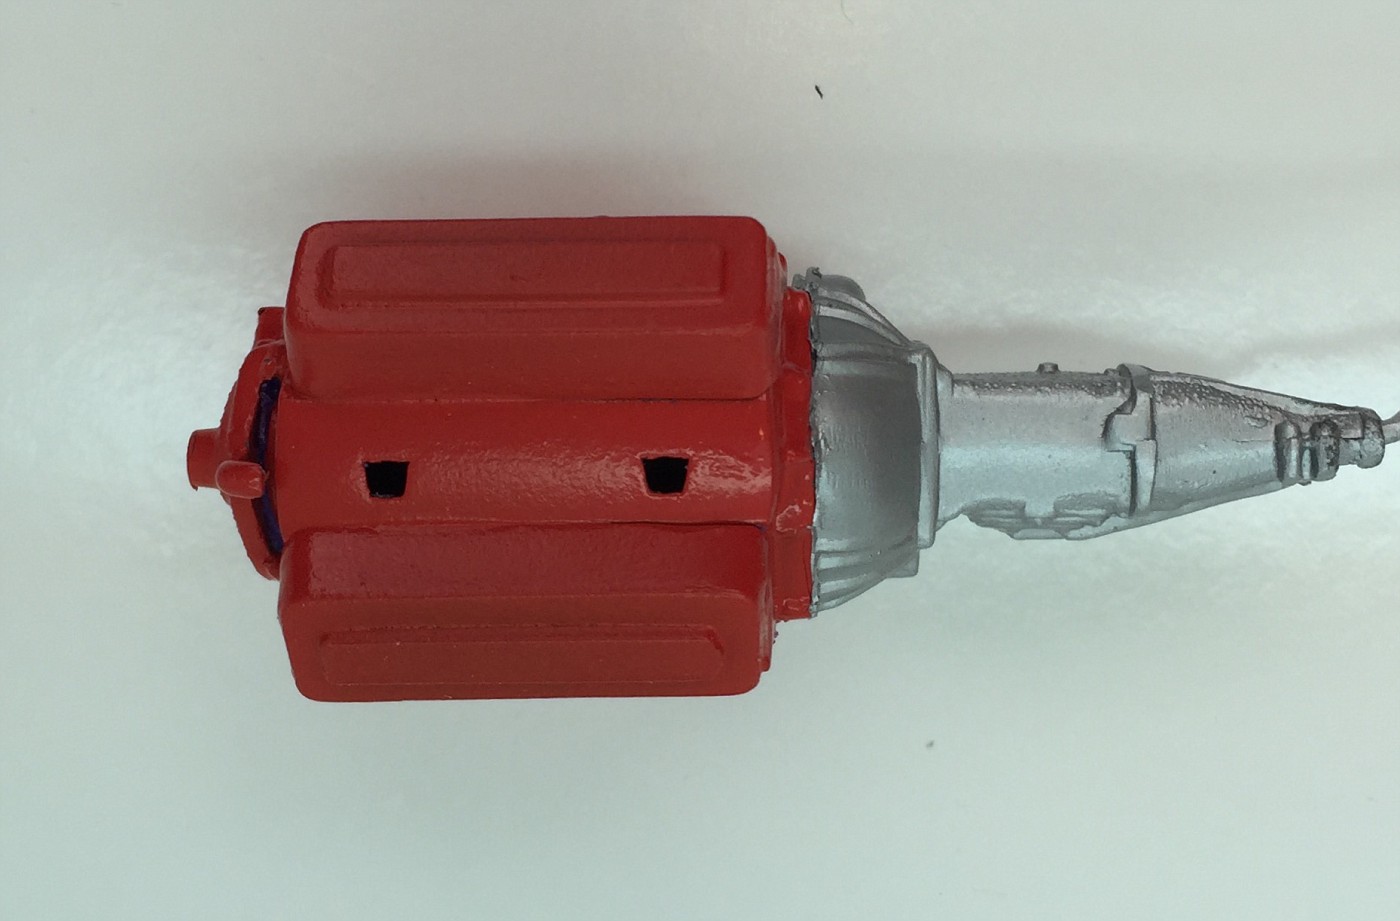
FullSizeRender2-vi.jpg

A couple more pics of the separation lines using Maskol:
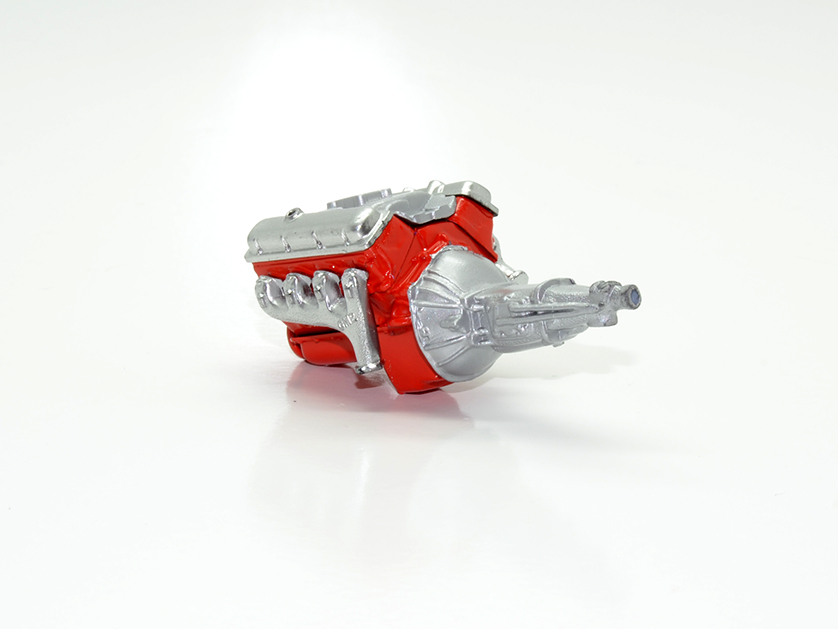
Maskol1-vi.jpg

Maskol2-vi.jpg

Anyhow, if you hate trying to mask off the engine and transmission, or other similar parts while painting them, Maskol is very easy to use and very effective at creating a very nice and clean line.

Tim

  • Member since
    January 2015
Posted by taaron76 on Tuesday, May 19, 2015 9:38 PM

And here is the motor update pics for the day...  I didn't use the box valve covers since the ones off of a '71 Chevelle were more like the stock'65 Chevelle valve coves.  It already has the holes for the two vacuum or breather lines.  Lots of work left to do on the engine, but I'm at a work stoppage until the parts I ordered get here.

Tim

Eng2-vi.jpg

Eng3-vi.jpg

Eng1-vi.jpg

Eng4-vi.jpg

  • Member since
    March 2012
  • From: Corpus Christi, Tx
Posted by mustang1989 on Wednesday, May 20, 2015 5:02 AM

Doug: I hear you on that! The funds.....the funds..............the funds!!! I've got only one car in mind and it aint no classic by any means. If I could just have her back............

Tim: Motor and photography are first class bud!! Keep the pics a comin'!  Yes


 Forum | Modelers Social Club Forum (proboards.com) 

  • Member since
    October 2008
  • From: Georgia
Posted by Rigidrider on Wednesday, May 20, 2015 10:47 AM
Joe, I hear ya bud... I've had 4 Mustangs over the years, a 65 , 66, a 67, a 67 fastback, and lastly a 70 mach 1 fastback. The latter I've kicked myself every day since parting with, and the 65 being my first I miss too. My cousin was a HUGE Mustang fan being his dad ( my uncle) raced professional Pro Stock in the 60s and 70s and still gets out to do a bit of racing now and hes in his 70s! You'd never know it by looking at him. Doug PS... Nothing like a Mustang, right? Lolol...

When Life Hands You A Bucket Of Lemons...

Make Lemonade!

Then Sell It Back At $2 Bucks A Glass...

  • Member since
    March 2012
  • From: Corpus Christi, Tx
Posted by mustang1989 on Wednesday, May 20, 2015 2:10 PM

Rigidrider
  Nothing like a Mustang, right? Lolol...

I know! I throw a hissy everytime I see somebody driving one these days!


 Forum | Modelers Social Club Forum (proboards.com) 

  • Member since
    March 2012
  • From: Corpus Christi, Tx
Posted by mustang1989 on Thursday, May 21, 2015 5:10 AM

Although the picture doesn't depict the exact shade here ( just short of a blood red actually) ...something tells me that I'm really gonna like this paint ! It is the exact shade of red I was after.


RSCN0209_zpsllcuf2yp.jpg


 Forum | Modelers Social Club Forum (proboards.com) 

  • Member since
    January 2014
Posted by Seabe on Thursday, May 21, 2015 1:03 PM

Haaaaaaaahahahahahaha!!!! Sorry for laughting, Mustang - but you've just realised something a lot of our F1 guys have been struggeling with... The colour on a photograph is not the colour on the car!

The first guys to commercially realise and exploit this, was Colin Chapman and the rest of the Lotus guys. I am super-impressed in my build (97T) that he decals are the correct colour - biscuit. Which (esp at the time it was initiated) was discovered how they will display GOLD (of the JPS sponsors) on any photographs taken trackside...

The same "fate" befell M@rlb0r0... in reverse. Their day-glo scheme came out "plain red" on most photo's, causing a lot of (modelling) guys not to realise it is actually a fluo. Much the same as a lot of guys do golden JPS decals...) And please, while we're on red... (Misty may get excited here - and Tony!)... don't get me going on Ferrari reds over the era's! (But if you want advice, just shout, it's... interesting!) There are MANY different shades.

Anyways, what I'm trying to say is... shades of certain colours are helluva difficult to capture on photo's. Red (esp if there's a fluo hint) is one of them!

  • Member since
    January 2012
  • From: Hatfield
Posted by Misty on Thursday, May 21, 2015 5:41 PM

yep, zero paints seem to do a  different Ferrari red for every model and year, loads of them Crying  and you have to make sure you use the correct colour undercoat too Huh? madness. Add to that the fact they come in 30ml pots, enough to do about 6 cars, and you end up wasting 5 times more than you use.  Angry so unless there is a glaring difference everything will get Ferrari f1 2000 red on it until it's all gone! Super Angry

Funnily enough I bought some aftermarket decals for my tamiya 1/12 lotus 72d . The kits decals are gold but the am ones were, like you said, a biscuit colour.  I thought I had been done! Until I looked closely at some decent photos and checked in the forums.  I may even get around to building it one day Embarrassed 

  • Member since
    January 2015
Posted by taaron76 on Thursday, May 21, 2015 8:45 PM

Finally got around to starting on the interior.  The plan was a two-tone gray and to finally give flocking a shot.  Overall, I think it came out pretty good and is fairly easy to use.  I picked up a couple of things that will help me on my next one.  The only thing I might change is the color of the seats.  I might either paint them black, or a light gray than what they are.

I still have loads of detailing to do like the door panels and the second half of the dash, but heres where I'm at so far.

Tim

  • Member since
    January 2014
Posted by Seabe on Thursday, May 21, 2015 10:26 PM

Misty - a short overview as I have it about Ferrari reds: you can use "normal red" (Italian red/TS8 in Tamiya range) on early Ferrari's. In 97 they went MBro all the way ito sponsorship and the red became a more bright red - TS49 or the mention F1-2000 red will work for all that era cars. (Yes, there may be very subtle differences between years, but... really?! )

Then in... I think Monaco 2007 (up to Spain 07 was bright red) they changed it mid-season for two seasons to a candy apple red. And I also think from a personal point of view the 08 car was slightly different to the 07. So, multi-layered paint for that... (I used light golden paint as base with clear red for the 08 and plan to go silver with clear red on 07 - it's an endless debate!)

From 09 they had a more pearly red... TS85. Until this year, where apparently it seems it is more back to plain red again? I haven't seen a consensus actually on this year's colour, it may still be pearly... and at the moment you'll anyways only get it from Tameo (shortly)and they are usually spot-on with their colour precription.

  • Member since
    March 2012
  • From: Corpus Christi, Tx
Posted by mustang1989 on Friday, May 22, 2015 4:25 AM

Tim: Way to go on that interior. I'll be using flocking for the first time on my F-100 and I hope it turns out as good as what you've done here. You're really getting a pattern down to your building and it looks like the skill level is increasing with each build. Again great work bud. Yes

Seabe: Now that sir, is some information about red right there. Interesting.


 Forum | Modelers Social Club Forum (proboards.com) 

  • Member since
    September 2013
Posted by Raven728 on Friday, May 22, 2015 8:24 PM

Ok, I was finally able to wrap up the Challenger and get some photos. Great kit overall, the fit of the parts was outstanding, except for the body/interior/chassis assembly I talked about earlier. When I was dry-fitting, I thought that things didn't look quite right, but figured it would come together eventually. Boy was I wrong. I also realized very late in the build that I had forgotten to paint the black part inside the front, around the headlights and grille, which was almost impossible to do cleanly by hand.

- Steve

  • Member since
    January 2015
Posted by taaron76 on Friday, May 22, 2015 11:47 PM

Put some overtime in getting the interior finished, minus the seat belts... waiting on parts to come it.

I drilled the gauges out and glued styrene behind the holes to give the decals a nice flat surface.  Borrowed this idea from Joe (mustang1989) when he was building his Charger.  I also BMF's the pedals.

Of course it wouldn't be right without a function glove box, right?

I wanted to add some more color to the interior, so I decided on black in a few places here and there.

  • Member since
    March 2012
  • From: Corpus Christi, Tx
Posted by mustang1989 on Saturday, May 23, 2015 5:23 AM

Steve: Man it sounds like you had your hands full with this Challenger! I can't tell by those beautiful finishing photos that you had any trouble with it. It turned out great if you ask me. And somehow you managed to pull off some great pics of that red paint job which I can never seem to do. Great job bud!!!!! YesYesYesYesYes

Tim: That interior is lookin' sweet dude! That instrument panel gauge idea works like a charm don't it? Got a close up of the instrument panel cluster?

My son and I are in Sugarland this weekend for a hockey tournament that he is playing in and wouldn't you know it that I brought along the travel work bench items.......I'll have that hood completed this weekend with the hole cut out for the carburetors and cleaned up.Stick out tongue

In my die hard fashion:


 Forum | Modelers Social Club Forum (proboards.com) 

  • Member since
    January 2015
Posted by taaron76 on Saturday, May 23, 2015 6:53 AM

LOL @ Joe!  That is awesome!!!  I'll take a closeup today of the panel.

Tim

  • Member since
    September 2013
Posted by Raven728 on Saturday, May 23, 2015 9:49 AM

Thanks Joe. I feel like I could've done a better job with it, so I'm a little disappointed with myself, but live and learn, eh? It still makes a fine desk model. Smile  I'm glad the 'TorRed' came across so well, it's a really great shade.

Hockey dad who brings his model on the road with him? Talk about dedication!

I've been in love with first generation Camaros for as long as I can remember. My plan is to build a model of my favorite of each year, '67 to '69. Last year I built a '69 RS in Hugger Orange, so next up is a '68. I don't know anything about this kit, and I'm frankly not expecting it to be very easy, but it's the only one I know of:

I'm normally a factory stock kind of guy, but I want to make this one more customized. I'm imagining a sinister-looking street racer, very dark blue with no chrome, shaved door handles, racing tires, etc. Should be a fun summer build I think.

- Steve

  • Member since
    January 2015
Posted by taaron76 on Saturday, May 23, 2015 3:28 PM

Steve - I love that '68!  By far my favorite muscle car of all time!!!

Tim

  • Member since
    January 2015
Posted by taaron76 on Saturday, May 23, 2015 3:28 PM

A few rear suspension updated.  I removed the lower control arms from the axle and mounted them with pins so that the suspension would travel.  The front part of the lower control arms will be mounted to the frame with scale bolts and nuts, they just haven't arrived yet.  Rear suspension is ready to be painted now.  The upper control arms will be mounted and assembled the same way as the lower control arms.  I also started running the fuel line...

Tim

Molded lower control arms.

The control arms are pinned here to allow travel.

Here are the rear suspension mocked up with pins, minus the upper control arms... and paint of course.

  • Member since
    January 2012
  • From: Hatfield
Posted by Misty on Saturday, May 23, 2015 4:00 PM

Did some more pics with a better background and a good dusting with the airbrush. much happier. the RFI is here

http://cs.finescale.com/fsm/modeling_subjects/f/4/t/165645.aspx

there are many more pics on my flickr page.

  • Member since
    January 2015
Posted by taaron76 on Saturday, May 23, 2015 4:16 PM

WOW!  Amazing build and some amazing details!!!

Tim

  • Member since
    September 2013
Posted by Raven728 on Saturday, May 23, 2015 8:02 PM

That is a really nice build, Misty. Yes Let me know if you want me to post one of the new pics in place of the current front page one.

- Steve

  • Member since
    January 2014
Posted by Seabe on Sunday, May 24, 2015 12:04 AM

Superb build, Misty!

  • Member since
    January 2012
  • From: Hatfield
Posted by Misty on Sunday, May 24, 2015 5:43 AM

It's ok Steve,  I'll stick with the one I have.

  • Member since
    October 2008
  • From: Georgia
Posted by Rigidrider on Sunday, May 24, 2015 10:28 AM

Beautifully done Misty!

Doug

When Life Hands You A Bucket Of Lemons...

Make Lemonade!

Then Sell It Back At $2 Bucks A Glass...

  • Member since
    March 2012
  • From: Corpus Christi, Tx
Posted by mustang1989 on Monday, May 25, 2015 4:50 AM

Misty: That thing came out just beautifully!!!!. I tried building an open wheel car a while back and I shelved it and subsequently in a move let it go. It was a Tamiya kit and I remember it the car was a Marlboro sponsored car. Builds like this inspire me to re-visit that kit some day. I want to thank you for being a part of this GB and would like to extend the invitation to stay and build another in you feel so inclined.

Tim: Nice work on that suspension and chassis!

Steve: I've got you added to the roster--as a matter of fact I have updated the roster with not only that but with all of the completed builds and then I found out that I'm not even on the roster. Gotta get on that host and get him in gear these days.... hey wait a minute..........that's me! Indifferent


We are back from the trip now and I'll be back at the bench shortly. I managed to get the cutout in the hood completed but need to clean it all up a bit.


 Forum | Modelers Social Club Forum (proboards.com) 

  • Member since
    January 2015
Posted by MOPAR - D on Monday, May 25, 2015 7:58 AM

Joe - that's great traveling with your build. I got a weekend in Dallas coming in July and I was thinking of doing the same.

Guys your builds all look great here and I'm glad to be a part of this GB

I've black primed the de-chromed parts and sprayed Alcad on them. I also had to redo the fuel tank supports as they were resting on the ground. I'm still learning how to work with the Alcad I'm good with how the axels turned out they look like a black chrome but the other pieces I think need some more Alcad to make them more shiny   

  • Member since
    March 2012
  • From: Corpus Christi, Tx
Posted by mustang1989 on Monday, May 25, 2015 8:29 AM

Dan: Go for it man!! If I've only got one night then I aint gonna bother.... but two?? Game on brother! Your build is looking great so far pal! Gonna try and have it done by August 1st?

Well the hard efforts of Saturday night at the hotel and this morning have paid off finally. I've got the cut out cleaned up and ended up having to shave some plastic off of the bottom of the hood scoop so that the chrome air intake horn would clear the scoop. That thing is tight on the clearance!!! The scoop is only about .032" thick now in the center and I started with .058" !!!! I have the holes drilled in the hood and in the edges of the scoop so I will be able to pin it in place to make things easier to install later.

Still gotta prime it and paint but here it is so far:


 Forum | Modelers Social Club Forum (proboards.com) 

  • Member since
    January 2012
  • From: Hatfield
Posted by Misty on Monday, May 25, 2015 10:09 AM

thanks mustang.

unless a self propelled counts then i cant build another motor Sad i was committed to build one from last year. gonna stick around and follow all your builds though.

im sure if there is a 2016 GB ill be back though Toast

JOIN OUR COMMUNITY!

Our community is FREE to join. To participate you must either login or register for an account.

SEARCH FORUMS
FREE NEWSLETTER
By signing up you may also receive reader surveys and occasional special offers. We do not sell, rent or trade our email lists. View our Privacy Policy.