SEARCH FINESCALE.COM

Enter keywords or a search phrase below:

The 2015 /16 Red Hot and Rollin Automotive Group Build--Ended

121085 views
2225 replies
1 rating 2 rating 3 rating 4 rating 5 rating
  • Member since
    April 2015
Posted by Scarecrow Joe on Friday, June 19, 2015 11:19 AM

Those pulleys look awesome!  Just like real brushed aluminum. What finish you used, taaron?

  • Member since
    January 2014
Posted by Seabe on Friday, June 19, 2015 11:07 AM

That is looking simple awesome Tim!

Great stuff - my Lotus is done as well. Hope to get some shot tomorrow. 95% certain I'm doing a challenge to myself and picking up the Tameo F2004 box next - detailed 43rd build... *looks for corner to hide in*

  • Member since
    January 2015
Posted by taaron76 on Thursday, June 18, 2015 10:20 PM

Just a couple of updates on the engine.  I finished all the water, vacuum and electrical lines tonight and gave it a light wash to bring out the details.  Next up, suspension and brake! 

Tim

  • Member since
    January 2015
Posted by taaron76 on Thursday, June 18, 2015 10:20 PM

Tony - Thanks!  I believe it was Model Master flocking material.  I just airbrushed a thick coat of paint on the areas needed to flocked and used a salt shaker to distribute the material around.  Pretty simple, but I thought it would be harder than that.  Well worth the time and money investment.

Tim

  • Member since
    April 2005
  • From: Australia
Posted by taxtp on Wednesday, June 17, 2015 10:19 PM

Very neat, as always Tim. The wheels have come up well and the flock looks really evenly distributed. What brand of flock do you use ?

Seabe - that's what I did, picked up an entirely different box. This build was going to be another Alfa or a Leyton House CG901B. At the moment my next build is another of these Revell NASCAR s, this time an AC Delco Monte Carlo driven by Dale Earnhardt Jnr. I mention it here only to compare to whatever I pick up at the time.

Cheers

Tony

I'm just taking it one GB at a time.

  • Member since
    January 2015
Posted by taaron76 on Wednesday, June 17, 2015 3:57 PM

Some more updates, here and there... slowly but surely.

Finally got the trunk flocked and added the stock wheel that came with the Z-16 as a spare.

Here is a shot of the wheels prior to shooting them with metallizer gun metal and then with some clear.

... and after.

  • Member since
    January 2014
Posted by Seabe on Tuesday, June 16, 2015 8:17 AM

Like both builds, but esp the Williams!

Built my FW13 a couple of years ago and gave it a post-race look, great fun!

Glad you don't have my problem - I simply cannot decide what to build next after the P34. The Lotus is approaching final stages, but already have a reasonable idea of what's coming next in 43rd.

The closest I was to committing, was to a S27 MP4/22 - haven't done a S27 kit in years, so a bit apprehensive. But - more dubious about the finish. I haven't worked with Alclad Chrome before - and with it being winter I am presuming I'll just make it more like to screw that up than usual! Some other options are two clear body kits - Merc CLK-GTR and a 312T3, the RB6 and the Yamaha M1 (09). Oh, and maybe as a long-term project the 12th scale F2002 with SMS detail set, maybe in parallel to one of the above - I won't be able to plug on with that one without "break". Will most likely get a bee in my bonnet in two days' time and pick up an entirely different box!

  • Member since
    April 2005
  • From: Australia
Posted by taxtp on Tuesday, June 16, 2015 6:58 AM

and finally, here is my next build...can we add it to the first page please.

Continuing my rampage through the most annoying kits in my stash, it's my first NASCAR in 20+ years, and my 2nd ever. It's a simplified kerbside Revell Pro Finish kit of Jeff Gordon's Monte Carlo from 1999. The body comes pre painted with a few extra decals to add. The rest of it is simplified. Here's what you get in the box.

Cheers

Tony

I'm just taking it one GB at a time.

  • Member since
    April 2005
  • From: Australia
Posted by taxtp on Tuesday, June 16, 2015 5:39 AM

Here's the Alfa. It's not great but it's ok for the shelf. Better than the junker I inherited when I opened the box !

I used a rarely seen decal set from DMC Decals, in the end the 'orange peel' reflection you  can see on the decals on the hood is not 'orange peel', its some sort of reflection from the decal. It's isnt really as noticeable in real life. I know it's not 'orange peel' because I brushed a smooth coat or three of Future to seal the decals, rather than risk solvent on these decals.

I think the third photo is ok for page one.

Cheers

Tony

I'm just taking it one GB at a time.

  • Member since
    April 2005
  • From: Australia
Posted by taxtp on Tuesday, June 16, 2015 5:32 AM

Dan, Eric and Joe, Excellent in progress work on this page.

I promised a couple of builds some time back, a Tamiya 1/20 Williams FW-13B and 1/24 Alfa Romeo 155V6TI touring car, built from a 2nd hand kit that I bought.

I've been really bad on progress reports, but I've managed to finish them both in between a busy period or two.

Cheers

Tony

First the Williams...the first photo is fine for page one.

I'm just taking it one GB at a time.

  • Member since
    March 2012
  • From: Corpus Christi, Tx
Posted by mustang1989 on Tuesday, June 16, 2015 5:15 AM

Ok. Some progress this morning. I didn't like how the brake lines looked being black and all so I removed them and shot them with a coat of aluminum and reinstalled them. Upon reinstallation I got a nasty glue boo-boo on the L/H frame rail so I fabricated an aluminized shield to go over the lines. It was either this or remove the lines, sand down the frame and repaint it so I chose a route which I thought would do the trick, look decent and still cover the mishap up.  I still have to fabricate some stand off clamps holding the lines to the frame but here we are so far...


2015-06-16%202015-06-16%20001%20001_zpsd


 Forum | Modelers Social Club Forum (proboards.com) 

  • Member since
    March 2012
  • From: Corpus Christi, Tx
Posted by mustang1989 on Sunday, June 14, 2015 7:23 PM

Dan: Man that thing just blew up on us didn't it? You've come a long way from the last time I've seen this. It's looking flat out awesome good buddy!!! Yes

Eric: That motor is looking great! Glad to see you back building among us again.Wink


 Forum | Modelers Social Club Forum (proboards.com) 

  • Member since
    March 2011
Posted by ewheeler454 on Sunday, June 14, 2015 6:50 PM

Mopar, that's looking sharp!

I was able to get some work done on the 53 Ford today. Most of the engine is done, mainly just running the wires. Finished up the exhaust and mounted the rear end. also have a little of the interior done from a week or two ago.

L8TR,

Eric

  • Member since
    January 2015
Posted by MOPAR - D on Sunday, June 14, 2015 4:40 PM

Joe your detail and ideas on this build are amazing this is one cool van. 


I worked on the engine today getting the fuel lines and filters tied in and the plug wiring.

  • Member since
    February 2010
  • From: New Jersey
Posted by 68GT on Sunday, June 14, 2015 12:30 PM

Joe, I'm not a van guy but I'm lovinin this!

On Ed's bench, ???


  • Member since
    March 2012
  • From: Corpus Christi, Tx
Posted by mustang1989 on Saturday, June 13, 2015 9:22 PM

Dan: That build of yours is really beginning to take shape now!!! Yes

Joe: Don't you dare quit now! If I, with troubles of my own , can't quit neither can you! Wink


 Forum | Modelers Social Club Forum (proboards.com) 

  • Member since
    April 2015
Posted by Scarecrow Joe on Saturday, June 13, 2015 8:10 PM

Thats crazy looking MOPAR...awesome!

My project has started to get on my nerves....Im about to throw it in the box for 6 months...or in the trash..,

Its a cool kit but the fitment is so horrible...getting the body to fit the interior and then the chassis is taking the best of me.  Not to mention the fitting of the clear parts. Already the windshield I had to scratchbuilded fromnsome clear plastic scraps I had.  Anyways, added a ladder.  I thought "How these guys could put thing on the roof in a van so high from the ground as this one?"

So...ladder!
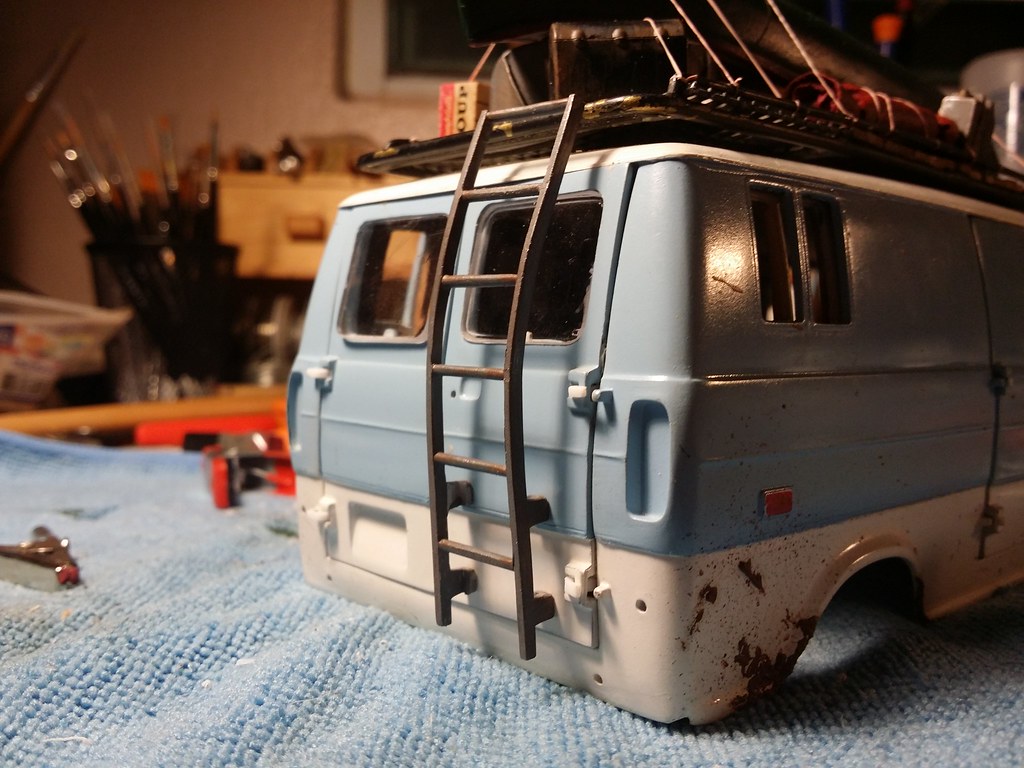
 20150613_194239 by nenekinkin, on Flickr
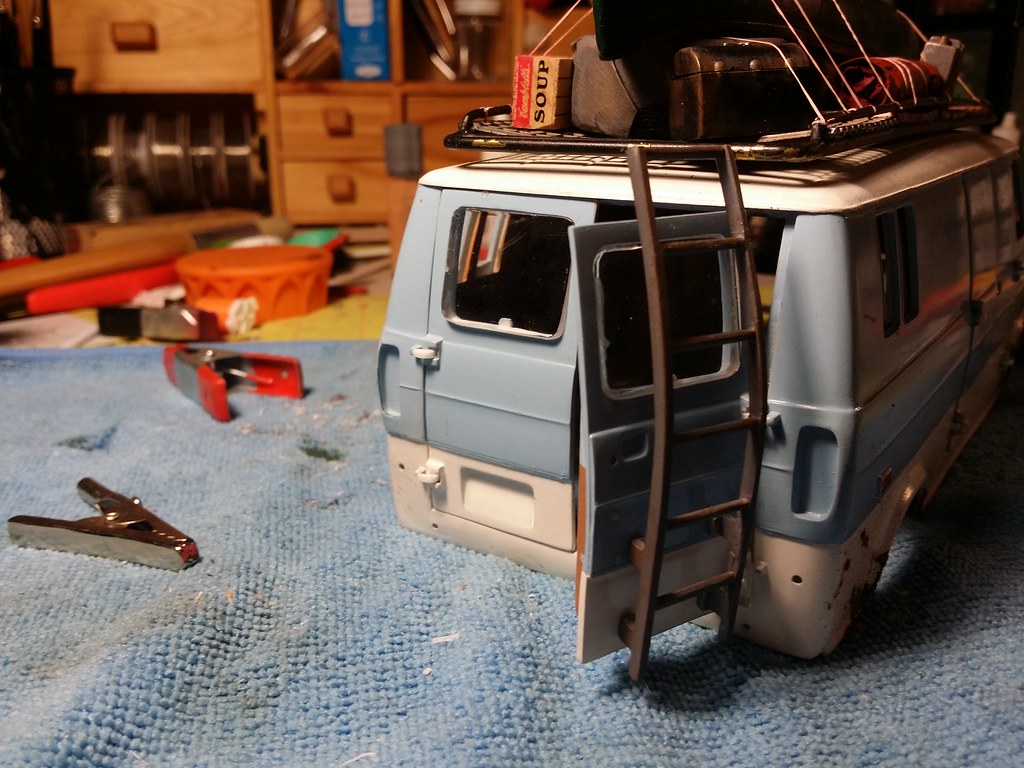
 20150613_194259 by nenekinkin, on Flickr

Detail of doors...
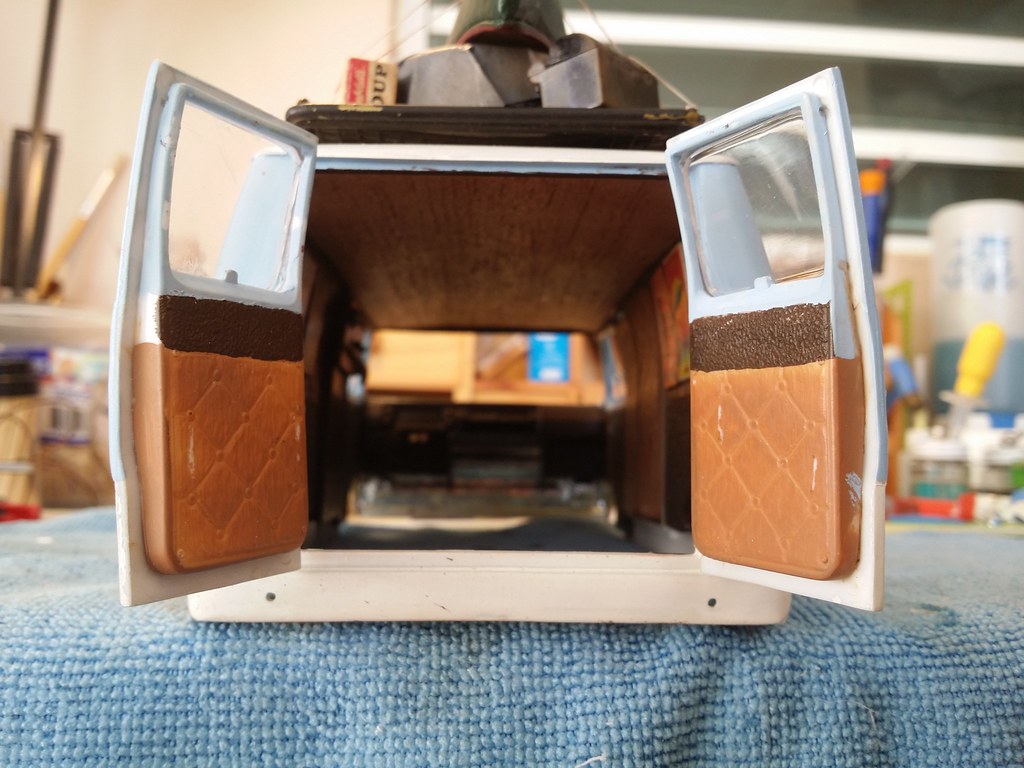
 20150613_172426 by nenekinkin, on Flickr
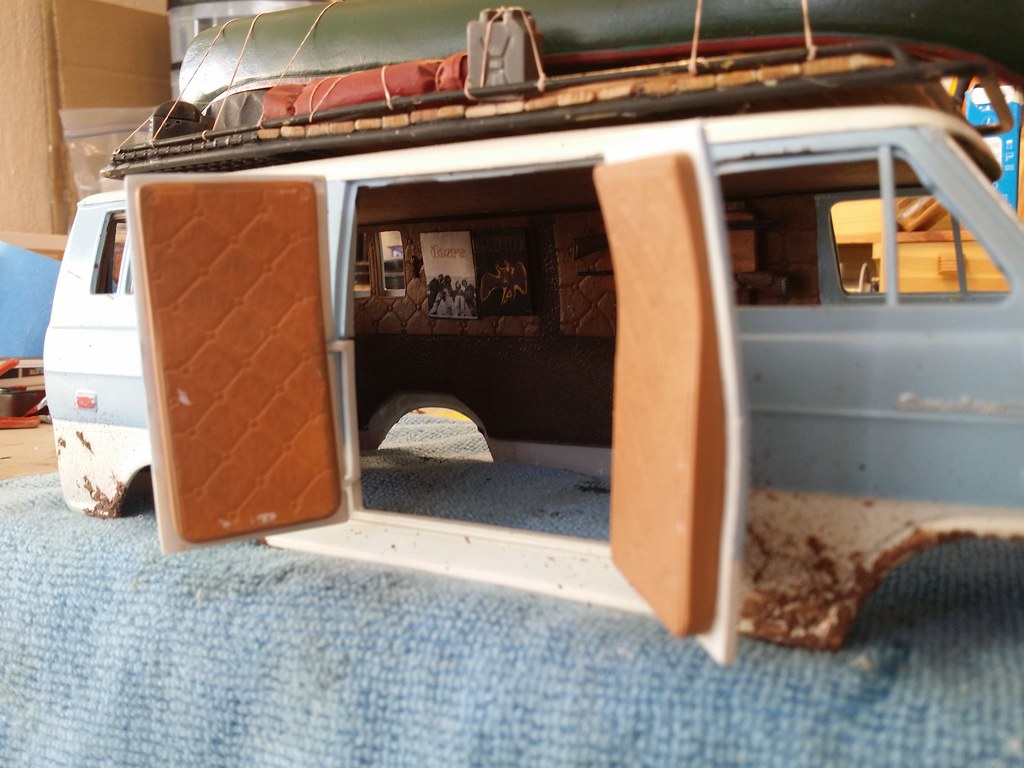
 20150613_173652 by nenekinkin, on Flickr

Im taking a bit of time off....need to relax, damn it!  Indifferent

  • Member since
    January 2015
Posted by MOPAR - D on Saturday, June 13, 2015 3:10 PM

  • Member since
    January 2015
Posted by MOPAR - D on Saturday, June 13, 2015 3:08 PM

Was able to do spray the frame and bed black today.

  • Member since
    January 2012
  • From: Hatfield
Posted by Misty on Saturday, June 13, 2015 2:31 PM

crikey that hood decal was a bit.... Ick!naff. better luck next time Yes

loving the brake system 

  • Member since
    January 2015
Posted by MOPAR - D on Saturday, June 13, 2015 9:16 AM

Joe the brake system is looking real good. Some times we have to use plan B and I know you have one for the hood.

  • Member since
    March 2012
  • From: Corpus Christi, Tx
Posted by mustang1989 on Saturday, June 13, 2015 8:20 AM

Even from a distance the hood decals show the problems I was having but besides that it's what I'm after regarding "the look".


2015-06-12%202015-06-12%20003%20001_zpsd


2015-06-12%202015-06-12%20003%20003_zps7


But when you get a lot closer it's painfully evident that thissSig_DOH.gif_zpsiyz57xcc.png.........aint gonna cut it! pie_in_the_face-2223_zpshvbvnyfb.gif


2015-06-12%202015-06-12%20003%20002_zpst


2015-06-12%202015-06-12%20003%20004_zpsi


So................I stripped the hood of decals. I'm going to have to do some paint work as well but that's no biggie. I'll probably just strip it and start over rather than touch it up. Oh well.......that's modeling folks.


2015-06-13%202015-06-13%20001%20002_zpsw


 Thankfully, I did manage to make some forward progress today in the way of brake lines. It's not much but its a start:


2015-06-13%202015-06-13%20001%20001_zpsq


 Forum | Modelers Social Club Forum (proboards.com) 

  • Member since
    March 2012
  • From: Corpus Christi, Tx
Posted by mustang1989 on Saturday, June 13, 2015 5:05 AM

There's Tim! And he's sportin' a cool lookin' motor now!! Glad to have you back Tim!


 Forum | Modelers Social Club Forum (proboards.com) 

  • Member since
    January 2015
Posted by taaron76 on Friday, June 12, 2015 11:48 PM

After two weeks of vacation and a busy week, I figured three weeks was long enough to stay away from the '65.  I got some more of the engine detailing done tonight, finally.  I still have to run the vacuum lines, water lines and throttle cables, but there is always tomorrow.  I had to make a bracket for the alternator since I used aftermarket pulleys, which was a little tricky.  The hardest part was running the fuel lines to the Holley 750.  I cut the fuel filter line a little short and had to do something a tad different, but I think it worked out ok.  Loads more to do still...

Tim

  • Member since
    April 2015
Posted by Scarecrow Joe on Friday, June 12, 2015 11:24 AM

Oh yeah! Sorry...didnt caught it the first time....Big Smile

  • Member since
    March 2012
  • From: Corpus Christi, Tx
Posted by mustang1989 on Friday, June 12, 2015 9:34 AM

That's the Microsol and it worked awesome. I still have some trimming to do and a little clean up here and there.


 Forum | Modelers Social Club Forum (proboards.com) 

  • Member since
    April 2015
Posted by Scarecrow Joe on Friday, June 12, 2015 9:30 AM

What about some decal softening solution? Could it helped some what?

  • Member since
    March 2012
  • From: Corpus Christi, Tx
Posted by mustang1989 on Friday, June 12, 2015 7:41 AM

Thanks Joe! I hear you guys on the life gets in the way stuff. Been there and done that. Glad you guys are back!!

Ok folks I've got an update...............FINALLY!!!! I took a break from the suspension/ brake system build up to concentrate all my efforts on what I dreaded the most....the flame decals. As I was applying the decals I suddenly remembered back 30+ years ago when I built this kit for the first time my experience with them. You see, there so much clear carrier film intermixed with the flames that they don't conform too well to all the contours of the hood...................AT ALL! Large bubbles and air pockets everywhere!!  My first thought was to do what I did 30 years ago and pull 'em off and say screw it! I bought myself a little time to think by removing the decal from the hood and leaving in a bowl of water overnight. Last night I laid the decal out on a paper towel to dry somewhat and began cutting out the clear carrier film from the flames (BTW these decals are as tough as a boot!! Especially for being 32 years old!!!!!) . This morning I re-applied the decal with ALOT of Microsol. It took me the better part of 3 hours of smoothing and cutting the clear carrier from the edges of the flames to get this result. I've got my procedure down now and the other side won't be half this much work. I've still got a little work to do on it in the way of tidying up and applying a small area of flames on this side but I had to take a dang break!! :mellow:


2015-06-12%202015-06-12%20002%20001_zps4


 Forum | Modelers Social Club Forum (proboards.com) 

  • Member since
    January 2014
Posted by Seabe on Wednesday, June 10, 2015 10:32 PM

Had a bit of "life gets in the way" this side as well, but at last the P34 is done. Not very happy, but will take some pics over the weekend. Winter here, so I hardly see sunlight at home, not good for photo's!

But anyways, some wheel issues, to be expected after the forced forceful dis-assembly of the entire engine/transmission area... which was what made me build a bit half-heartedly at this one from there on in anyways. No tyre logo decals included, so will have to order when next I order something from across the waters. And no, I've tried again and failed miserably at painting the tyre logos!

But this rather unique car is done and will go into the rack with the rest. Now to figure out what next! Have one or two options that are looking to be favourites at this stage.

Great work, everybody! Some seriously good efforts here. Mustang - that's the way to roll! Nice chillaxing...

  • Member since
    March 2011
Posted by ewheeler454 on Wednesday, June 10, 2015 9:15 PM

Hi all!

Sorry I haven't been posting lately but things have been hectic with the job change hehehehe. Things are slowing down so I hope to start building again. The 53 Ford is just sitting there calling my name hehehe. I have been keeping up with all the building and you guys are amazing at what your doing.

Mustang,

I built the orange 54 High boy many many many years ago lol.

L8TR

Eric

JOIN OUR COMMUNITY!

Our community is FREE to join. To participate you must either login or register for an account.

SEARCH FORUMS
FREE NEWSLETTER
By signing up you may also receive reader surveys and occasional special offers. We do not sell, rent or trade our email lists. View our Privacy Policy.