SEARCH FINESCALE.COM

Enter keywords or a search phrase below:

The 2015 /16 Red Hot and Rollin Automotive Group Build--Ended

121085 views
2225 replies
1 rating 2 rating 3 rating 4 rating 5 rating
  • Member since
    April 2015
Posted by Scarecrow Joe on Wednesday, June 10, 2015 10:06 AM

Lovely thing you got there, mustang!

  • Member since
    March 2012
  • From: Corpus Christi, Tx
Posted by mustang1989 on Tuesday, June 9, 2015 6:09 PM

I got this in the mail today. Only three more to get the whole bunch of 'em. (I built all of these as a kid so I'm anxious to get a second shot at them.)


2015-06-09%202015-06-09%20001%20001_zpsj


 Forum | Modelers Social Club Forum (proboards.com) 

  • Member since
    March 2012
  • From: Corpus Christi, Tx
Posted by mustang1989 on Sunday, June 7, 2015 5:06 PM

Dan: Man that thing is lookin' right on dude!!! Keep all the progress pics coming!!!

Joe: You get tha "wow" factor out of me every time I look at another one of your updates man!!!

 Sorry I haven't been around for a bit but I've been out of pocket for the last couple of days. Me and my family went to a lake cabin for the weekend and it was great !!! Spent the whole weekend not doing a damn thing except relaxing and it was long overdue. No demands on our time, no computer and nobody else nagging at us. Just straight up family time. Big Smile

The cabin:

The pier:( the view right outside of the cabin)

and the scene out on the pier at sundown:

I didn't catch a thing but I had a great time!! Cool 


 Forum | Modelers Social Club Forum (proboards.com) 

  • Member since
    January 2015
Posted by MOPAR - D on Sunday, June 7, 2015 2:22 PM

Joe nice detail on the van deffently 70's style. 

Added the upper supports for the sign boards and have received my new carbs and transfer case for the hydraulic pump. I'm thinking of going with a black bed chrome rails. And a black frame.

  • Member since
    April 2015
Posted by Scarecrow Joe on Saturday, June 6, 2015 8:42 PM

Appreciate it! Glad you like it.

  • Member since
    September 2013
Posted by Raven728 on Saturday, June 6, 2015 8:13 PM

Honestly? I think it's frickin' amazing! Your attention to detail is ...

Also --

- Steve

  • Member since
    April 2015
Posted by Scarecrow Joe on Saturday, June 6, 2015 7:46 PM

Inside wall are complete.

 20150606_203448 by nenekinkin, on Flickr

 20150606_203054 by nenekinkin, on Flickr

 20150606_203332 by nenekinkin, on Flickr

Maybe tomorrow I will mate the body and the interior.  Still needs the dash and firewall to be installed.

What you guys think?

  • Member since
    April 2015
Posted by Scarecrow Joe on Saturday, June 6, 2015 5:03 PM

Had some problems in the weekend and progress has been slo but the vintage rock posters and the rifle rack are finally in place.  Also see if you can find the crucifix.

 20150606_172420 by nenekinkin, on Flickr

 20150606_133927 by nenekinkin, on Flickr

  • Member since
    January 2015
Posted by MOPAR - D on Friday, June 5, 2015 8:34 AM

I've checking in lately but have been very busy with. A lot of other stuff going on. Everyone's been posting awesome progress on there builds. 

As I have not had much time to spend at the bench lately still working on some details with the hydraulic system. I have this very poor picture of how I built this rig back in the 70's as a kid. This is a picture of the only picture that I still have of it. The model is long gone now and back then between my older brother and I we were limited with what materials we had to use in customizing our builds. So this is what has inspired me into building my current version of it.

  • Member since
    March 2012
  • From: Corpus Christi, Tx
Posted by mustang1989 on Tuesday, June 2, 2015 6:10 PM

'Preciate it Joe!Wink


 Forum | Modelers Social Club Forum (proboards.com) 

  • Member since
    April 2015
Posted by Scarecrow Joe on Tuesday, June 2, 2015 2:36 PM

Damn nice work, mustang!

  • Member since
    March 2012
  • From: Corpus Christi, Tx
Posted by mustang1989 on Tuesday, June 2, 2015 5:12 AM

Well folks. Here's what the driveshaft looked like before all half hangin' out of the xmsn.


DSCN0252_zpsmoplsugj.jpg


I managed to cut a piece of brass rod just the right length and save the u-joints and yoke from the original driveshaft, pin 'em , position/ phase 'em and glue 'em into place.


DSCN0254_zpsv7d8dsfw.jpg.


and then a real light coat of flat black with a drop of gloss clear in it shot on at around 30 psi to give it a smooth and metallic look......and we're in business.


DSCN0256_zps5m35atrt.jpg


 Forum | Modelers Social Club Forum (proboards.com) 

  • Member since
    March 2012
  • From: Corpus Christi, Tx
Posted by mustang1989 on Monday, June 1, 2015 8:49 PM

modelcrazy

Thanks guy, you are really too kind. I mean REALLY too kind.

Naw I aint. I just know what it's like to put up with a crap kit and turn it into something half decent.


 Forum | Modelers Social Club Forum (proboards.com) 

  • Member since
    March 2012
  • From: Corpus Christi, Tx
Posted by mustang1989 on Monday, June 1, 2015 8:48 PM

Now that's just gonna look cool in there!!! Cool


 Forum | Modelers Social Club Forum (proboards.com) 

  • Member since
    April 2015
Posted by Scarecrow Joe on Sunday, May 31, 2015 12:30 PM

Thanks guys!

It seems I cant leave this thing alone...new ideas keep coming. Now what a 1970's cool van be without some interior decoration, music related of course...think it needs, posters!

 20150531_130550 by nenekinkin, on Flickr

Geeked

  • Member since
    July 2014
Posted by modelcrazy on Sunday, May 31, 2015 9:17 AM

Thanks guy, you are really too kind. I mean REALLY too kind.

Steve

Building a kit from your stash is like cutting a head off a Hydra, two more take it's place.


http://www.spamodeler.com/forum/

  • Member since
    March 2012
  • From: Corpus Christi, Tx
Posted by mustang1989 on Sunday, May 31, 2015 8:14 AM

Those rifles turned out great Joe !!!!


 Forum | Modelers Social Club Forum (proboards.com) 

  • Member since
    March 2012
  • From: Corpus Christi, Tx
Posted by mustang1989 on Sunday, May 31, 2015 5:12 AM

 We'll get this posted right up pretty quick pal! BTW.....It aint trash...no build is trash that you put time , effort and diligence into to get done despite the shortcomings of a kit. You did good Steve....you did good! Yes


 Forum | Modelers Social Club Forum (proboards.com) 

  • Member since
    January 2012
  • From: Hatfield
Posted by Misty on Sunday, May 31, 2015 3:28 AM

Steve I would never thought a fujimi i kit could be such bad quality. Well done for persevering and turning it into a great result.

  • Member since
    April 2015
Posted by Scarecrow Joe on Saturday, May 30, 2015 10:36 PM

Pretty cool BMW!

Built a rifle rack of real wood to be hanged somewhere on a wall inside,some gas cans and also a bit of detail of the roof items;  an old, well used tool box is seen.,

 20150530_221126 by nenekinkin, on Flickr

 20150530_221502 by nenekinkin, on Flickr

  • Member since
    July 2014
Posted by modelcrazy on Saturday, May 30, 2015 10:23 PM

Mustang,

(Rant warning) 

I'm finished with the Fujimi BMW M3 E30. I must say I did not like this kit at ALL. It was like they mixed up 2 or 3 kits together in one box. The interior did not fit the frame, the frame did not fit the body. There was a battery holder for what I assume would be for a motorized version. I was missing tree A, and the detail was non-existent. There were 0 panel lines and it came with 3 different steering wheels and 3 different types of rearview side mirrors, but the instructions just showed one type. The instructions and painting guide didn't address the forward turn signals.  This had to be the worst kit it has ever been my displeasure to assemble. It has really put me off Fujimi kits (their 1/700 waterline kits seem OK). If it wasn't meant for my son-in-law's birthday, I would have tossed it LONG ago. It took everything I had (including my wife nagging me to finish his present) to finish it. The only saving grace is my son-in-law really won't know the difference. What really puts me off is the cost of the kit. It is embarrassing to me to think how much I wasted on it. If I were to do it again, I wouldn't pay 10% of the cost.

Well enough of my rant. Sorry, bottom line, I wouldn't recommend this kit.

It's totally up to you if you want to put this trash on the wall.

I will be working on the AMT Shelby next, which is 5 times the kit and half the cost.

Steve

Steve

Building a kit from your stash is like cutting a head off a Hydra, two more take it's place.


http://www.spamodeler.com/forum/

  • Member since
    March 2012
  • From: Corpus Christi, Tx
Posted by mustang1989 on Saturday, May 30, 2015 10:12 PM

This is intense!! The level of detail here is just crazy. It inspires me to get ahold of a  1/25 Revell Chevrolet Van "Mean Mudder" kit from the 80's. Now if I can just find one for less than 175 bucks!! Indifferent


 Forum | Modelers Social Club Forum (proboards.com) 

  • Member since
    April 2015
Posted by Scarecrow Joe on Saturday, May 30, 2015 10:05 PM

Hey guys! Ive been browsing this thread for some time and I must tell you...these are some of the most detailed and realistic builds Ive seen.

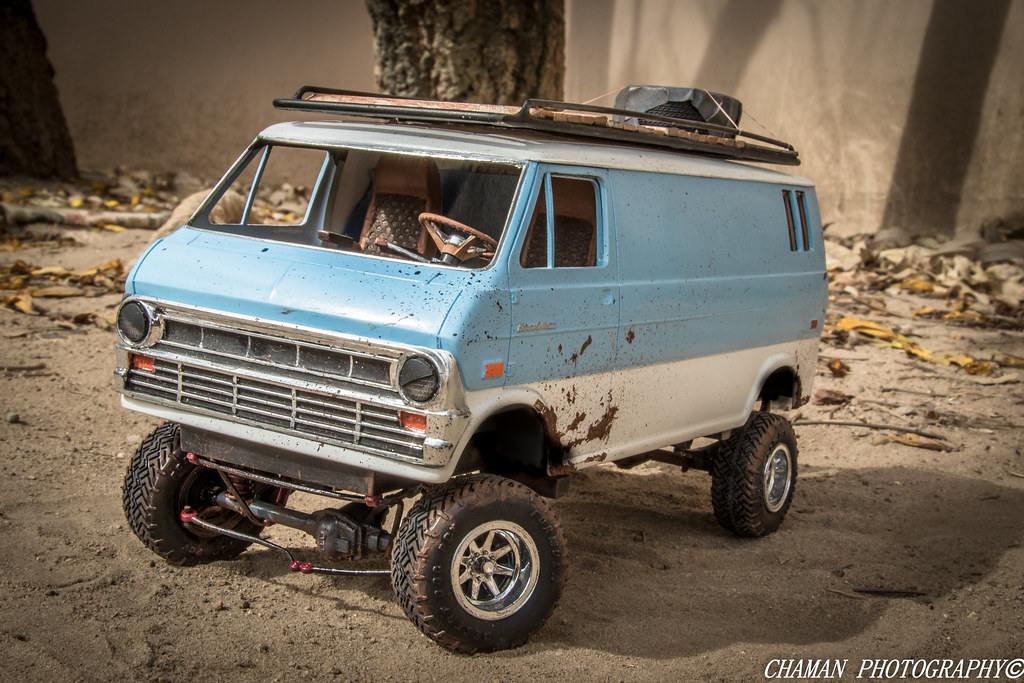
I have been building something automotive too, a blast from the past.  Its the Ford van, High Jacker, the one that had even a bed and a small kitchen! Somone invited me to join this thread, so I hope you guys like it and think is worth it to be shown here.

 20150327_145025 by nenekinkin, on Flickr

I decided not to go with the theme offered in the box and went with a more down to Earth approach.  I painted the body in a two tone scheme like the original van.

Original from a vintage advertisement:

 1974-ford-econoline by nenekinkin, on Flickr

Mine:

 20150419_190329 by nenekinkin, on Flickr

 IMG_5533 by nenekinkin, on Flickr

Chassis and engine:

 IMG_5522 by nenekinkin, on Flickr

 IMG_5526 by nenekinkin, on Flickr

I couldn't resist the temptation of detailing the engine even if it would not be visible...at least the photos tell the story!

I scratchbuilt the springs, shocks, the exhaust etc...

 20150410_142146 by nenekinkin, on Flickr

 20150404_180027 by nenekinkin, on Flickr

The seats were too plain so I added some detail that imitates what you would expect from a seat in those times...

 20150409_191159 by nenekinkin, on Flickr

Painted them in a two tone scheme also

 20150410_225149 by nenekinkin, on Flickr

Real cloth rug...an old t-shirt...LOL!

 20150411_131132 by nenekinkin, on Flickr

Angry Eyes....

 20150412_145451 by nenekinkin, on Flickr

Dash with CB radio...scratchbuilt the cable...

 20150417_165437 by nenekinkin, on Flickr

Went crazy and did a roof rack with brass and wood, my first time soldering brass tubing.

 20150426_144212 by nenekinkin, on Flickr

 20150426_174740 by nenekinkin, on Flickr

 20150502_190853 by nenekinkin, on Flickr

Thought it looked to innocent so I added mud and dirt!! Its baking soda, mixed with paint and a bit of white glue. The little splashes were made with an old toothbrush.
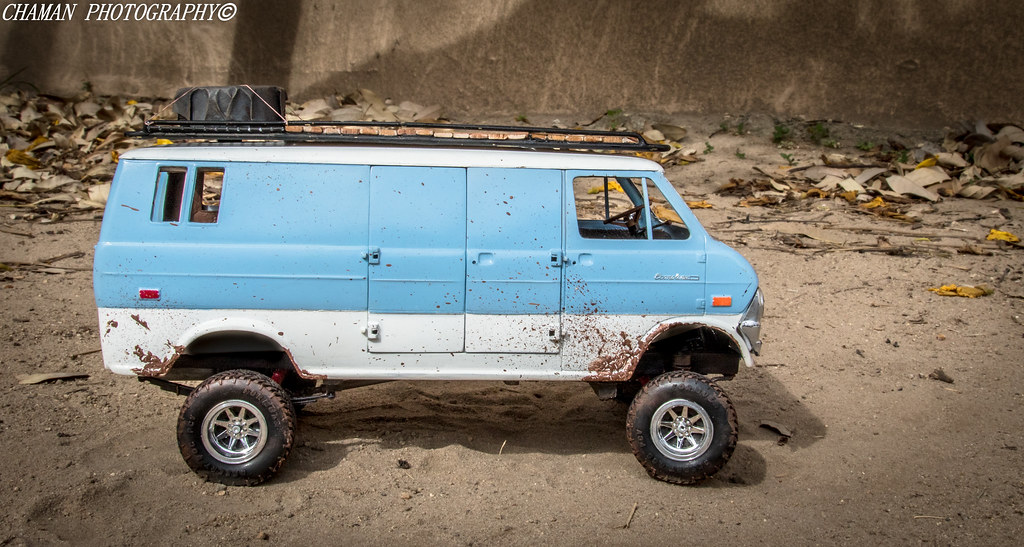
 LY2A6519 by nenekinkin, on Flickr

 LY2A6499 by nenekinkin, on Flickr

From here I added lots of accessories and details, even a canoe! Also I replace a lot of parts, specially  the furniture, with real wood. The whole roof inside is balsa, the walls also have real wood details.  At this point it looks nearly complete but there still is a lot of work to do since Im planning to show the model in a little diorama like a cool camping site! I dont want to bore you guys with details so here is the link to the complete WIP thread with much more pics:

http://cs.finescale.com/fsm/modeling_subjects/f/4/t/165037.aspx

Here is how she looks outside minus the off road lights, custom bumpers, etc
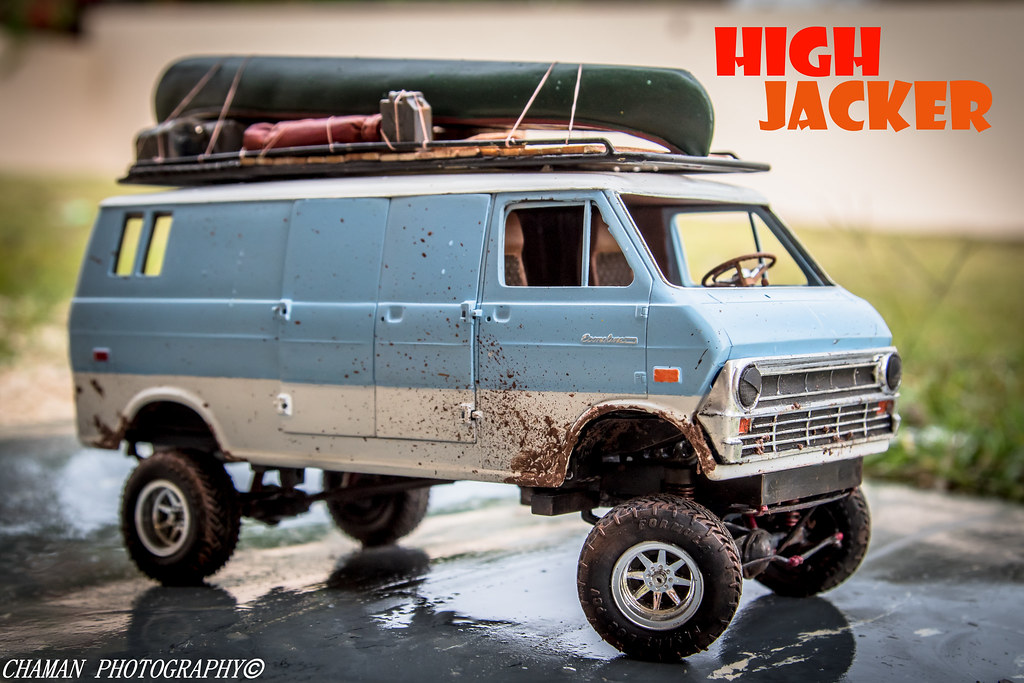
 LY2A7863titlte by nenekinkin, on Flickr
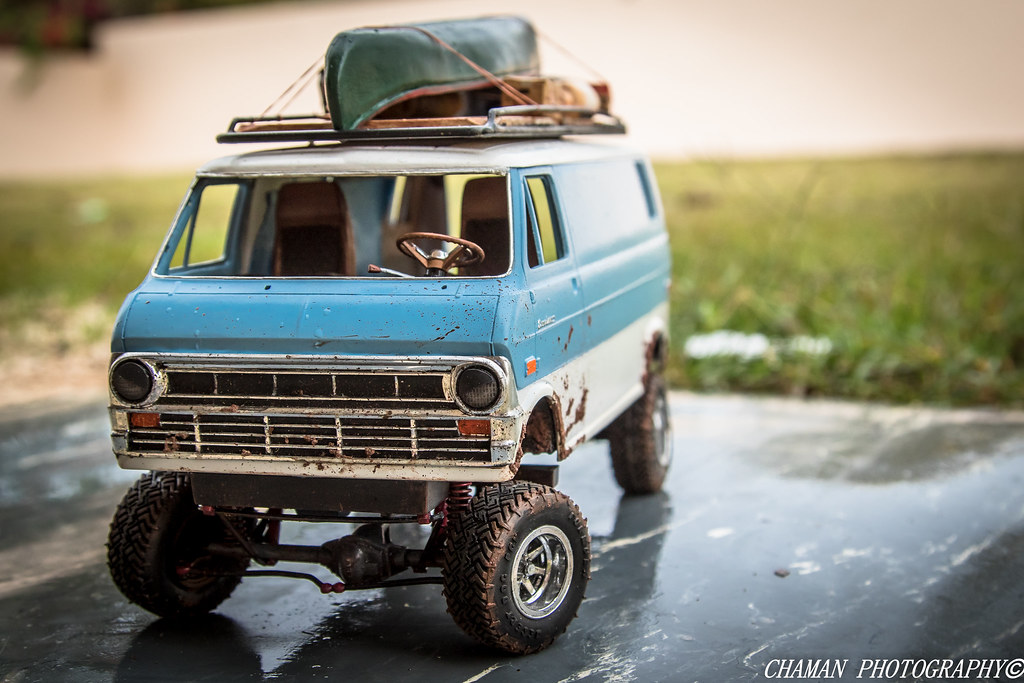
 LY2A7868 by nenekinkin, on Flickr
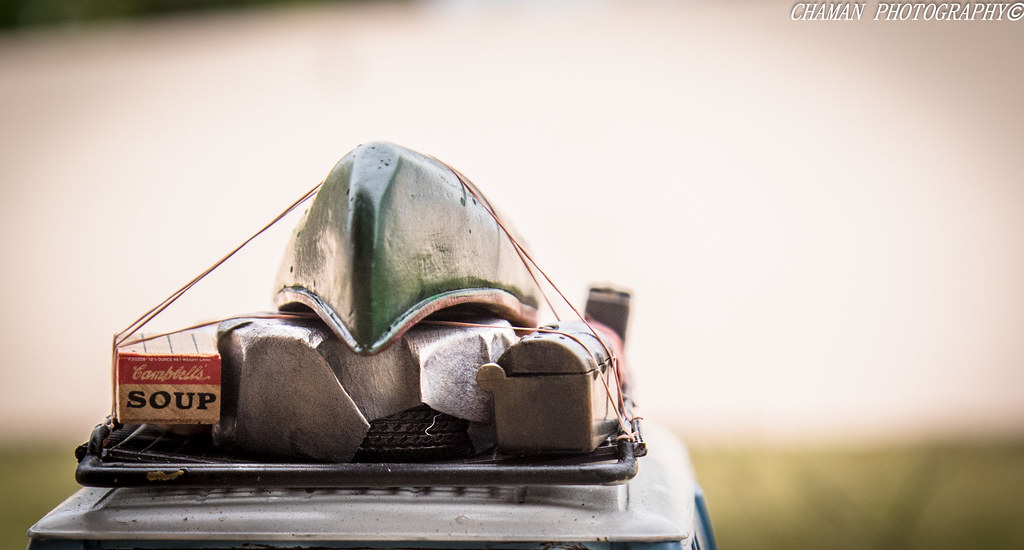
 LY2A7875 by nenekinkin, on Flickr

Thanks for looking!Big Smile

  • Member since
    April 2015
Posted by Scarecrow Joe on Saturday, May 30, 2015 12:08 PM

"The Force is strong in this thread...."

                                                        Darth Vader.

  • Member since
    March 2012
  • From: Corpus Christi, Tx
Posted by mustang1989 on Friday, May 29, 2015 6:41 PM

I stretched a filament out a little today to test the theory. It stretched and held up. I wouldn't go "Stretch Armstrong" on it but it'll take some.Big Smile


 Forum | Modelers Social Club Forum (proboards.com) 

  • Member since
    October 2008
  • From: Georgia
Posted by Rigidrider on Friday, May 29, 2015 6:39 PM

Cool! I see many a broken light bulb in my future! Lolol...

Doug

PS... I thought most filiment was a tungsten filiment and tungsten used for TIG welding is very hard yet is likely to break into pieces if dropped. Again, good thinking and great find!

When Life Hands You A Bucket Of Lemons...

Make Lemonade!

Then Sell It Back At $2 Bucks A Glass...

  • Member since
    March 2012
  • From: Corpus Christi, Tx
Posted by mustang1989 on Friday, May 29, 2015 5:40 PM

Doug: Thanks bud! The filament is just as strong as a regular spring. It's gotta hold up to the heat somehow!! lol


 Forum | Modelers Social Club Forum (proboards.com) 

  • Member since
    October 2008
  • From: Georgia
Posted by Rigidrider on Friday, May 29, 2015 5:20 PM

#1... The drawer you speak of is the MOST important drawer in the box...

#2 ... Great idea and good tip!

#3... isnt the filiment kinda brittle? Just curious. ?

Build is coming along great Joe.

Doug

When Life Hands You A Bucket Of Lemons...

Make Lemonade!

Then Sell It Back At $2 Bucks A Glass...

  • Member since
    March 2012
  • From: Corpus Christi, Tx
Posted by mustang1989 on Friday, May 29, 2015 2:28 PM

Thanks Seabe!!

I was working on the hood and firewall to stall myself long enough for a problem to resolve itself and I think it did. I was looking on my work bench at a broken 1/8" drill bit and was about to toss when I had another thought. I could use the smooth /arbor side of the drill bit for a master cylinder pivot point for the brake input linkage and rods. I cut the drill bit about 9/16" long, drilled a hole in the frame at just about the right point and pushed 'er through. It worked perfectly.....


DSCN0242_zpszlvfp7zd.jpg


DSCN0241_zpsn8i4hs2z.jpg


Something else also crossed my mind when I was doing some of the paint and body work pertaining to return springs. While I liked the idea of the wrist watch band retaining pin spring I was searching for a spring still yet smaller and more to scale. I do like a lot of the scratch work that goes on with home made wound springs but I just wanted something with a little more uniformity in the coils. I think I might have found what I'm looking for. My headlight burned out in my truck yesterday and wouldn't ya know there's a filament that looks like a spring in there? LOL. While a headlight bulb filament is NOT the right scale, a 3157 light bulb...................is! Today I broke a bulb on a spare bulb I had in my spare parts drawer of my box (all you automotive style mechanics out there know the drawer I'm talking about too--spare bolts, nuts , fuses, electrical stuff, and just about everything to put a car together and run with drawer) . Inside there were two filaments: One larger than the other and both more than perfect for what my use for them was.


RSCN0251_zpstuc0vwef.jpg


DSCN0248_zpsk6reczia.jpg


RSCN0249_zps12wxkekx.jpg

The next obstacle.............lengthening the driveshaft by about 1/4". :headslap:


 Forum | Modelers Social Club Forum (proboards.com) 

  • Member since
    January 2014
Posted by Seabe on Friday, May 29, 2015 10:56 AM

Well done Mustang - that is a brilliant save to get around the problem at hand!

JOIN OUR COMMUNITY!

Our community is FREE to join. To participate you must either login or register for an account.

SEARCH FORUMS
FREE NEWSLETTER
By signing up you may also receive reader surveys and occasional special offers. We do not sell, rent or trade our email lists. View our Privacy Policy.