SEARCH FINESCALE.COM

Enter keywords or a search phrase below:

Japanese Group Build VI

27447 views
536 replies
1 rating 2 rating 3 rating 4 rating 5 rating
  • Member since
    July 2014
Posted by modelcrazy on Thursday, May 18, 2017 10:42 AM

Lost, thanks,

I applied Tamiya acrylic for that one. I used high pressure because low pressure will make my AB spit. My thinning ratio was probably 60% lacquer thinner 40% paint. I got within around 1/2 inch and barley pulled the trigger for the paint supply.

Gam,

I understand, I'm just not as patient as you are.

Steve

Building a kit from your stash is like cutting a head off a Hydra, two more take it's place.


http://www.spamodeler.com/forum/

  • Member since
    November 2009
  • From: SW Virginia
Posted by Gamera on Thursday, May 18, 2017 7:36 AM

Thanks Steve, I've had others refer me to ImageShack too. I'm at the point of being in something like a bad relationship with PH right now. I keep swearing I'm going to leave but then keep coming back. Embarrassed

"I dream in fire but work in clay." -Arthur Machen


  • Member since
    April 2014
  • From: Australia
Posted by lostagain on Thursday, May 18, 2017 3:07 AM

Really good result with the Kate there Steve. that all happened in the twinkling of an eye  - in the same timeframe I have anaged to glue on one more piece of PE railing!

What's your method for the squiggles/blotches? i.e. paint type, thinning ratios, pressures? I have not tried anything that fine yet.

  • Member since
    July 2014
Posted by modelcrazy on Tuesday, May 16, 2017 11:29 PM

That one is just fine Gam, especially with all the trouble you have been having.

I switch from PB to imageshack around 2 years ago. I just let all the pictures stay on PB and just started loading new ones on IS. Occasionally, I go to PB to get a photo or maybe move a couple over and am so glad I changed. I really don't understand how they stay in business.

Steve

Building a kit from your stash is like cutting a head off a Hydra, two more take it's place.


http://www.spamodeler.com/forum/

  • Member since
    November 2009
  • From: SW Virginia
Posted by Gamera on Tuesday, May 16, 2017 9:12 PM

Hey Steve, not sure what was going on. My boss's computer was saving the photo in some weird format that wasn't a picture file. Very strange, I've never seen it do that before.

Well anyway I downloaded the photo on my laptop, uploaded it to PB, and posted it so you are golden. Of course if you'd prefer a different photo just let me know and I'll change it out.

"I dream in fire but work in clay." -Arthur Machen


  • Member since
    July 2014
Posted by modelcrazy on Tuesday, May 16, 2017 12:11 PM

PB??

You should be able to highlight then copy the photo and paste it where you want.

Steve

Building a kit from your stash is like cutting a head off a Hydra, two more take it's place.


http://www.spamodeler.com/forum/

  • Member since
    November 2009
  • From: SW Virginia
Posted by Gamera on Tuesday, May 16, 2017 11:56 AM

Steve: The Takao sounds awesome! Been trying to download and then upload your photo to post it and having some goofy issues here. Will get you posted to the front page before too much longer (hopefully!) 

"I dream in fire but work in clay." -Arthur Machen


  • Member since
    July 2014
Posted by modelcrazy on Tuesday, May 16, 2017 10:36 AM

Jack, thanks, that means a lot.

Gam, thanks pardner, I have started dabbling with the Takao again.

Steve

Steve

Building a kit from your stash is like cutting a head off a Hydra, two more take it's place.


http://www.spamodeler.com/forum/

  • Member since
    November 2009
  • From: SW Virginia
Posted by Gamera on Tuesday, May 16, 2017 7:19 AM

Wow Steve, she came out great!!! As I said, love the mottling. 

Will get you posted as soon as I get a chance! 


Mike: Hey thanks! I was trying to use the tapes own stickiness to attach it to the seats. So fold it over and use glue- thanks! 

"I dream in fire but work in clay." -Arthur Machen


  • Member since
    April 2006
  • From: ON, Canada
Posted by jgeratic on Tuesday, May 16, 2017 12:23 AM

Hi Steve, that is exemplar work on the Kate - a fine example of this workhorse of the IJN. Yes

regards,

Jack

  • Member since
    July 2014
Posted by modelcrazy on Monday, May 15, 2017 10:50 PM
Thanks Gam and Mike,
I completed the Kate. This was a very fun kit and I highly recommend it. The decals were a little thick. And I would have preferred to stack the canopy in whichever position I wished but the plastic is probably too thick to do that. The kit does provide for three different canopy options and the armament options are also outstanding. The detail is outstanding for a 1/72 although some belts would benefit the interior.
All in all, there were very few cons to this kit IMO.
Steve

Steve

Building a kit from your stash is like cutting a head off a Hydra, two more take it's place.


http://www.spamodeler.com/forum/

  • Member since
    November 2008
  • From: Far Northern CA
Posted by mrmike on Monday, May 15, 2017 2:38 PM

MC that Kate is lookin' real good - hard to believe its 1/72nd!

Cliff, the "secret" for the tape seatbelts is to fold over the tape on itself (learned that from a post here on the forum). Then cut to width and get the drape over the seat to suit, then attach with a dab of your favorite glue.

Miike

  • Member since
    November 2009
  • From: SW Virginia
Posted by Gamera on Monday, May 15, 2017 11:51 AM

She's lookin' good Steve. Some fine work there with the mottling. And the chipped, dinged-up paint looks great. 

"I dream in fire but work in clay." -Arthur Machen


  • Member since
    July 2014
Posted by modelcrazy on Sunday, May 14, 2017 11:27 AM

Now it's time for a wash then a dull coat. The open canopy is molded together so is somewhat interesting to paint. I'll install the wings after the canopy is attached.


Steve

Building a kit from your stash is like cutting a head off a Hydra, two more take it's place.


http://www.spamodeler.com/forum/

  • Member since
    November 2009
  • From: SW Virginia
Posted by Gamera on Friday, May 12, 2017 11:21 AM

Steve: Yes

"I dream in fire but work in clay." -Arthur Machen


  • Member since
    July 2014
Posted by modelcrazy on Friday, May 12, 2017 10:25 AM
I'm heading down the final stretch. I sprayed the black nose then the overall grey base coat. The upper surfaces have green squiggles and blotched which I hope to get to tonight.


Steve

Building a kit from your stash is like cutting a head off a Hydra, two more take it's place.


http://www.spamodeler.com/forum/

  • Member since
    November 2009
  • From: SW Virginia
Posted by Gamera on Thursday, May 11, 2017 8:55 AM

Mike: Hey thanks man! 

When I tried using tape I ended up with it sticking to itself, sticking to my fingers, sticking to the seat where I didn't want it... I've had somewhat better success with paper seatbelts but I ended up just buying some the Eduard PE ones that I use most of the time now. They're pretty cheap and pre-painted- and I'm lazy. Sleep

Steve: The NM looks good!  

"I dream in fire but work in clay." -Arthur Machen


  • Member since
    July 2014
Posted by modelcrazy on Wednesday, May 10, 2017 10:09 PM
I sprayed the silver on the kit and will start with the base coat tomorrow.

Steve

Building a kit from your stash is like cutting a head off a Hydra, two more take it's place.


http://www.spamodeler.com/forum/

  • Member since
    November 2008
  • From: Far Northern CA
Posted by mrmike on Wednesday, May 10, 2017 9:05 PM

I really appreciate the compliment, Gamera. This was (is) my first attempt at scratching seatbelts. I had a good reference from a detailed blog of the same kit, and it took several attempts. What I value most about the FSM forum is the knowledge and input I gain from other members; it encourages me to go ahead and push my skills forward.

BTW, really enjoyed seeing your work in the Favorite Builds thread!

Mike

  • Member since
    November 2009
  • From: SW Virginia
Posted by Gamera on Wednesday, May 10, 2017 7:48 PM

Mike I know what you mean, everytime I use PB anymore I feel like someone kicked me in the head but I've got so much stuff on there I hate to switch out for another service.

On a happier note really nice work there! I've tried making seat belts with tape but they never looked as good as yours.

"I dream in fire but work in clay." -Arthur Machen


  • Member since
    November 2008
  • From: Far Northern CA
Posted by mrmike on Wednesday, May 10, 2017 6:50 PM

After some frustration with PBucket, I'm back with a brief update on the Gekko. Made up some seatbelts with Tamiya tape and fine florist wire and got the seats installed. The photos were taken a couple months ago, but I couldn't get up the resolve to post them - I'm still reluctant to set up a Flickr account. Anyway, here's the pics:

  " />

Since then, I"ve been smoothing things in prep for paint and working on the detail parts so they'll be ready to install.

Great builds going on in here!

Mike

  • Member since
    November 2009
  • From: SW Virginia
Posted by Gamera on Wednesday, May 10, 2017 1:46 PM

Oh wow, now that's cool! Looking forward to seeing her come together. 

Sure I'll put you down right now. 

"I dream in fire but work in clay." -Arthur Machen


  • Member since
    December 2003
  • From: 37deg 40.13' N 95deg 29.10'W
Posted by scottrc on Wednesday, May 10, 2017 12:58 PM

Hi Gamera,

Looks like I get to join another of your Japanese GBs.  I got this for the Midway GB and this one and plan to start on it early next month.

The kit is bigger than I expected.  

  • Member since
    November 2009
  • From: SW Virginia
Posted by Gamera on Wednesday, May 10, 2017 8:12 AM

Everything looks nice and smooth. She's coming along fine. Yes

"I dream in fire but work in clay." -Arthur Machen


  • Member since
    July 2014
Posted by modelcrazy on Tuesday, May 9, 2017 10:58 PM

I worked on the seams tonight, painted some grey to check for smoothness and sanded a little more. I then went over the panel lines to remove the Mr Dissolved Putty and I think that should do it.
Tomorrow night I'm spraying silver for a base for some chipping. Japanese aircraft weren't as worn out and chipped as they were at the end of the war but there was some. I also sanded and smoothed the torpedo. I'm not going with the Type 91 modification 2 Torpedo which was used at Pearl (adding the wooden fins) because I'm building this as a May 1942 time frame. The kit is awesome enough to include the wood fins for the Mod 2 torp, but doesn't seem to include instructions to add the modification to the kits torpedo. 

Steve

Building a kit from your stash is like cutting a head off a Hydra, two more take it's place.


http://www.spamodeler.com/forum/

  • Member since
    November 2009
  • From: SW Virginia
Posted by Gamera on Monday, May 8, 2017 12:35 PM

Thanks for the heads up! 

It does look like a gem of a kit. Heart

"I dream in fire but work in clay." -Arthur Machen


  • Member since
    July 2014
Posted by modelcrazy on Monday, May 8, 2017 11:10 AM

Thanks Gam, yeah the new Airfix kits are a really good value.

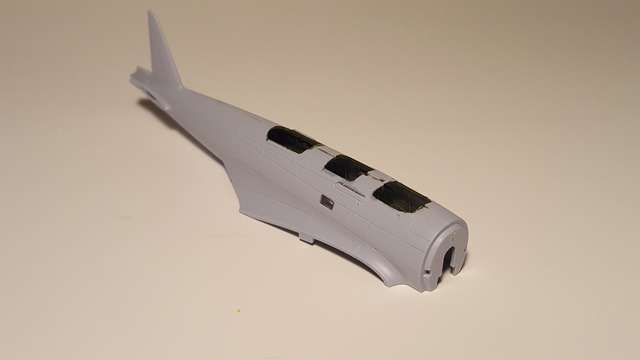
Continuing on with the Kate. I attached the fuselage to the wings and vert stabilizers to the fuse. The only complaint I have with the kit, which is easily remedied with a little trimming and sanding, is the attachment point of the wings and stabilizers to the parts tree. The attachment points are big and invade on the surfaces. But like I said these are easily remedied.

If you decide to build this kit, be aware of the gauge at the bombardier's position. The panel it is attached to came loose while installing the fuselage because the gauge slips into a slot on the fuse. This was easily fixed bit reinstalling the panel after the fuse was on.

The gaps at the wings and stabilizers are very small and the fit is tremendous IMO.

I really like this kit. Good on ya Airfix!

Steve

Building a kit from your stash is like cutting a head off a Hydra, two more take it's place.


http://www.spamodeler.com/forum/

  • Member since
    November 2009
  • From: SW Virginia
Posted by Gamera on Sunday, May 7, 2017 5:02 PM

Steve: Really nice work there. Love how detailed the cockpit is, I would have thought it a 1/48th kit if you hadn't said it were 1/72nd.

WrinkledM: Ohhhh, that's sharp! Love the NM finish! Unfortunatly I cannot get PhotoBucket to work tonight, I'll try to get you photo posted ASAP. That's assuming you want to use this one?


If I didn't already have so many photos on PH I'd drop it, I swear everytime I use it I feel like I've been kicked in the head....


Edit: Ok I got your photo posted, let me know if you want to change it.

"I dream in fire but work in clay." -Arthur Machen


  • Member since
    December 2007
  • From: Beavercreek, Ohio
Posted by Wrinkledm on Sunday, May 7, 2017 9:42 AM

Model three of three for the GB is complete...   I really enjoyed building this Tamiya 1/72 A6M5 kit, and in my humble opinion has to be one of the finest kits I've ever built. With one tiny exception, the fit and finish was simply outstanding. This Zero is modeled as it appeared at Wright Field in October 1945 having made the rounds as a test and evaluation aircraft. This A6M5 Zero currently resides at the Smithsonian, albeit in its original colors.  Enjoy and looking forward to next years GB!


Tamiya 1/72 A6M5

Oct 1945

Tags: 1/72 , Zeke , Tamiya , Zero , a6m5 , Wright Field

  • Member since
    July 2014
Posted by modelcrazy on Sunday, May 7, 2017 1:29 AM

Thanks Gam,

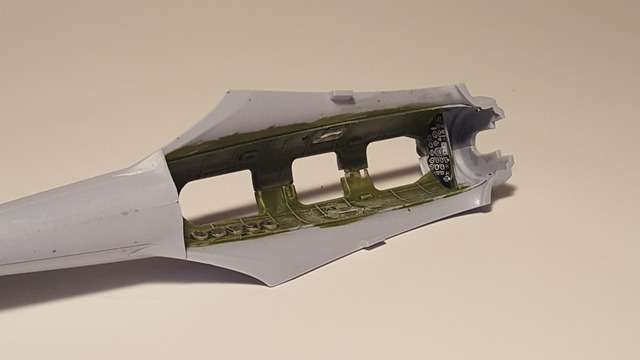
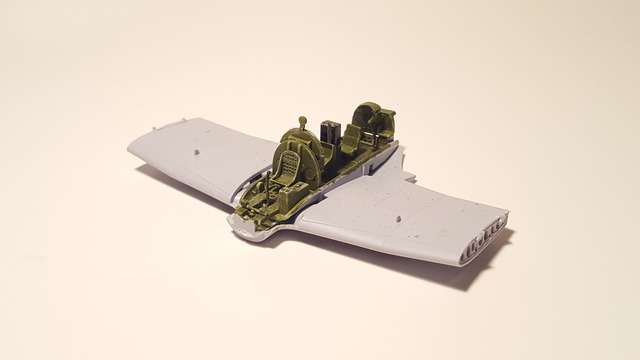
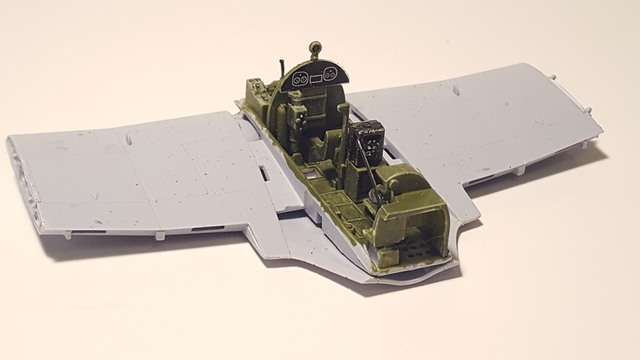
A little more on the Kate today. The pit is installed and painted as well as the interior fuse. Next will be mating the fuse and wings then adding the stabilizers and rudder. The kit is fitting very will and the interior detail is quite nice.
GOvhJd.jpg

eS53zN.jpg

IMlKza.jpg

E5TvnC.jpg

Steve

Building a kit from your stash is like cutting a head off a Hydra, two more take it's place.


http://www.spamodeler.com/forum/

JOIN OUR COMMUNITY!

Our community is FREE to join. To participate you must either login or register for an account.

SEARCH FORUMS
FREE NEWSLETTER
By signing up you may also receive reader surveys and occasional special offers. We do not sell, rent or trade our email lists. View our Privacy Policy.