SEARCH FINESCALE.COM

Enter keywords or a search phrase below:

OTS (1/72) GB 2017

12004 views
160 replies
1 rating 2 rating 3 rating 4 rating 5 rating
  • Member since
    February 2010
  • From: New Jersey
Posted by 68GT on Sunday, January 7, 2018 4:37 PM

Thanks Wayn and the Fujimi F-4N is done.

On Ed's bench, ???


  • Member since
    April 2006
  • From: Denver, Colorado
Posted by waynec on Saturday, January 6, 2018 5:09 PM

Thanks to everyone who contributed. 2016 was an odd year and i certainly dropped the ball on this GB as a builder and moderator. Anyone still working on something post it.

Никто не Забыт    (No one is Forgotten)
Ничто не Забыто  (Nothing is Forgotten)


  • Member since
    February 2010
  • From: New Jersey
Posted by 68GT on Thursday, January 4, 2018 3:08 PM

Thanks, thats Testors' Metalizer stuff.  Non-bufffing Steel and today I hit the lower suff with Burnt Metal.  I'm not sure when this is going to close but I want to get this done.

On Ed's bench, ???


  • Member since
    January 2015
Posted by TheMongoose on Wednesday, January 3, 2018 11:14 PM

68GT that came out really nice. The metal finish on the tail looks really sharp too.

In the pattern: Scale Shipyard's 1/48 Balao Class Sub! leaning out the list...NOT! Ha, added to it again - Viper MkVii, 1/32 THUD & F-15J plus a weekend madness build!

  • Member since
    February 2010
  • From: New Jersey
Posted by 68GT on Wednesday, January 3, 2018 8:57 PM

and some decals today.

On Ed's bench, ???


  • Member since
    February 2010
  • From: New Jersey
Posted by 68GT on Wednesday, December 27, 2017 12:04 PM

I procrastinated long enough on masking and painting the top side of th Phantom.  Time to get it done.

On Ed's bench, ???


  • Member since
    April 2005
  • From: Australia
Posted by taxtp on Thursday, December 14, 2017 6:57 PM

Hi Simpilot,

Sorry I missed your post. Yes they were, I fixed it after the photo was taken. The Academy kit has a pin that protrudes from the cowling, to hang the spinner and props on. The props are molden on a ring on a ring, that is closed on one side, so it only fits over the pin one way. If you do that, you end up with back to front propellors. Luckily it came apart fairly easily and I shaved off the pin and mounted it all with CA, this time the right way around.

Cheers

Tony

I'm just taking it one GB at a time.

  • Member since
    March 2017
  • From: Mid Michigan
Posted by shamoo on Thursday, December 14, 2017 4:53 PM

Some nice work going on in here!

Thought I had better stop in and show that I haven’t been completely idle. Got some paint on the Hurricane. Taking a bit of artistic license with the colors but wanted to use what I already had. Was initially going to do the tropical scheme but every example I saw online had the chin filter, which this lacks. Tried for more like the sea hurricane instead. Got a little touch up to do, then a gloss coat and decals. I’ll hit the nonexistent cockpit when I install the “pilot” figure. More soon!

  • Member since
    March 2006
Posted by simpilot34 on Saturday, December 9, 2017 3:39 AM

Veryyyy niiiice!!! Love your work Tony!Toast One question, too late now but, was the prop all one piece? The blades look like they are backwards as in the curved bit should be the trailing edge.

Cheers, Lt. Cmdr. Richie "To be prepared for war, is one of the most effectual means of preserving the peace."-George Washington
  • Member since
    April 2005
  • From: Australia
Posted by taxtp on Friday, December 8, 2017 9:50 PM

I got my French Bf 109E-3 done. It's the Academy kit with Berna decals, which are niiiice. I hope you like it. I've ordered some aftermarket wing cannons, but  Ithought I might as well post it now.

Cheers

Tony

I'm just taking it one GB at a time.

  • Member since
    March 2006
Posted by simpilot34 on Friday, December 8, 2017 8:14 PM

Looking goo guys!!!Toast

Cheers, Lt. Cmdr. Richie "To be prepared for war, is one of the most effectual means of preserving the peace."-George Washington
  • Member since
    April 2005
  • From: Australia
Posted by taxtp on Wednesday, November 29, 2017 5:48 PM
Thanks Mongoose. I'm happy to hear your health issues are resolved Wayne. Keep on keeping on ! Cheers Tony

I'm just taking it one GB at a time.

  • Member since
    April 2006
  • From: Denver, Colorado
Posted by waynec on Wednesday, November 29, 2017 3:22 PM

taxtp
Quick question, was there any discussion about a badge for this GB ? Cheers Tony
 

I need to knock one out this week. Between photobucket blowing up, some now resolved health issues and teaching and class prep, i have not kept this up as well as i have in the past. 

Никто не Забыт    (No one is Forgotten)
Ничто не Забыто  (Nothing is Forgotten)


  • Member since
    January 2015
Posted by TheMongoose on Wednesday, November 29, 2017 2:29 PM

Camo looks super!! A close up of the canopy looks like you got the lines nice and sharp.

In the pattern: Scale Shipyard's 1/48 Balao Class Sub! leaning out the list...NOT! Ha, added to it again - Viper MkVii, 1/32 THUD & F-15J plus a weekend madness build!

  • Member since
    April 2005
  • From: Australia
Posted by taxtp on Tuesday, November 28, 2017 11:43 PM

Nice start on the Hanomag, those are tempting little kits.

Here's where my 109 is at, I've forgotten to post some WIP photos here, although they are in the Pride of the Luftwaffe GB.

Cheers

Tony

I'm just taking it one GB at a time.

  • Member since
    April 2005
  • From: Australia
Posted by taxtp on Tuesday, November 28, 2017 11:24 PM
Quick question, was there any discussion about a badge for this GB ? Cheers Tony

I'm just taking it one GB at a time.

  • Member since
    May 2009
  • From: Poland
Posted by Pawel on Tuesday, November 28, 2017 3:39 PM

That Swedish Spitfire is definitely something else! Lookin' good!

I started building another Hanomag - this time the Ausf. D, from a Dragon kit. Started working on the interior:

1:72 Dragon Sd. Kfz. 251/1 Ausf. D by Pawel

1:72 Dragon Sd. Kfz. 251/1 Ausf. D by Pawel

Thanks for lookin' and have a nice day!

Paweł

All comments and critique welcomed. Thanks for your honest opinions!

www.vietnam.net.pl

  • Member since
    April 2005
  • From: Australia
Posted by taxtp on Monday, November 27, 2017 6:39 PM
Good contrast on those Spitfires Mongoose. I like building up collections like that. Cheers Tony

I'm just taking it one GB at a time.

  • Member since
    January 2015
Posted by TheMongoose on Sunday, November 26, 2017 9:31 PM

Here’s my 2nd build! For this Spitfire I tried post shading using Tamiya panel line accent over acrylic gloss varnish. I cleaned the residual off with a cuetip and turpenoid. That part worked really well. Some of the panel lines on the airfix kit are really too wide for this method. I had to paint the grooves in a few cases because it wouldn’t flow through them. I’ve included a side by side comparison of both Spits, one with pre and one with post shading on panel lines. I tried for some burnt metal on the exhaust. I also tried to show some exhaust down the side of the fuselage. Not sure it turned out well, let me know your thought? It’s matt varnish with graphite blown over it to try and simulate the air flow mixing with exhaust flow.

[url=https://themaddmongoose.smugmug.com/Model-Uloads/i-fGNxbfx/A] [/url


In the pattern: Scale Shipyard's 1/48 Balao Class Sub! leaning out the list...NOT! Ha, added to it again - Viper MkVii, 1/32 THUD & F-15J plus a weekend madness build!

  • Member since
    March 2006
Posted by simpilot34 on Thursday, November 23, 2017 1:16 AM

Shamoo the Hurri is looking good! Yes, pity bout the trailing edge ventilation.

Mon, very smooth paintwork!! Looks great!

Cheers, Lt. Cmdr. Richie "To be prepared for war, is one of the most effectual means of preserving the peace."-George Washington
  • Member since
    January 2015
Posted by TheMongoose on Monday, November 20, 2017 8:54 PM

Here she is with PRU Blue livery. I put the gloss varnish over the vallejo paint in prep for decals tomorrow. Once those are set I’ll try the tamiya panel line washes over the weekend. Traveling for a few days so it’ll be Saturday before i get back to her.

In the pattern: Scale Shipyard's 1/48 Balao Class Sub! leaning out the list...NOT! Ha, added to it again - Viper MkVii, 1/32 THUD & F-15J plus a weekend madness build!

  • Member since
    March 2017
  • From: Mid Michigan
Posted by shamoo on Sunday, November 19, 2017 4:36 PM

Thanks for the kind words, guys!

My canopy did come.  They even sent the full clear sprue.  Unfortunately they cut the sliding portion of the canopy off the sprue before they sent it.  So I'll have to order the sliding part now.

In the meantime got some work done on the Hurricane:

Fuselage wasn't too bad for gaps, but there is quite a bit of mismatch between the halves.  The tailwheel is probably 15-20 % smaller in diameter after sanding it even.


[CENTER]

Seperate ailerons and the first kit I can remember that left gaps in the trailing edges.

[CENTER]

Got putty drying now so hopefully ready for priming tomorrow.

And yes it will get the cannons added!

  • Member since
    March 2006
Posted by simpilot34 on Saturday, November 18, 2017 1:30 AM

Thanks Tony!! Toast

Dave I'm lovin that Corsair!! Pity bout the canopy but hopefully will arrive soon. Looking forward to seeing how the Hurri comes together as well!!

Mon thats a nice start on the SnoopSpit! I have that kit as well so looking forward to your build. On the Tamiya washes, they arent like other washes where you can just rub them off. I used some Zippo lighter fuel which is mainly Naptha and it doesn't hurt the Future coat at all.

Cheers, Lt. Cmdr. Richie "To be prepared for war, is one of the most effectual means of preserving the peace."-George Washington
  • Member since
    April 2005
  • From: Australia
Posted by taxtp on Friday, November 17, 2017 11:50 PM
Glad to see that Spitfire XIX, I've built that kit five times :) Cheers Tony

I'm just taking it one GB at a time.

  • Member since
    January 2015
Posted by TheMongoose on Friday, November 17, 2017 10:05 PM

Shamoo im looking forward to seeing that cannon mounted on that Hawker!


well in order to get a pilot for my earlier spitfire i ended up buying an Airfix Sptfire because it came with a seated British pilot A great excuse for another model...however I’m buildng it rather than putting it in the stash so here’s my latest addition to the group build! Doing this out of the box. Going to try the Tamiya panel line washes on it like simpilot34 did.


In the pattern: Scale Shipyard's 1/48 Balao Class Sub! leaning out the list...NOT! Ha, added to it again - Viper MkVii, 1/32 THUD & F-15J plus a weekend madness build!

  • Member since
    April 2005
  • From: Australia
Posted by taxtp on Tuesday, November 14, 2017 6:19 PM
Shamoo I do like the post war Corsairs, yours is interesting to me. I hope you get that canopy. Cheers Tony

I'm just taking it one GB at a time.

  • Member since
    March 2017
  • From: Mid Michigan
Posted by shamoo on Tuesday, November 14, 2017 2:04 PM

In the interest of completing the group build I'm adding a second kit, in case my canopy parts don't arrive in time.

Aoshima 1/72 Hawker Hurricane IID Series No. 9.  Picked this up at the LHS dirt cheap after they bought up somebody's stash.  It's a very basic kit, but test fitting looks like it should go togwether ok.  I don't have either the time or the talent yet to scratch any detail so it's just going to be out of the box.


  • Member since
    March 2017
  • From: Mid Michigan
Posted by shamoo on Tuesday, November 14, 2017 1:56 PM

I'm impressed!  Now I'm a bit reluctant to show my work.

I've taken the Corsair as far as I can go until the canopy shows up.  With any luck they will send the entire clear sprue as I managed to snap the slider in half now.  Not a bad kit.  A little finicky attaching the landing gear and doors.  I think if I were to build this kit again I'll find a pilot figure and build it gear up.  I also attached the wing gun pieces when the instructions called for it and of course mangled them.  Luckily there was another set on the sprue so I replaced them.  Different gun set but I'm not after any kind of accuracy on this build, just a clean result.  Once the glass is installed I'll add the radio wire.

  • Member since
    April 2005
  • From: Australia
Posted by taxtp on Monday, November 13, 2017 6:23 AM

That worked very well Simpilot. I was thinking about how to do this the other day. Nice 190 too.

Cheers

Tony

I'm just taking it one GB at a time.

  • Member since
    March 2006
Posted by simpilot34 on Friday, November 10, 2017 11:01 PM

Mon, didn't do pre or post shading. Just used Tamiya's panel line wash and left it streaky and just let it stay where the q tip couldn't get to it lol. Yes, the spiral wasn't a piece of cake but wasn't that bad either. First attempt with the kit supplied decal went pear shaped after ten minutes lol, as i knew it would. Then reprayed it white, cut a very very low angled piece of Tamiya tape and slowly worked it around and down. Sprayed the black, then dry brushed white at the tip.

Cheers, Lt. Cmdr. Richie "To be prepared for war, is one of the most effectual means of preserving the peace."-George Washington
  • Member since
    January 2015
Posted by TheMongoose on Friday, November 10, 2017 10:52 PM

Simpilot34 did you do preshading or postshading on the underside? 

On a related note i see your black and white twist on the prop came out great. Seems like those are really hard to do based on other posts I’ve read. 

In the pattern: Scale Shipyard's 1/48 Balao Class Sub! leaning out the list...NOT! Ha, added to it again - Viper MkVii, 1/32 THUD & F-15J plus a weekend madness build!

  • Member since
    March 2006
Posted by simpilot34 on Friday, November 10, 2017 10:21 PM

Nice finish Mon!!! Looks great!! Each one will get better as we go, and you are well on your way!!

Well I'm sticking a fork in my 190 and calling it done! Was a nice build, not too much fuss. Here's the final pics. Comments and critiques welcome Toast

Cheers, Lt. Cmdr. Richie "To be prepared for war, is one of the most effectual means of preserving the peace."-George Washington
  • Member since
    January 2015
Posted by TheMongoose on Friday, November 10, 2017 9:59 PM

Here she is in all her glory! 1/72 Spitfire Mk Vb by kovozavody (acquired it at the London IPMS show last December) The matt varnish really made it look nice. I’m no master builder yet (cue the lego song...) but I really think I’ve improved over the last 2 years this is my best one yet. Lots to improve like around the cockpit but that gives me something to work on for the next group build. For this one I focused on preshading panel lines and putting down some nice paint. At the end I took a shot at adding the aerial antenna wire For effect. Will have to buy some of that fine stuff for my next one as i think it helps finish off the model. Paints are all Vallejo. Complete out of the box build.

 I love these group builds because I can follow along with others as they build to learn new skills. Great work on here gang ‍ Thanks Wayne for being on top of this all year!

In the pattern: Scale Shipyard's 1/48 Balao Class Sub! leaning out the list...NOT! Ha, added to it again - Viper MkVii, 1/32 THUD & F-15J plus a weekend madness build!

  • Member since
    April 2006
  • From: Denver, Colorado
Posted by waynec on Sunday, November 5, 2017 8:06 PM

simpilot34

Looking good Mon!!!Toast


i agree. working on fiishing shelf queens for Rapid City contest on 11NOV. pulled out my Dragon Neubau Fahrzeug No. 2. the hand pinted camo (Vallejo) went quite well but the tracks snapped into multiple pieces. guess i should not have primed them. so it is somewhat on hold until i order replacement tracks or buy another kit. might as well finish it up, decals, weathering and, worse case, put it in my recovery vehilce tralier sans tracks.
anybody have contact info for dragon usa?


Никто не Забыт    (No one is Forgotten)
Ничто не Забыто  (Nothing is Forgotten)


  • Member since
    April 2005
  • From: Australia
Posted by taxtp on Sunday, November 5, 2017 6:45 PM

I've just read this GB thread from start to finish. There are some great completed models here, some really interesting in progress builds, and since 1/72 is my main scale, I can't resist joining up.

I'll start by crossing over with the 'Pride of the Luftwaffe GB' because my schedule is a little packed for the remainder of this year, hope you don't mind.

First up is an Academy Me 109E-3/E-4. I'll build it as an E-3, and also use some after market Berna decals to make a French one. It's the top aircraft on the illustration.

Cheers

Tony

I'm just taking it one GB at a time.

  • Member since
    March 2006
Posted by simpilot34 on Saturday, November 4, 2017 7:58 AM

Looking good Mon!!!Toast

Cheers, Lt. Cmdr. Richie "To be prepared for war, is one of the most effectual means of preserving the peace."-George Washington
  • Member since
    January 2015
Posted by TheMongoose on Thursday, November 2, 2017 9:20 PM

Looks like a rush by me lately heres my latest progress. All the decals are on. Tonight and tomorrow I’ll apply the solvaset and then i can put the last few parts on and finish it up with some flat varnish!

edit - i noticed it seems like i lost alot of the preshading when i applied the gloss varnish to prep for decals. Anyone else experience this?do i need to make the preshading darker to allow for this or will it show up better once i put the matt coat on it?

In the pattern: Scale Shipyard's 1/48 Balao Class Sub! leaning out the list...NOT! Ha, added to it again - Viper MkVii, 1/32 THUD & F-15J plus a weekend madness build!

  • Member since
    January 2015
Posted by TheMongoose on Sunday, October 29, 2017 8:16 PM

It’s been a busy day, gotta love cold rain in the midwest. I have all the main painting done now! Seems like I should be done but i still have the canopy to paint and the antenna, guns, sight, and tail wheel to put on, then paint them all before decals. Looks like next weekend will see this one finished. In the pics below i did everything without masking but the cockpit. Masking tape and vallejo haven’t been good to me. I went just a tad lighter with the middlestone than the azure to get a little more contrast. Once it dries I have to seal it before i mess something up. I’m really happy with this so far. Aarons airbrush videos and that 11hr drive to Omaha this year feel like they’re paying off.

In the pattern: Scale Shipyard's 1/48 Balao Class Sub! leaning out the list...NOT! Ha, added to it again - Viper MkVii, 1/32 THUD & F-15J plus a weekend madness build!

  • Member since
    May 2009
  • From: Poland
Posted by Pawel on Sunday, October 29, 2017 3:54 PM

Nice, that's what preshadding is about - a little shading, not necessarily an "in your face" caricature. Good luck with your build and have a nice day

Paweł

All comments and critique welcomed. Thanks for your honest opinions!

www.vietnam.net.pl

  • Member since
    January 2015
Posted by TheMongoose on Sunday, October 29, 2017 2:52 PM

Here’s my 1st shot at preshading. I’m really happy with how this model is turning out. I may have just overdone the azure blue but you can still see a little black behind it and in person it has a distinct shadow to the panel lines. I dont car for heavy preshading so it’s perfect for me. I also got to try out the air brush lesson I got at IPMS National this year. I did all this without using a whole cup of paint! 

The fit is pretty good overall. Typical wing root problem on one side only, front intake is a little tilted to one side but I’m probably the only one who will notice, and the wheels were not made to be in the retracted position but noting a scalpel couldn’t fix.

Before

Aftrer

In the pattern: Scale Shipyard's 1/48 Balao Class Sub! leaning out the list...NOT! Ha, added to it again - Viper MkVii, 1/32 THUD & F-15J plus a weekend madness build!

  • Member since
    May 2009
  • From: Poland
Posted by Pawel on Sunday, October 29, 2017 6:09 AM

TheMongoose
this one looks stupendous. Nice job on the camo!

Thanks a lot for your kind words - I'm glad you like it!

All comments and critique welcomed. Thanks for your honest opinions!

www.vietnam.net.pl

  • Member since
    July 2014
Posted by modelcrazy on Sunday, October 29, 2017 1:13 AM

TheMongoose
I finally sat down at the bench again and refocused on my Spitfire. This is my first time preshading. I’m using a Soto (By Badger) airbrush with the smallest tip. It’s a little tiny for Vallejo paints but I just clean off the tip more often and try to not stop sprayong to prevent clogging. Had a few splotches show up but with acrylic i just clean it right off. Here’s what it looks like.

I'm not any good at preshading, I'm better at black baseing. I usually over do the base coat and wipe out any evidence of my work. Good on ya if you can pull it off.

Steve

Steve

Building a kit from your stash is like cutting a head off a Hydra, two more take it's place.


http://www.spamodeler.com/forum/

  • Member since
    January 2015
Posted by TheMongoose on Saturday, October 28, 2017 11:25 PM

Pawel, Half tracks are my fav and this one looks stupendous. Nice job on the camo!

In the pattern: Scale Shipyard's 1/48 Balao Class Sub! leaning out the list...NOT! Ha, added to it again - Viper MkVii, 1/32 THUD & F-15J plus a weekend madness build!

  • Member since
    January 2015
Posted by TheMongoose on Saturday, October 28, 2017 11:23 PM

QUIZ question...now that I’ve looked at this in a new light, were you able to tell which side i did 1st? I looked at it and went...dang you can tell the left side (looking at top) was where i started and i got much better at thin lines by the time i got to the starboard wing. Didn’t feel that obvious in the moment.

In the pattern: Scale Shipyard's 1/48 Balao Class Sub! leaning out the list...NOT! Ha, added to it again - Viper MkVii, 1/32 THUD & F-15J plus a weekend madness build!

  • Member since
    January 2015
Posted by TheMongoose on Saturday, October 28, 2017 11:20 PM

I finally sat down at the bench again and refocused on my Spitfire. This is my first time preshading. I’m using a Soto (By Badger) airbrush with the smallest tip. It’s a little tiny for Vallejo paints but I just clean off the tip more often and try to not stop sprayong to prevent clogging. Had a few splotches show up but with acrylic i just clean it right off. Here’s what it looks like.

In the pattern: Scale Shipyard's 1/48 Balao Class Sub! leaning out the list...NOT! Ha, added to it again - Viper MkVii, 1/32 THUD & F-15J plus a weekend madness build!

  • Member since
    May 2009
  • From: Poland
Posted by Pawel on Thursday, October 26, 2017 6:40 AM

shamoo - thanks a lot for your kind words!

Paweł

All comments and critique welcomed. Thanks for your honest opinions!

www.vietnam.net.pl

  • Member since
    March 2017
  • From: Mid Michigan
Posted by shamoo on Wednesday, October 25, 2017 2:21 PM

Looking good all. Pawel, I continue to be impressed b your work. 

  • Member since
    May 2009
  • From: Poland
Posted by Pawel on Wednesday, October 25, 2017 9:29 AM

Hello everybody!

I got kinda stuck on my Half-track in july, but now got my dung together and finished it. My main problem was to get to "cluttering up" the interior a little. I have scratchbuilt some generic crates and some Tellerminen. Now the finished vehicle looks like that:

1:72 Revell Sd. Kfz. 251/7 Ausf. C by Pawel

1:72 Revell Sd. Kfz. 251/7 Ausf. C by Pawel

1:72 Revell Sd. Kfz. 251/7 Ausf. C by Pawel

1:72 Revell Sd. Kfz. 251/7 Ausf. C by Pawel

Thanks a lot for looking and have a nice day

Paweł

All comments and critique welcomed. Thanks for your honest opinions!

www.vietnam.net.pl

  • Member since
    March 2006
Posted by simpilot34 on Tuesday, October 24, 2017 4:00 AM

Love the T-Cat GT!!!Toast Rhino's looking good as well!!

Cheers, Lt. Cmdr. Richie "To be prepared for war, is one of the most effectual means of preserving the peace."-George Washington
  • Member since
    February 2010
  • From: New Jersey
Posted by 68GT on Sunday, October 22, 2017 7:27 PM

On Ed's bench, ???


  • Member since
    March 2006
Posted by simpilot34 on Thursday, October 19, 2017 5:27 AM

Looking great guys!! Love all your work!!

Cheers, Lt. Cmdr. Richie "To be prepared for war, is one of the most effectual means of preserving the peace."-George Washington
  • Member since
    April 2006
  • From: Denver, Colorado
Posted by waynec on Monday, October 16, 2017 8:41 PM

Ditto on the FW.

i did a Bell in 1/35.

Class prep has taken all my time but after this week i will be able to get back to the bench and posting here (once i decide on a posting site). i do have a Trumppter SA-6 and artillery tractor painted plus the PATRIOT and TYPE XVII to finish up. Model contest in Loveland CO this weekend and Rapid City SD on 11NOV.

Никто не Забыт    (No one is Forgotten)
Ничто не Забыто  (Nothing is Forgotten)


  • Member since
    June 2003
  • From: Rowland Heights, California
Posted by Duke Maddog on Sunday, October 15, 2017 11:44 PM

Wow, there's some fantastic work being done on here! Way to go guys! Theuns, I love that little helicopter; that brings back memories! Can't wait to see more done on that.


I haven't gotten much done, but here's what little I did complete.

I assembled the pilot deck for the 'phib, starting with the pilot house controls and then adding the hatch and other bits and bobs:


Later I cemented the interior and the pilot house deck in place:


Thanks for looking in, comments are welcome.


  • Member since
    March 2017
  • From: Mid Michigan
Posted by shamoo on Sunday, October 15, 2017 11:17 AM

Nice work all!  I've got some progress to share as well.

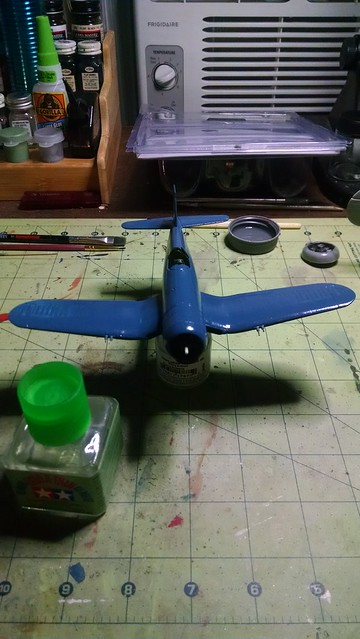
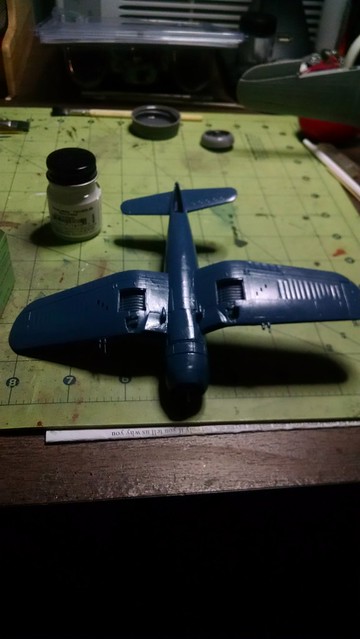
Got the airframe painted up and applied Future in preparation for the decals.

 IMG_20171007_211600773 by David Brownlee, on Flickr

 2017-10-07_09-20-33 by David Brownlee, on Flickr

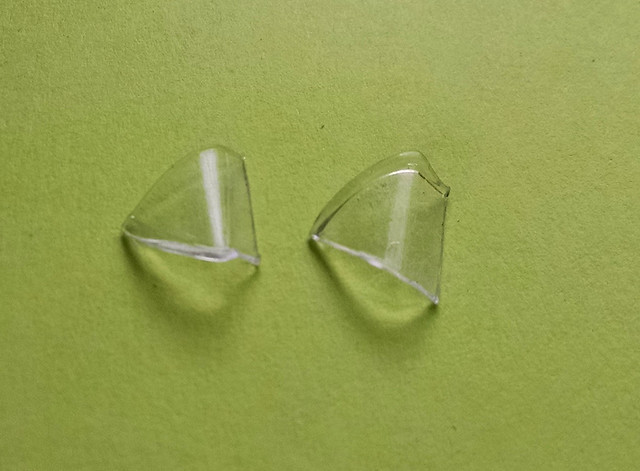
Unfortunately as I started playing with masking the canopy I snapped the front windscreen in two. Crying  Worst part is I had just finished reading an article of hints that talked about how brittle clear plastic can be so it is wise to support canopies with silly putty when working with them.  The d**n silly putty was literally inches away on the bench.  Oops

 2017-10-06_11-48-33 by David Brownlee, on Flickr

I have contacted Revell and ordered a new canopy but it does have to ship from Germany, so it could be eight weeks before it arrives.  If it doesn't get here in time I've got a Hurricane that's a fairly simple build to finish the group build, anyway.
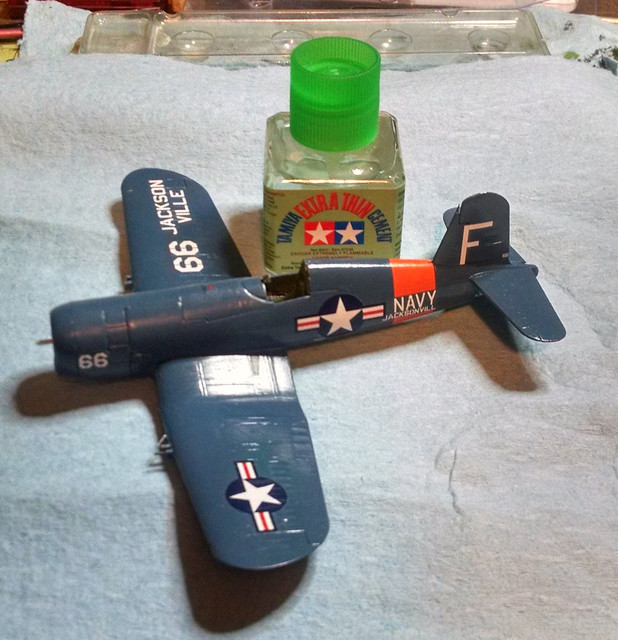
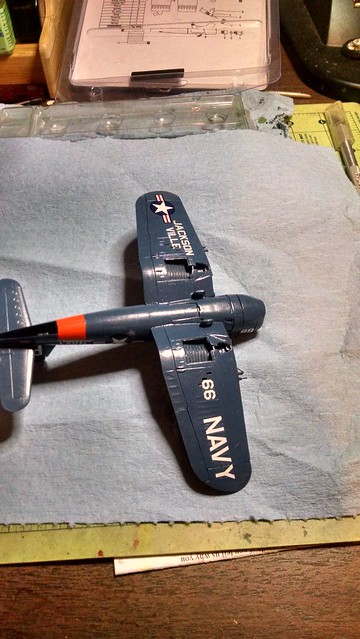
Decals applied:

 2017-10-13_08-23-28 by David Brownlee, on Flickr

 2017-10-13_08-23-15 by David Brownlee, on Flickr

I've got to find a little orange paint to fill in the gap on the bottom of the fuselage stripe.

The landing gear is installed and being painted, then I'll attach the gear doors.  There is the option of attaching either two drop tanks or two small bombs.  I'm not sure yet which I will use, if I use them at all.  My late father was a USAF pilot (F-105 Weasel and F-4E) and he always told me when I was building aircraft as a kid the the planes wert a lot more fun to fly clean so...  It is marked for a stateside training bird, so I imagine the tanks would likely not be used very often.  I also would need to find out if Navy practice bombs were painted a different color than live ones.  If anyone knows I would appreciate the information.  I could always display them alongside the plane in a runway diorama.   

Dave

  • Member since
    May 2009
  • From: Poland
Posted by Pawel on Saturday, October 14, 2017 5:06 AM

Hello!

modelcrazy - that colourful finish sure does look good!

Good luck with your modelling projects and have a nice day

Paweł

All comments and critique welcomed. Thanks for your honest opinions!

www.vietnam.net.pl

  • Member since
    July 2014
Posted by modelcrazy on Saturday, October 14, 2017 12:55 AM

I did that kit a few years ago and it turned out well if I may say so myself. I'm very proud of it, especially since it was my first build after returning to the hobby.

Nice kit.

Steve

Building a kit from your stash is like cutting a head off a Hydra, two more take it's place.


http://www.spamodeler.com/forum/

  • Member since
    March 2006
Posted by simpilot34 on Friday, October 13, 2017 7:09 PM

Ooooo I'll be watching this one Aaron!! My brother done this kit years ago and it went together very well with not much fuss. I have it in my stash too for later dates.

Cheers, Lt. Cmdr. Richie "To be prepared for war, is one of the most effectual means of preserving the peace."-George Washington
  • Member since
    September 2015
  • From: The Redwood Empire
Posted by Aaronw on Friday, October 13, 2017 4:58 PM

I'll be doing a Curtiss Hawk, the export version of the U.S. Navy F11C2 Goshawk.

This is the Monogram kit from the late 1960s.


  • Member since
    September 2015
  • From: The Redwood Empire
Posted by Aaronw on Thursday, October 12, 2017 10:02 PM

I'd like to get in on this one. I've probably had less than 10 hours at the bench since last October and am really wanting to get back at it.

I'll go with something nice and simple, a Monogram F11C2 Goshawk, but I'll be doing it as as an export Hawk rather than as a US Navy Goshawk. I haven't decided on nationality yet, these did well on the export market for Curtiss so I have many options open.

  • Member since
    April 2010
Posted by Theuns on Sunday, October 8, 2017 6:21 AM

That sounds cool, I am also busy on the heli section with the MRC 1/32 H-13 , interesting to compare the two.


Theuns

  • Member since
    March 2006
Posted by simpilot34 on Sunday, October 8, 2017 1:59 AM

Theuns Im liking it already!! I have that same kit as well and have the Eduard PE set for it. Lol let's just say that after you're finished with the PE set the only plastic left is the fishbowl, engine and rotors basically.Toast

Cheers, Lt. Cmdr. Richie "To be prepared for war, is one of the most effectual means of preserving the peace."-George Washington
  • Member since
    April 2010
Posted by Theuns on Saturday, October 7, 2017 3:10 AM

Here it is in basic "civi" scheme of silver and my fav metalic blue ;-)

 . by Theunis van Vuuren, on Flickr


Theuns

  • Member since
    February 2010
  • From: New Jersey
Posted by 68GT on Friday, October 6, 2017 6:40 AM

I havn't touched the Phantom since my last post on here and should get back to it.  I have scouts this weekend so I'll be tied up untill Sunday afternoon.

On Ed's bench, ???


  • Member since
    April 2010
Posted by Theuns on Friday, October 6, 2017 4:57 AM

Very nice work on that FW 190 :-)

Here is my 1/72 Italeri Bell 47, Waybe please add it to the list.

 . by Theunis van Vuuren, on Flickr

 . by Theunis van Vuuren, on Flickr


Thanx


Theuns

  • Member since
    March 2006
Posted by simpilot34 on Wednesday, September 27, 2017 12:52 AM

Thanks Pawel!

Shamoo- lovin the work on the Corsair! Can't wait to see her finished!

Well I've gotten the exhaust stains on and dull coated. Quite happy how the stains came out, first time doing exhaust stains that heavy. Think I was on the borderline of overdoing it actually lol.

Cheers, Lt. Cmdr. Richie "To be prepared for war, is one of the most effectual means of preserving the peace."-George Washington
  • Member since
    March 2017
  • From: Mid Michigan
Posted by shamoo on Sunday, September 24, 2017 5:42 PM

I like all the work going on here.  I've got the new Airfix FW-190 on the shelf here.  It might be the next one I pull out.  Been itching to see what all the fuss about these is.

Did get the final bits of the fuselage buttoned up on the Corsair.  Seams look good, so next up is paint.

 2017-09-24_06-09-19 by David Brownlee, on Flickr

 2017-09-24_06-10-28 by David Brownlee, on Flickr

Did have a bit of a fit issue with the top fuselage cover, just aft of the cowl flaps.  Filled it in with styrene, but lost a bit of the surface detail.  Not really too noticeeable so I'm going to live and learn.

Dave

  • Member since
    May 2009
  • From: Poland
Posted by Pawel on Sunday, September 24, 2017 5:39 AM

simpilot34 - that Fw190 is lookin' really good! Even that shiny paint is lookin' better in the last photos! Good luck and have a nice day

Paweł

All comments and critique welcomed. Thanks for your honest opinions!

www.vietnam.net.pl

  • Member since
    March 2006
Posted by simpilot34 on Saturday, September 23, 2017 11:04 PM

Great progress 68!! Love it when they go together that quick eh?

Theuns she's looking good so far mate!!

Ok here goes again. I'm on the puter this time so here's the pics I tried to load via my phone. Got her legs on and on her feet. Tank on. Had to get a shot with the prop assembly to see how she'll look later Whistling, and a lil bit of oil stains.

Toast

Cheers, Lt. Cmdr. Richie "To be prepared for war, is one of the most effectual means of preserving the peace."-George Washington
  • Member since
    April 2010
Posted by Theuns on Sunday, September 17, 2017 11:31 PM

I have managed , after allot of curcing and filing to join the fuselage halves on my P-35. There are no alignment pins and the moldings are noe the same on the left and right hand side.

This little model is one step away from being reboxed and replaced with another ;-)


Theuns

  • Member since
    February 2010
  • From: New Jersey
Posted by 68GT on Sunday, September 17, 2017 7:11 PM

Thing really got moving on this F-4N this weekend.

On Ed's bench, ???


  • Member since
    March 2006
Posted by simpilot34 on Saturday, September 16, 2017 1:54 AM

I see your pic Shampoo! Yes, definitely different kit altogether.

Great work guys!!

A lil update, got her legs on. A few shots on her feet too.

Tried to do it from my phone, didn't work will get them posted soon 


Cheers, Lt. Cmdr. Richie "To be prepared for war, is one of the most effectual means of preserving the peace."-George Washington
  • Member since
    March 2017
  • From: Mid Michigan
Posted by shamoo on Friday, September 15, 2017 8:14 PM

simpilot34
Shamoo a note on their kit is they got the rocket rail numbers and locations wrong. they only had 8 rails and the two inboards are staggered wierdly. Started this kit years ago and sidelined it due to life getting in the way. Don't know who had it first but have  both the Italeri and Revell kits and they are EXACTLLY the same. Wish I would have known that because I got an Eduard Zoom PE set for the Italeri kit and a full PE set for the Revell one Put a fully wired Engines N Things R-2800 on the Italeri one that I started and it looks great compared to the relief molded piece in the kit. Forgot to mention I bought the Revell kit as a -5 lol but you could build it as a -4B if you wanted too by changing the cowl ring, HOWEVER, the exhaust ports on a -5 are higher than those on a -4/-4B so that part is ok for the boxing you have.

Simpilot, thanks for the thought but I believe we are talking about two different kits.  I see the one you are talking about on scalemates, but mine is the newer tool.  It doesn't have the rockets, just a choice of two bombs or two drop tanks.  Thanks for the heads  up though.

I did get a bit done.  Got it ready for some primer.

 2017-09-15_03-56-02 by David Brownlee, on Flickr

I see that I have tweaked one of the wing guns.  Should have left them off for painting.  Thinking of replacing them with some hypodermic needles anyway.  Also got the engine assembled and painted.  Was going to attempt some detailing but after reading about the contest judging standards in another thread, I think for the time being I'll concetrate on getting a satisfactory finish out of the box.

 2017-09-15_08-15-57 by David Brownlee, on Flickr

Dave

  • Member since
    February 2010
  • From: New Jersey
Posted by 68GT on Monday, September 11, 2017 7:49 PM

I got started on that Fujimi F-4N this saterday.

On Ed's bench, ???


  • Member since
    April 2010
Posted by Theuns on Sunday, September 10, 2017 9:33 AM

It has been slow building on my side but the engine paints up nicely.

 . by Theunis van Vuuren, on Flickr

The cockpit is very busy with loads of resin and extremely small PE bits, I left some of them off that are so small I can hardly grip them with tweezers and inside the fuse they will not be visable anyway.

Fitting the tub insde the fuse is actually quite difficult, the instructions are vague, there are no locator tabs or indication where it is suppose to fit.

I also had to use a lighter RAF green as the USAAF interior green was way to dark.

 . by Theunis van Vuuren, on Flickr

 . by Theunis van Vuuren, on Flickr

Looking at the pic I see I need to toutch up the buckles on the shoulder straps.


Theuns

  • Member since
    February 2010
  • From: New Jersey
Posted by 68GT on Sunday, September 10, 2017 7:25 AM

Very nice!

On Ed's bench, ???


  • Member since
    March 2006
Posted by simpilot34 on Sunday, September 10, 2017 4:25 AM

68 the tiggercat be looking good man!!

Got a lil more done on my FW, wheels and struts painted. used some AK true metal paste on the oleos and quite like how they turned out. Picked out the nuts on the rims with a toothpick. Here'sa few progress pics.Toast

Cheers, Lt. Cmdr. Richie "To be prepared for war, is one of the most effectual means of preserving the peace."-George Washington
  • Member since
    February 2010
  • From: New Jersey
Posted by 68GT on Saturday, September 9, 2017 8:09 AM

Thanks, I wanted to try something new so this is the perfect candidate.  I would say it was a white box or earlyer judging from the instructions.

On Ed's bench, ???


  • Member since
    June 2008
Posted by lewbud on Friday, September 8, 2017 7:20 PM

Looking good 68GT!  I love the Tigercat, wish someone would make a modern kit of it.  I know Pavla did one about fifteen years ago, but it never made it to this side of the pond, and is now rarer than hen's teeth it seems.

Pawel, sometimes you have to forego accuracy for what looks right.  I think the last time this kit was popped was for the Heritage Edition back in the early eighties.  Outside of Starfighter Decals sheet, your only other option is the kit decals which are 35+ years old (and they weren't that great back then).

Buddy- Those who say there are no stupid questions have never worked in customer service.

  • Member since
    February 2010
  • From: New Jersey
Posted by 68GT on Friday, September 8, 2017 6:23 PM

Not really the look I was going for on the Tigercat but its not bad.

On Ed's bench, ???


  • Member since
    February 2010
  • From: New Jersey
Posted by 68GT on Thursday, September 7, 2017 1:18 PM

I was thinking that I might start up a Fujimi F-4N this weekend.

On Ed's bench, ???


  • Member since
    March 2006
Posted by simpilot34 on Sunday, September 3, 2017 1:10 AM

Thanks GT!! getting closer to the end, and thats where you start trying to rush it along lol. Needed to pull the reigns back a few times, she'll be on her feet soon.

Cheers, Lt. Cmdr. Richie "To be prepared for war, is one of the most effectual means of preserving the peace."-George Washington
  • Member since
    February 2010
  • From: New Jersey
Posted by 68GT on Saturday, September 2, 2017 10:40 AM

That 190 looks awsome!


Pawel

68GT - How come you're using Skyraider decals here? Did you think about tweaking them a little?


The kit decals were junk and I wasnt using these so thats why I used the Skyraider decals.  What kind of tweaking are you talking about?

On Ed's bench, ???


  • Member since
    March 2006
Posted by simpilot34 on Saturday, September 2, 2017 6:58 AM

Heyyyy guys!!! hope all is well with everyone!! glad to see this GB is still going too!! I'm working on an Academy FW-190A-8 at the moment, hope it's not too far along to join in. Getting the m-o-j-o back and know that te greatest inspiration is a GB. Wayne if I may finish this one here and start/continue another i would be greatful. here's a few pics of where it sits now.

Have a thread posted in Aircraft put up today too, miss the good times on here and I'm ready to keep building!!

Shamoo a note on their kit is they got the rocket rail numbers and locations wrong. they only had 8 rails and the two inboards are staggered wierdly. Started this kit years ago and sidelined it due to life getting in the way. Don't know who had it first but have  both the Italeri and Revell kits and they are EXACTLLY the same. Wish I would have known that because I got an Eduard Zoom PE set for the Italeri kit and a full PE set for the Revell one Sad Put a fully wired Engines N Things R-2800 on the Italeri one that I started and it looks great compared to the relief molded piece in the kit. Forgot to mention I bought the Revell kit as a -5 lol but you could build it as a -4B if you wanted too by changing the cowl ring, HOWEVER, the exhaust ports on a -5 are higher than those on a -4/-4B so that part is ok for the boxing you have.

Cheers, Lt. Cmdr. Richie "To be prepared for war, is one of the most effectual means of preserving the peace."-George Washington
  • Member since
    March 2017
  • From: Mid Michigan
Posted by shamoo on Monday, August 28, 2017 8:26 PM

Pawel

68GT - How come you're using Skyraider decals here? Did you think about tweaking them a little?

Dave - It can only be a Corsair, right? What make is that kit?

Good luck with your OTS builds and have a nice day

Paweł


pawel, it is indeed a Corsair, Revell of Germany's F4U-4.  Seems to go together fairly well.

 Untitled by David Brownlee, on Flickr

  • Member since
    May 2009
  • From: Poland
Posted by Pawel on Monday, August 28, 2017 3:59 PM

68GT - How come you're using Skyraider decals here? Did you think about tweaking them a little?

Dave - It can only be a Corsair, right? What make is that kit?

Good luck with your OTS builds and have a nice day

Paweł

All comments and critique welcomed. Thanks for your honest opinions!

www.vietnam.net.pl

  • Member since
    March 2017
  • From: Mid Michigan
Posted by shamoo on Monday, August 28, 2017 3:16 PM

Wow, great work here!  

Finally got a little time myself:

 2017-08-28_03-24-12 by David Brownlee, on Flickr

I'm going to attempt detailing the engine next, as well as fixing up a coiple seams to get ready for primer.

Dave

  • Member since
    June 2008
Posted by lewbud on Sunday, August 27, 2017 5:38 PM

Wayne,

Put me down for one of Dragon's 1/72 Humvee's.  I've done two in NATO green, maybe it's time for a desert tan one.


Buddy- Those who say there are no stupid questions have never worked in customer service.

  • Member since
    February 2010
  • From: New Jersey
Posted by 68GT on Sunday, August 27, 2017 3:54 PM

Today I sat down and applied some leftover skyraider decals I had.

On Ed's bench, ???


  • Member since
    April 2006
  • From: Denver, Colorado
Posted by waynec on Monday, August 21, 2017 9:02 AM

Shamoo and Theunis  thanks. now to spend some time learning the program.


Никто не Забыт    (No one is Forgotten)
Ничто не Забыто  (Nothing is Forgotten)


  • Member since
    April 2006
  • From: Denver, Colorado
Posted by waynec on Monday, August 21, 2017 8:55 AM

OOPS. shouldn't do this sans coffee


Никто не Забыт    (No one is Forgotten)
Ничто не Забыто  (Nothing is Forgotten)


  • Member since
    July 2005
  • From: Texas
Posted by painklr on Monday, August 21, 2017 8:26 AM

Hi Waynec,

You have me down for the wrong plane.  I just picked mine out yesterday morning.  Please pencil me in for Academy's SB2C-4 Helldiver.

Progress pics up soon.

  • Member since
    April 2010
Posted by Theuns on Sunday, August 20, 2017 11:34 PM

here is how I do it.

I click on the pic, it then gives the little "arrow" share icon on the R/H bottom of the pic.

Click on this and it then gives me the IMG code highlited in a blue bar, I right click on this , copy and then go paste.

Sofar it works well for me.....took a while to figure it out though LOL


Theuns

  • Member since
    March 2017
  • From: Mid Michigan
Posted by shamoo on Sunday, August 20, 2017 8:33 PM

waynec

Theunis how do you post your photos from FLICKR? i see the link but want the photo to show up.


give this a try:

How to make Flickr images work

Between bstarr3 & shamoo
bstarr3 said 10 days ago

I read on Toshi's Corsair thread that you were offering to give him instructions to upload Flickr images so they will embed in posts.  I'm trying to figure this very thing out myself.  Would you mind forwarding the directions to me?  Thanks


Brian


shamoo said 9 days ago

I'd be happy to.  A qualifier though... I have been unable to make this work on my iPhone.  I am using a PC.  I haven't tried on an an Android system yet, but I might try rthat this weekend.

Click on the picture in Flikr that you want to imbed.

 fnsc1 by David Brownlee, on Flickr

Scroll down to the bottom of that page to check the settitngs of the photo.

 fnsc2 by David Brownlee, on Flickr

Make sure the two settings i have sloppily circled in red are at "public" and "safe"

Just under the picture is a curved arrow.

 fnsc1 by David Brownlee, on Flickr

Click on the arrow to reveal this screen:

 fnsc3 by David Brownlee, on Flickr

Click on the "BB Code" and set5 the size to medium 640x512 is what I use.  Highlight and right click to copy the entire line of code.

Now go to your post on Finescale, put the cursor where you want the picture in the body of your message, right click, and select paste. Your picture will apperar in a few seconds or when you save and post your message.

Good luck.

Dave

  • Member since
    April 2006
  • From: Denver, Colorado
Posted by waynec on Sunday, August 20, 2017 4:53 PM

Theunis how do you post your photos from FLICKR? i see the link but want the photo to show up.

Никто не Забыт    (No one is Forgotten)
Ничто не Забыто  (Nothing is Forgotten)


  • Member since
    April 2010
Posted by Theuns on Sunday, August 20, 2017 2:09 AM

Wayne, pencile this little model in please. It is a MPM 1/72 P-35 "upgrade kit"

I still need to figure out how I will be able to pose the one piece canopy open to actually show off the nice PE and resin cockpit.

 . by Theunis van Vuuren, on Flickr

 . by Theunis van Vuuren, on Flickr


Theuns

  • Member since
    July 2005
  • From: Texas
Posted by painklr on Saturday, August 19, 2017 11:52 PM

Sounds like fun.  Please add me to the group.  I still need to figure out what to build.

  • Member since
    June 2003
  • From: Rowland Heights, California
Posted by Duke Maddog on Thursday, August 17, 2017 3:18 PM

After a month of my life in total upheaval, I finally found some time to 'play' on the workbench. Let me show you the latest from Maddog Manufacturing. It is a very small update, so...

 I completed the interior part of the landing craft here:


And then test-fit it inside to see how it fit. Surprisingly, this fit fine:


Meanwhile, I tried to get the forward door to fit on that but found out I had glued something wrong on it so I had to repair that. Maybe next time I'll be able to get it to fit right.


Well that completes my small update. I'll be going back to work so I might not have much time to work on my models again for awhile, but at least I was able to get this much done. I'm thrilled.

Thanks all for looking in, comments are welcome.


  • Member since
    May 2009
  • From: Poland
Posted by Pawel on Sunday, August 13, 2017 3:37 PM

68GT - I like how you tackle two models at once! It's interesting to see you working on that LCM3. I also have this one, I planned to build a Vietnam-era tango boat out of it, but it would require a stretch to LCM6 first. Sorry to hear the fit is not so good - Dragon models have that problem pretty often. Their P-38 Lightning is a prime example. Good luck with your builds and have a nice day

Paweł

All comments and critique welcomed. Thanks for your honest opinions!

www.vietnam.net.pl

  • Member since
    February 2010
  • From: New Jersey
Posted by 68GT on Sunday, August 13, 2017 11:27 AM

Some more Tigercat progress with gaps in the wing roots being filled and a fresh coat of blue.

On Ed's bench, ???


  • Member since
    February 2010
  • From: New Jersey
Posted by 68GT on Sunday, August 6, 2017 6:42 PM

More progress this weekend on the Tigercat.  Going to uise the Eaglestrike decals for a Skyraider since the lit ones are very yellowed.

On Ed's bench, ???


  • Member since
    June 2003
  • From: Rowland Heights, California
Posted by Duke Maddog on Thursday, August 3, 2017 9:36 AM

Wayne, I also got started on my kit too.

This is Dragon's LCM-3 that I started:


I started with the pilot house. For the life of me I could not get that assembly to line up. This was the best looking job I had managed to do:


I then moved on to the front ramp, adding the hinge parts to the bottom:


Of course, that meant that I now had to finish adding the bars on top:


That is all ready for installation now. Man, I expected this model to fit better, but it has been a mass of ill-fitting parts and unclear positioning!

Moving on I added the top deck to the lower hull and that is as far as this got to date:


Hopefully I'll be able to get to this sometime soon again. My house is torn up while we upgraded our electrical system. Stay tuned, more to come.

  • Member since
    February 2010
  • From: New Jersey
Posted by 68GT on Wednesday, August 2, 2017 8:04 PM

Wayne, I got started on the Monogram F7F-3 today.  The 188 is going to wait a little longer.

On Ed's bench, ???


  • Member since
    April 2006
  • From: Denver, Colorado
Posted by waynec on Sunday, July 30, 2017 9:19 PM

got it.

Никто не Забыт    (No one is Forgotten)
Ничто не Забыто  (Nothing is Forgotten)


  • Member since
    June 2003
  • From: Rowland Heights, California
Posted by Duke Maddog on Sunday, July 30, 2017 8:02 PM

Wayne I had thought I expressed an interest in joining this Group Build with a TBD model. I didn't see my name there on the list though. My bad if I forgot. I'd like to submit this model here for this Group Build; the 1/72 scale Dragon LCM-3:


Please add me to the list and I'll go ahead and post some progress pics once you do. Thanks!

  • Member since
    February 2010
  • From: New Jersey
Posted by 68GT on Sunday, July 30, 2017 11:45 AM

I'd like to kick my Matchbox Ju-188 from the Multiprop GB over here if thats okay.  I also have a Monogram F7F lined up after it.

Save

Save

Save

On Ed's bench, ???


  • Member since
    June 2003
  • From: Rowland Heights, California
Posted by Duke Maddog on Sunday, July 30, 2017 9:16 AM

I like it Theuns. It looks better than the one I did.


Excellent work overall. I need to get started on mine; if only I could find the time!

  • Member since
    February 2010
  • From: New Jersey
Posted by 68GT on Sunday, July 30, 2017 8:45 AM

Excellent job on the Val and Zero!

On Ed's bench, ???


  • Member since
    April 2010
Posted by Theuns on Sunday, July 30, 2017 3:27 AM

Here is is, not happy with the result but atleast its out of my way now ;-)

 . by Theunis van Vuuren, on Flickr

 . by Theunis van Vuuren, on Flickr


Theuns

  • Member since
    May 2009
  • From: Poland
Posted by Pawel on Thursday, July 27, 2017 2:14 PM

modelcrazy - like I wrote, that Zero is lookin' good! The weathering is also spot on. Looking at your model reminds me that I also plan to build a Zero some time - it's a classic and I don't have it on my list yet, so I have to fix that!

For now I have detailed the Italeri pioneer bridges for my Hanomag:

1:72 Revell Sd. Kfz. 251/7 Ausf. C by Pawel

I added carrying handles and snap fittings that allowed to join the bridges side by side to allow wider vehicles to cross the obstacle. But the most difficult operation was to mahe a new bottom plate with the cut-outs instead of the solid thick plate Italeri (ESCI) gives you OOB. I have also put down the Italeri decals and some mud camouflage and weathering:

1:72 Revell Sd. Kfz. 251/7 Ausf. C by Pawel

1:72 Revell Sd. Kfz. 251/7 Ausf. C by Pawel

1:72 Revell Sd. Kfz. 251/7 Ausf. C by Pawel

Now I have to waether the bridges accordingly and it's starting to look almost done! Thanks for looking and have a nice day

Paweł

All comments and critique welcomed. Thanks for your honest opinions!

www.vietnam.net.pl

  • Member since
    July 2014
Posted by modelcrazy on Saturday, July 22, 2017 10:44 PM
Thanks Pawel.
I’m done with the Zero. The color looks greener against the white background but the Japanese did use a grey green on their Zeros. This was a nice kit although there was quite a bit of small flash that needed to be cleaned if one were to look close. For the price, I would recommend it and I liked the option to fold the wingtips however, I will stick to a Hasegawa or Tamiya kit for next 1/72 Zeke. I think I have 3 more Hasegawa Zero’s in the stash, all model 52s.

The different weathering process I tried was a thick oil wash rather than my usually oil pin wash. I also used oils for the fuel and smoke stains.

Steve

Building a kit from your stash is like cutting a head off a Hydra, two more take it's place.


http://www.spamodeler.com/forum/

  • Member since
    May 2009
  • From: Poland
Posted by Pawel on Saturday, July 22, 2017 6:15 AM

modelcrazy - ain't that a shame whaen it happens? Luckily you have made a nice save here. That machine is lookin' good - I wonder what's your weathering here is going to be.

Theuns - lookin' good! I kinda thought this is going to be done in South African markings!

Good luck with your builds and have a nice day

Paweł

All comments and critique welcomed. Thanks for your honest opinions!

www.vietnam.net.pl

  • Member since
    April 2010
Posted by Theuns on Saturday, July 22, 2017 1:17 AM

Nice looking Zero :-D

Surprizingly the Heller decals were in register this time :-)

 . by Theunis van Vuuren, on Flickr


Theuns

  • Member since
    July 2014
Posted by modelcrazy on Friday, July 21, 2017 10:06 PM

I repainted with the JN grey. I think it looks better.
The decals are thick but were able to settle down. Now comes the washes. I'm going to try something diffrent on this one.

Steve

Building a kit from your stash is like cutting a head off a Hydra, two more take it's place.


http://www.spamodeler.com/forum/

  • Member since
    July 2014
Posted by modelcrazy on Friday, July 21, 2017 9:07 AM
I black based the Zero and added the mottling. I than sprayed the color coat and was admiring it when I notice that the color didn't seem right. I sprayed JA gray instead of JN gray Bang Head. Back to the booth tonight.

Steve

Building a kit from your stash is like cutting a head off a Hydra, two more take it's place.


http://www.spamodeler.com/forum/

  • Member since
    July 2014
Posted by modelcrazy on Thursday, July 20, 2017 3:32 PM

well it IS cute LOL. I'll bet you make it look mean though.

Steve

Building a kit from your stash is like cutting a head off a Hydra, two more take it's place.


http://www.spamodeler.com/forum/

  • Member since
    May 2009
  • From: Poland
Posted by Pawel on Thursday, July 20, 2017 3:11 PM

modelcrazy - lookin' good, I hope you can take care of those gaps with some thin putty, maybe even surfacer would be enough here?

Now I don't know if you didn't hurt the feelings of my Hanomag, it's trying to look mean and you say it's cute :D:D

I have put on a coat of shaded panzergrau and some tinted future on top of that:

1:72 Revell Sd. Kfz. 251/7 Ausf. C by Pawel

Now I'll put the decals on and then I'll try to put on some mud camouflage. Thanks for lookin' and have a nice day

Paweł

All comments and critique welcomed. Thanks for your honest opinions!

www.vietnam.net.pl

  • Member since
    July 2014
Posted by modelcrazy on Tuesday, July 18, 2017 11:00 AM

Looking great Pawel. That thig is so cute!

I put the wings and tail on the Zeek. The gaps are larger than the Hasegawa kit but aren’t too bad.

Steve

Building a kit from your stash is like cutting a head off a Hydra, two more take it's place.


http://www.spamodeler.com/forum/

  • Member since
    May 2009
  • From: Poland
Posted by Pawel on Monday, July 17, 2017 5:00 PM

Hello everybody!

Theuns - looks like it's going to be an interesting build! Do you have any shots of your cockpit here?

I have cranked up the tempo on my build and I have assembled most of the parts for painting. Wheelsm tracks and the assault bridge are still removable. The bridge parts (grey) are Italeri ex-ESCI. I have replaced the kit-supplied width indicators with wire - they look a lot better. Anybody knows what are those small rectangular objects just behind the air cleaners over the fenders? Anyhow, here are the photos:

1:72 Revell Sd. Kfz. 251/7 Ausf. C by Pawel

1:72 Revell Sd. Kfz. 251/7 Ausf. C by Pawel

And now it's time to put on some paint - thanks for lookin' and have a nice day

Paweł

All comments and critique welcomed. Thanks for your honest opinions!

www.vietnam.net.pl

  • Member since
    April 2010
Posted by Theuns on Sunday, July 16, 2017 6:25 AM

I had a little time this morning so masked the canopy .


 . by Theunis van Vuuren, on Flickr

 . by Theunis van Vuuren, on Flickr


Theuns

  • Member since
    May 2004
  • From: Land of Lakes
Posted by cbaltrin on Saturday, July 15, 2017 4:10 PM

Sign me up! TBD for now!

On the Bench: Too Much

  • Member since
    April 2006
  • From: Denver, Colorado
Posted by waynec on Saturday, July 15, 2017 4:04 PM

been doing the world war toons TIGER and SHERMAN. primed both with usual primer and they pebbled really badly with my usual ACE NOW gray. scrubbed them down and tried with ARMOR PRIMER gray. same thing. This was in the garage in the afternoon, close to 90F.

thought about it and took both paints to the bunker in the basement, found some scrap and tried both paints and both were fine. very well could be the primer was drying before it got to the plastic due to the heat.

FYI the SHERMAN is s so but tthe TIGER is treally nice. never liked SHERMANs anyway and this added fuel to that.

Никто не Забыт    (No one is Forgotten)
Ничто не Забыто  (Nothing is Forgotten)


  • Member since
    April 2006
  • From: Denver, Colorado
Posted by waynec on Saturday, July 15, 2017 3:35 PM

MC very nice. 

Pawel my bad you are on the roster. i have one of those so look forward to your build.

Никто не Забыт    (No one is Forgotten)
Ничто не Забыто  (Nothing is Forgotten)


  • Member since
    May 2009
  • From: Poland
Posted by Pawel on Saturday, July 15, 2017 3:21 PM

Hello everybody!

modelcrazy - good start on that Airfix Zero. Ist that one of their new tools?

waynec - it sure would be nice to be on the roster here!

And I've got another update. I have painted the interior of my Hanomag:

1:72 Revell Sd. Kfz. 251/7 Ausf. C by Pawel

Now I'm closing up the hull and I'll try to prepare that baby for painting. Thanks for lookin' and have a nice day

Paweł

All comments and critique welcomed. Thanks for your honest opinions!

www.vietnam.net.pl

  • Member since
    July 2014
Posted by modelcrazy on Thursday, July 13, 2017 9:32 PM

Thanks Pawel, the deck is from Coastal Kits. It makes a good backdrop.

Wayne, I started the Airfix Zero. As typical I started with the cockpit and engine. I assembled the pit and engine, added some belts, painted, dry-brushed, added a wash and assembled the fuse halfs.

Steve

Building a kit from your stash is like cutting a head off a Hydra, two more take it's place.


http://www.spamodeler.com/forum/

  • Member since
    May 2009
  • From: Poland
Posted by Pawel on Wednesday, July 12, 2017 4:04 PM

modelcrazy - that Val is really nice! Congratulations! Nice wooden deck, too!

That Revell model is really nice. Nice, new tooling and almost on par with the more expensive Dragon Model. Much easier to get, too!

Duke - thanks, I appreciate it!

Good luck with your 1/72 builds and have a nice day

Paweł

All comments and critique welcomed. Thanks for your honest opinions!

www.vietnam.net.pl

  • Member since
    July 2014
Posted by modelcrazy on Wednesday, July 12, 2017 9:44 AM

Thanks Shamoo and Duke!

Steve

Building a kit from your stash is like cutting a head off a Hydra, two more take it's place.


http://www.spamodeler.com/forum/

  • Member since
    June 2003
  • From: Rowland Heights, California
Posted by Duke Maddog on Wednesday, July 12, 2017 9:02 AM

Pawel, I recognize your name and model. Way to go man, that is gonna look great.


Modelcrazy, you did a magnificent job on that Val. Everything looks perfect man, the extra work you did really makes this pop.

  • Member since
    March 2017
  • From: Mid Michigan
Posted by shamoo on Wednesday, July 12, 2017 6:20 AM
Modelcrazy, that is impressive! Nice job. Dave

  • Member since
    July 2014
Posted by modelcrazy on Tuesday, July 11, 2017 9:37 PM
Pawel, I built a Revell 1/72 SdKfz 7/1 last year and really enjoyed it. It had great detail especially for a 1/72. It rivaled a 1/35 kit.
I’m done with the Val. This was a nice kit though the instructions were a little hard to interpret at times. It did require some scratching to make it acceptable but all in all it was fairly accurate.
I still have an Akagi Zero to complete so I have one more to do.

Steve

Building a kit from your stash is like cutting a head off a Hydra, two more take it's place.


http://www.spamodeler.com/forum/

  • Member since
    May 2009
  • From: Poland
Posted by Pawel on Tuesday, July 11, 2017 4:42 PM

Hello!

1:72 is my favourite scale and I'd like to join! I'd like to show you my 1:72 Sd. Kfz. 251/7 Ausf. C. It started as this Revell kit:

1:72 Revell 03197 Sd.Kfz.251/16 Ausf.C

I started by tackling the tracks - thaey are very nice, link and lenght. I had some problems with the direction the tracks go on, because they go on just the other way than on every tank we normally see - the "V" of the track points down on the REAR of the track run. But now it's done and here what the tracks look like:

1:72 Revell Sd. Kfz. 251/7 Ausf. C by Pawel

I have also started fitting out the hull interior:

1:72 Revell Sd. Kfz. 251/7 Ausf. C by Pawel

Now I have to finish that interior in order to close up the hull. Thanks for looking, good luck with your 1:72 builds and have a nice day

Paweł

All comments and critique welcomed. Thanks for your honest opinions!

www.vietnam.net.pl

  • Member since
    July 2014
Posted by modelcrazy on Sunday, July 9, 2017 12:23 AM
I added the decals today. I chipped the decals with an x-acto blade where the paint was already chipped. The decals went down very nicely and reacted well to the setting solution.
Next will be the washes.

Steve

Building a kit from your stash is like cutting a head off a Hydra, two more take it's place.


http://www.spamodeler.com/forum/

  • Member since
    July 2014
Posted by modelcrazy on Friday, July 7, 2017 10:48 PM
I received my AB air valve today and resumed painting the Val. I sprayed the bottom grey and did the chipping. I also sprayed a gloss coat to start applying the decals tomorrow.

Steve

Building a kit from your stash is like cutting a head off a Hydra, two more take it's place.


http://www.spamodeler.com/forum/

  • Member since
    July 2014
Posted by modelcrazy on Tuesday, July 4, 2017 1:17 AM

Dave, I find that 1/3 of my time is research, 1/3 is building and 1/3 is painting.

I sprayed the Val silver, sprayed some chipping fluid and got one coat of JN green on before my air valve assembly quit on my AB. I  have it soaking in  thinner but don't hold out much hope for a fix. That will set me back a week or two. I really need to get a second AB.

Steve

Building a kit from your stash is like cutting a head off a Hydra, two more take it's place.


http://www.spamodeler.com/forum/

  • Member since
    March 2017
  • From: Mid Michigan
Posted by shamoo on Monday, July 3, 2017 5:05 PM

All right, here we go.  Got a little start on this one a few weeks back.  Maybe a group build will relight the fire.

The victim: RoG F4U4-4 Corsair

 Untitled by David Brownlee, on Flickr

Got the cockpit done.

 Untitled by David Brownlee, on Flickr

Installed.

 Untitled by David Brownlee, on Flickr

 Untitled by David Brownlee, on Flickr

 Untitled by David Brownlee, on Flickr

That's where it sits at the moment.  Fairly impressed with the kit so far.  Decent detail, and is fitting together well so far.  I need to try a little weathering.  That's going to be a bit of an experiment.  Many thinfgs have changed since I got back into the hobby.  I end up spending more time researching than I do building.

  • Member since
    July 2014
Posted by modelcrazy on Sunday, July 2, 2017 10:37 PM
OK Guys, here's the update for the Val. I added some Evergreen sprue for the canopy bracing. The canopy isn't attached and neither are the wing tips, they are just there to show the progress. I need to come up with something for the gadgets on the dash. I cut the flaps and showed them in the down position.

Steve

Building a kit from your stash is like cutting a head off a Hydra, two more take it's place.


http://www.spamodeler.com/forum/

  • Member since
    March 2017
  • From: Mid Michigan
Posted by shamoo on Sunday, July 2, 2017 11:39 AM

Theuns

Here is the TurboMecca engine for the AS 316.

I dressed it up with some thin copper wire to simulate the lines aswell as stretched black sprue for the electrical connections.

Theuns

PS, do you not see the pix I posted now and in my previous post?


i can see these but not the previous 

  • Member since
    April 2010
Posted by Theuns on Sunday, July 2, 2017 10:47 AM

Here is the TurboMecca engine for the AS 316.

I dressed it up with some thin copper wire to simulate the lines aswell as stretched black sprue for the electrical connections.

Theuns

PS, do you not see the pix I posted now and in my previous post?

  • Member since
    June 2003
  • From: Rowland Heights, California
Posted by Duke Maddog on Sunday, July 2, 2017 9:55 AM

Theuns, I'd love to see it, but all I get are a big white space with a grey symbol in the middle. When I try viewing the image or loading it in a new tab or refreshing the page; I still see no photos. I'm really interested in seeing this little Helicopter.

  • Member since
    April 2010
Posted by Theuns on Sunday, July 2, 2017 2:19 AM

Here is the engine as the kit supplies it. I painted the intake and gearbox parts silver, the hot section of the turbine was painted with alclad burnt iron and then dusted with duralumminium to give a gunmetal look, the rear exhaust part is just burnt iron.

I will add some fuel and controll links to it.


Theuns

PS to give you an idea of the scale, the "pole" in the back is a toothpick LOL

  • Member since
    April 2010
Posted by Theuns on Sunday, July 2, 2017 12:49 AM

Since loosing my pix on PB I went over to google photos, here is my entry for this GB.

1/72 Heller Allo 3. A very basic little kit, the fit is not to good and the glazing parts are a little fiddly to install but for this subject we are not really spoilt for choice.

I like this helo because I flew in it as a combat medic doing casevac duties and a good mate of mine was a tecnition on them in the Aie Force.

I will add a littl more detail to make it look a little more "real"


Theuns

  • Member since
    July 2014
Posted by modelcrazy on Friday, June 30, 2017 11:07 AM

I did some work on the Val's seams last night and got them smoothed out. I scratched the missing cockpit piece and need to scratch something to duplicate whatever is sitting on top. I also need to scratch the canopy braces but that should be about it.

Drawing of Val cockpit.

My silly futile attempt at duplicating the missing section. But if it works....

Steve

Building a kit from your stash is like cutting a head off a Hydra, two more take it's place.


http://www.spamodeler.com/forum/

  • Member since
    April 2010
Posted by Theuns on Thursday, June 29, 2017 10:54 AM

Wayne, put me down for this 1/72 Heller Allo 3 please.

Will be a simple out the box build


Theuns

  • Member since
    April 2006
  • From: Denver, Colorado
Posted by waynec on Tuesday, June 27, 2017 9:05 PM

trying Google photo. these were copy paste

PATRIOT

this one needs some sanding touch up. PS forgot i have alredy build 2 of these in OTS

1/35 in background 


Никто не Забыт    (No one is Forgotten)
Ничто не Забыто  (Nothing is Forgotten)


  • Member since
    June 2008
Posted by lewbud on Tuesday, June 27, 2017 12:43 PM

I'm in.  Don't know with what, but sign me up.

Buddy- Those who say there are no stupid questions have never worked in customer service.

  • Member since
    July 2014
Posted by modelcrazy on Tuesday, June 27, 2017 8:01 AM

Here are the pics I said I would upload.

Steve

Building a kit from your stash is like cutting a head off a Hydra, two more take it's place.


http://www.spamodeler.com/forum/

  • Member since
    July 2014
Posted by modelcrazy on Monday, June 26, 2017 2:29 PM

Thanks DM, The issues are there is a missing fusalage seperator piece between the pilot and gunner and the canopy, when displayed in the closed position, is too tapered. The canopy issue can be overcome by displaying it open and I think I can scratch a passable missing piece for the cockpit opening.

The Hasegawa and Airfix offerings have their problems as well.

Steve

Building a kit from your stash is like cutting a head off a Hydra, two more take it's place.


http://www.spamodeler.com/forum/

  • Member since
    June 2003
  • From: Rowland Heights, California
Posted by Duke Maddog on Monday, June 26, 2017 11:38 AM

This is excellent. Great job on the Val Modelcrazy, I don't see any issues.


Wayne, I'm looking forward to seeing that Patriot and the Type VII,


BTW, do we have a badge for this yet? Anyone coming up with something?

  • Member since
    April 2006
  • From: Denver, Colorado
Posted by waynec on Monday, June 26, 2017 11:02 AM

i may have one of those in the stash when i was in my PEARL HARBOR phase. i will be posting pics as soon as photobucket and i get the emails and paswords straightened out.

PATRIOT is painted. think i should have reversed the colors on the vehicle and canisters but i am not going to redo it, windows and decals, than mirrors and ready to weather a bit.

TYPE VII is primed but has some sanding clean up and another priming.

Никто не Забыт    (No one is Forgotten)
Ничто не Забыто  (Nothing is Forgotten)


  • Member since
    July 2014
Posted by modelcrazy on Monday, June 26, 2017 8:58 AM

Wayne, I started the 1/72 Cyber Hobby Aichi D3A Type 99 Val.

There are some issues with the canopy and cockpit opening but I'm positioning the canopy open so most of the issues will be hidden. I am also placing the wingtips in the folded position. This will be a depiction of AI-201 off the Akagi June 1942 Midway attack.

I have pictures of the cockpit but they are on my other computer so I'll upload them later. The kit is going together nicely but there are some minor gap issues on the bottom.

The wings are on and I applied some Mr. Dissolved Putty.

Steve

Building a kit from your stash is like cutting a head off a Hydra, two more take it's place.


http://www.spamodeler.com/forum/

  • Member since
    March 2017
  • From: Mid Michigan
Posted by shamoo on Sunday, June 25, 2017 3:57 PM

Count me in on this one. I'v got a small start on the Revell F4U-4 Corsair. I started a WIP that I'll copy over. If time allows I've got more.

Dave

  • Member since
    April 2010
Posted by Theuns on Sunday, June 25, 2017 10:55 AM

Very nice paintwork on that spitty, well done


Theuns

  • Member since
    June 2003
  • From: Rowland Heights, California
Posted by Duke Maddog on Sunday, June 25, 2017 10:00 AM

Mongoose, that is looking great! Way to go! Looks like you're on target to be the first one to finish this.


I also love participating in this Group Build so sign me up! I'll dig through my stash to see what i can submit for this. Stay tuned.

  • Member since
    January 2015
Posted by TheMongoose on Friday, June 9, 2017 11:21 PM

Did some painting after work today. Will let this dry then try to glue these halves together without getting glue all over. Thanks for the advice bossman! 

In the pattern: Scale Shipyard's 1/48 Balao Class Sub! leaning out the list...NOT! Ha, added to it again - Viper MkVii, 1/32 THUD & F-15J plus a weekend madness build!

  • Member since
    December 2002
Posted by Bossman on Wednesday, June 7, 2017 5:48 PM

TheMongoose
My other dilema still remains getting glue on pieces I don't want it on. I'm using the th In CA and putting a drop in gap. Maybe for these smaller planes i have to get one of those pipet tubes? Seems too much comes off the little tamiya brush and runs out the back of the part.

Hi Mongoose - 

When I buy a new jar of solvent-type glue with a brush applicator - One of the first things I do is cut off about 50% of the brush bristles.  That should help a little.

Chris

  • Member since
    July 2014
Posted by modelcrazy on Wednesday, June 7, 2017 4:29 PM

Hey Wayne!

I'll start with 2.

#1 The 1/72 Aichi D3A Type 99 Val.

#2 An Airfix 1/72 A6M2b Type 0 Model 21 Zeke. And I got a nifty brush with it.

Steve

Building a kit from your stash is like cutting a head off a Hydra, two more take it's place.


http://www.spamodeler.com/forum/

  • Member since
    April 2006
  • From: Denver, Colorado
Posted by waynec on Wednesday, June 7, 2017 2:47 PM

TheMongoose the wheel well issue looks quite annoying.

i had to move a model table to the main floor. funny how, even with a big shop in the bunker, i can fit all the tools i need to build in one artists carry box. of course i cannot airbrush but can brush paint and weather onn the cardtable too.

Никто не Забыт    (No one is Forgotten)
Ничто не Забыто  (Nothing is Forgotten)


  • Member since
    April 2010
Posted by Theuns on Tuesday, June 6, 2017 11:40 PM

Needless to say I always look forward to this GB and you can sign me up please. Dont know what yet but will get something.


Theuns

  • Member since
    January 2015
Posted by TheMongoose on Tuesday, June 6, 2017 9:01 PM

Well I'm on the road this week so no access to paint But i have been able to work off a tv tray lol. It's an obsession. This first pick is all the individual sections I could build and still feel I could do paint later. One confusing point is the instructions clearly show decals for seatbelts and IP, but they don't exist in the kit. Looked all over. Finally looked up some in box reviews. Neither showed any decals for the cockpit. Dang. 

My other dilema still remains getting glue on pieces I don't want it on. I'm using the th In CA and putting a drop in gap. Maybe for these smaller planes i have to get one of those pipet tubes? Seems too much comes off the little tamiya brush and runs out the back of the part. 

this is a close up of the wheel pants (i know, I'm captain obvious ) where you can see the kit isn't designed to have wheels up. I think i have to shave off part of the wheel so they will sit flush. Without the top of the wing in place they fit just fine lol. If you've found this on models you've built let me know how you thought to fix it up?

In the pattern: Scale Shipyard's 1/48 Balao Class Sub! leaning out the list...NOT! Ha, added to it again - Viper MkVii, 1/32 THUD & F-15J plus a weekend madness build!

  • Member since
    December 2002
  • From: Fort Knox
Posted by Rob Gronovius on Sunday, June 4, 2017 8:24 AM

Sounds like fun, I will need to dig out a kit to build.

  • Member since
    January 2015
Posted by TheMongoose on Saturday, June 3, 2017 6:50 AM

This is just what i needed to get that kit i bought at ipms in London last year off the shelf. I've never seen this manufacturer in the states but it sounded like KP was popular inEurope. The kit details look good upon opening the box.

Put me down for the Spitfire Mk. VB


edit-new picture link

In the pattern: Scale Shipyard's 1/48 Balao Class Sub! leaning out the list...NOT! Ha, added to it again - Viper MkVii, 1/32 THUD & F-15J plus a weekend madness build!

JOIN OUR COMMUNITY!

Our community is FREE to join. To participate you must either login or register for an account.

SEARCH FORUMS
FREE NEWSLETTER
By signing up you may also receive reader surveys and occasional special offers. We do not sell, rent or trade our email lists. View our Privacy Policy.