SEARCH FINESCALE.COM

Enter keywords or a search phrase below:

Monogram Mafia IV Group Build

52505 views
1009 replies
1 rating 2 rating 3 rating 4 rating 5 rating
  • Member since
    February 2014
  • From: Michigan
Posted by silentbob33 on Thursday, July 5, 2018 9:22 PM
Looking good Stik! I have a few bottles of MM acrylic and I'm not a fan.

On my bench: Academy 1/35 UH-60L Black Hawk

  • Member since
    July 2004
  • From: Sonora Desert
Posted by stikpusher on Thursday, July 5, 2018 7:55 PM

Thanks MC. It’s funny how the discontinued paint lines can still have such fans after so many years. Polly S was excellent stuff. Polly Scale was pretty damned good too. MM Acrylics... a poor substitute... Floquil.... a true loss... They can come up with new stuff, but the shades and performance is never the same. All paints are not created equal, and never will be.


F is for FIRE, That burns down the whole town!

U is for URANIUM... BOMBS!

N is for NO SURVIVORS...

       - Plankton

LSM


  • Member since
    July 2014
Posted by modelcrazy on Thursday, July 5, 2018 6:43 PM

The pit and the radiator look great Stick.

I miss Polly S. I  still have a few bottles left from the 70's!

Steve

Building a kit from your stash is like cutting a head off a Hydra, two more take it's place.


http://www.spamodeler.com/forum/

  • Member since
    July 2004
  • From: Sonora Desert
Posted by stikpusher on Thursday, July 5, 2018 5:56 PM

Well, I’m past my 6 month deadline as of yesterday... but since I’m running this show....


I have doing my usual small bits of progress here over the past few days...


I dry brushed the radiator detail on the insert piece
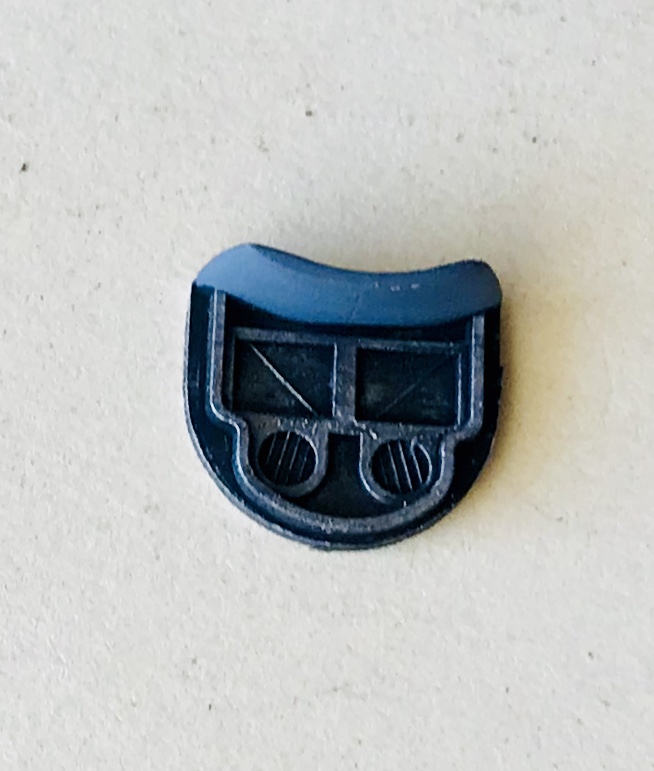


and once dry, glued it in place
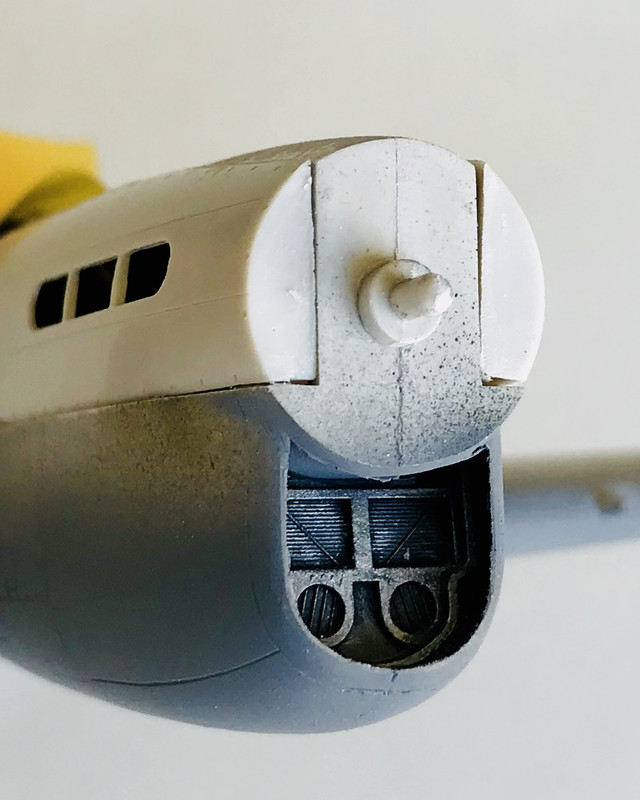


don’t worry, the engine access panels are just tacked in place for painting, so I can install the exhaust stacks after the base color is on...


Today I added the Desert Pink over the OD in the window scallops. 
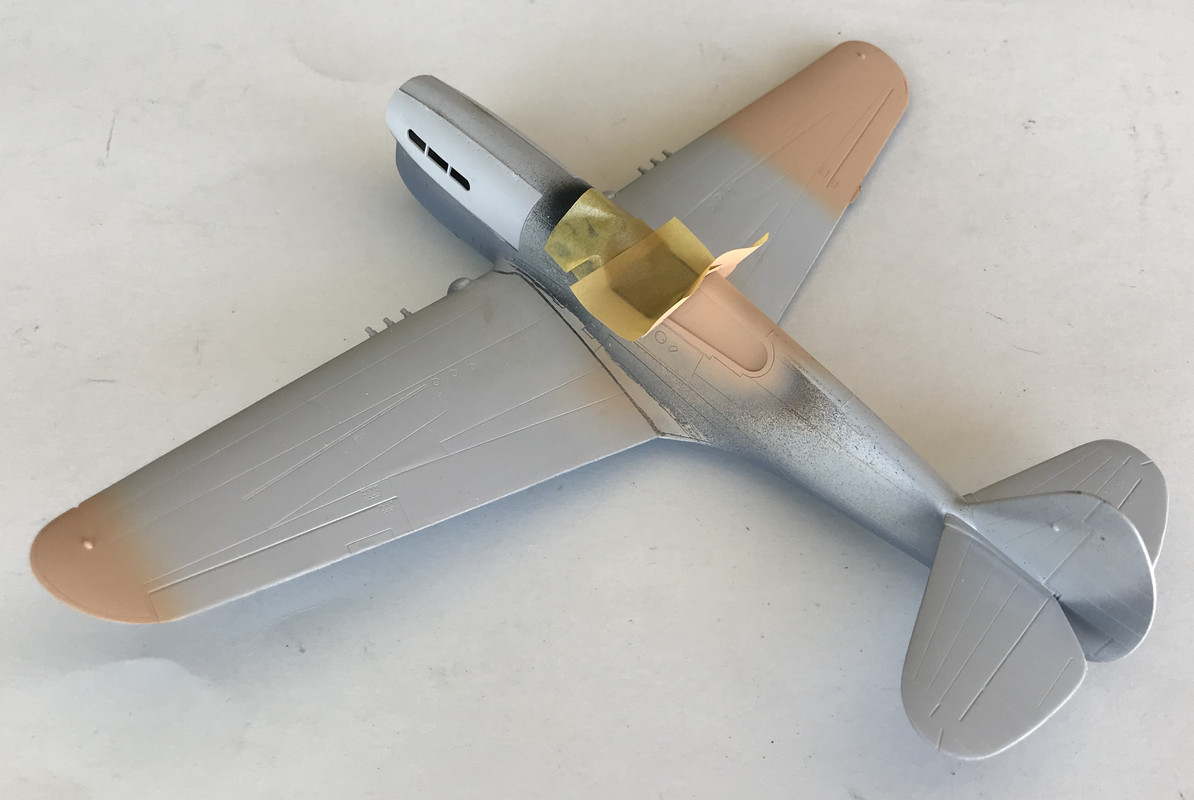


Since I had extra in the airbrush cup, I sprayed the rest over the wing tips to see how the color looked over the bare plastic as opposed to the OD base in the window scallops. To my eye, the color has a more vivid tone that compared to over the bare plastic. In direct sunlight, the difference is more noticeable about the depth of the color.
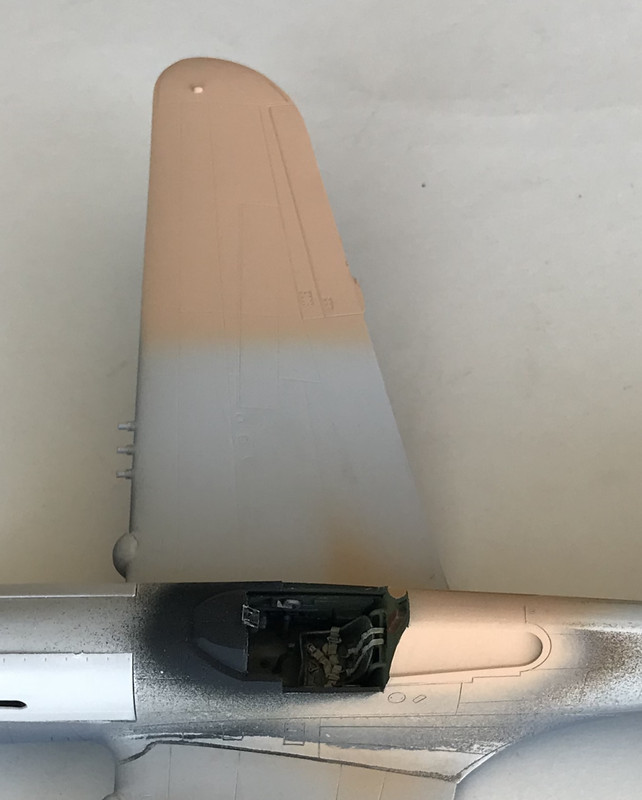


So, like on the real 57th FG P-40s, I’ll paint the uppers in OD first, then apply the Desert Pink, AKA Sand 26, on top for a nice even tone. I am using Polly S (pre Polly Scale) Desert Pink, which I bought off our our own Duke Maddog from his IPMS auction “mystery box”, Christmas 2017. I prefer their take on the color compared to all the other paint brands. Thank you Mark!


F is for FIRE, That burns down the whole town!

U is for URANIUM... BOMBS!

N is for NO SURVIVORS...

       - Plankton

LSM


  • Member since
    July 2004
  • From: Sonora Desert
Posted by stikpusher on Monday, July 2, 2018 2:32 PM

So last nite after work, I did a bit more work on this when I came home... I added the horizontal stabilizers, landing gear fairing front caps, and the cowl flap panel... and then let it dry overnite...


This morning I got in a quick airbrush session and applied a coat of Tamiya Neutral Gray to the undersurface.


It’s getting there now....


F is for FIRE, That burns down the whole town!

U is for URANIUM... BOMBS!

N is for NO SURVIVORS...

       - Plankton

LSM


  • Member since
    July 2004
  • From: Sonora Desert
Posted by stikpusher on Sunday, July 1, 2018 5:50 PM

Today before work I did the seam clean up at the wing root areas... all the rubber band work helped on that big time! 


Starting to look like a P-40 now!


F is for FIRE, That burns down the whole town!

U is for URANIUM... BOMBS!

N is for NO SURVIVORS...

       - Plankton

LSM


  • Member since
    July 2004
  • From: Sonora Desert
Posted by stikpusher on Sunday, July 1, 2018 5:45 PM

MC, that hot rod is starting to look pretty boss!!!


So when we left off, I still needed to complete the cockpit paint work, which I did yesterday...


Then I assembled the cockpit tub


and then installed the tub into the fuselage


and last thing I did yesterday was to get the wings glued in place...


I first glued the lower wing in place, then once that had dried, I added the upper wing halves with all the rubber bands to minimize any gaps... the upper right wing had some mild warping at the trailing edge, so that’s why I used the clothes pin to clamp that issue... it worked perfectly...


F is for FIRE, That burns down the whole town!

U is for URANIUM... BOMBS!

N is for NO SURVIVORS...

       - Plankton

LSM


  • Member since
    July 2014
Posted by modelcrazy on Friday, June 29, 2018 9:28 PM

The belts and IP are looking great Stick.

I finished the body painting, installed the interior and attached the body to the frame. Now I need to paint the door handles and a few other things, add the fenders, lights, window frame etc, add some radiator bracing and I think I'll be finished.

Steve

Building a kit from your stash is like cutting a head off a Hydra, two more take it's place.


http://www.spamodeler.com/forum/

  • Member since
    July 2004
  • From: Sonora Desert
Posted by stikpusher on Friday, June 29, 2018 7:26 PM

So I decided to fix up the gun sight a bit... I can’t stand a solid sheet there where it is supposed to be glass... so I opened up the solid sheet to represent framing...


Then I painted it up and once that dried I added a drop of clear to represent the projector lens, and some clear sheet for the lens... once that dried a quick dose of Future to make it look shiny....


and of course, some Future on each instrument as a lens glass


And some dry brushing on the cockpit sidewalls, floor, and seat, along with some wash in the seat itself to help the belts stand out a bit more....


almost ready for installation....


F is for FIRE, That burns down the whole town!

U is for URANIUM... BOMBS!

N is for NO SURVIVORS...

       - Plankton

LSM


  • Member since
    July 2004
  • From: Sonora Desert
Posted by stikpusher on Friday, June 29, 2018 12:23 PM


I just have this bit of progress that I’ve made- the seat harness is mostly painted, and Promodeler instrument decals added to the IP. I made my best shot at replicating the actual instrument positioning by type to the decals that I had.


F is for FIRE, That burns down the whole town!

U is for URANIUM... BOMBS!

N is for NO SURVIVORS...

       - Plankton

LSM


  • Member since
    July 2004
  • From: Sonora Desert
Posted by stikpusher on Tuesday, June 26, 2018 10:23 PM

Thanks Bob! Next time that I try this, I’ll use more thinner and less black in the top color mix.


F is for FIRE, That burns down the whole town!

U is for URANIUM... BOMBS!

N is for NO SURVIVORS...

       - Plankton

LSM


  • Member since
    November 2003
  • From: Nashville, TN area
Posted by bobbaily on Tuesday, June 26, 2018 6:22 PM

Looks good Stik-I like the black base & your paint blend-will have to give it a try next build

Bob


  • Member since
    July 2004
  • From: Sonora Desert
Posted by stikpusher on Tuesday, June 26, 2018 2:21 PM


Here is after this mornings detail paint session so far...


obviously I still have more to do here....


F is for FIRE, That burns down the whole town!

U is for URANIUM... BOMBS!

N is for NO SURVIVORS...

       - Plankton

LSM


  • Member since
    July 2004
  • From: Sonora Desert
Posted by stikpusher on Monday, June 25, 2018 9:58 PM

Looks pretty shiny to me MC!


This is a simple fun kit. Just me speed!


Over the weekend I did get the fuselage assembled and sanded


and the Ultracast seat glued in place


So today I started some painting... I’m trying black basing in the cockpit and other interior areas such as the wheel wells...


then I mixed up a custom Interior Green using Tamiya Yellow Green and NATO Black... I airbrushed on very thinned coats over the black base


more in a few days...


F is for FIRE, That burns down the whole town!

U is for URANIUM... BOMBS!

N is for NO SURVIVORS...

       - Plankton

LSM


  • Member since
    July 2014
Posted by modelcrazy on Monday, June 25, 2018 8:58 PM

I'm still here, I just have been working on the body over and over. I'm not going to put anymore coats on it although It's not as glossy as I would like. The interior is drying right now so I don't have any pictures yet.

Well I say that but you need to see what won peoples choice and the big eagle at EagleQuest this year.

So since I don't have pictures of my poor attempt, I'll let you feast on this instead.

1/18 Revell Mustang GT

I could have sworn I took more pictures of this. I'm sure it will be in FineScale soon.

Steve

Building a kit from your stash is like cutting a head off a Hydra, two more take it's place.


http://www.spamodeler.com/forum/

  • Member since
    July 2004
  • From: Sonora Desert
Posted by stikpusher on Saturday, June 23, 2018 12:36 AM

As usual, work starts in the cockpit. I wasn’t planning on any AM, but when I opened the box, I found that I had bought some Ultracast seats with harness and squirreled them away in here, so I will use one. 


which means that I had to fill in the mounting slots for the kit seat


So all this is now ready for paint....


More soon....


F is for FIRE, That burns down the whole town!

U is for URANIUM... BOMBS!

N is for NO SURVIVORS...

       - Plankton

LSM


  • Member since
    July 2004
  • From: Sonora Desert
Posted by stikpusher on Saturday, June 23, 2018 12:05 AM

Agreed... nice work on that car!


Well, I’m running short on time, and have decided to do this kit for my second build...


F is for FIRE, That burns down the whole town!

U is for URANIUM... BOMBS!

N is for NO SURVIVORS...

       - Plankton

LSM


  • Member since
    April 2005
  • From: Australia
Posted by taxtp on Sunday, June 17, 2018 7:22 PM

Looking good Steve

I'm just taking it one GB at a time.

  • Member since
    July 2014
Posted by modelcrazy on Sunday, June 17, 2018 6:42 PM

Thanks Tony and Bob,

I'm still working on the final coat for body but also added the suspension and glued the engine in. Here's where it sits now.

Steve

Building a kit from your stash is like cutting a head off a Hydra, two more take it's place.


http://www.spamodeler.com/forum/

  • Member since
    September 2012
Posted by GMorrison on Friday, June 15, 2018 10:29 PM

Hey Don Carlos, I took care of dat ting for yah. List my builds as complete please.

It's an offer you can't refuse.

 Modeling is an excuse to buy books.


  • Member since
    February 2014
  • From: Michigan
Posted by silentbob33 on Friday, June 15, 2018 9:55 PM
Engine looks really good to me Steve! Of course I know nothing about cars...

On my bench: Academy 1/35 UH-60L Black Hawk

  • Member since
    April 2005
  • From: Australia
Posted by taxtp on Thursday, June 14, 2018 11:22 PM

It looks pretty good Steve, no reason to be unhappy that I can see. 

Cheers

Tony

I'm just taking it one GB at a time.

  • Member since
    July 2014
Posted by modelcrazy on Thursday, June 14, 2018 10:14 PM

taxtp

Your reference to the 'magic floating generator' made me laugh. Why do they do that, its always puzzled me. It's held there by belts alone !

Cheers

Tony


Yeah, right? I read the reference to the magic generator a few years ago from Mustang I think. It made me laugh so much that I never forgot it.

I cut the generator down to make it an alternator and added the bracket. I also finally attached the wires to the distributor. The plug wires I have is 1 gauge too large, so I had a hard time getting them on it. I had to drill out the entire distributor cap and epoxy them in the hole. The one in the center is for the coil. I'm not supper happy with it, but it'll do.

It doesn't look like much has been done but it was time consuming. I still need to put one more coat on the body because of the decals I had to remove then gloss it. while that dries, I'll start on the suspension on the frame. 

Steve

Building a kit from your stash is like cutting a head off a Hydra, two more take it's place.


http://www.spamodeler.com/forum/

  • Member since
    April 2005
  • From: Australia
Posted by taxtp on Wednesday, June 13, 2018 7:40 PM

Your reference to the 'magic floating generator' made me laugh. Why do they do that, its always puzzled me. It's held there by belts alone !

Cheers

Tony

I'm just taking it one GB at a time.

  • Member since
    July 2014
Posted by modelcrazy on Monday, June 11, 2018 10:16 PM

UP, good looking Thunderstreak.

Bob, the 18 looks great.

I'm back on the 32 after completing the push on the Scharnhorst.
I removed the decals, too bad to, they looked nice, wrinkles notwithstanding. I stole the engine from the Nomad, painted and modified it to fit and added spark plug wires. I have some cleaning up to do to it still, but this is what it will look like.

No magic floating generator. I'll add a bracket.  I think I'm going to cut it down to make it and alternator instead.

Steve

Building a kit from your stash is like cutting a head off a Hydra, two more take it's place.


http://www.spamodeler.com/forum/

  • Member since
    February 2014
  • From: Michigan
Posted by silentbob33 on Monday, June 11, 2018 8:34 PM
Thanks Tony! I hope I don't have as many self-inflicted issues on my next build

On my bench: Academy 1/35 UH-60L Black Hawk

  • Member since
    April 2005
  • From: Australia
Posted by taxtp on Monday, June 11, 2018 7:52 PM

Good effort Bob, in the circumstances. It's a nice model of an '18 too.

Cheers

Tony

I'm just taking it one GB at a time.

  • Member since
    February 2014
  • From: Michigan
Posted by silentbob33 on Monday, June 11, 2018 6:59 PM

Well I finished this up today.  There are a few issues but considering all the health issues I've been having and the side effects from the medications I'm happy with it.  The markings are for the CAG of VFA-151 circa 2005.  Any comments/critiques are welcome.  Thanks for hosting Stik!

On my bench: Academy 1/35 UH-60L Black Hawk

  • Member since
    February 2014
  • From: Michigan
Posted by silentbob33 on Sunday, June 10, 2018 10:53 AM

Great looking builds guys!  I'm running out of time here so I guess I'd better pick up the pace.  I finally got all the decals on.  They mostly went on fine, but the instructions that came with them was a bit lacking on the stencils so I spent a lot of time trying to find sources to show where they went.  In the end I went with my best guess on some of them.  I'm entering the home stretch now...

On my bench: Academy 1/35 UH-60L Black Hawk

  • Member since
    June 2017
Posted by UnwaryPaladin on Friday, June 8, 2018 9:31 PM

Thank you Tony. I might give to my Dad for Father's Day. He worked on them in the National Guard. He was telling me the canopy on the F84 could be dangerous. A guy was leaning into the cockpit and bumped the switch that closes the canopy. Crushed the poor guy. The switch was supposed to be locked, it wasn't. 

JOIN OUR COMMUNITY!

Our community is FREE to join. To participate you must either login or register for an account.

SEARCH FORUMS
FREE NEWSLETTER
By signing up you may also receive reader surveys and occasional special offers. We do not sell, rent or trade our email lists. View our Privacy Policy.