SEARCH FINESCALE.COM

Enter keywords or a search phrase below:

Pride of the Luftwaffe GB

42445 views
1268 replies
1 rating 2 rating 3 rating 4 rating 5 rating
  • Member since
    April 2015
Posted by Mopar Madness on Friday, February 2, 2018 2:51 PM

She’s coming along Bish!  I agree with the wood atop the tail stand.  Quick question, have you had an opportunity to build the equivalent Airfix 109?  Based on what I can see, the Tamiya kit looks better eventhough it’s older. 

Chad

God, Family, Models...

At the plate: 1/48 Airfix Bf109 & 1/35 Tamiya Famo

On deck: Who knows!

  • Member since
    December 2002
  • From: Bury St Edmunds, Suffolk, England
Posted by Bish on Friday, February 2, 2018 2:42 PM

I have fallen behind a touch so time for soome catching up. So after masking and painting the RLM 71 on top i then did the same for the 65 on the sides and underneath.

Then came the fun part, decals. As i mentioned before, this is my first tamiya aircraft. I have bult plenty of their armour kits with no decals issues. And i hope the ones for this kit on not a reflection of their usuall aircraft decals because they were, as we would say in Blighty, bloody awful. Half of them broke. I applied the underwing decals which also broke up, but after applying i realised they were to big. So i removed them and replaced them from the decal stash. I also applied the swastika as per instructions so it was over lapping onto the rudder. I then found a pic of White 5, bloody typical, and saw this was wrong. So after removing the decals, which had been in place over 24 hours, i had to re-paint the tail and apply new decals, also from the decal stash. So that was a fune 5 days. Bang Head

I also did some work on the base. After the sides wdere stained and varnished, i added the celluclay. This will get a light dry brush and then i will add the grass this weekend.

The winch and crate have also been painted. I could not quite make out the colour of the inside of the crate from the photo. Not sure if its painted a light colour or bare wood. So i painted it buff.

And finally, got started on the tail stand. I was not to worried about it looking a bit rough given that it was knocked up in the workshops. I am thinking about putting some wood on top as i don't think the metal frame of the aircraft would be put straight onto a metal stand.

And thats it for now. I had hoped this would have been completed by last weekend, but you know what they say, perfection can't be rushed right Big Smile. Hopfully i will have it done by early next week.


I am a Norfolk man and i glory in being so


On the bench: Airfix 1/72nd Harrier GR.3/Fujimi 1/72nd Ju 87D-3

  • Member since
    April 2015
Posted by Mopar Madness on Friday, February 2, 2018 1:28 PM

Howdy friends!  Those 190's are looking good guys!  Update #2.  The fuselage has been closed up and the wings attached.  This is where I've ran into my first snag.  I have never made an Fw190 and had the fuselage and wings go together without issue.  No matter the manufacturer.  So, with this one, I had to get creative with the clamps.  I'm sure its builder error.  Also, the wings have a unfortunate seam along the leading edge when combined.  But, I'm still VERY pleased with this kit.  Landing gear is next.

Chad

God, Family, Models...

At the plate: 1/48 Airfix Bf109 & 1/35 Tamiya Famo

On deck: Who knows!

  • Member since
    January 2015
Posted by BrandonD on Friday, February 2, 2018 1:04 PM

falconmod


jgeratic

John, that is interesting you masked both top colours individually.  Was that to cut down on paint layers, or to get those lighter streaks in between the main colours?

regards,

Jack


the lighter shades between the two colors was a mistake on my part, I used poster sticky stuff (the green stuff) for the masks so that I would get a thin feathered edge between them.  I apparently didn't pull  the sticky tack back far enough, I'll have to go over it again to get rid of the line between them.


I think in retrospec I should have sprayed the lightest color first without the masks then put them on and sprayed the dark color.  not sure what I was thinking.

John

"And now for something completely different"


I used to hate soft-edged camo because of what I thought was the need to do careful masking, but now it's the opposite, and I hate hard-edged camo.

For the soft-edged stuff, I can't emphasize enough how glad I am that I took the time to practice with the right tools to get to the point where I can freehand it. When I first saw people doing it, I thought "Nope. No way. Way too hard," but once I got past the fear and tried it, it took some getting used to, but it's the best way to go, IMO.

I use a Sotar 20/20 with a 0.2mm nozzle, and my paint mixes are as follows (I mix all of them with Mr. Levelling Thinner, but the same ratios are good with Tamiya Lacquer Thinner, in my experience):

Model Master Enamels: 2:1 thinner to paint
Gunze Mr. Color: 4:1 thinner to paint
Tamiya acrylics: 2:1 or 3:1 thinner to paint
Mr. Paint: I rarely thin, as it's pre-thinned, but sometimes I do for amist coat

I shoot at 15PSI for the up-close stuff, sometimes dropping it to 10PSI if I need to be really close. The key is to thin the paint to a point where it almost runs, but not quite.

The following planes are 1/48.

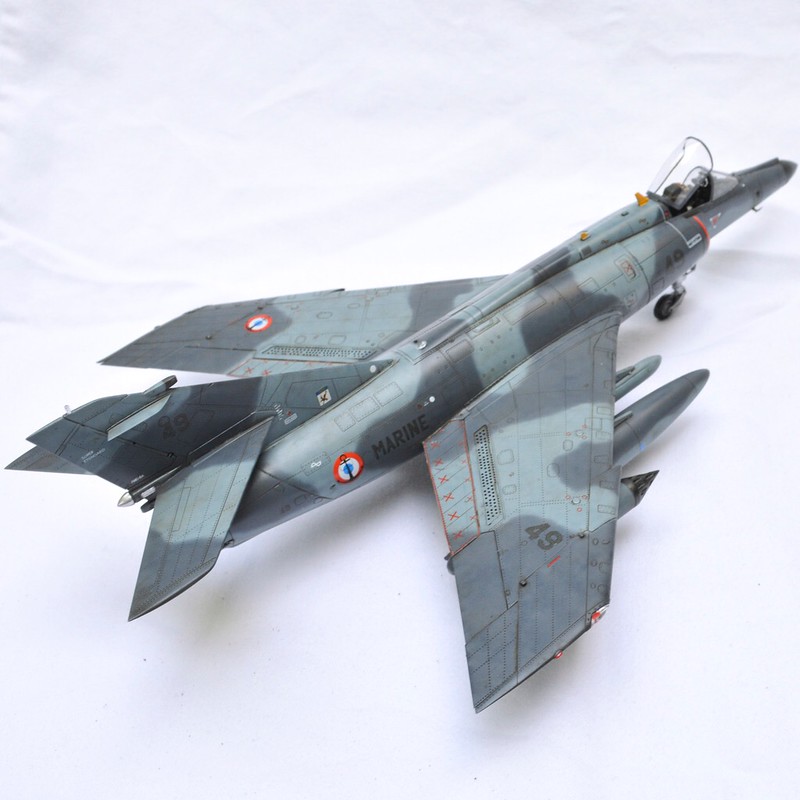
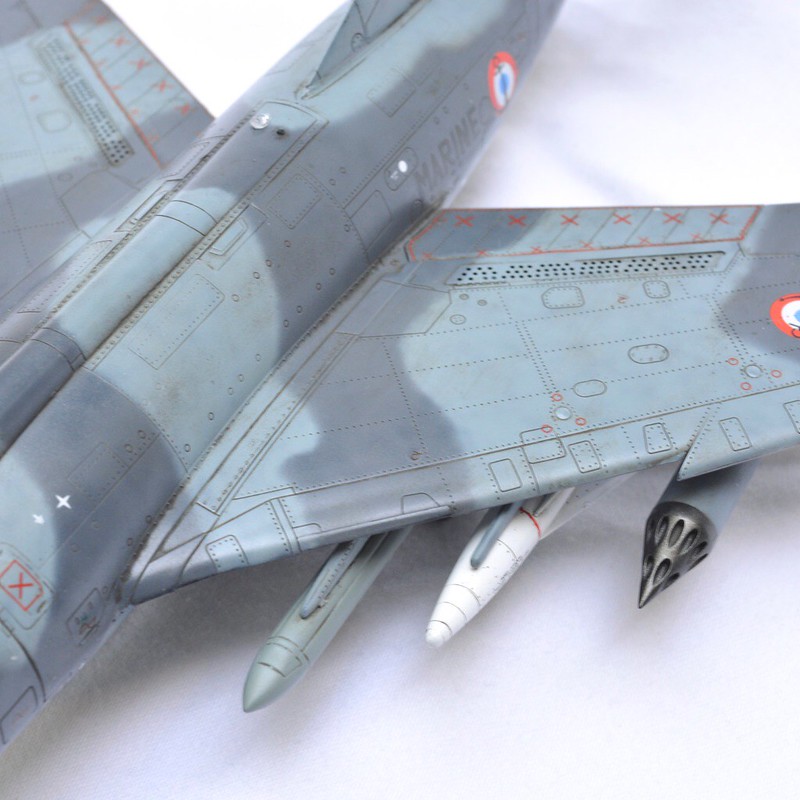
This is Kitty Hawk's Super Etendard painted with Model Master enamels. I shot it tighter (closer to the model, about 1/2 inch to 1 inch and about 18PSI) since I wanted a sharper line.
Untitled

UntitledThe key to getting a sharp-ish line is to angle the paint flow inward to the color you're painting so any overspray carries over to the part where it's going to be that color anyway.

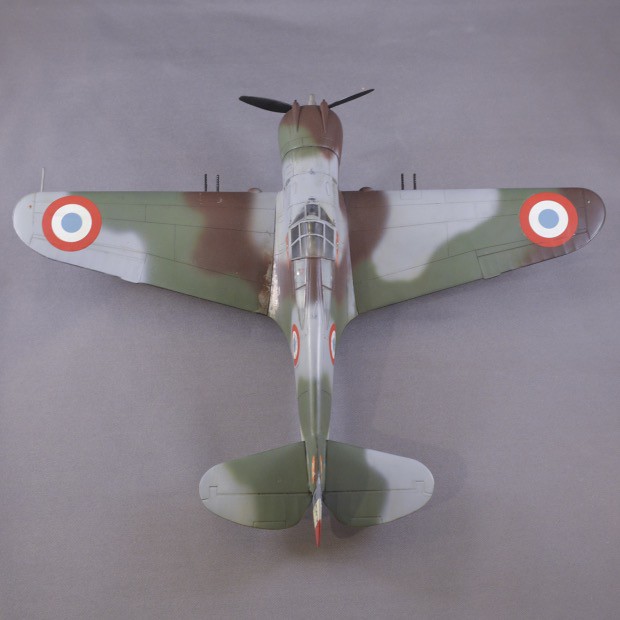
For this Hobbycraft P-36, I wanted a more feathered edge, so I pulled the spraying back a bit, and held it at about a 90-degree angle to the surface to get a softer edge.
Untitled

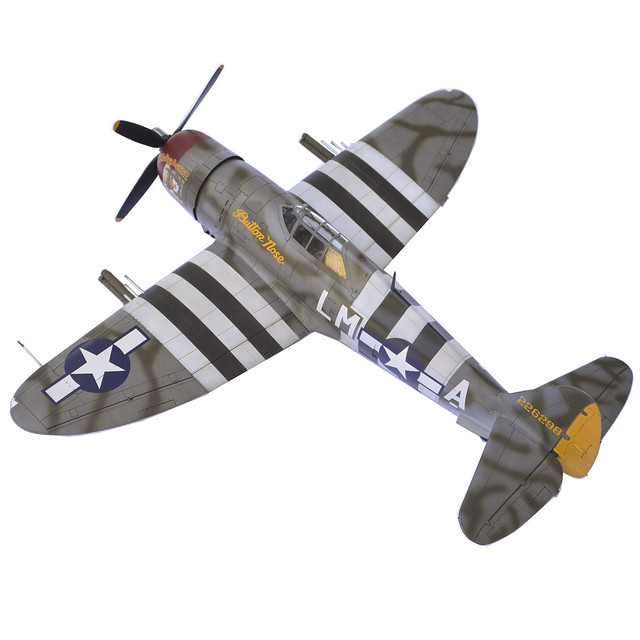
For Tamiya's P-47 Razorback, I had to use tape on the cowl rudder and invasion stripes (though you can make a good argument for NOT making the stripes hard-edged) but then free-handed the rest with Tamiya paints.
P-47 04

Now, in keeping with this build subject, I'll show my 1/72 Airfix Fw-190 that was kind of the bane of my existence due to the smaller scale.
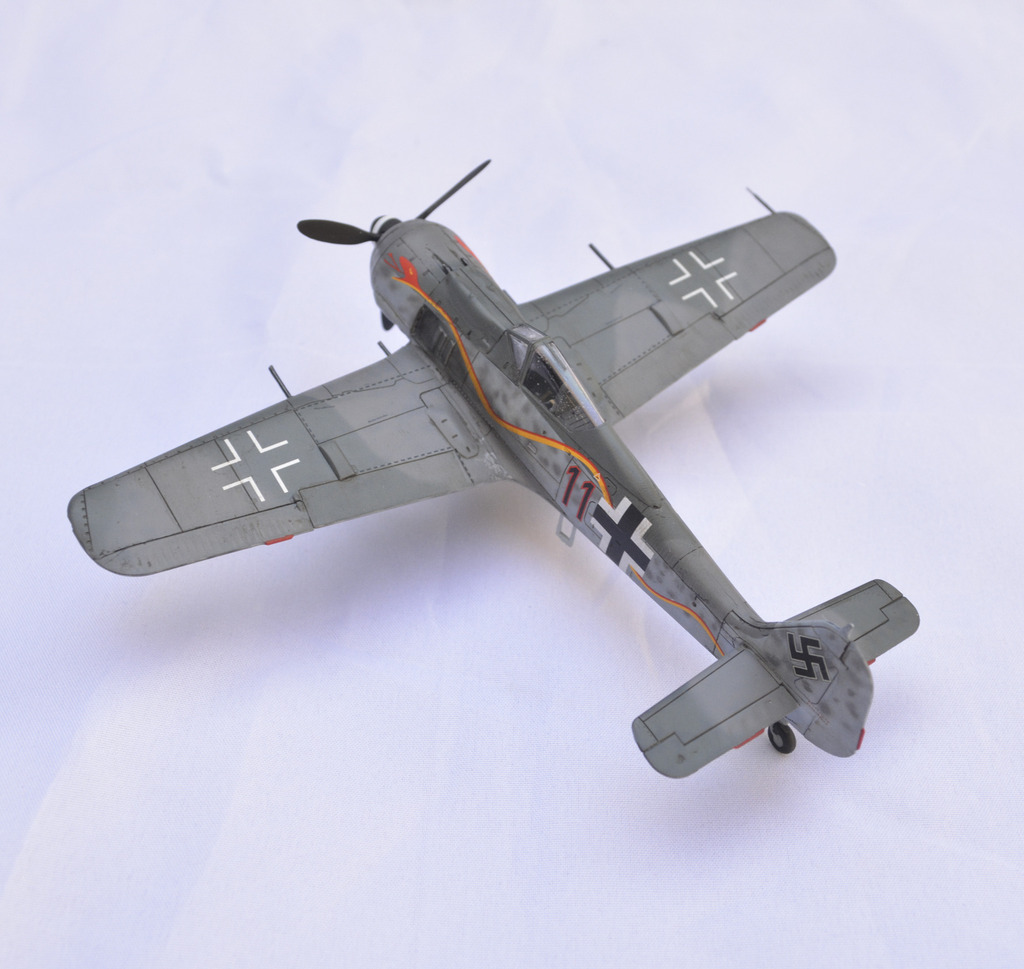
For this one, I used tape for the hard-edged upper/lower fuselage demarcation line, but then freehanded the RLM 74 and 75 where they meet, as well as the mottling. I totally messed up the mottling on the tail and made one spot WAY too big, but the beauty of freehanding soft-edged stuff is that you can just come back with the other color, overspray the error and fix as needed. For the 1/72 mottling, I was at 3.5:1 thinner:paint, 10PSI indicated (so about 8 when actually spraying) and was holding really close to the model.

Hopefully this doesn't come off as my trying to push my way of doing it or seeming like a know-it-all (because I've learned a ton in this thread alone and still have a LONG way to go), but I found that I hated using Blu Tac because I ran into the snag you have with the lighter color, and I found I got inconsistent results because I am not good at pressing the Blu Tac "worms" down consistently, and some of it ends up being hard-edges, while some ends up being soft-edged.

-BD-

  • Member since
    September 2011
  • From: Milaca, Minnesota
Posted by falconmod on Friday, February 2, 2018 12:32 PM

jgeratic

John, that is interesting you masked both top colours individually.  Was that to cut down on paint layers, or to get those lighter streaks in between the main colours?

regards,

Jack


the lighter shades between the two colors was a mistake on my part, I used poster sticky stuff (the green stuff) for the masks so that I would get a thin feathered edge between them.  I apparently didn't pull  the sticky tack back far enough, I'll have to go over it again to get rid of the line between them.

I think in retrospec I should have sprayed the lightest color first without the masks then put them on and sprayed the dark color.  not sure what I was thinking.

John

"And now for something completely different"

On the Bench: 1/72 Ki-67, 1/48 T-38

1/144 AC-130, 1/72 AV-8A Harrier

  • Member since
    April 2006
  • From: ON, Canada
Posted by jgeratic on Friday, February 2, 2018 11:49 AM

John, that is interesting you masked both top colours individually.  Was that to cut down on paint layers, or to get those lighter streaks in between the main colours?

regards,

Jack

  • Member since
    September 2011
  • From: Milaca, Minnesota
Posted by falconmod on Friday, February 2, 2018 10:04 AM

rooster513

Nice camo John! Mottling in that scale is always so much fun!Wink


Thanks,  Ya I know what you mean,  I'm going to use a stencile attached to a popsicle stick and move it along the side spraying through it as I go.  Done it before and it works pretty well,   you get a very slightly feathered edge and no air brush splatter. Propeller

John

On the Bench: 1/72 Ki-67, 1/48 T-38

1/144 AC-130, 1/72 AV-8A Harrier

  • Member since
    September 2014
Posted by rooster513 on Friday, February 2, 2018 9:58 AM

Nice camo John! Mottling in that scale is always so much fun!Wink

-Andy

  • Member since
    September 2014
Posted by rooster513 on Friday, February 2, 2018 9:50 AM

PJ - I really like the chipping effect you achieved there!

Finally got a couple pictures of my progress. Main construction done and got a coat of primer on it. This was my first time using stynlrez primer and so far I'm pretty happy with it, went down nice and smooth. They suggest a .5mm needle but I was able to shoot it through my .35mm with out too much trouble. 

RLM 02 was shot where it was needed and next up with be the topside camo!

-Andy

  • Member since
    September 2011
  • From: Milaca, Minnesota
Posted by falconmod on Friday, February 2, 2018 6:52 AM

Got some painting done on my 1/72 190 F-8

Now for some mottling!

John

On the Bench: 1/72 Ki-67, 1/48 T-38

1/144 AC-130, 1/72 AV-8A Harrier

  • Member since
    November 2008
  • From: Central Florida
Posted by plasticjunkie on Thursday, February 1, 2018 10:06 PM

Doug

Great job on the camo.

Steve

That's a fine looking Dora. You pulled off the stripe deal and looks great.

BD

The boxtop is Barkhorn's D9 with "Christil" under the canopy. must have been his wife's name. I'm not doing his markings on mine but Gerhard Michalski's D9 from Stab/JG4.

The colors are RLM76, 75 and 83 with a real cool spotted RLM 75 over the RLM 83. The side fuselage mottling is extending behind the side crosses. Instead of using the tail band decals I'm opting to spray paint those instead.

The canopy was riveted, masked, painted RLM66 first then RLM83. The RLM66 will show as the the interior frame color. The salt exposes some chips from foot traffic and wear on the wing walkway. 

The salt chipping exposes a few chips here and there on the outside of the doors. The inside will get the same treatment later on.

The prop unit got the salt chipping too. The MM RLM70 was  not dark enough so a few drops of flat black was added to darken the color a bit. The spiral will be next.


 GIFMaker.org_jy_Ayj_O


Too many models to build, not enough time in a lifetime!!

  • Member since
    October 2008
  • From: Georgia
Posted by Rigidrider on Thursday, February 1, 2018 7:34 PM

Steve... Very clean finish! Nicely done...

Brandon, Thank you... Still a bit to do, but so far so good, no issues to speak of for now, I have to get the Jg301, yellow and red campaign  band on now. Then I can start weathering and decals. 

Andy, Thank you also... I try to find (sometimes) unusual paint schemes and markings. I really like the Barkhorn D-13 paint, but its been done to death. 

Thanks again! 

Doug

When Life Hands You A Bucket Of Lemons...

Make Lemonade!

Then Sell It Back At $2 Bucks A Glass...

  • Member since
    September 2014
Posted by rooster513 on Thursday, February 1, 2018 7:13 PM

Doug that is a interesting paint scheme. Your pulling it off nicely!

Steve that came out really nice! Great job on the underside. I'll get you on the front page shortly!

-Andy

  • Member since
    January 2015
Posted by BrandonD on Thursday, February 1, 2018 6:36 PM

John - that's a good solution to keep the fuselage where it needs to be.

Doug - I love the paintwork. I knew this one would be great, and it's not disappointing.

Plasticjunkie - Very nice work. What does the wording under the canopy say?

Bish - when salt weathering, if you're using Tamiya paints, watch out for staining. I had some salt stains on my Stuka, but scrubbing it took care of it. A clear coat that isn't Tamiya might help, or Imay have just been unlucky.

-BD-

  • Member since
    April 2006
  • From: ON, Canada
Posted by jgeratic on Thursday, February 1, 2018 11:19 AM

Hi Steve, that looks right on, and great job on the underside candy striping. Yes

regards,

Jack

  • Member since
    July 2014
Posted by modelcrazy on Thursday, February 1, 2018 10:33 AM

The mottling looks great Doug Yes

I'm done with the Dora. Not much to say about the kit. It's a typical 1/72 Hasegawa. Nice detail with few gaps.

Steve

Building a kit from your stash is like cutting a head off a Hydra, two more take it's place.


http://www.spamodeler.com/forum/

  • Member since
    October 2008
  • From: Georgia
Posted by Rigidrider on Thursday, February 1, 2018 10:15 AM

Morning all! I couldn't sleep last night, (Full moon effect maybe?) So I got up at about 04:30, made coffee, consumed said coffee, got to work on paint. So far so good... I think...

 Got the bulk of the Brown / violet (Plain ole flat brown) on, and some of the Dunkle grau on.

The green and mottling done...

And lastly the light grey on the upper wing surfaces...

And were going to leave it at this point for now... Take care all! 

Doug

When Life Hands You A Bucket Of Lemons...

Make Lemonade!

Then Sell It Back At $2 Bucks A Glass...

  • Member since
    December 2002
  • From: Bury St Edmunds, Suffolk, England
Posted by Bish on Thursday, February 1, 2018 8:16 AM

I know the feeling Doug. I did my first spirals last year and took me several attempts to do the decals. I am not sure i am ready for making my own in 72nd and there are no AM ones on the market i could find. I am gladi found some masks for the 32nd kits, they look much better painted than the decals.

I am a Norfolk man and i glory in being so


On the bench: Airfix 1/72nd Harrier GR.3/Fujimi 1/72nd Ju 87D-3

  • Member since
    October 2008
  • From: Georgia
Posted by Rigidrider on Thursday, February 1, 2018 7:57 AM

Steve... Thank you, After looking at hundereds of pictures over the years I noticed that you can almost always see the aluminum color of the frame inside the cockpit. S I just started painting masked canopys silver first, then the exterior color. Voila! Well, it works for me. Some tape the inside of the canopy to paint silver. Too much work for ms, lolol...

TJ, PJ, Thanks... I just hope I can pull this one off. It looks a bit odd in the pictures with a mostly 76&81 color scheme with just hilites of green and darker grey blended in... 

Bish, Thank you sir! Yes the spinner was painted all white first then I trimmed a piece of masking tape to about 3/32, then tried several times to get it wound around and spaced evenly, then painted black. I personally have NEVER been able to get the decals supplied with some decal sheets to work. And the picture of this bird, showed a very thin spiral. 

More later today! Thanks all...

Doug

When Life Hands You A Bucket Of Lemons...

Make Lemonade!

Then Sell It Back At $2 Bucks A Glass...

  • Member since
    November 2008
  • From: Central Florida
Posted by plasticjunkie on Thursday, February 1, 2018 7:55 AM

Bish

Dawn as in washing up liquid right, good tip.. Thanks.


Forgot you are across the pond. Yes any liquid dish washing soap will do. If you can get Dawn there in the UK do so, it's really good.

 GIFMaker.org_jy_Ayj_O


Too many models to build, not enough time in a lifetime!!

  • Member since
    December 2002
  • From: Bury St Edmunds, Suffolk, England
Posted by Bish on Thursday, February 1, 2018 6:58 AM

Dawn as in washing up liquid right, good tip.. Thanks.

I am a Norfolk man and i glory in being so


On the bench: Airfix 1/72nd Harrier GR.3/Fujimi 1/72nd Ju 87D-3

  • Member since
    November 2008
  • From: Central Florida
Posted by plasticjunkie on Thursday, February 1, 2018 6:51 AM

Bish

Be sure to add a few drops of Dawn in the water to keep it from beading up. The Dawn will let you brush on the water like paint.

Doug

That paint looks very good specially the spinner spiral.

 GIFMaker.org_jy_Ayj_O


Too many models to build, not enough time in a lifetime!!

  • Member since
    November 2003
  • From: Naples, FL
Posted by tempestjohnny on Thursday, February 1, 2018 4:52 AM
Wow Doug John Ernie all look great


  • Member since
    December 2002
  • From: Bury St Edmunds, Suffolk, England
Posted by Bish on Thursday, February 1, 2018 3:02 AM

Doug, coming on very nicely.Was the spinner spiral painted.

I am a Norfolk man and i glory in being so


On the bench: Airfix 1/72nd Harrier GR.3/Fujimi 1/72nd Ju 87D-3

  • Member since
    December 2002
  • From: Bury St Edmunds, Suffolk, England
Posted by Bish on Thursday, February 1, 2018 2:37 AM

plasticjunkie

Thanjs Andy.

Bish

Enamels work fine. I've used it before. Here is a picture of my George painted with MM  IJN Green enamel


Thanks PJ, i like how thats come out. Might do some practice runs on some scrap before trying it on a kit, i really like the effects it has.

I am a Norfolk man and i glory in being so


On the bench: Airfix 1/72nd Harrier GR.3/Fujimi 1/72nd Ju 87D-3

  • Member since
    July 2014
Posted by modelcrazy on Wednesday, January 31, 2018 10:18 PM

Rigidrider
I paint them silver first so the "aluminum" shows on the inside of the canopy where the frame would be masked for paint of the outter frame.

Good idea Doug, I never thought of that.

Steve

Building a kit from your stash is like cutting a head off a Hydra, two more take it's place.


http://www.spamodeler.com/forum/

  • Member since
    October 2008
  • From: Georgia
Posted by Rigidrider on Wednesday, January 31, 2018 10:09 PM

OK, got some more of mine done...

Prop, hub, and spinner painted and canopy slide ready to paint.

Canopy and wind screen masked, temporarily (The slide section) glued on. Front windscreen is permenantely glued down. I paint them silver first so the "aluminum" shows on the inside of the canopy where the frame would be masked for paint of the outter frame.

OK, the first application of a faded 76. I mix with light grey to tone down the blue. These old birdies were pretty well worn towards the fall/winter of 1944.

And the underside. Now we'll let that set up until morning and do some more. This one is going to have a lot of the Brown/violet and far less green in it. More later!

Take care...

Doug 

When Life Hands You A Bucket Of Lemons...

Make Lemonade!

Then Sell It Back At $2 Bucks A Glass...

  • Member since
    October 2008
  • From: Georgia
Posted by Rigidrider on Wednesday, January 31, 2018 9:51 PM

Falcon mod... Nice cockpit! That scale is getting too small for my old *** any more! lol

Andy... Yeah, give it a try. I just hold a thin shield up to the inside when ut comes time to paint, and it keeps her off her belly while the paint is still setting.

Steve, TJ, Both paint jobs are coming along nicely! Decal work also looking great! Keep up the good work.

Brandon, lolol... I'll keep trying! lol... Hey, I love a Wurger... all of them!

Take care all!

Doug

When Life Hands You A Bucket Of Lemons...

Make Lemonade!

Then Sell It Back At $2 Bucks A Glass...

  • Member since
    February 2014
  • From: Michigan
Posted by silentbob33 on Wednesday, January 31, 2018 8:19 PM

Somehow I just realized that I had signed up for this GB and completely forgot Embarrassed.  I haven't commented at all and wanted to apologize.  There's too much to go back and try and keep it all straight, but I did look through everything and you guys are doing some great things.  I'm a bit behind my schedule with my recent health problems but with some medical leave I can hopefully get caught up.

On my bench: Academy 1/35 UH-60L Black Hawk

  • Member since
    September 2011
  • From: Milaca, Minnesota
Posted by falconmod on Wednesday, January 31, 2018 11:16 AM

rooster513

John - That pit looks really nice! Looks like construction is coming along nicely as well despite some of the issuesYes


Thanks,  it's it took some bending and taping while the glue set.  The gun cover was totally mis-shapen had to do a lot of bending and filing to get it to sit right.

    I got the cockpit in and the elevators and the wing all glued on.  pictures later on that.  Still have to figure out how to attach the cowel? it's all butt joints so I need to add some flanges to hold things together.

John

On the Bench: 1/72 Ki-67, 1/48 T-38

1/144 AC-130, 1/72 AV-8A Harrier

JOIN OUR COMMUNITY!

Our community is FREE to join. To participate you must either login or register for an account.

SEARCH FORUMS
FREE NEWSLETTER
By signing up you may also receive reader surveys and occasional special offers. We do not sell, rent or trade our email lists. View our Privacy Policy.