SEARCH FINESCALE.COM

Enter keywords or a search phrase below:

Aces on the Wrong Side of History GB - 2018

19421 views
334 replies
1 rating 2 rating 3 rating 4 rating 5 rating
  • Member since
    August 2012
  • From: Parker City, IN.
Posted by Rambo on Wednesday, July 25, 2018 4:30 PM

I've been wanting to add a update for the last few days but I've been having trouble with the site not wanting to load, but then later in the night around 1am when I'm on break at work its back up. Just a few things to show 1st the 110 all taped up waiting for the RLM74.
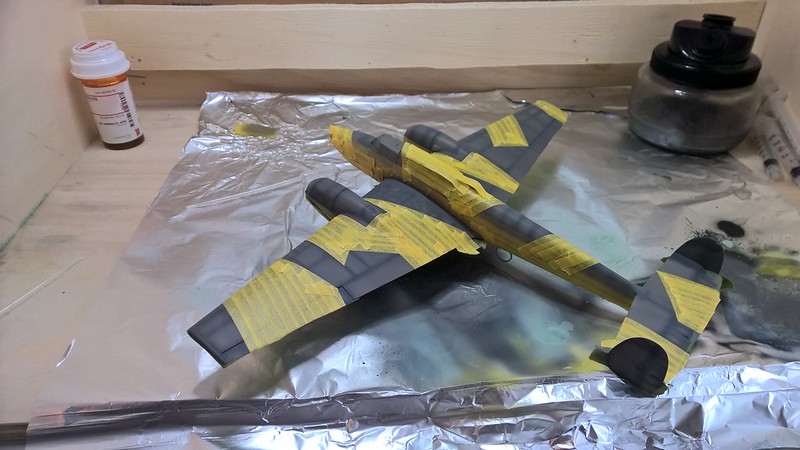
BF 110E 18

Then after a clear coat using that Krylon spray acrylic again, I might just start using it for all my gloss coats from now on I really like how it acts. All the decals went on just fine with a few of the really small ones breaking up but the kit comes with a extra or two of all the small ones so no big deal. BF 110E 19
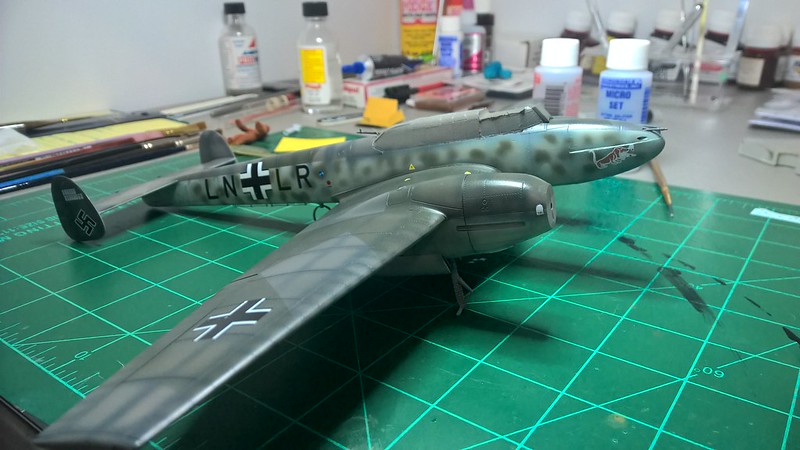
The mottling is a bit to big in some places but I was starting to get a cramp in my hand luckly the crosses on the side covered up the worst looking one. Think next time I will have two glasses of tea before I spray mottling again. The last thing I started to use my Mig dark wash but after about two inches on the underside of one wing I decided that it was just going to be to much work. Unlike a tank aircraft have tones of panel lines a rivets so I broke out the ol flory wash and just slopped it all on. Here in a bit I'll start removing it, this is a new bottle and I gave it a good shake the thing foamed way up like I havent seen before like it was full of soap or something it ended up leaving alot of bubbels behind that I couldn't pop hopefully it cleans up well.BF 110E 20
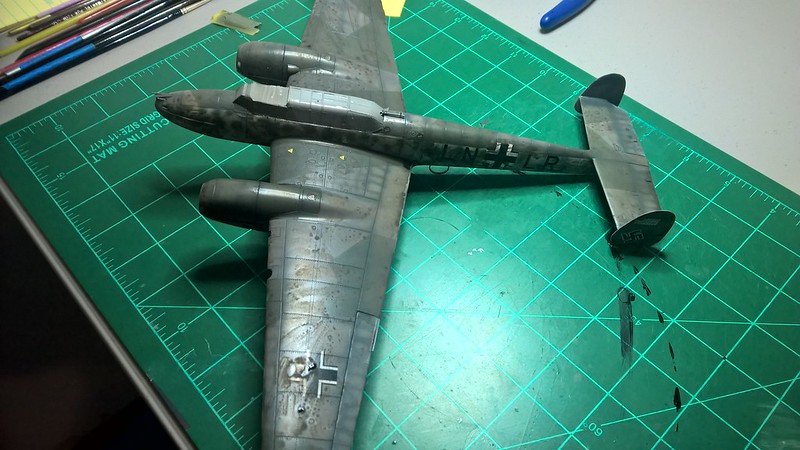
Clint

  • Member since
    December 2002
  • From: Bury St Edmunds, Suffolk, England
Posted by Bish on Tuesday, July 24, 2018 3:27 AM

Cheers guys.

Nick, stunning job on the Zero, came out really well and great job on the figure as well.

I am a Norfolk man and i glory in being so


On the bench: Airfix 1/72nd Harrier GR.3/Fujimi 1/72nd Ju 87D-3

  • Member since
    April 2006
  • From: ON, Canada
Posted by jgeratic on Monday, July 23, 2018 10:58 PM

Nick, splendid job on Iwamoto's Zero. Yes

The figure looks nicely done too, and it was cool see this ace again as I had built his Claude earlier this year.


regards,

Jack

  • Member since
    August 2012
  • From: Parker City, IN.
Posted by Rambo on Monday, July 23, 2018 8:02 PM
That winter camo came out very well

Clint

  • Member since
    August 2015
  • From: the redlands Fl
Posted by crown r n7 on Monday, July 23, 2018 4:40 PM

Most impressive Bish !

thanks again guys on your comments


 Nick.

  • Member since
    December 2002
  • From: Bury St Edmunds, Suffolk, England
Posted by Bish on Monday, July 23, 2018 3:17 PM

I am almost done on the Stuka but one last update before i finish it off. First up, decals. No problems with these, includeing the ywllow V on the wing.

Then an overall wash with Flory bwashes and some exhaust staining.

And then the white was. I have seen this subject done a few times usually useing an airbrush. But i decided to hand brush Tamiya flat white to give a more realistic look. Followed by a little more exhaust stains.

Just a few more bits to add.

I am a Norfolk man and i glory in being so


On the bench: Airfix 1/72nd Harrier GR.3/Fujimi 1/72nd Ju 87D-3

  • Member since
    August 2012
  • From: Parker City, IN.
Posted by Rambo on Monday, July 23, 2018 11:23 AM
Great job Nick

Clint

  • Member since
    May 2013
  • From: From the Mit, but live in Mason, O high ho
Posted by hogfanfs on Monday, July 23, 2018 10:58 AM

Nick, 

Absolutely stunning work!


 Bruce


 On the bench:  1/48 Eduard MiG-21MF

                        1/35 Takom Merkava Mk.I


  • Member since
    July 2014
Posted by modelcrazy on Monday, July 23, 2018 10:26 AM

Looks beautiful Nick Yes

Steve

Building a kit from your stash is like cutting a head off a Hydra, two more take it's place.


http://www.spamodeler.com/forum/

  • Member since
    August 2015
  • From: the redlands Fl
Posted by crown r n7 on Monday, July 23, 2018 9:58 AM

My Tamiya A6M5 is done. Painted with Tamiya xf-11 and xf-12. Weathered with masters touch oil paints. The decals are from the kit using Tamiya decal setting solutions.The pilot is also from the kit representing LT(jg) Tetsuzo Iwamoto with 80 victories?


Thank you for all your comments and for being in this GB.


 Nick.

  • Member since
    August 2015
  • From: the redlands Fl
Posted by crown r n7 on Friday, July 20, 2018 8:41 PM

Thank you Steve and Clint finished up the canopy tonight some little odds and ends to do. 


 Nick.

  • Member since
    August 2012
  • From: Parker City, IN.
Posted by Rambo on Friday, July 20, 2018 4:34 PM
Great job on him Crown

Clint

  • Member since
    July 2014
Posted by modelcrazy on Friday, July 20, 2018 4:27 PM

Excelent Job on him Nick.

Steve

Building a kit from your stash is like cutting a head off a Hydra, two more take it's place.


http://www.spamodeler.com/forum/

  • Member since
    August 2015
  • From: the redlands Fl
Posted by crown r n7 on Friday, July 20, 2018 10:10 AM

I managed to finish the flyer .


 Nick.

  • Member since
    August 2012
  • From: Parker City, IN.
Posted by Rambo on Thursday, July 19, 2018 5:30 PM
Thanks Bish hopefully this weekend.

Clint

  • Member since
    December 2002
  • From: Bury St Edmunds, Suffolk, England
Posted by Bish on Thursday, July 19, 2018 3:58 AM

The 110 is looking good Clint, look forwardto seeing the results of the mottling.

I am a Norfolk man and i glory in being so


On the bench: Airfix 1/72nd Harrier GR.3/Fujimi 1/72nd Ju 87D-3

  • Member since
    December 2002
  • From: Bury St Edmunds, Suffolk, England
Posted by Bish on Thursday, July 19, 2018 3:57 AM

Thanks Nick.

Great work on that, you have a really nice effect on those panel lines.

I am a Norfolk man and i glory in being so


On the bench: Airfix 1/72nd Harrier GR.3/Fujimi 1/72nd Ju 87D-3

  • Member since
    August 2012
  • From: Parker City, IN.
Posted by Rambo on Wednesday, July 18, 2018 8:47 PM
Thanks guys. MM they are beautiful I'm looking for the eduard F night fighter right now Imo the best looking 110

Clint

  • Member since
    April 2015
Posted by Mopar Madness on Wednesday, July 18, 2018 8:33 PM

Those 110’s really are beautiful birds. Yours is coming along nicely!

Chad

God, Family, Models...

At the plate: 1/48 Airfix Bf109 & 1/35 Tamiya Famo

On deck: Who knows!

  • Member since
    August 2015
  • From: the redlands Fl
Posted by crown r n7 on Wednesday, July 18, 2018 6:41 PM

Clint looking good !


 Nick.

  • Member since
    August 2012
  • From: Parker City, IN.
Posted by Rambo on Wednesday, July 18, 2018 6:23 PM

Got the 110 primed with Tamiya grey primer. Then preshaded using Tamiya nato black. The underside RLM76 was then sprayed using Lifecolor acrylic paint. The RLM76 was then masked and Tamiya white was sprayed followed by Lifecolor RLM04 yellow. The underside was all masked and RLM75 was sprayed alos using Lifecolor. This is where it sits now, tomorrow I will mask the 75 and spray the 74 then more masking and the molting will be put down. The size of the 110 will be like molting two 109s so not looking foward to it. This was my first time using Lifecolor paints I've had some tip dry that I never get with Tamiya but I'm going to blame that on the high wet temps. I started with thinning 50/50 with its own thinner that still seems to be a bit thick so next time will bump it to 40/60 paint/thinner. The color match is really good with the Lifecolor paint but I've had a chance to play with some Mission Model paint at a friends. It was just the best to use, so my plan is now to use up my few bottels of Lifecolor I got and start replacing them with Mission Model paints. I will still be using my Tamiya for IJN stuff and all my armor builds since I am very happy with my building process there. The only reason I went away from using Tamiya on German aircraft is wanting paint already color matched even tho I custom mix Tamiya for my armor but there is less colors for armor then for aircraft... Maybe I'm just crazy... anyway thanks for sticking with me here lol

BF 110 E 16

BF 110 E 17

Clint

  • Member since
    August 2012
  • From: Parker City, IN.
Posted by Rambo on Wednesday, July 18, 2018 2:33 PM
Crown: Great weathering

Clint

  • Member since
    August 2015
  • From: the redlands Fl
Posted by crown r n7 on Wednesday, July 18, 2018 1:39 PM

Chad thank you it’s thinned oil paint.


 Nick.

  • Member since
    April 2015
Posted by Mopar Madness on Wednesday, July 18, 2018 12:55 PM

 I love that streaking under the fuselage! 

Chad

God, Family, Models...

At the plate: 1/48 Airfix Bf109 & 1/35 Tamiya Famo

On deck: Who knows!

  • Member since
    August 2015
  • From: the redlands Fl
Posted by crown r n7 on Wednesday, July 18, 2018 11:58 AM

Bish nice work on the stuka.

Clint that masking is tedious but you make it look easy.

Steve awesome 190 I did the same thing but on the under side of the zero's cowling let it dry some 0000 steel wool and repiant.

 I have been away from the bench for a few weeks. here are my latest pics. next comes clear flat and a light coat of gloss.


 Nick.

  • Member since
    August 2012
  • From: Parker City, IN.
Posted by Rambo on Tuesday, July 10, 2018 10:17 PM
Wow at least you caught it right away hope you find what you need.

Clint

  • Member since
    July 2014
Posted by modelcrazy on Tuesday, July 10, 2018 9:51 PM

I would have had this done now but I screwed up. Instead of applying decal setting solution to the fusalage and right wing cross I applied Testers thin cement Bang Head. Yeah....I was a little miffed. Luckly I caught the mistake quickly. It took me a second to figure out why the solution was melting the decal and paint. Anyway, fighting the urge to just toss the thing into the trash I set it aside, thought about it, scrapped off the fues cross and reapplied the paint. I masked the red stripe with a post-it note and peeled off the black Gruppe mark!
I'm going to Boise this weekend for 2 weeks and I'll see if I Have some extra 1/72 German decals in my decal box when I get there. The kit does'nt come with swastikas so maybe I can also find some of those as well. I really don't want to buy a whole new set.

Steve

Building a kit from your stash is like cutting a head off a Hydra, two more take it's place.


http://www.spamodeler.com/forum/

  • Member since
    April 2013
Posted by SchattenSpartan on Tuesday, July 10, 2018 4:56 AM

Bish, that base camo looks really good. I'm looking forward to seeing that Stuka with the whitewash on it.

Clint, almost all the Eduard masks I've used so far have problems with being a little bit too small in some places. They're not a perfect fit, but they still make masking canopies so much easier, especially big ones like on the 110.

  • Member since
    August 2012
  • From: Parker City, IN.
Posted by Rambo on Tuesday, July 10, 2018 12:17 AM
MM: Still time consuming but them pre cut masks make things alot easier.

Clint

  • Member since
    April 2015
Posted by Mopar Madness on Monday, July 9, 2018 10:26 PM

Masking a Bf 110 canopy is no small feat!  

Chad

God, Family, Models...

At the plate: 1/48 Airfix Bf109 & 1/35 Tamiya Famo

On deck: Who knows!

JOIN OUR COMMUNITY!

Our community is FREE to join. To participate you must either login or register for an account.

SEARCH FORUMS
FREE NEWSLETTER
By signing up you may also receive reader surveys and occasional special offers. We do not sell, rent or trade our email lists. View our Privacy Policy.