SEARCH FINESCALE.COM

Enter keywords or a search phrase below:

80 Years of Airfix GB

115232 views
1664 replies
1 rating 2 rating 3 rating 4 rating 5 rating
  • Member since
    December 2002
  • From: Bury St Edmunds, Suffolk, England
Posted by Bish on Saturday, January 19, 2019 7:46 AM

stikpusher


Bish

Thats come on really well Stik, looks like a nice kit.


Thanks Bish, aside from “modeling skills required”, I think that this is a great kit. It’s not shake and bake, but it’s not dog either. I would love to see Airfix do more 32nd or 35th scale armor kits of their own.


I like kits like that, you don't want a battle with it, but you want sopme challenge. And i will second that.

I am a Norfolk man and i glory in being so


On the bench: Airfix 1/72nd Harrier GR.3/Fujimi 1/72nd Ju 87D-3

  • Member since
    July 2008
  • From: Vancouver, the "wet coast"
Posted by castelnuovo on Friday, January 18, 2019 10:29 PM

Some work done on the Stuka

  • Member since
    April 2015
Posted by Mopar Madness on Friday, January 18, 2019 6:32 PM

checkmateking02

There is a great variety of kits being built here, and they are looking great.  It's really interesting to see all the different things Airfix has produced--and learn how well they do or don't go together.

I've progressed this far:  undersurface is painted; dark earth is applied; I masked that yesterday; and have now applied the dark green.


I love building spitfires, but the camouflage is a pain in the butt. Looking forward to see yours! 

Chad

God, Family, Models...

At the plate: 1/48 Airfix Bf109 & 1/35 Tamiya Famo

On deck: Who knows!

  • Member since
    July 2004
  • From: Sonora Desert
Posted by stikpusher on Friday, January 18, 2019 5:42 PM

Bish

Thats come on really well Stik, looks like a nice kit.


Thanks Bish, aside from “modeling skills required”, I think that this is a great kit. It’s not shake and bake, but it’s not dog either. I would love to see Airfix do more 32nd or 35th scale armor kits of their own.


F is for FIRE, That burns down the whole town!

U is for URANIUM... BOMBS!

N is for NO SURVIVORS...

       - Plankton

LSM


  • Member since
    December 2002
  • From: Bury St Edmunds, Suffolk, England
Posted by Bish on Friday, January 18, 2019 4:07 PM

Steve, loks like you got to grips with that pit. Looking nice.

I am a Norfolk man and i glory in being so


On the bench: Airfix 1/72nd Harrier GR.3/Fujimi 1/72nd Ju 87D-3

  • Member since
    December 2002
  • From: Bury St Edmunds, Suffolk, England
Posted by Bish on Friday, January 18, 2019 4:02 PM

John, looks like you going to need a drop on filler in there, be interesting to see how the rest of it goes together.

I am a Norfolk man and i glory in being so


On the bench: Airfix 1/72nd Harrier GR.3/Fujimi 1/72nd Ju 87D-3

  • Member since
    December 2002
  • From: Bury St Edmunds, Suffolk, England
Posted by Bish on Friday, January 18, 2019 4:00 PM

Svenne, some nice work there, but looks like its not amking it easy for you.

I am a Norfolk man and i glory in being so


On the bench: Airfix 1/72nd Harrier GR.3/Fujimi 1/72nd Ju 87D-3

  • Member since
    December 2002
  • From: Bury St Edmunds, Suffolk, England
Posted by Bish on Friday, January 18, 2019 3:55 PM

checkmateking02

There is a great variety of kits being built here, and they are looking great.  It's really interesting to see all the different things Airfix has produced--and learn how well they do or don't go together.

I've progressed this far:  undersurface is painted; dark earth is applied; I masked that yesterday; and have now applied the dark green.


Agreed, geting some good insight into a range of Airfix kits. Thats loking good, i like how you have masked that.

I am a Norfolk man and i glory in being so


On the bench: Airfix 1/72nd Harrier GR.3/Fujimi 1/72nd Ju 87D-3

  • Member since
    December 2002
  • From: Bury St Edmunds, Suffolk, England
Posted by Bish on Friday, January 18, 2019 3:53 PM

Thats come on really well Stik, looks like a nice kit.

I am a Norfolk man and i glory in being so


On the bench: Airfix 1/72nd Harrier GR.3/Fujimi 1/72nd Ju 87D-3

  • Member since
    July 2004
  • From: Sonora Desert
Posted by stikpusher on Friday, January 18, 2019 3:25 PM

Mopar, it is a good kit, that just needs a little extra effort. Especially in checking references and comparing them to the instructions....

Kensar, this kit is molded in the typical gray Airfix plastic. The coloring just changes due lighting and my photo edits.


so for my next update:


Last nite after dinner, I added the gun shield and the final fiddly bits to the trail legs... 


But I waited to let the glue dry overnite to do the seam clean up on the trail leg recoil spades. Which I did today at the midday. I also added the tow cables to the shield. And cleaned up the seams on the rounds that the kit includes.


Gunner Tommy Atkins standing by, and awaiting the rest of his Guardsmen gun crew to help hold Nijmegen bridge from counter attacking Panzers...


Construction is now 98% complete. I have left the cradle mount separate from the carriage, and the wheels, to aide in ease of painting, which it is now all ready to commence on my days off next week.


F is for FIRE, That burns down the whole town!

U is for URANIUM... BOMBS!

N is for NO SURVIVORS...

       - Plankton

LSM


  • Member since
    September 2017
  • From: western North Carolina
Posted by kensar on Friday, January 18, 2019 6:47 AM

Stik - looks like a lot of parts on that gun- sufficiently busy.  Are they all the same base color?


Thanks, Lewbud.


Kensar


  • Member since
    June 2008
Posted by lewbud on Friday, January 18, 2019 5:07 AM

Kensar,

The P-40 looks great! 

Bish,

The S.M. 79 is coming along nicely. It is a unique looking aircraft. Can't wait to see it in paint.

Steve,

I hope you've got an Eduard mask for that canopy.  Looks like I'll be adding a Blennie to my stash as it was used in the Battle of Britain and I have decals for it.

CMK,

The Spit is looking good.

I was planning on starting off with the 109 so I went to YouTube to check out some build videos for inspiration. I watched several, including one by a certain Waggish American, and was inspired to pull the kit out and see where I had left off (I started this kit several years ago for my BoB group build). Everything was where I had left it except the cockpit, I have no idea where it went. I'll do a more extensive search in the morning but if I can't find it, I'll either paint the canopy black to hide it or find a resin replacement.

There's a lot of good work going on here, keep it going.

Buddy- Those who say there are no stupid questions have never worked in customer service.

  • Member since
    September 2003
  • From: AandF in the Badger State
Posted by checkmateking02 on Thursday, January 17, 2019 8:33 PM

There is a great variety of kits being built here, and they are looking great.  It's really interesting to see all the different things Airfix has produced--and learn how well they do or don't go together.

I've progressed this far:  undersurface is painted; dark earth is applied; I masked that yesterday; and have now applied the dark green.


  • Member since
    April 2015
Posted by Mopar Madness on Thursday, January 17, 2019 7:04 PM

That actually looks pretty darn good for a vintage kit.  Keep up the good work.

Chad

God, Family, Models...

At the plate: 1/48 Airfix Bf109 & 1/35 Tamiya Famo

On deck: Who knows!

  • Member since
    July 2004
  • From: Sonora Desert
Posted by stikpusher on Thursday, January 17, 2019 5:14 PM

Today’s mid afternoon update. 


First up, I finished the cradle and mount. The parts are for the most part nicely detailed, but mold seam lines are prominent and require lots of clean up. Thankfully, the plastic is on the softer side. Also some of the attachment points and directions for certain small parts are ambiguous. Test fit, check reference photos, test fit, check reference again, and test fit again, just to be sure, before applying glue.


anyways here is the completed gun on the cradle and mount


and a close up of some of the details on the mount...


Then, while the glue was drying there, I built up one of the Bronco crew figures and posed him with an Airfix 32nd scale figure... as you can see, they are fairly close in stature and should work for this....


Next to a 1:35 scale ruler (left side) both stand at around 1.8M tall...
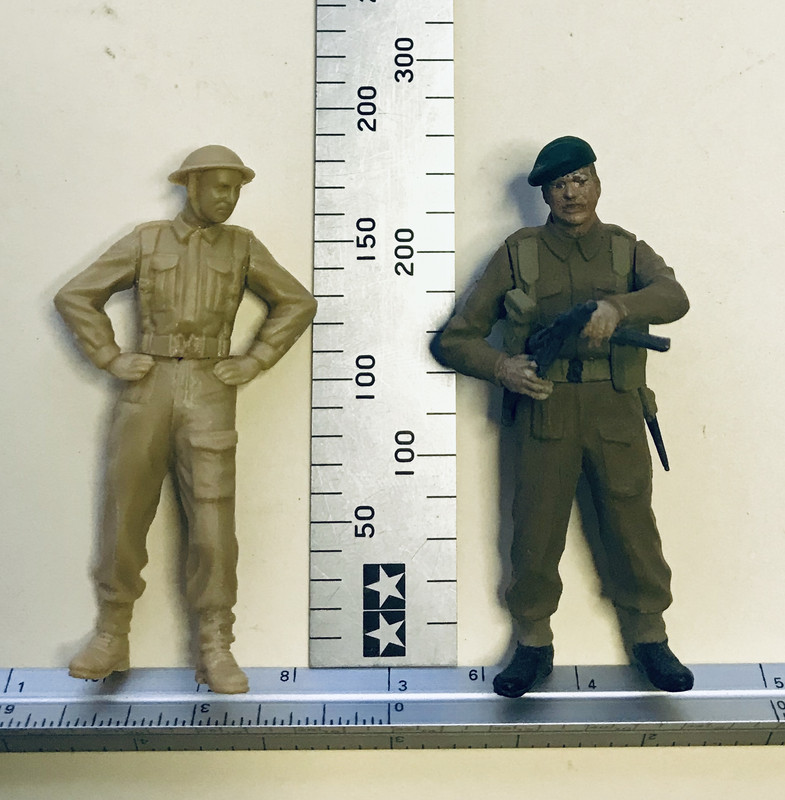


Then I started work on the carriage. There are stil a lot of detail parts to add there before final assembly...


Then a test fit all together along with the Bronco figure


More tomorrow... This is progressing faster than I expected...


F is for FIRE, That burns down the whole town!

U is for URANIUM... BOMBS!

N is for NO SURVIVORS...

       - Plankton

LSM


  • Member since
    December 2005
  • From: Goteborg / Sverige
Posted by Svenne Duva on Thursday, January 17, 2019 12:57 PM

Hi modelcrazy,

Looking good, don't enver you the masking work...

sic transit gloria mundi

  • Member since
    December 2005
  • From: Goteborg / Sverige
Posted by Svenne Duva on Thursday, January 17, 2019 12:53 PM

Hi Frank,

The Clipper is coming on nicely!
The big B-29 is ... cool!

sic transit gloria mundi

  • Member since
    April 2015
Posted by Mopar Madness on Thursday, January 17, 2019 12:43 PM

Frank - You’re doing great on those classic airfix kits. 

Steve - Looks like you’re definitely at the halfway point on that Blenheim!


Chad

God, Family, Models...

At the plate: 1/48 Airfix Bf109 & 1/35 Tamiya Famo

On deck: Who knows!

  • Member since
    June 2017
  • From: Winter Park, FL
Posted by fotofrank on Thursday, January 17, 2019 12:23 PM

A brief update on the Clipper and the WB-29. The Clipper is just about ready for primer.

The filling and sanding is finished. I'm waiting for it to be warm enough out on the patio so I can paint. The crew door in the nose doesn't fit very well so I filled the gap around the door with some PPP.


As soon as the temp on the patio gets up to around 70º, I'll go out and paint.

When I put the crew door on the B-29, there was quite a depression. I beefed up the door with some styrene. I'll fill the gaps with some PPP. Where the turrets used to be, I'll build up with styrene and sand to shape I don't want to use too much putty because of shrinkage.


So that's the latest.

OK. In the stash: Way too much to build in one lifetime...

  • Member since
    July 2004
  • From: Sonora Desert
Posted by stikpusher on Thursday, January 17, 2019 11:02 AM

modelcrazy

I've been working slowly on the Blenheim due to some other builds that moved ahead for everything. With being said I was able to work on the seams left over from the canopy/nose attachment. I need to attach the masks and get on the painting. No..the GBU 12 Paveway II's are not for the Blenheim although they would really have come in handy.


I was gonna say something about the Paveways and the Blenheim.... 


F is for FIRE, That burns down the whole town!

U is for URANIUM... BOMBS!

N is for NO SURVIVORS...

       - Plankton

LSM


  • Member since
    July 2014
Posted by modelcrazy on Thursday, January 17, 2019 1:19 AM

I've been working slowly on the Blenheim due to some other builds that moved ahead for everything. With being said I was able to work on the seams left over from the canopy/nose attachment. I need to attach the masks and get on the painting. No..the GBU 12 Paveway II's are not for the Blenheim although they would really have come in handy.

Steve

Building a kit from your stash is like cutting a head off a Hydra, two more take it's place.


http://www.spamodeler.com/forum/

  • Member since
    July 2004
  • From: Sonora Desert
Posted by stikpusher on Wednesday, January 16, 2019 10:10 PM

My latest project that I started this evening. And also my entry for this GB.


I won’t be using the kit figures. They are just the basic multipose infantry figures and don’t quite work for this subject. So I will be using this Bronco figure set. Thankfully,  Bronco’s figures tend to be on the larger end of the 1/35 spectrum


I made it thru step 5, which basicly assembled the barrel, breech, muzzle brake, and cradle. I found a 1980 trademark stamp inside the base of the cradle.


More to come in the next few days...


F is for FIRE, That burns down the whole town!

U is for URANIUM... BOMBS!

N is for NO SURVIVORS...

       - Plankton

LSM


  • Member since
    September 2011
  • From: Milaca, Minnesota
Posted by falconmod on Wednesday, January 16, 2019 7:42 AM

Got started on my Swift last night. the cockpit and nose wheel sub-assembly's

fit looks real good except for this large rather trench like seem that I don't think is suppossed to be there.

And here's the sub-assembly's that go in the fuselage.

Falcon  (John)

On the Bench: 1/72 Ki-67, 1/48 T-38

1/144 AC-130, 1/72 AV-8A Harrier

  • Member since
    August 2004
  • From: Forest Hill, Maryland
Posted by cwalker3 on Wednesday, January 16, 2019 5:34 AM

Bish - Yes, the bomb bay is nice. I just wish it they had supplied bombs instead of making you buy another kit.

Kensar - Thanks. Yes, there is a good amount of detail for a 1/72 kit. I continue to be impressed with these Airfix kits.

Joe Rix - Thank you. The interior has some nice detail, but you'll see next to nothing when finished and it's all closed up.

Svenna Duva - Thank you.


Cary


  • Member since
    December 2005
  • From: Goteborg / Sverige
Posted by Svenne Duva on Tuesday, January 15, 2019 1:32 PM

Right,

short update but quite a few pics:

Sprueshot, attachement points are on the heavy side, this will cause issues further if not carefull:

Parts break under pressure when you try to snip them off using sprue cutter:

Better use a raisor saw:

Last time I see the IP:

Not stricktly following the build sequence, I am hoping that this will help closing any gaps at the wing root:


But unfortunatly the starboard wing is warped:

I think I can get arround this by making the tabs force the wing up instead of down:

Sorry for picture quality, hope to improve in this area as well Propeller

Thank you for looking and feel free to comment!

Svenne


sic transit gloria mundi

  • Member since
    December 2005
  • From: Goteborg / Sverige
Posted by Svenne Duva on Tuesday, January 15, 2019 1:10 PM

Hi cwalker3,

That looks already very impressing, I am hooked :)

Svenne

sic transit gloria mundi

  • Member since
    December 2005
  • From: Goteborg / Sverige
Posted by Svenne Duva on Tuesday, January 15, 2019 1:05 PM

Hi Kensar,

Gratulations on your completed build.
I am not very familiar to the P-40 but I realize that has to change.
Very inspiring build, lov the attention to detail.

Svenne

sic transit gloria mundi

  • Member since
    August 2009
  • From: MOAB, UTAH
Posted by JOE RIX on Tuesday, January 15, 2019 12:12 AM

Terrific work on the Lancaster Cwalker. The cockpit looks great.

"Not only do I not know what's going on, I wouldn't know what to do about it if I did". George Carlin

  • Member since
    June 2017
  • From: Winter Park, FL
Posted by fotofrank on Monday, January 14, 2019 2:25 PM

Split shots and five minute epoxy. This is the base of the stand for the Clipper. I weighted this because I don't want it to tip because of the weight of the model. The stand will be painted of course.


OK. In the stash: Way too much to build in one lifetime...

  • Member since
    April 2006
  • From: ON, Canada
Posted by jgeratic on Monday, January 14, 2019 9:49 AM

Kensar, excellent looking Warhawk there.  Yes

Learned something new too, I think I see wheel wells completely covered in canvas?

--------------

Everyone else, great stuff coming off your respective benches...

regards,

Jack

JOIN OUR COMMUNITY!

Our community is FREE to join. To participate you must either login or register for an account.

SEARCH FORUMS
FREE NEWSLETTER
By signing up you may also receive reader surveys and occasional special offers. We do not sell, rent or trade our email lists. View our Privacy Policy.