SEARCH FINESCALE.COM

Enter keywords or a search phrase below:

Battle For Germany 45 GB Starts Now - 08 May 06

93436 views
2321 replies
1 rating 2 rating 3 rating 4 rating 5 rating
  • Member since
    April 2005
  • From: Piscataway, NJ!
Posted by wing_nut on Saturday, January 21, 2006 5:17 PM

Started the camo portion of the program. The use of the Rust-oleum plastic primer (thanks Tom) has taken care of the painting problems that had really had me nervous... see the thread below.

http://www.finescale.com/FSM/CS/forums/572528/ShowPost.aspx


Very happy with the way the paint is laying down.  Never used a primer beofre and will never go without it now.


Marc  

  • Member since
    February 2003
  • From: A Spartan in the Wolverine State
Posted by rjkplasticmod on Saturday, January 21, 2006 6:48 PM

Looking good Marc.  Very nice, smooth painting.

Regards,  Rick

RICK At My Age, I've Seen It All, Done It All, But I Don't Remember It All...
  • Member since
    August 2003
  • From: Alice Springs Australia
Posted by tweety1 on Saturday, January 21, 2006 6:55 PM
Looking good Marc, looking REAL good!
--Sean-- If you are driving at the speed of light and you turn on the headlights, what happens???
  • Member since
    July 2004
  • From: SETX. USA
Posted by tho9900 on Saturday, January 21, 2006 7:24 PM

Marc - looks great!  What brush do you spray with?  Those are some nice crisp lines for freehand...

Believe it or not I didn't follow my golden rule and didn't prime before acrylic on the fuselage of the little Storch I am building for fun... ends up I had some paint pull up, and after touch up the hand painted paint looks a tad darker than the sprayed on.  I am thinking that after weathering and dull coating it won't be noticable but I am glad I did the rest of the plane.  I rushed through this one in the home stretch (painting and small bits) and made two mistakes...  one I (like a total fool) unmasked my canopy after painting... later as I was putting on the landing gear it I was thinking of my weathering approach and futuring and all then BAM!!!  It jumped up and hit me in the head... I have to dull coat after decals go down and I already removed the masks.. luckily I was able to slide some tape in between the fuselage and gear and mask over those 3,000 windows .. in the process I disengaged one of my gear legs and had to CA it back in... CA left a small rim around the attachment point but it's not noticable...  (snowball effect)

I plan on going to the "not so local hobby" shop tomorrow and pick up the Tank Green from Vallejo for the Tiger II.. when I do I am going to go hog wild and get me a bunch of these Academy 1/72 kits for stress release.  They're only about $5 to $10 each and a bucket of fun!!!

The only part I had problems with on this one, is where the nose tip of the cowling attaches (three part cowling) I should have sanded it more because there is a small gap that I am not filling.. I had already painted the cowl (I had to the way the prop goes in, paint, insert prop through nose piece. then into one half of the cowl, glue the other half to that one,)  and this was a for fun kit.. and again... it doesn't look that bad..

Has anyone built the 1/32 Fi-156 by Monogram or Revell?  I want to build one for a ceiling hanger...  just curious as to the kit...  Kind of a neat plane and after reading a lot about it I am impressed with its abilities...


---Tom--- O' brave new world, That has such people in it!
  • Member since
    April 2005
  • From: Piscataway, NJ!
Posted by wing_nut on Saturday, January 21, 2006 8:55 PM

Rick, Sean & Tom... Thanks very much I appreciate it.


Tom - Not freehand... Fun-tac and tape

Marc  

  • Member since
    November 2003
  • From: Nashville, TN area
Posted by bobbaily on Saturday, January 21, 2006 9:17 PM

Marc-nice paint work.

Finally got the a/b operation moved from the garage to the spare bedroom.  Sharing with the cat.  She doesn't like the smell of acrylic.  I don't like the smell of the litter box....we're even....Big Smile [:D]

Put a coat of RLM 83 on the 262 today.  Not happy with the seams around the front cowling.  Figure I can touch it up a little before masking and painting the RLM 81.  However, looking at other builds of the Tamiya kit (including the one in the instructions), their gap is present also (maybe not as extreme as mine though).  Question for the group of experts-was the front panel of the cowl an access panel?

While waiting for the paint to cure before masking, I washed the Panther kit.  Hope to be able to complete it by the end date.  Finding myself over committed, with the Battle of the Atlantic GB starting soon.Banged Head [banghead]...of course, I'm looking forward to that one too....so many builds and so little time....


Bob


  • Member since
    April 2005
  • From: Piscataway, NJ!
Posted by wing_nut on Sunday, January 22, 2006 12:22 AM
Looks good Bob.  Can't wait to see the affect of the mask on the fuselage.

Marc  

  • Member since
    August 2003
  • From: Alice Springs Australia
Posted by tweety1 on Sunday, January 22, 2006 1:46 AM

Looking really good Bob.

Might have to make a 262 one day, in the distant future that is.


Quick quiz for ya's.

What is this a knock off of???

http://cgi.ebay.com.au/Precision-Airbrush-Kit-Air-Brush-Air-Tool-H-80_W0QQitemZ6031279733QQcategoryZ2594QQrdZ1QQcmdZViewItem


How tacky can it be for $100 bucks??

--Sean-- If you are driving at the speed of light and you turn on the headlights, what happens???
  • Member since
    February 2003
  • From: Melbourne, Australia
Posted by darson on Sunday, January 22, 2006 6:04 AM

Tweets I'll think I'll pass on the AB although it does look good.  I notice they have even ripped off the same camera angles that Iwata use in their advertising.

All, I don't know if you have checked out this post in the aircraft forum but please do it is a classic, I even called SWMBO in in to check it out.  All I can say is I hope that guy was wearing brown underdacks Big Smile [:D]

http://www.finescale.com/FSM/CS/forums/204252/ShowPost.aspx

Cheers

  • Member since
    August 2003
  • From: Alice Springs Australia
Posted by tweety1 on Sunday, January 22, 2006 7:38 AM

Laugh [(-D]Seen that one before, but it still cacks me!Laugh [(-D]


I can't help but smile as the Spit goes past, and you hear it fly into the background.

Theres something about those prop engines that the jet fans just can't appreciateSigh [sigh]


-:edit:- 34 and still cant spell for ****

--Sean-- If you are driving at the speed of light and you turn on the headlights, what happens???
  • Member since
    July 2004
  • From: SETX. USA
Posted by tho9900 on Sunday, January 22, 2006 8:53 AM
 tweety1 wrote:

What is this a knock off of???

http://cgi.ebay.com.au/Precision-Airbrush-Kit-Air-Brush-Air-Tool-H-80_W0QQitemZ6031279733QQcategoryZ2594QQrdZ1QQcmdZViewItem

Tweets - that's a dead ringer for the Iwata HP-C Plus "High Line", that MAC valve in front gives it away...

Check it out at the bottom of this page and compare:

http://www.dixieart.com/High_Performance_PLUS_and_Hi-Line_Iwata_Airbrushes.html

---Tom--- O' brave new world, That has such people in it!
  • Member since
    July 2004
  • From: SETX. USA
Posted by tho9900 on Sunday, January 22, 2006 8:54 AM
Bob - looking good!  Can't answer the cowl question but looking forward to the finished product!!!
---Tom--- O' brave new world, That has such people in it!
  • Member since
    February 2003
  • From: A Spartan in the Wolverine State
Posted by rjkplasticmod on Sunday, January 22, 2006 9:08 AM

Bob, the 262 is looking real good.  The upper cowl panel was a hinged access panel for the guns. 

Regards,  Rick

RICK At My Age, I've Seen It All, Done It All, But I Don't Remember It All...
  • Member since
    July 2003
  • From: Bicester, England
Posted by KJ200 on Sunday, January 22, 2006 11:53 AM
Marc, great progress on the 190.

Are you using an AB or a spraygun on that thing?Wink [;)]

Bob, great job on the 262. Fairly sure that the panel infront of the gun bay was an access panel, as that was where the radar antenna were located on nightfighter 262s.

Tom, show us some pics!

Try the Academy Me 163, it's a breeze and it looks great.

Progress Update


Almost finished the camo on the Panther. There's a bit of overspray here and there, turns out I've bent the tip on the fine needle of my 100, but it's not too noticeable.
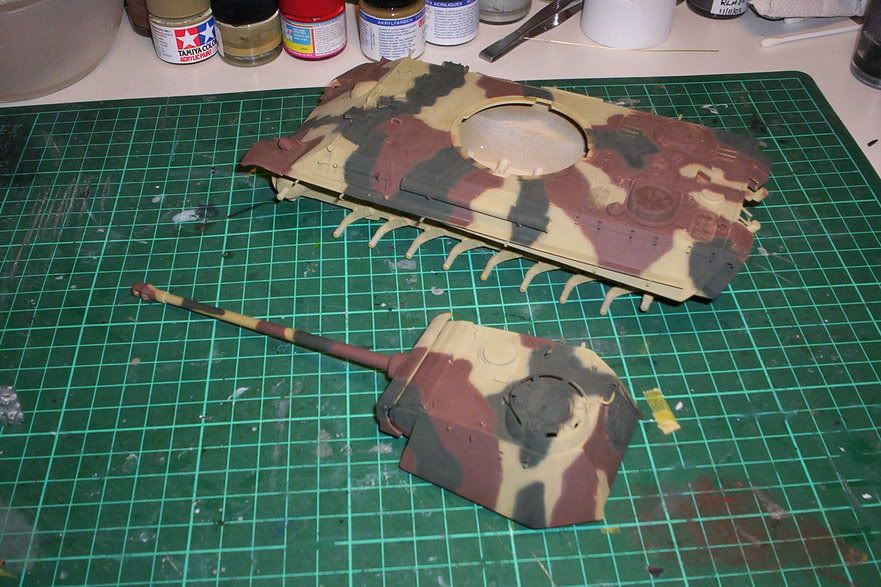


.....and the other side with a set of assembled Friuls...
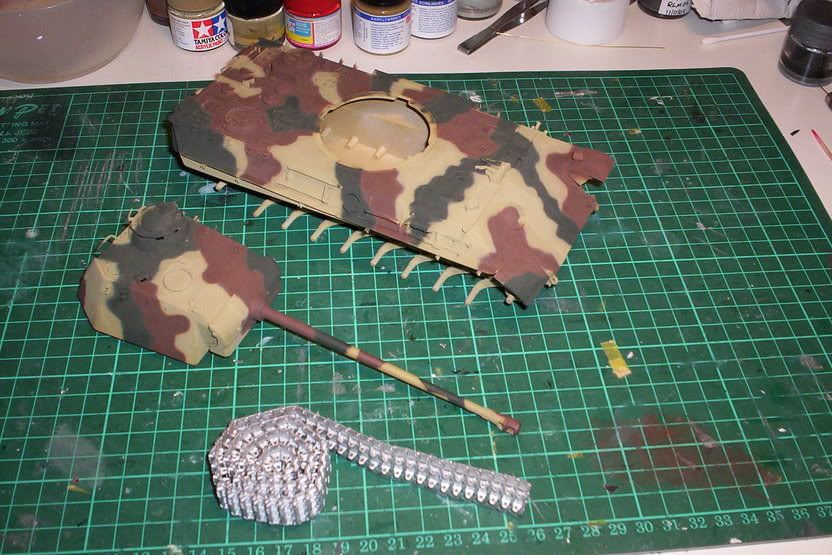


....and to keep kitty company I picked up Trumpetter's KV2, and ordered the Lion Roar PE and replacement barrel set to go with it.

I daren't put the turret on the Panther, as everytime I do, I end up scratching the deck paint work! Hence no photo with it on.

Karl


Currently on the bench: AZ Models 1/72 Mig 17PF

  • Member since
    April 2005
  • From: Piscataway, NJ!
Posted by wing_nut on Sunday, January 22, 2006 11:53 AM

The RLM "84" is curing and I nearly went blind making the gun sight.  PE, resin, clear styrene and aluminum from a V8 can.


edit:  WOW that's a big photo... oopsWhistling [:-^]

Marc  

  • Member since
    February 2003
  • From: A Spartan in the Wolverine State
Posted by rjkplasticmod on Sunday, January 22, 2006 12:03 PM

Karl, the Panther is looking great.  Excellent painting, especially with a bent tip Smile [:)].

Marc, incredible work.  My old eyes & fat fingers could never have pulled that off.

Regards,  Rick

RICK At My Age, I've Seen It All, Done It All, But I Don't Remember It All...
  • Member since
    June 2005
  • From: San Tan Valley,AZ
Posted by smokinguns3 on Sunday, January 22, 2006 1:28 PM
Well guys thay all look great and Wing_Nut wow id have to agree with rjkplasticmod i think my eye's would go crosseyed even with a magnifing glass. Everyone looks like they are makong good progress on there builds.
Rob I think i can I think i can
  • Member since
    November 2003
  • From: Nashville, TN area
Posted by bobbaily on Sunday, January 22, 2006 3:38 PM

Karl-Panther is looking good.  Enjoy watching the progress.

Marc-great job.  Using the dime helps me to even better appriciate your work.

Well, now to the bad news (or an opportunity to grow....).  Used some Pactra masking tape (no one around carries Tamiya tape) to mask off and ended up pulling up the RLM83. (No Tom, I didn't prime it first.....Sad [:(]).  Had not started spraying the RLM 81, so I resprayed the areas effected.  My plan is to let it cure till Tuesday evening and then Future the upper surfaces then mask & spray.  Should be able to finish the paint by weekend (more scheduling constraints on my part).

Question for the group-Tom had mention using Kryron primer, and although that sounds like a wise move, since I've moved my operation indoors, I'm hesitant to using a spray can.  Will MM acrylic primer perform as well or am I just wasting time & paint?  As a general rule, I like to use MM acrylic although I do use Tamiya acrylic on occasion, using Tamiya thinner all the time.  Your thoughts?

Bob


  • Member since
    November 2004
  • From: Salisbury Massachucetts USA
Posted by PanzerWulff on Sunday, January 22, 2006 6:07 PM
i dont know if you can find it but you might want to try Chartpack drafting tape it comes in a variety of widths I keep a few rolls of the 5MM stuff on hand look for a drafting or large art supply store ( even a small well stocked one ) if they dont have it on hand they should be able to order it i swear by the stuff it holds compound curves real well
ACE??? you were NEVER an ace AN ace HOLE maybe! (Lister to Rimmer on BBC's RED DWARF) Chris"Hey GRAVITY still works"Gray
  • Member since
    February 2003
  • From: A Spartan in the Wolverine State
Posted by rjkplasticmod on Sunday, January 22, 2006 6:29 PM

Bob, I always prime my models, but I only use Floquil Gray primer, which is an enamel.  I have used Tamiya acrylic primer on metal figures & it works well for that, but I've never tried masking over it.

Regards,  Rick 

RICK At My Age, I've Seen It All, Done It All, But I Don't Remember It All...
  • Member since
    July 2004
  • From: SETX. USA
Posted by tho9900 on Sunday, January 22, 2006 8:00 PM

Bob - I've used the MM Grey acrylic primer with some success... when I have though it was only because I was using a color with noted poor coverage on top (red or yellow or something)  My thought is to try it in some scrap plastic... tape it and pull up, retape it with fresh tape and let it sit two or three days then try it and you should know.  You could always spray it on a porch or balcony if the acrylic doesn;'t work.  The Krylon primer dries VERY fast so it shouldn't have time to pick up something  from the outdoors...

Karl - I should have picks tomorrow.  Just had time to future this AM and then had to go to the in-laws so it'll be tomorrow before I can get to it.

---Tom--- O' brave new world, That has such people in it!
  • Member since
    April 2005
  • From: Piscataway, NJ!
Posted by wing_nut on Sunday, January 22, 2006 10:44 PM

Rick, Smokinguns, Bob -thanks... I have finally got some normal vision back.Confused [%-)]

Karl- Nice job on the target. Camo looks nice.

Bob-I feel your pain. I did prime and some paint still pulled up in the wing root.  Easy touch up but I think I hate this Trumpeter plastic.Angry [:(!]

And one of my biggest worries about this kit is turning out to be true... the LG will not support the weight.  I am sorry... for close to $90 for a kit... I think it should be better than this.  the LG is some kind of nylon-like plastic that flexed so much the LG covers popped offAngry [:(!]Angry [:(!]Angry [:(!]Angry [:(!]Angry [:(!]Angry [:(!]Angry [:(!]Angry [:(!]

EDIT: - I managed to get the gear at the right, as in correct, angle.  Trumpeter tried to make the LG more accurate by having the top of the strut bend back at 90 ish degrees and fit into a hole on the back side of the well instead of the usual pin in the hole under the upper wing.  Problem is too much movement.  So I cracked the joint and let some CA seep in and hit it with zip kicker, cracked it again …filled and zipped… did this a few times and each time it got a bit tighter.  It’s a good thing they did not go with the even more accurate round connect and used a squire peg in a square hole or this would have been and in flight model.  Even with this I had to have the LG just a bit too far back so the weight pushed it out front to the right spot.  Tamigawa (or is it Hasemiya?) kits from now on!

Marc  

  • Member since
    November 2003
  • From: Nashville, TN area
Posted by bobbaily on Monday, January 23, 2006 6:59 AM

Marc-very nice 190-hate to hear about the LG though.

Thanks all for the input on the paint problem.  Tom-will take your advise and test the MM acrylic primer for future reference. 

My plan of action now is to let the paint cure till Friday, then try 3-M lo tack painters tape (the blue stuff) and de-tack it a bit (stick it to the table, pull it up and then apply.)

Film @ 11.......

Bob


  • Member since
    December 2004
  • From: 288921 E, 5659868 N UTMz12, NAD83
Posted by jboutin on Monday, January 23, 2006 10:11 AM

Bob, Marc and Karl, good looking progress.  Marc I highly doubt I'll have the same lg problem as you with my 1:72 dora.  Though when you knock over your bottle of Ambroid Proweld you get a whole new set of problems!  Angry [:(!]

F&*% me was I mad and to boot it spilled onto my Hasegawa fuselage and not the Airfix! Censored [censored] It just had to do that, Murphy's law or something like that eh?  Amazingly with all the cockpit pieces spread out on my cutting mat it never touched anything else!Shock [:O] The only issue was the front cowling of the port fuselage half.  The exhaust ports look a little more like the Airfix offering now!  Anyway I've got it sanded down and I had to rescribe the panel lines in that area.  It could have been a lot worse, luckily with my cat-like reflexes I was able to grab the part as soon as the glue hit it but there was still a bit of melting of the surface detail...Sad [:(]

Rick I did get some pics but my computer was given me problems so I couldn't down load them, I'll have pics tomorrow. As of now the Hasegawa cp is ready to be put into the fuselage and the Airfix cp which, I scratched based on the Hasegawa parts, still has to be painted.  The best thing?  The true details resin seats!  wow! they totaly kick butt!Thumbs Up [tup]Big Smile [:D]

JAY - fighting evil since 2:15pm, July 8,1976 -
  • Member since
    June 2005
  • From: San Tan Valley,AZ
Posted by smokinguns3 on Monday, January 23, 2006 1:33 PM

lookin good Wing_Nut is that a trump 1/24 190 i might have to get me one to keep my Me 109 companey i should have some picks of the 88 up here as soon as get motivated.

and jboutin sorry to here about the glue man that must of had you worred.

Rob I think i can I think i can
  • Member since
    December 2003
  • From: Olympia, WA
Posted by wooverstone8 on Monday, January 23, 2006 11:10 PM

Hello everyone.

This is my second time posting on this thread. There are quite a few very interesting builds going on here at this moment.

KJ200: The camo job is beautiful done on the panther

Wing Nut: you must have very steady hands, your gun site looks awesome!

Jboutin: Sorry to here all your misfortunes with your kit. We’ve all experience these problems with models from time to time. Not to long ago I was building my 1/48 Tiger I, I manage to spill everything from paint to glue on this model, Even the parts I tried to attach to model manage to fall on the carpet. I wanted scream… Censored [censored]

Here is my first progress shot:

(Fw 190 D-9 Flown by Major Gerhard Barkhorn)

This isn’t much, but it’s a start.

  • Member since
    February 2003
  • From: Melbourne, Australia
Posted by darson on Tuesday, January 24, 2006 5:27 AM

Bob looking good with the 262, I really do have to build one of those lego model stands.  I hop the issue with the paint pulling up isn't too bad.

Tom, would you forgive me if I asked you again exactly what aircraft you are currently doing at the moment?  I know it's a couple of pages back, but if you could just let me know again I'd appreciate it.

Karl c'mon bit the bullet, I want to see the Panther with the turret on.  Also, how are you planning on weathering the Fruils?

Marc I have to ask, are all your builds like this or are simply trying to mock us Wink [;)].

Jay sorry to hear about the glue issue Sad [:(].  I don't think there's anything worse (in modeling) than that heart leaping into you throat feeling when you realise you may have just destroyed a good portion of your latest creation.

Sean (wooverstone) I don't appear to have you on page one of the build, sorry about that.  Can you confirm that your kit is the 1/48th D-9 (?) thanks.

Cheers

  • Member since
    July 2003
  • From: Bicester, England
Posted by KJ200 on Tuesday, January 24, 2006 7:38 AM

Jay, there must have been something in the air last night, I did the self same thing and spilt Plasticweld all over the turret of my new KV2!!!Banged Head [banghead] I also managed to get it all over the front air scoop for my Hasa 106 G10 which was also sitting on my desk Banged Head [banghead]X2! Nothing that can't be sorted though.

Darren, I was tempted but I've spent too long applying that camo scheme. The Turret can wait until I put a coat of Future on at the weekend.

As for weathering the Friuls, not sure yet. Probably start with a coat of RLM 66 as a base then a mix of rust and various dark browns to give an oxidised steel look. Then perhaps a wash, followed by a matt coat, and then pastels. As you can see, still not decided on this one.

Thanks for all the kind words on the Panther guys, much appreciated.

Progress Update

Not alot. Was supposed to spend last night touching in the paintwork on the Panther, but made the mistake of opening the KV2 box!Ashamed [*^_^*] At least I've built half the KV2's hull! Got to love armour for a quick progress hit!Big Smile [:D]

Karl


Currently on the bench: AZ Models 1/72 Mig 17PF

  • Member since
    December 2003
  • From: Olympia, WA
Posted by wooverstone8 on Tuesday, January 24, 2006 9:25 AM
 darson wrote:

Sean (wooverstone) I don't appear to have you on page one of the build, sorry about that.  Can you confirm that your kit is the 1/48th D-9 (?) thanks.

Yes, 1/48th D-9

Thanks

  • Member since
    December 2004
  • From: 288921 E, 5659868 N UTMz12, NAD83
Posted by jboutin on Tuesday, January 24, 2006 9:34 AM

Thanks for the encouragement guys, I was able to sand it down and make it look acceptable again.  So here are my first prgress pics of my 1:72 Airfix and Hasegawa Fw190 D9s.  The one on the right is the Hasegawa CP.  I scratched the Airfix based on the Hasegawa bits.  I am really impressed with the resin seats, it adds so much to the CP, especially when all you see in 1:72 is pretty much the seat! As you can see the Airfix isn't painted yet.  This morning I was able to get that done and the fuselage halves for both models are now closed with CP installed! Enjoy!

JAY - fighting evil since 2:15pm, July 8,1976 -
JOIN OUR COMMUNITY!

Our community is FREE to join. To participate you must either login or register for an account.

SEARCH FORUMS
FREE NEWSLETTER
By signing up you may also receive reader surveys and occasional special offers. We do not sell, rent or trade our email lists. View our Privacy Policy.