SEARCH FINESCALE.COM

Enter keywords or a search phrase below:

Battle For Germany 45 GB Starts Now - 08 May 06

93436 views
2321 replies
1 rating 2 rating 3 rating 4 rating 5 rating
  • Member since
    November 2003
  • From: Nashville, TN area
Posted by bobbaily on Tuesday, January 31, 2006 9:06 AM
Karl-very impressive Panther.  I plan on using your pics when I start on mine.

Bob


  • Member since
    December 2004
  • From: 288921 E, 5659868 N UTMz12, NAD83
Posted by jboutin on Tuesday, January 31, 2006 9:27 AM
Lookin' good Karl, keep up the good work.  Thumbs Up [tup]
JAY - fighting evil since 2:15pm, July 8,1976 -
  • Member since
    February 2003
  • From: A Spartan in the Wolverine State
Posted by rjkplasticmod on Tuesday, January 31, 2006 1:15 PM

Looks great Karl.  Looking forward to seeing it all muddied up.

Regards,  Rick

RICK At My Age, I've Seen It All, Done It All, But I Don't Remember It All...
  • Member since
    July 2013
Posted by DURR on Tuesday, January 31, 2006 1:30 PM

bobaily great job on the legos Smile [:)]

red13 is lookin good too

  • Member since
    August 2004
  • From: Nowhere. (Long Island)
Posted by Tankmaster7 on Tuesday, January 31, 2006 5:09 PM
nice looking me-262!

I just ordered the hasegawa 1/32 fw-190 and eagle parts cannon fairings and resin cockpit. I cna't wait to get started on that when it arrives... I'm going to begin on my little fw-190 for this build soon as well.

-Tanky Welcome to the United States of America, a subsidiary of Exxon Mobil Corporation, in partnership with Halliburton. Security for your constitutional rights provided by Blackwater International.
  • Member since
    December 2003
  • From: Olympia, WA
Posted by wooverstone8 on Tuesday, January 31, 2006 5:52 PM

Karl: The Panther is very impressive indeed. I like the wash on the wheels, very nice work.

  • Member since
    July 2003
  • From: Bicester, England
Posted by KJ200 on Wednesday, February 1, 2006 3:08 AM
Guys, thanks for all the encouragement on the Panther, glad you like it.

Tanky, looking forward to that 1/32 190, sounds interesting.

Progress Update

While looking at the Panther last night a horrible realisation crept over me.......


.......I'd managed to install all the suspension arms in the wrong postition! There followed a choice selection of Anglo-Saxon expletives!Banged Head [banghead]

I'd installed all the arms with, what  I thought was a bump stop on top of the arm, not in the recesss at the rear of the arm, thus giving me a ride height 2mm too high. Obviously all the arms are securely welded in place with Plasticweld, and therefore not able to be removed.

I ended up twisting them over the locating lug, with only two snapping in the process, no big deal, as both will be hidden behind road wheels. Now however all the axles are toed out by a few degrees, which means I'm going to have to mount each wheel skew to the axle while keeping it parrallel to the hull side.

Dumb mistake, but, I'll put it down to experience.

Karl


Currently on the bench: AZ Models 1/72 Mig 17PF

  • Member since
    December 2004
  • From: 288921 E, 5659868 N UTMz12, NAD83
Posted by jboutin on Wednesday, February 1, 2006 9:47 AM

Karl - that's unfortunate, I bet I would have done the same thing, not knowing how targets are made and all...Smile,Wink, & Grin [swg]

I have some progress updates... I got the radiator scoops on!  hot dog! My Dora's are progressing...slowly.

I've been working overtime a bunch lately and just have not had the time to do modeling.  This morning before I left for work I made it a point of doing something (the scoops)! even if it took me 15 minutes, at least I got something done. Big Smile [:D]

JAY - fighting evil since 2:15pm, July 8,1976 -
  • Member since
    April 2005
  • From: Piscataway, NJ!
Posted by wing_nut on Wednesday, February 1, 2006 6:25 PM

 KJ200 wrote:
Dumb mistake, but, I'll put it down to experience.


Are there "smart" mistakes?


Bad news but it sounds like you got it all squared away.

Marc  

  • Member since
    September 2004
  • From: Vernon, BC, Canada
Posted by razordws on Wednesday, February 1, 2006 7:59 PM
That's too bad Karl!!! Hope everything turns out okay in the end.

Dave

  • Member since
    November 2003
  • From: Nashville, TN area
Posted by bobbaily on Friday, February 3, 2006 7:45 PM

Karl-sorry to hear of your misfortune.  I'm sure most of us would have never noticed.  However, I will be paying special attention while assembling my Panther (might get started tomorrow).  And I know you will sort it out so that no one will ever know.

262 has had the landing gear installed, been Futured and is resting.  Might try decaling tomorrow night, maybe Sunday.  Learned a few lessons in the process.  First, install the landing gear 'shocks' prior to installing the landing gear.  Second, never place the bottle of super glue de-bonder next to the similarly shaped bottle of super glue.  Discovered that the right landing gear was  askew, de-bonded, attempted to remove and snapped it off.  Then in the process of super glueing, applied de-bond (which is much thinner) and removed some paint on the lower wing.  After applying the 'real' super glue & touching up the paint, all is somewhat well.  The landing gear is slightly askew, not enought that I'm going to fret it.  Just remember it when I build another 262.  This one has been a learning experience.

Bob


  • Member since
    November 2004
  • From: Salisbury Massachucetts USA
Posted by PanzerWulff on Friday, February 3, 2006 8:54 PM

hey you guys building Me 262's might want to get a load of this

http://www.stormbirds.com/project/index.html

HEH anyone got a DEEP pocket

ACE??? you were NEVER an ace AN ace HOLE maybe! (Lister to Rimmer on BBC's RED DWARF) Chris"Hey GRAVITY still works"Gray
  • Member since
    April 2005
  • From: Piscataway, NJ!
Posted by wing_nut on Friday, February 3, 2006 10:51 PM

Finally some progress.  Back from 3 days in Texas and the LHS has finally gotten some white decal paper in stock.  Printing on that is just opaque enough to work.  Gloss coated tonight, taped the canopy and got the interior color down.  I can see the light at the end of the tunnel at last.

Marc  

  • Member since
    September 2004
  • From: Vernon, BC, Canada
Posted by razordws on Friday, February 3, 2006 11:33 PM
She's looking very nice Bob, can't wait to see the decals on her!

Dave

  • Member since
    August 2003
  • From: Alice Springs Australia
Posted by tweety1 on Saturday, February 4, 2006 6:31 AM

Building has stalled on the 190.

Waiting for Squadron to get my order rightSigh [sigh]

Ordered some WWII seatbelts cause the pit just don't look right without em.

This would be the second time it's happened, which surprises me cause they are usually really goodConfused [%-)]

Ah well, good to see you guys making some progress.

Bummer on the axles Karl, but I reckon you'll have em fixed well enough so no one will notice.

Not even TomEvil [}:)]Wink [;)]


--Sean-- If you are driving at the speed of light and you turn on the headlights, what happens???
  • Member since
    February 2003
  • From: A Spartan in the Wolverine State
Posted by rjkplasticmod on Saturday, February 4, 2006 9:50 AM

Looking good Bob, in spite of a few mishaps along the way.  Every model built is a learning experience for me.  Trouble is, I'm a slow learner Smile [:)].

Regards,  Rick

RICK At My Age, I've Seen It All, Done It All, But I Don't Remember It All...
  • Member since
    July 2003
  • From: Bicester, England
Posted by KJ200 on Saturday, February 4, 2006 10:28 AM
Guys, thanks for all the encouragement.

Bob, nice progress on the 262, I look forward to seeing it with decals.

Progress Update

Spent the last few modeling sessions applying post shading to all the panel lines etc, as well as applying a liberal application of Gunze 'Mud' to the wheels and lower hull.

Here are a few quick photos to give some idea of progress.


Karl


Currently on the bench: AZ Models 1/72 Mig 17PF

  • Member since
    November 2003
  • From: Nashville, TN area
Posted by bobbaily on Saturday, February 4, 2006 12:06 PM

Rick, Dave & Karl-thanks.  Still just doesn't look right without the Legos attached Big Smile [:D]

Karl-Panther is looking great!  Question about paint (for my own selfish reasons Evil [}:)]).. What brand paint did you use?  I'm using MM acrylics, able to find the yellow & green, but MM doesn't seem to make a 'rotbrun'.  Ended up purchasing some 'red earth' which looks close.  Any thoughts?  Thanks


Bob


  • Member since
    December 2003
  • From: Olympia, WA
Posted by wooverstone8 on Saturday, February 4, 2006 12:24 PM

Bob: your progress looks pretty good, Once you get the decals on her, you’ll have an excellent Me262.

Karl: The panther is great. I like the way you applied the mud on the panels, it looks perfect IMO. It’s not too heavy.

As for me I have no progress on the 190 DSad [:(].

  • Member since
    February 2003
  • From: A Spartan in the Wolverine State
Posted by rjkplasticmod on Saturday, February 4, 2006 12:57 PM

Karl,  Looking better all the time.  Very nice work.

Regards,  Rick

RICK At My Age, I've Seen It All, Done It All, But I Don't Remember It All...
  • Member since
    September 2004
  • From: Vernon, BC, Canada
Posted by razordws on Saturday, February 4, 2006 1:56 PM
Looking Great Karl!!!!

Bob: The model master acryl equivilent is called schokladnbraun or something like that and is #4797. However it is much darder and doesn't have as much red in it.

Dave

  • Member since
    November 2003
  • From: Nashville, TN area
Posted by bobbaily on Saturday, February 4, 2006 7:28 PM

Dave-thanks for the info.  Looks like another trip to the LHS.

Karl-question regarding the PE grills.  Did you paint the underlying area before attaching the PE grills and then painting the entire area or did you just apply the grills and then paint?  btw-had I not been aware of your experience with the axles, I would have made the same mistake.  The instructions aren't very clear regarding the install.  Thanks again for sharing.


edit-btw, while waiting for the Future to cure on the 262, I started on the Panther.

Bob


  • Member since
    February 2003
  • From: Melbourne, Australia
Posted by darson on Sunday, February 5, 2006 4:54 AM

Karl the Panther is looking better and better all the time.  Tell me is that a hard edge scheme and if so did you mask it or spray it free hand, either way it looks awesome.

Bob the 262 is looking excellent as well, the changes you've made on the paint scheme have made all the difference.  Oh and btw if you hadn't mentioned the landing gear know one would have noticed.

As to your question to Karl on painting the area underneath the grills before applying the PE, I definitely would as you won't get the paint through the PE grill easily.  I am currently building Skybow's 1/48 Late Tiger 1 and I had this exact issue, I painted the entire engine deck in MM Rust (a fantastic German red primer color), then I followed up with a few coats of Dark yellow over the top before applying the PE grills.  This left red primer in the grill slats and dark yellow on top of the grills.

With all this Panther building going on at the moment I lashed out and picked up the Tamiya 1/48 Panther G.  I'm going to do it OOB and have a crack at a hard edge scheme, so fingers crossed.

Progress Update
Well I have finished the painting on the Dora after a little cursing and frustration.  As I had no RLM 75 on hand I foolishly thought that I just follow Tamiya's paint mix instructions, bad move.  Following their directions my RLM 75 came out almost black Grumpy [|(].
Anyway I have tried to patch it up as best as I can and here a couple of shots of the model ready for Futureing.  Following Marc's example the prop is just added for the photo.


The camo and mottling is all done free hand (like you can't tell) and was a lot of fun to do.


Cheers


  • Member since
    April 2005
  • From: Piscataway, NJ!
Posted by wing_nut on Sunday, February 5, 2006 6:35 AM

Karl – The panther is looking great


Bob – Let’s see some decals on that 262!  And nice start on the Panther (is there an echo in hereWink [;)])


Darson – A fine looking 190 indeed.


So after all the PITA back and forth to the LHS looking for decal paper, transparent decals, half a dozen reprints, trying to cut stencils,,, my buddy say’s, “I have an Alps printer… I can knock those decals out for you in a few minutes.”Angry [:(!]


Marc  

  • Member since
    February 2003
  • From: A Spartan in the Wolverine State
Posted by rjkplasticmod on Sunday, February 5, 2006 9:44 AM

Darren, the Dora is coming along great.  Keep up the good work.

Regards,  Rick

RICK At My Age, I've Seen It All, Done It All, But I Don't Remember It All...
  • Member since
    June 2005
  • From: San Tan Valley,AZ
Posted by smokinguns3 on Sunday, February 5, 2006 10:28 AM
Well looks like evrybodys making some peogress the panther looks great and the Dora is coming along nicely.
Rob I think i can I think i can
  • Member since
    July 2003
  • From: Bicester, England
Posted by KJ200 on Sunday, February 5, 2006 11:27 AM
Guys, thanks for all the encouragement and kind words about the Panther.

Bob, in reference to the paints, I just used the Tamiya colours stated in the painting guide. I posted over on the Armour forum about the accuracy of these colours, but it would appear that the Tamiya paints are pretty much spot on.

As for the PE I stuck everything on before I started painting. To hide the plastic beneath the grilles I just dribbled dilute water colour burnt umber into the recesses. It takes a little bit of time but adds depth.

Glad it wasn't just me who found that part of the Panther instructions confusing!

Darren, I'm not sure if the camo scheme is supposed to be hard or soft edged, but I've assumed soft edged and simply freehanded the camo on. In the photos it looks like a fairly hard edge, but up close I think it looks like a scale soft edge.

The Dora looks great. You would never know that your 75 was a mix.

Progress Update

Spent an hour or so last night CAing the suspension arms flush to the hull to cure the toe out caused by correcting my earlier mistake. I had to squeeze each arm to the hull, apply CA and hold for a couple of minutes while it all hardened.

Yes....I tried accelerator but it seems to make the joints weaker.

Here's a pic of progress to date.....
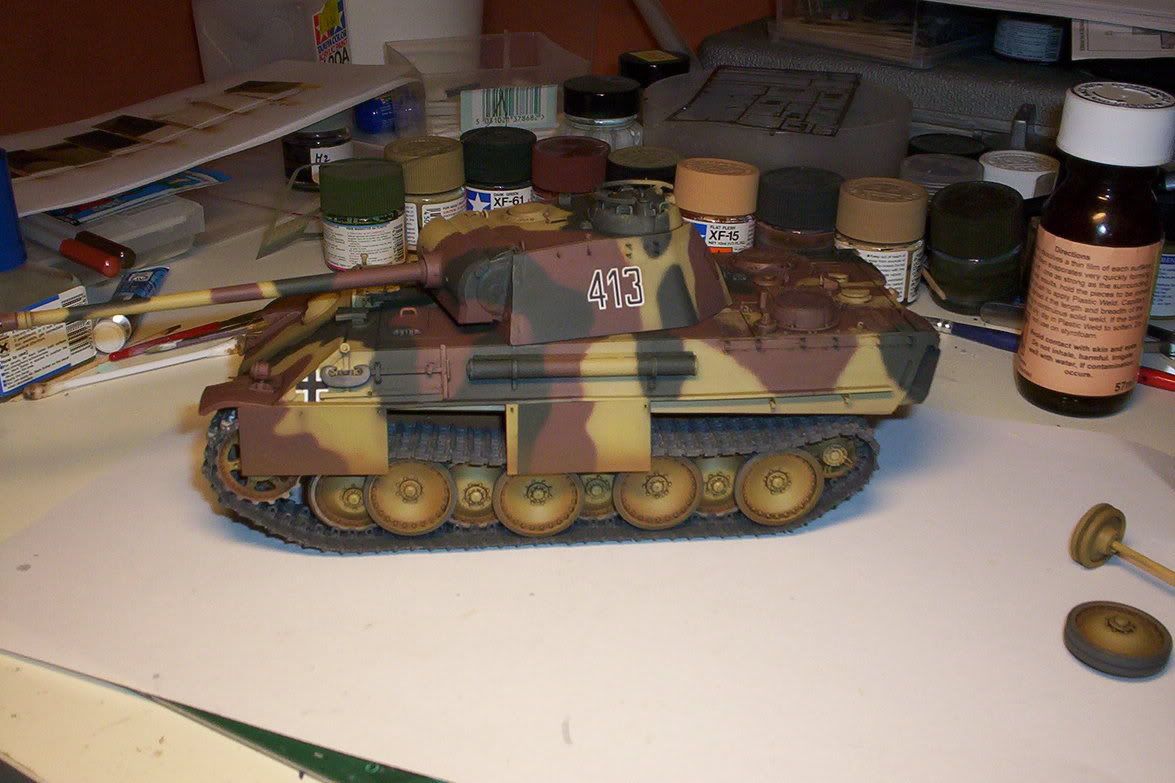


...the schurzen are a temporay attachment, as are the tracks.

Karl


Currently on the bench: AZ Models 1/72 Mig 17PF

  • Member since
    February 2003
  • From: A Spartan in the Wolverine State
Posted by rjkplasticmod on Sunday, February 5, 2006 12:58 PM

Karl,  The Panther is looking great.  Almost makes me want to try an Armor build.

As for me, I finally got back to the Komet & have the Pit about done.  Pics to follow in a day or so.

Regards,  Rick

RICK At My Age, I've Seen It All, Done It All, But I Don't Remember It All...
  • Member since
    July 2003
  • From: Bicester, England
Posted by KJ200 on Sunday, February 5, 2006 1:54 PM
 rjkplasticmod wrote:

 Almost makes me want to try an Armor build.


The force is strong within this one.........

Glad you like the big cate.

Look forward to pics of the Komet.

Karl

Currently on the bench: AZ Models 1/72 Mig 17PF

  • Member since
    November 2003
  • From: Nashville, TN area
Posted by bobbaily on Sunday, February 5, 2006 4:03 PM

Karl & Darren-thanks for the reply regarding paint/PE.

  Darren, the 190 looks great. Would have never known there were any issues with the paint.

 Karl-Panther looks great too, especially the metal treads.  I'm gonna have to try that one day.  For what it's worth, I forgot to put the periscopes in the drivers compartment before gluing the works together.Shock [:O].  Spent a fair amount of time this afternoon with Silly Putty on my finger & the periscope stuck to the putty trying to 'fish' it up thru the hole via the turret opening.  Finally made it though.  Also broke off one of the latches on the drivers door.  Doesn't look like there are any spare handles included.  There oughta be a law.....guess I'll have to bend some wire prior to painting.

Rick-dive on in (to the armour side)...the waters fine....

Marc- Only applied the main decals.  Think I'll wait till another time to apply the stencils.

[URL="http://photobucket.com"][/URL]

edit-appear to be having some issues with Photobucket....can't seem to get the pic to post correctly.

Bob


JOIN OUR COMMUNITY!

Our community is FREE to join. To participate you must either login or register for an account.

SEARCH FORUMS
FREE NEWSLETTER
By signing up you may also receive reader surveys and occasional special offers. We do not sell, rent or trade our email lists. View our Privacy Policy.