SEARCH FINESCALE.COM

Enter keywords or a search phrase below:

Battle of Britain GB 2006 - 1 May to 31 Oct 06

55081 views
1038 replies
1 rating 2 rating 3 rating 4 rating 5 rating
  • Member since
    November 2003
Posted by TryintoModel on Monday, July 10, 2006 7:48 AM

Progress update - I'm making a little head way on my Tamiya 1/48 Bf-109E-4.  I'm just about ready to fire up the paint booth.  I had a Tamiya 1/72 Bf-109E-3 sitting in the stash also, so I decide "what the heck", and decided to build another at the same time.  I couldn't decide what paint scheme and decals to use, so now I can choose two.  Smile [:)]  I need some PE seatbelts for the 1/48, though.  I'll have to do some looking around.  I need to get the canopies masked for both and get all the 1/48 pieces preped for painting.  At least they are all already trimmed.

  • Member since
    July 2003
  • From: Bicester, England
Posted by KJ200 on Sunday, July 9, 2006 6:52 AM
Tom, the Hase He111 is still in the box, along with the AIMS decal sheet, and the Eduard canopy mask set. 

Any pointers would be much appreciated.

Progress Update

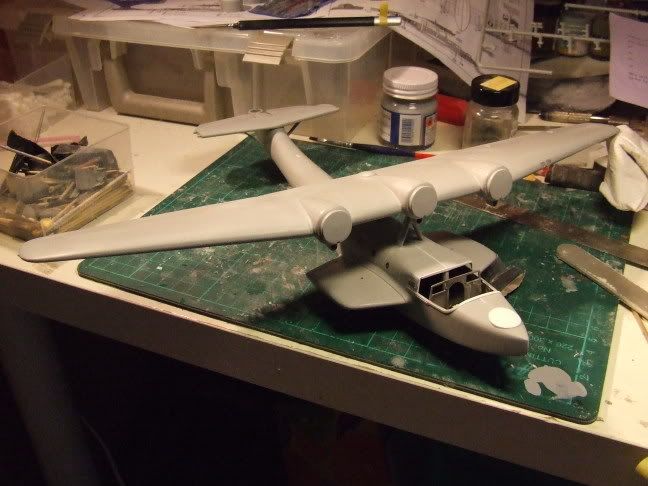
I'm still working on the Do 24, which due to the need to backdate it is taking a fair bit of time. I was hoping to have it in the paint shop this weekend, but I have run out of styrene strip for the crew walkways on the upper fuselage, that and I'm waiting on Aeroclub Wright Cyclones, and 11'6" Hamilton props, which I should have in a couple of days.

In the mean time I've re-started work on my Nieuport 17 for the Alliad Aces GB!

It doesn't help that I keep eyeing up the Tamiya 1/48 Hetzer in my LHS.

Definite case of too many kits, too little time.

Karl

Currently on the bench: AZ Models 1/72 Mig 17PF

  • Member since
    July 2004
  • From: SETX. USA
Posted by tho9900 on Saturday, July 8, 2006 5:53 PM

oh yeah... I'm doing the finishing bits on the Heinkel... all I need to do is connect the other exhaust, put in the guns and a few nick nacks like that... I was relieved when I took the tape off the windscreen today the window was not too fogged from the CA or had too much adhesive from leacing the Eduard masks on for a week and a half.  I would like to do another of these now that I have some of the idiosynchrasies of the kit under my belt.  This one looks ok except for a nick I took out of the canopy trying to seperate it from the fuselage to attach the IP.  (That's right, this model of the He-111 comes with an invisible IP, I didn't want to mar it anymore than I did)...

I think the next one I will do in black sides and splinter uppers... the majority of the refs show that and I think in retrospect it would have looked better.

Karl - have you built one of the Hasegawa He-111's before?  If not I can give you some pointers on a few things to look for when assembling... I saw you had one a few pages back in the build...

---Tom--- O' brave new world, That has such people in it!
  • Member since
    February 2003
  • From: Montreal, Quebec, Canada
Posted by superbear on Friday, July 7, 2006 10:14 AM

Thanks Darren & Tom I'm doing very well I was down with Bronchitis & a very bad cold that stuck around for an encore.  I'm still waiting on the garage door guys to install the new door so that I can set up my painting area and practice .  I feel the need to ruin another build with my pathetic painting skillsSmile [:)]  Have a good weekend all.


Cheers

Marc

Marc
  • Member since
    July 2004
  • From: SETX. USA
Posted by tho9900 on Friday, July 7, 2006 7:35 AM

Bear - thanks and glad to have ya back!  Hope you're feeling better!

Darren - I though tthat pic looked familiar!!

---Tom--- O' brave new world, That has such people in it!
  • Member since
    February 2003
  • From: Melbourne, Australia
Posted by darson on Thursday, July 6, 2006 11:28 PM

Great to here you're back on board Bear.  I sure hope you're feeling better from whatever caused your sick leave.

Tom, talk about missing questions in posts, the Bf-109 "Black 5" was a warm build for last years BoB GB that I during the Christmas 04-05 period.  You're right you know that does seem like 10 years ago in modeling terms.  Oh yeah and that problem with decals has nothing to do with your wrist, I should know because I do exactly the same thing all the time Wink [;)]

Sean I don't know if you guys remember but Tony Mollica (taxtp) did a Wick's stipple camo 109 for last years BoB GB.  Tony used sea sponge which you can buy from any arts and crafts store for almost nothing.  His camo worked out fantastically and he even picked an OOB award for it at the recent IPMS Australian Model Expo.

Darren

  • Member since
    February 2003
  • From: A Spartan in the Wolverine State
Posted by rjkplasticmod on Thursday, July 6, 2006 7:39 PM

Add another vote for Stipple on Wick's bird.  You can buy special stippling brushes at art supply stores if so inclined.

Regards,  Rick

RICK At My Age, I've Seen It All, Done It All, But I Don't Remember It All...
  • Member since
    July 2004
  • From: SETX. USA
Posted by tho9900 on Thursday, July 6, 2006 7:03 PM

Sean - I vote for the stipple too... I have some paint call outs for several 1940 109's and Wicks is one of them... it has the tight stipple Darren talked about.  I'm betting if you found a synthetic material sponge with small enough cells you could use that to replicate the regular stipple pattern.

Darren:  an addendum on things that can be hard to do with my wrist.. Decals.. getting them to sit just right is hard sometime without tearing them to shreds or bumping them out of alignment.

oh yeah.. I started decaling tonight on the He-111..  Wink [;)]  Like I said I rarely think about it.. it's just your question that made me realize what a pain it was to decal.

---Tom--- O' brave new world, That has such people in it!
  • Member since
    February 2003
  • From: Montreal, Quebec, Canada
Posted by superbear on Thursday, July 6, 2006 7:21 AM

Hi all I'm back from extended sick leave and motivation for modeling has returned albite slowly.

Tom & Karl Great progress on your builds.  I have a He 111 in my stash and I'm not looking fwd to masking that green house canopy.

Progress report,  finished filling in the seems & sanding  I'm ready to head to the paint shop.  I'll have to wait a bit as my paint shop has to be moved to the garage by order of a higher authoritySmile [:)] and I can't set up till the folks comme to replace the garage door, rails and other bits Sad [:(] 

Keep up the great progress all.


Cheers

Bear 

Marc
  • Member since
    February 2003
  • From: Melbourne, Australia
Posted by darson on Thursday, July 6, 2006 6:58 AM

Sean not that Aeromaster would ever make a mistake but I am going to vote for stipple.  Every reference shot I have ever seen of JG2 during the BoB (although most are Wick) shows the tight stipple mottling not the sprayed on kind.  Given that camo was adopted on a unit by unit basis I think stipple is a safe option to go with.

Cheers

  • Member since
    August 2003
  • From: Alice Springs Australia
Posted by tweety1 on Thursday, July 6, 2006 12:57 AM

Never mind, I just oredered the decal set for Yellow 14 from errormaster.

Strange though, the Aeromaster decals show standard mottle camo, but the IPMS site states stipple...............................hmmmmmConfused [%-)]

Which one????

My votes on stipple, what you guys reckon??

--Sean-- If you are driving at the speed of light and you turn on the headlights, what happens???
  • Member since
    August 2003
  • From: Alice Springs Australia
Posted by tweety1 on Wednesday, July 5, 2006 11:59 PM

Tom, what did you do to your wrist!Shock [:O]

Sounds painful.


BTW, thanks for the linkSmile [:)]

This'll be my first attempt at stipple camo, just gotta find the HERIDDO decal somewhere.

--Sean-- If you are driving at the speed of light and you turn on the headlights, what happens???
  • Member since
    July 2004
  • From: SETX. USA
Posted by tho9900 on Wednesday, July 5, 2006 7:49 PM
 darson wrote:

As a by the by does your wrist have a big effect you in any other way when you're modeling?

Cheers

Darren, the only thing I notice and curse about is using PE and very small parts that require holding part A while you attach part B before gluing it into the fuselage.... again the fine motor movement required to get some of those pieces in confounds me sometimes... I usually come up with a way around it but it certainly is a bugger until I figure it out...

I was somewhat ambidextrous before the accident so I have learned to get around most things I was used to doing with my left hand,  it's things that require dexterity in both hands that get me... I usually figure out a way around them or fake it when I can't..  Wink [;)]

---Tom--- O' brave new world, That has such people in it!
  • Member since
    February 2003
  • From: Melbourne, Australia
Posted by darson on Wednesday, July 5, 2006 7:31 PM

Not a problem Tom I know how easy it is to pass up a post.

I think you're taking the best option in getting the IP back on.  If you leave the canopy on and try and slide it through the access hatch (your wrist aside of course) and then drop the IP inside the canopy you could be in big trouble.

As a by the by does your wrist have a big effect you in any other way when you're modeling?

Cheers

  • Member since
    July 2004
  • From: SETX. USA
Posted by tho9900 on Wednesday, July 5, 2006 6:06 PM

Darren - I seem to have ignored a question you posed to me the other day and wanted to answer it before it got forgotten.

On the subject of the IP for the He-111 I plan on carefully untacking the canopy as a unit from the body and gluing it in.. .it's the only practical way for me to do it.  I looked at trying to slide it through the crew access hatch but as I have no use of my left wrist (well I can roll my hand from from side to side with it but it doesn't bend and flex...it's fused together due to an a long story that resulted in many operations, the last one was the fusion) I wouldn't be able to manuever it once inside the canopy.  Definitely a learning situation there.  So once I get ready amd take the masks off I am going to reassess the situation and probably go ahead with it...

That 109 looks nice!!  Is that the one you did for the BoB GB last yr?  That seems like 10 yrs ogo in modeling years...

---Tom--- O' brave new world, That has such people in it!
  • Member since
    December 2002
  • From: Connecticut, USA
Posted by Aurora-7 on Tuesday, July 4, 2006 10:30 PM
So bloody long to get started again. Here I've just started re- tackeling the seams where I left off last year.


  • Member since
    February 2003
  • From: Melbourne, Australia
Posted by darson on Tuesday, July 4, 2006 8:32 PM

Tom I'm glad to hear that the ejector pin marks aren't in a terminal location for you.  One of the reasons I replaced Hasegawa's wheel wells with the Ultracast replacement was that the ejector pin marks would be very difficult to remove.

I had a look at that IMPS Stockholm link you put up and it sure has some great schemes and even one that I actually built a couple of years ago.

Progress wise I was fitting and gluing the components on the wheel well to the lower wing last night when I found something that I really hate.  After going through all the hassles of priming and then Alcading the wheel wells and undercarriage parts, I came across one piece that I completely missed Angry [:(!].  So out comes the future for primer again and now I will go through the hassle of letting it cure before I can continue.  Oh well at least that means I can get back to the cockpit tonight.

Cheers

  • Member since
    September 2004
  • From: Vernon, BC, Canada
Posted by razordws on Tuesday, July 4, 2006 8:21 PM
I've been away for a week but I'm glad to see the usual suspects are hard at it here. Tom & Karl, nice progress so far. Karl I would have never guessed the Do 24. I hope to get going on the Br 20 next month

Dave

  • Member since
    July 2004
  • From: SETX. USA
Posted by tho9900 on Tuesday, July 4, 2006 10:31 AM

Tweets - this might suit you!  a few different 1939/40 109's on here in something a step up from just splinter with lichtblau sides..

http://ipmsstockholm.org/magazine/2000/02/stuff_eng_profile_bf109.htm

---Tom--- O' brave new world, That has such people in it!
  • Member since
    August 2003
  • From: Alice Springs Australia
Posted by tweety1 on Tuesday, July 4, 2006 9:36 AM

Wow, cant beleive how much progress you guys have made.

I haven't even opened the box on my 109!!!!

And I still have to find a camo scheme........................might look for something basic, seeing as time is now running short.

Any ideas folks???(nudge nudge)

--Sean-- If you are driving at the speed of light and you turn on the headlights, what happens???
  • Member since
    July 2003
  • From: Bicester, England
Posted by KJ200 on Tuesday, July 4, 2006 9:22 AM

Tom, I've got ejector pin marks in each corner of wheel bay box. Probably won't be visible once the gear doors are on though.

I just find it annoying that you pay a hefty premium a Hasa kit over something like a new Revell kit, and yet it's the Revell kit where the ejector pin marks are hidden away!

Rant over.

Karl


Currently on the bench: AZ Models 1/72 Mig 17PF

  • Member since
    July 2004
  • From: SETX. USA
Posted by tho9900 on Tuesday, July 4, 2006 8:15 AM

Karl - wierd!  on mine there are two small pin marks way up high on the strut where it appears they will be inside the wheel well anyway, I'm going to test fit that before I decide if they show or not...  there were some marks in the wheel bay but there is a "box" that goes inside the wheel bay which covers anything up.  The box has a small bit of detail to make the bay a bit more interesting...

ahhhh I am glad you posed this question because I hadn't got to the wheel bay yet, but just looked and noticed there is a single ejector mark on each bay door... they look easy enough to sand off, not TOO near any detail...

---Tom--- O' brave new world, That has such people in it!
  • Member since
    July 2003
  • From: Bicester, England
Posted by KJ200 on Tuesday, July 4, 2006 6:16 AM

Darren, I've been using Mr White for the last couple of years, works pretty well, but a bugger to apply. Will have to give the disolved putty a go, along with Mr Surfacer 500.

Tom, I was looking at the gear struts and the wheel bays, and they look like they've got loads of pin marks.

Karl


Currently on the bench: AZ Models 1/72 Mig 17PF

  • Member since
    February 2003
  • From: Melbourne, Australia
Posted by darson on Monday, July 3, 2006 9:04 PM

Tom I love that WWII in color site it's got some brilliant images.  Unfortunately it's also got some shots which are not of the genuine article or are taken well after the war.  For instance there is a shot of a Dornier Do 335 Arrow which I know for a fact was taken by the Dornier engineers who restored Werk No 240102 at Oberpfaffenhofen Germany in the mid 70s.

Cheers

  • Member since
    February 2003
  • From: Melbourne, Australia
Posted by darson on Monday, July 3, 2006 6:57 PM

Karl thanks for the heads up on the landing & nav light cover I will certainly follow your advice and fit that before painting.  I've heard from several other people that the gun inserts are a bit of a dog when it comes to fit but at least I'm expecting that now.

On the topic of great Gunze products, have a look at Mr Dissolved Putty.  It's basically the same thing as Mr Surfacer only much thicker which makes it a lot better filling larger gaps and as it is applied with a brush it is a lot cleaner than normal putty.  I've switched to it almost completely now and only use Mr Surfacer on touch-up work.

Cheers

  • Member since
    July 2004
  • From: SETX. USA
Posted by tho9900 on Monday, July 3, 2006 6:22 PM

Karl - I figured that about the last one.. the letter codes matched the one the CAF used to have here but the pic was on one of the WWII in color sites... it still didn't look right but I left it...

The Hasegawa He-111 kit had very little ejector marks, most were hidden quite nicely.  (.i.e not a huge on on the cushion of the pilots seat like I have seen on some kits) .. all in all it's a good little kit!!! 

---Tom--- O' brave new world, That has such people in it!
  • Member since
    July 2003
  • From: Bicester, England
Posted by KJ200 on Monday, July 3, 2006 3:20 PM
Tom, that last 111 is not the real deal. It's one of the CASA built machines used in the movie BoB, note the fronts of the engine cowlings, it's Merlin powered.

Is your Hase 111 covered in a million and one ejector pin marks? I've got used to Revell's latest kits, like the Greif and the He 162 where they are all hidden away.

Darren, watch the gun inserts on the Hase Hurricane along with the landing light cover and the nav lights. I attached the landing light covers to mine after painting, terrible mistake, as the fit was awful.

Progress Update

Just tried the Mr Surfacer and cellulose thinner trick on the sponson to fuselage joint, never tried it before......

.......Wow!! [wow]

I'm hooked on Mr Surfacer, both the possibilities and the fumes....Confused [%-)]

Anyway here are some pics....


Note the state of my desk!!!!


See what a mean about whale?
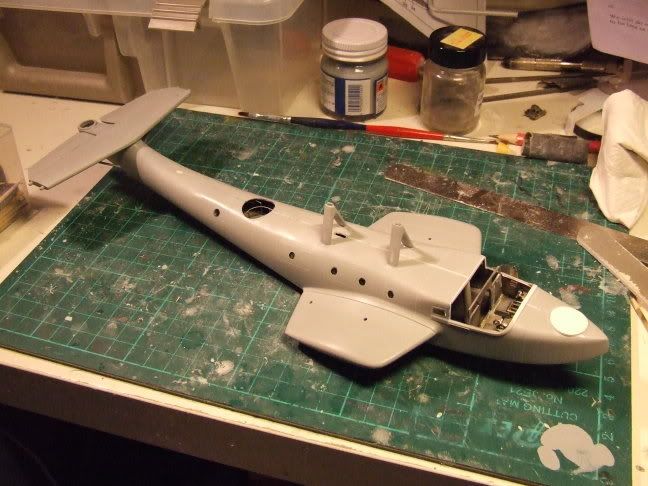


I'm leaving the fins off the tailplane until after painting, as it will make masking the red bands that bit easier.

Karl


Currently on the bench: AZ Models 1/72 Mig 17PF

  • Member since
    July 2003
  • From: Bicester, England
Posted by KJ200 on Monday, July 3, 2006 3:11 AM

Tom, can't see the pics at the moments as I'm at works, but looking forward to taking a gander when I get home.

Darren, not so much genius as pure desperation. I was even considering looking for a cheap B17 to nick the cowlings from!

Does anyone else suffer from pin holes in filled seams? I've tried Mr Surfacer 1000, which gets rid of the worst of them, but still leaves a few. Do I need some 1200 as well?

Progress Update

The main wing support struts are now mounted on the top of the fuselage, and faired in with copious amounts of Mr Surfacer, as the kit joint lacks the aerodynamic fairing. Same story with the horizontal stabiliser support struts.

I'll try and post some pics tonight.

Karl


Currently on the bench: AZ Models 1/72 Mig 17PF

  • Member since
    February 2003
  • From: Melbourne, Australia
Posted by darson on Sunday, July 2, 2006 8:45 PM

Tom I may have missed a post but how did you go putting in the IP?  I must admit I cringed when I read that you'd done that because I made a similar mistake with a P-47 gun sight and it was a pain in the backside to put back on the kit.

When can we see the results of the paint job by the way?

Karl the Do 24 is looking just great and the use of the 1/32 wheels for cowlings is a stroke of genius, I'm afraid I never would have thought of that in a million years.

The instructions on the Eduard site are just brilliant IMHO, I always download them when I order a PE set so I can begin construction preparation while I'm waiting for the PE fret to arrive.

Progress on the Hurricane is coming along reasonably well now, on the weekend I sprayed Alclad on the Ultracast and kit wheel well and landing gear components as well as finished off sanding away all of the extra bits and pieces from the fuselage that I don't need for a Mk.I.  Even though the fuselage on this kit is modular it's an absolute breeze to put together (as compared to the Hasegawa P-40) because the joins all fall along panel lines.  It's almost starting to look like an aircraft now rather than a collection of bits of styrene.

Cheers

  • Member since
    July 2004
  • From: SETX. USA
Posted by tho9900 on Sunday, July 2, 2006 6:14 PM

Well got the coat of night black on the He-111 like the one in the ref pic I posted... I tried to leave a little of the yellow band showing through for some accent as this was painted after the Battle had already started.  Right now it is curing while I am running the airbrush tip through the ultrasonic... it started wanting to clog and spray drops,,,

I'd take the masks off but I still have to future it... then probably a coat of semi gloss after the decals.

All of the color WWII photos I saw showed a semi gloss to satin type finish to the He-111 I didn't see in the refs... being these are actual photos I am taking their word on it... in fact one had an almost gloss tail.  Here's some pics:

wing root:

Notice the engine cowl on this one: especially at the front

again semi gloss look:

anyway, it's what I believe it should be... it should look good on a night bomber too!


---Tom--- O' brave new world, That has such people in it!
JOIN OUR COMMUNITY!

Our community is FREE to join. To participate you must either login or register for an account.

SEARCH FORUMS
FREE NEWSLETTER
By signing up you may also receive reader surveys and occasional special offers. We do not sell, rent or trade our email lists. View our Privacy Policy.