SEARCH FINESCALE.COM

Enter keywords or a search phrase below:

Knights of the Sky WWI GB The End

111747 views
1882 replies
1 rating 2 rating 3 rating 4 rating 5 rating
  • Member since
    February 2007
  • From: Lubbock, TX
Posted by MrDrummy on Saturday, June 14, 2008 7:37 PM

Guys,

Good lookin' stuff lately!

I'm stuck in the middle of 4 builds (P-51B, another 109, Mirage C/J, and a P-39) at the moment (what have I gotten myself into?!) but as soon as I'm done I'm on to the Camel!!  Can't wait to join you guys again!

-Justin
On the Bench: 1:48 Dragon Dr. 1 1:48 Trumpeter MiG-15 Fagot B Photo Sharing and Video Hosting at Photobucket
  • Member since
    September 2003
  • From: South Central Wisconsin
Posted by Daywalker on Saturday, June 14, 2008 10:32 AM
Nice work there Stephen!  I really like that rudder bar assy, very scale looking.  Well done! Thumbs Up [tup]

Frank 


  • Member since
    October 2004
  • From: Colorado
Posted by StephenLawson on Saturday, June 14, 2008 6:30 AM

 sirdrake wrote:
  "Hi everybody, time to throw some color onto the Dr.1. I know the underside of the wings is pale sky blue - but what about the underside of the fuselage? Was it painted blue as well, or was it that streaked Fokker green like the rest of the fuselage? All pictures I've seen just show the underside of the wings,  SirDrake"

 Greetings, SirDrake

The undersurfaces of the Fokker Dr.I were all lt. blue.  Very light blue.  EXCEPT! the undersurface cross fields from the factory were clear doped linen. When the borders on the crosses were changed the cross fields were overpainted.


Stachel...unconfirmed by Armee means unconfirmed!!!!

  • Member since
    October 2004
  • From: Colorado
Posted by StephenLawson on Saturday, June 14, 2008 6:25 AM

Greetings all. 

Since everyone is coming along in their builds I figured I better show some progress too.


Stachel...unconfirmed by Armee means unconfirmed!!!!

  • Member since
    January 2006
  • From: K-Town, Germany
Posted by sirdrake on Saturday, June 14, 2008 2:25 AM

Hi everybody, time to throw some color onto the Dr.1. I know the underside of the wings is pale sky blue - but what about the underside of the fuselage? Was it painted blue as well, or was it that streaked Fokker green like the rest of the fuselage? All pictures I've seen just show the underside of the wings, 

SirDrake

  • Member since
    September 2003
  • From: South Central Wisconsin
Posted by Daywalker on Tuesday, June 10, 2008 10:36 PM

You're really zipping along on this one T-rex!  Here's a link to wood finishes, hope it helps! Thumbs Up [tup]

Wood grain

Frank 


  • Member since
    February 2007
  • From: Calgary, Alberta, Canada
Posted by T-rex on Tuesday, June 10, 2008 7:25 PM

First update, okay so far so good, only small miss is I forgot to paint the interieur before pacing both half, but it not that big of a deal. the top wing will have to be secure more so it doens't fall off, here's what I got so far.

I'm going to add the wirering, but there one big problem, in the painting step how am I going to paint the model a realistique woodend appearest, but how and what color.

Working on: Trumpeter SU-152 (1/35) Trumpeter E-10 (1/35) Heller Somua (1/35)

"The world is your enemy, prince of a thousand enemy. And when they'll find you, they will kill you... but they will have to catch you first ''

  • Member since
    September 2003
  • From: South Central Wisconsin
Posted by Daywalker on Sunday, June 8, 2008 2:07 PM

Thanks Mike!  She's coming along slow but steadily now.  I messed up a little on the wheels, so I had to strip the paint off of them last night and respray them today.  Hopefully, it will go better the second time around! Dunce [D)]

Frank 


  • Member since
    February 2006
  • From: Smithers, BC, Canada
Posted by ruddratt on Sunday, June 8, 2008 11:46 AM
Hey Frank, that's lookin' real good my friend! Excellent progress, and a very innovative way to size the lozenge decals! Justin's right....looks like another home run! Thumbs Up [tup]

Mike

 "We have our own ammunition. It's filled with paint. When we fire it, it makes pretty pictures....scares the hell outta people."


  • Member since
    September 2003
  • From: South Central Wisconsin
Posted by Daywalker on Friday, June 6, 2008 6:20 PM

First off, Sign - Welcome [#welcome] Tom!  Please feel free to post lots of WIP pics! Big Smile [:D]

Stephen and Justin- Thanks fellas!  Starting to see the light at the end of the tunnel. Thumbs Up [tup]

Frank 


  • Member since
    February 2007
  • From: Lubbock, TX
Posted by MrDrummy on Friday, June 6, 2008 2:52 PM

Frank-

That looks great, my friend!  Looks like a tough job that you just knocked out of the park.  Nice to see that thing coming along!

-Justin
On the Bench: 1:48 Dragon Dr. 1 1:48 Trumpeter MiG-15 Fagot B Photo Sharing and Video Hosting at Photobucket
  • Member since
    April 2005
  • From: Baton Rouge, LA
Posted by T_Terrific on Friday, June 6, 2008 2:42 PM

I would like to try a Revell 1/28th Dr. 1, if I may.

Tom Cowboy [C):-)]

Tom TCowboy

“Failure is the opportunity to begin again more intelligently.”-Henry Ford

"Except in the fundamentals, think and let think"- J. Wesley

"I am impatient with stupidity, my people have learned to live without it"-Klaatu: "The Day the Earth Stood Still"

"All my men believe in God, they are ordered to"-Adolph Hitler

  • Member since
    October 2004
  • From: Colorado
Posted by StephenLawson on Friday, June 6, 2008 2:36 PM

Greetings Frank,

Nicely Done!  Its coming along very well indeed.


Stachel...unconfirmed by Armee means unconfirmed!!!!

  • Member since
    October 2004
  • From: Colorado
Posted by StephenLawson on Friday, June 6, 2008 2:25 PM

 sirdrake wrote:
  ". . . a " bit" of text Smile [:)] Interesting stuff, though. Thanks, Stephen. I never find such things when I search for them before I start building. Anyway, I'm convinced that one needs to build every kit twice: once for practice, and once for real.  I'm mostly done with the cockpit interior, but maybe I can incorporate some of the other points of this post. SD

That is the reason I do kit reviews. So you can see what I ran into and avoid the problems.  Model On!

One more thing here is a bit of fun with some new figures from Model Cellar.  Maestro Mike Good does it again in 1/48 for Model Cellar. Below Mr. Good comments.

"Hello All,
Here are images of the new 1/48 scale figures of the Richthofen Brothers which I sculpted for The Model Cellar. It should be noted that these figures were sculpted earlier this year before Eduard announced their figures which come with the Fokker Triplane/Albatross DV boxing. The Eduard kit and the associated figures came as a complete surprise to myself and Paul Ondeck at The Model Cellar."
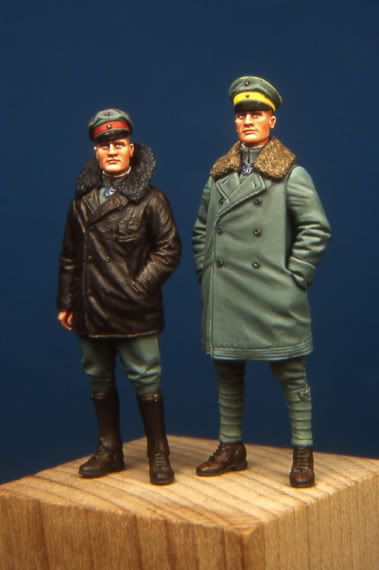
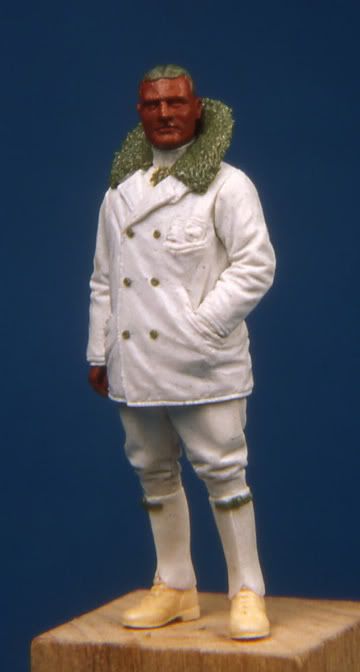
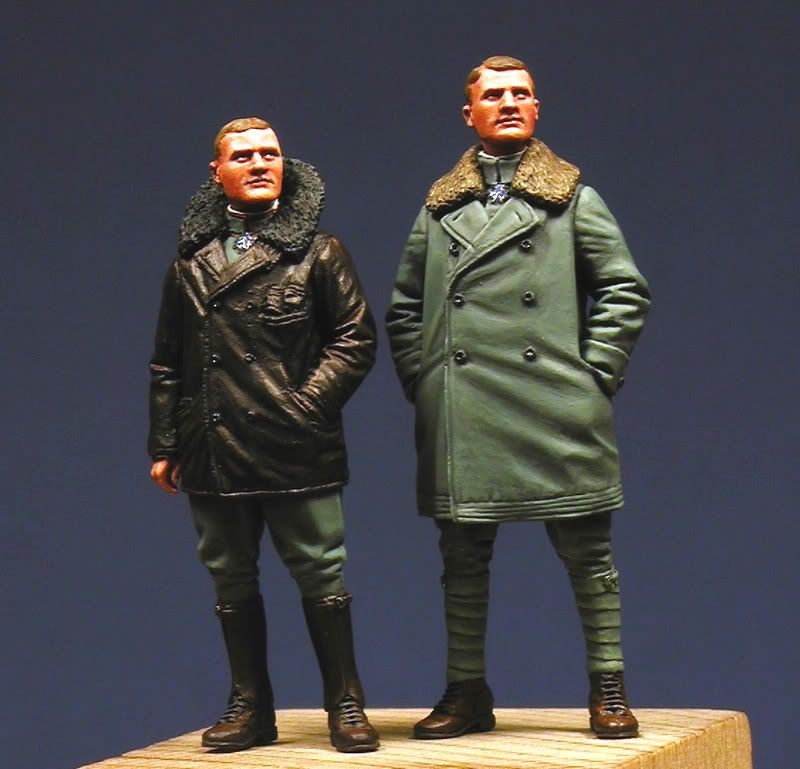
 

". . .Our figures show the correct relative heights of the two brothers, unlike the Eduard figures which appear to be the same size. Also, each kit includes alternative heads, with or without hats, and will be available as the pair or each figure can be purchased separately.

The inset photo shows the original sculpture of Manfred. The figures will be available soon from  The Model Cellar website.

Cheers!!
Mike Good"


Stachel...unconfirmed by Armee means unconfirmed!!!!

  • Member since
    September 2003
  • From: South Central Wisconsin
Posted by Daywalker on Friday, June 6, 2008 10:01 AM

I made some progress on the Fokker over the last couple of days.  Managed to lozenge the fuselage, which was quite stressfull as I only have enough decal to finish and any mistake on the large fuselage side pieces would have meant coming up with an entirely new scheme!  For templates, I took a piece of tracing paper and rubbed the edges with a soft pencil, leaving a mark where I needed to cut.  It worked out better than I had hoped.  I also used my mini punch and die set to cut out discs for the reinforcement plates where the struts and such attach.  I tried to contrast these as best as possible so it looked intentional and not like a bad patch job.  I know the pattern is not 100% correct, but I managed to get it done without too much fuss.  A couple of tiny patches here and there, and I did the best I could on the edges between the bottom colors and the top.  Just have to do the tail parts now and the crosses and I'm done decalling!  WOOHOO!  Big Smile [:D]

Here she is:


Frank 


  • Member since
    January 2006
  • From: K-Town, Germany
Posted by sirdrake on Thursday, June 5, 2008 1:32 AM
 StephenLawson wrote:

Yes the hand air pump (to keep pressure in the fuel tank) and the throttle quadrant are on the wrong sides.  Here is a bit if text on the subject.

Better the Devell you know.

 ... a " bit" of text Smile [:)] Interesting stuff, though. Thanks, Steven. I neverfind such things when I search for them before I start building. Anyway, I'm convinced that one needs to build every kit twice: once for practice, and once for real.

I'm mostly done with the cockpit interior, but maybe I can incorporate some of the other points of this post. 

SD

  • Member since
    September 2003
  • From: South Central Wisconsin
Posted by Daywalker on Wednesday, June 4, 2008 11:34 PM
SD- Great idea on the wire trick!  Looks to be a lot more simple than the way I did it, and looks great!  Thanks for the idea. Thumbs Up [tup]

Frank 


  • Member since
    October 2004
  • From: Colorado
Posted by StephenLawson on Wednesday, June 4, 2008 11:33 PM

Yes the hand air pump (to keep pressure in the fuel tank) and the throttle quadrant are on the wrong sides.  Here is a bit if text on the subject.

Better the Devell you know.


Stachel...unconfirmed by Armee means unconfirmed!!!!

  • Member since
    January 2006
  • From: K-Town, Germany
Posted by sirdrake on Wednesday, June 4, 2008 12:28 PM

Rudratt, thanks for the help with the streaky finish.

Some progress on the Dr.1. I started to work on the cockpit. I've never done any detailing in cockpit areas, but the interior of this plane is kind of wide open and pretty well visible.The Dr.1 has, as far as I know, a cockpit-cage (or however this is called Confused [%-)]) made of steel tubing. It is molded into the inside of the fuselage. Knowing that I would never be able to paint this raised tube detail in a satisfactory manner, I decided to use some old .4mm brass wire i had lying around and just glued it over the raised detail 

this is how far I got befor I ran out of wire... It needs some finishing touches, as the paint got scatched off the wire rather easily, but so far I'm quite happy with the effect. The next step is to scratchbuild the "bicycle pump" (fuel pump?) at the left side and the sextant-like thing from the right. I think I remeber I read somewhere that those are on the wrong sides - pump should be on the right and sextant on the left. Anyone knows whether that's true? When they get rebuilt anyway, it would be a pity to put them on the wrong sides...

SirDrake


  • Member since
    June 2006
  • From: Michigan
Posted by ps1scw on Monday, June 2, 2008 6:11 PM
 StephenLawson wrote:

My Uber kit arrived today.

I may wait for the weekend edition for the DR.I.

  • Member since
    February 2006
  • From: Smithers, BC, Canada
Posted by ruddratt on Sunday, June 1, 2008 1:04 PM

Sweet! I saw one on Ebay, but the price tag before shipping was astronomical, so I passed on it for now.

Looking forward to seeing your work on this one, Stephen! Thumbs Up [tup]

Mike

 "We have our own ammunition. It's filled with paint. When we fire it, it makes pretty pictures....scares the hell outta people."


  • Member since
    October 2004
  • From: Colorado
Posted by StephenLawson on Sunday, June 1, 2008 2:37 AM

My Uber kit 1136X arrived today.


Stachel...unconfirmed by Armee means unconfirmed!!!!

  • Member since
    September 2003
  • From: South Central Wisconsin
Posted by Daywalker on Saturday, May 31, 2008 11:27 AM

Thanks much Mike!  I am learing from the masters here! Big Smile [:D]

WOOHOO!!!  1500 posts, thank you VERY much everybody for making this GB so much fun.  I am having a blast and look forward to reading every single post.

I will be out of town for a few days on business so if anyone is looking for me, I shall be back later in the week.  Keep up the great work, and be sure to post lots of WIP photos! Thumbs Up [tup]

Frank 


  • Member since
    February 2006
  • From: Smithers, BC, Canada
Posted by ruddratt on Friday, May 30, 2008 10:49 PM

Thanks much, Justin! ...and it's great to see you posting again! Thumbs Up [tup]


 Daywalker wrote:
T-rex-

Mike's technique is what I used for my DVIII wood bits.  Mine is a darker finish, and I think his looks like a better representation of real wood. 

Frank, I gotta tell ya though that I'm really impressed with how yours looks. You have to remember that there are lots of different types of wood out there and ways of representing it on plastic. Yours looks great! Thumbs Up [tup]

...and about the lozenge you just applied - fantastic work so far. Just a little tidbit....on my D.VII, the upper and lower wings needed almost 200 decals applied (most of them lozenge & rib tapes) to get the job done. Now you know why I needed a break from them! Wink [;)]

(edited to add) Gentleman, I think this makes 1500 posts for this thread! Well done, guys!!

Party [party] Make a Toast [#toast] Party [party] Make a Toast [#toast]

Mike

 "We have our own ammunition. It's filled with paint. When we fire it, it makes pretty pictures....scares the hell outta people."


  • Member since
    February 2007
  • From: Lubbock, TX
Posted by MrDrummy on Friday, May 30, 2008 8:12 PM

Guys--

Been awhile, but there sure is some great looking stuff going up around here.

Frank- that prop looks awesome, man.  You're a braver man than I.

Mike- your build is looking great...  my Camel is still sitting in the box.  *sigh*   I've just gotten a bit busy with other builds.  I'll be done by October, I think!

Stephen--WOW!!! That collection is AWESOME!!

-Justin
On the Bench: 1:48 Dragon Dr. 1 1:48 Trumpeter MiG-15 Fagot B Photo Sharing and Video Hosting at Photobucket
  • Member since
    August 2006
  • From: The Great State of Wyoming
Posted by wyoroy on Friday, May 30, 2008 6:35 PM

Looks to be a challenge.

Roy (Capt. Wyoroy FAAGB/USNFAWGB)

John 3:16

  • Member since
    September 2003
  • From: South Central Wisconsin
Posted by Daywalker on Friday, May 30, 2008 5:48 PM

I managed to do a little work on the Fokker last night, feels good to finally be decalling!  The axle wing is now covered, though I think I should go back and clean it up a little more.  Without knowing exactly how they looked in real life, I took the liberty of wrapping the top lozenge around the front to overlap the bottom pattern.  Seems logical as a seam right acrss the front looked odd to my eye so I went ahead and did it my way!  I am going to add a piece of rib tape to smooth out the demarcation between the patterns.  I tell ya, covering entire pieces with decal material isn't easy, kudos to you guys that do this regularly!

I tell ya, I'd rather mask a canopy than decal an entire airframe any day of the week! Smile,Wink, & Grin [swg]


Frank 


  • Member since
    September 2003
  • From: South Central Wisconsin
Posted by Daywalker on Friday, May 30, 2008 5:36 PM

T-rex-

Mike's technique is what I used for my DVIII wood bits.  Mine is a darker finish, and I think his looks like a better representation of real wood.  I used a base coat of Tamiya deck tan (I believe!) followed by a dab of burnt umber oil paint which I then drug a coarse-bristled brush across.  This streaked the darker oil paint into a grain-like appearance.  I gave this a week to dry as oil paints dry VERY slowly then a couple of coats of Tamiya clear yellow were sprayed on to richen the tone and seal in the oil paints.  Works very well, thanks Mike! Big Smile [:D]

Frank 


  • Member since
    February 2006
  • From: Smithers, BC, Canada
Posted by ruddratt on Friday, May 30, 2008 12:03 PM

 ps1scw wrote:
The Eduard D.VII is a FUN! build.  I'd recommend it to anyone. 

Absolutely! I have two more in my stash! Wink [;)]


T-rex, I'll be doing a woodgrain fuselage on my Albatros D.V. The method I use is to start with an MM enamel base coat like tan or wood color, applied nice & smooth. Next, I mask off one panel at a time and using a rake brush, streak on a thinned darker earth color. The reason for doing each panel separately is to give the illusion of multiple panels by breaking up the grain patterns. Once they're all streaked, I spray on a coat of Tamiya clear yellow or orange, depending on the finish you're looking for.

Mike

 "We have our own ammunition. It's filled with paint. When we fire it, it makes pretty pictures....scares the hell outta people."


  • Member since
    February 2007
  • From: Calgary, Alberta, Canada
Posted by T-rex on Thursday, May 29, 2008 9:15 PM

Ah ha, just what I need, thanks, after all it unacceptable not having the wires on, now to paint it wood, but how to do that realistique wood glose appearence.

Working on: Trumpeter SU-152 (1/35) Trumpeter E-10 (1/35) Heller Somua (1/35)

"The world is your enemy, prince of a thousand enemy. And when they'll find you, they will kill you... but they will have to catch you first ''

JOIN OUR COMMUNITY!

Our community is FREE to join. To participate you must either login or register for an account.

SEARCH FORUMS
FREE NEWSLETTER
By signing up you may also receive reader surveys and occasional special offers. We do not sell, rent or trade our email lists. View our Privacy Policy.