SEARCH FINESCALE.COM

Enter keywords or a search phrase below:

Knights of the Sky WWI GB The End

111747 views
1882 replies
1 rating 2 rating 3 rating 4 rating 5 rating
  • Member since
    June 2004
  • From: Hooterville
Posted by Daryl Huhtala on Thursday, February 28, 2008 6:36 PM
Great find!  That looks like exactly what I need----book is now inbound!
  • Member since
    October 2004
  • From: Colorado
Posted by StephenLawson on Thursday, February 28, 2008 5:59 PM

I was recently sent this to review.  Its geared to the average modeler and is very well done.  Very cool stuff.  The author discusses items he made to detail an old Lindberg Biplane.  If you have a kit that you wish you had a better cockpit for, or a better engine to use - this may be your ticket.

Mold Making & resin casting


Stachel...unconfirmed by Armee means unconfirmed!!!!

  • Member since
    September 2003
  • From: South Central Wisconsin
Posted by Daywalker on Thursday, February 28, 2008 5:22 AM
 StephenLawson wrote:

 Daywalker wrote:
Thanks Stephen!  I am hoping to paint the wing in the next couple of days, it'll be nice to actually do some airbrushing! Thumbs Up [tup]  Is that the scheme your full-scale Fokker will wear?  Holy cow that's wild!


Yes it is.  But they too, painted the wing a solid green instead of the camouflaged version. I could tell you stories about replicas and paint scheme applications that would make your hair stand on end.  Try  a SSW D.IV in "all" purple and yellow.

Frank 


  • Member since
    October 2004
  • From: Colorado
Posted by StephenLawson on Wednesday, February 27, 2008 3:25 AM

 Daywalker wrote:
Thanks Stephen!  I am hoping to paint the wing in the next couple of days, it'll be nice to actually do some airbrushing! Thumbs Up [tup]  Is that the scheme your full-scale Fokker will wear?  Holy cow that's wild!


Yes it is.  But they too, painted the wing a solid green instead of the camouflaged version. I could tell you stories about replicas and paint scheme applications that would make your hair stand on end.  Try  a SSW D.IV in "all" purple and yellow.


Stachel...unconfirmed by Armee means unconfirmed!!!!

  • Member since
    September 2003
  • From: South Central Wisconsin
Posted by Daywalker on Tuesday, February 26, 2008 6:55 AM
Thanks Stephen!  I am hoping to paint the wing in the next couple of days, it'll be nice to actually do some airbrushing! Thumbs Up [tup]  Is that the scheme your full-scale Fokker will wear?  Holy cow that's wild!

Frank 


  • Member since
    October 2004
  • From: Colorado
Posted by StephenLawson on Tuesday, February 26, 2008 3:58 AM
 Daywalker wrote:

Couple of questions for you guys on the Fokker DVIII:

Does anyone have a good match for the green on the main wing, cowl, and top metal deck? 

WOuld the bungee shock absorbers be visible next to the wheel, or would they be hidden under the axle wing?

Not sure if I have enough upper lozenge to do a factory fresh machine, does anyone have any wild color schemes?

Thanks in advance! Thumbs Up [tup]

1. Testors Model master dark green (flat of course)

2. In the axle wing.  You would have to remove  the wheel to see the access to the bungees on the originals.

3.


Stachel...unconfirmed by Armee means unconfirmed!!!!

  • Member since
    September 2003
  • From: South Central Wisconsin
Posted by Daywalker on Monday, February 25, 2008 10:25 PM
 ruddratt wrote:

sirdrake, that has got to be the most clever and funniest post I've ever read here!! I'm still LMAO!! Laugh [(-D] Thanks!!!  I can't wait to see this built up! Did they short-change you on the decals, because I didn't see any? Lot's of surface detail, though! Tongue [:P]

Sign - Ditto [#ditto] ROTFLMFAO!!! Laugh [(-D]

 ruddratt wrote:

...and I got outbid on the Roden Pfalz, but eBay has plenty, so I'll be trying again soon. So for now, Frank, if you could add the Eduard 1/48 Albatros D.V to my entry list. Smile,Wink, & Grin [swg]

Mike- I updated your list, can't wait to see her!  An Albatros would be next on my "to get" list.

Frank 


  • Member since
    February 2006
  • From: Smithers, BC, Canada
Posted by ruddratt on Monday, February 25, 2008 9:08 PM

sirdrake, that has got to be the most clever and funniest post I've ever read here!! I'm still LMAO!! Laugh [(-D] Thanks!!!  I can't wait to see this built up! Did they short-change you on the decals, because I didn't see any? Lot's of surface detail, though! Tongue [:P]

...and I got outbid on the Roden Pfalz, but eBay has plenty, so I'll be trying again soon. So for now, Frank, if you could add the Eduard 1/48 Albatros D.V to my entry list. Smile,Wink, & Grin [swg]

Mike

 "We have our own ammunition. It's filled with paint. When we fire it, it makes pretty pictures....scares the hell outta people."


  • Member since
    January 2006
  • From: K-Town, Germany
Posted by sirdrake on Monday, February 25, 2008 3:45 PM

LEGO Camel - a look into the box...

Got my Camel kit today. Y'all know about Roden and Revell Camel kits, thought you might want to learn about how the Lego Camel differes from those kits... First impression: impressive! The kit has 577 parts (depending a bit on what you count as 'part'). So how many parts do your kits have...? Tongue [:P]

No PE parts, though - maybe there'll be a Lego Camel Profipack in the future? And all parts are already painted in their final colors. That'll save a lot of time during construction.

But I was surprised to see that none of the parts were attached to their sprues any more!
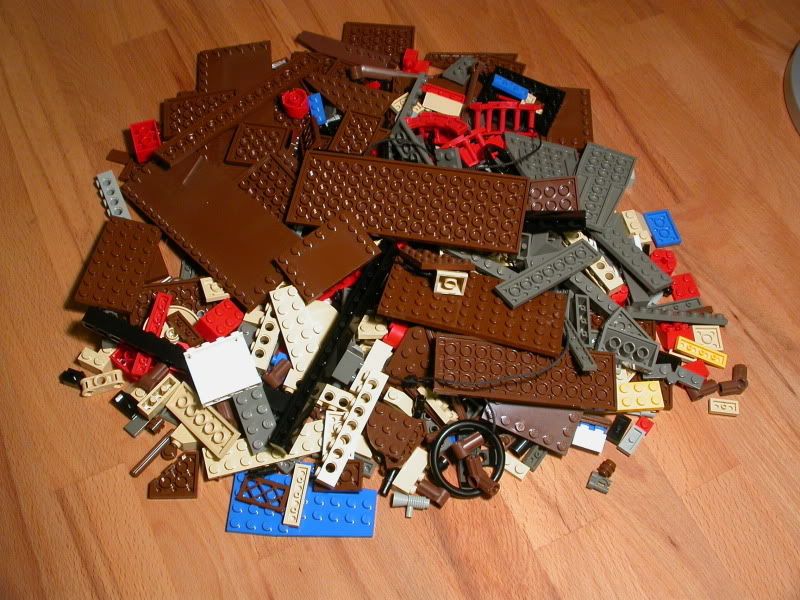
Actually there were no sprues at all! Well, that happens when you buy a used kit.. At least all parts are crisply molded. No flash whatsoever. However, many parts have quite distinctive ejector pin marks:
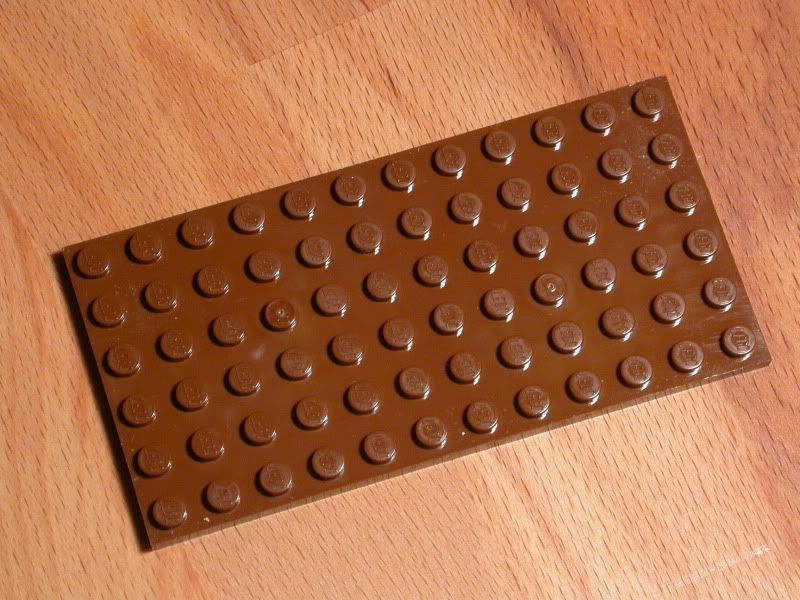
On the above part, for example, I counted 72 of them Boohoo [BH]. Wow, this will require a lot of work to sand them down! I'm really hope they'll do better in future releases. And the parts are not numbered. It will be difficult to find out what goes where. But the instruction book (yes, book) has 52 pages, and is very detailed. Many parts have some sort of a rather 'unspecific' or 'generic' appearance.In my opinion, they lack detail:

Others seem to be recycled from other kits. Look at  what they sell for spoked wheels:
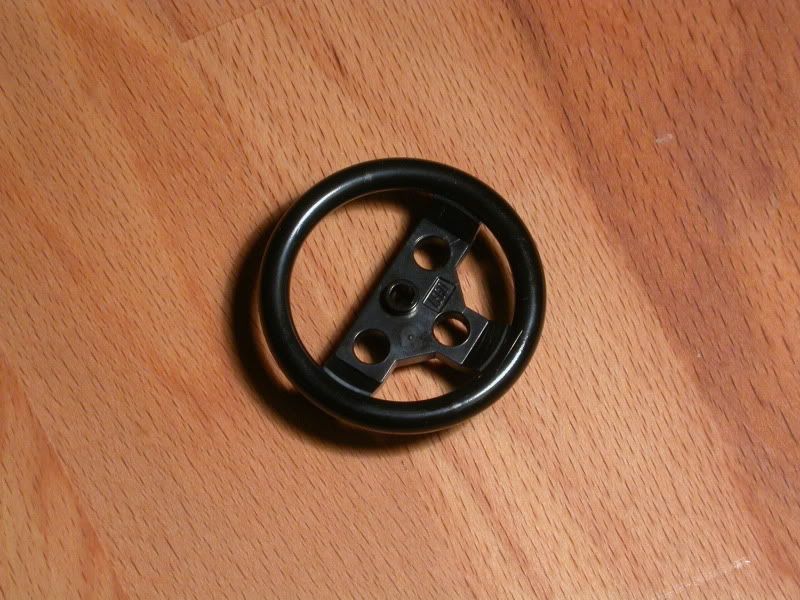
Maybe thats where the word 'steering wheel' comes from?. Or the cylinders for the rotary engine:
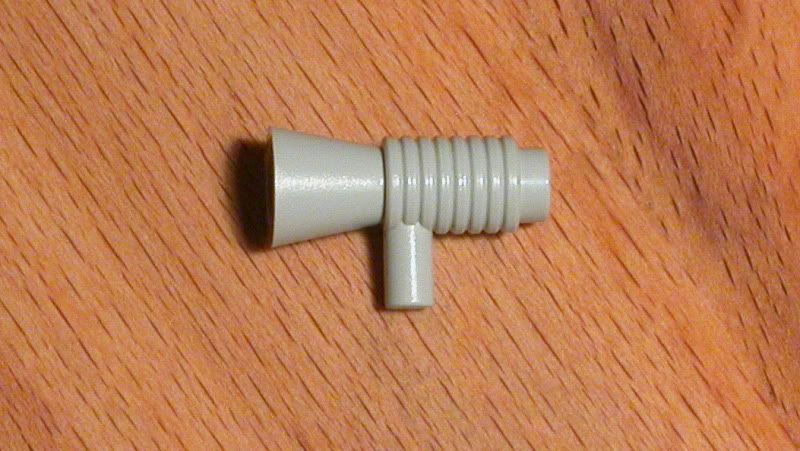
Did someone say bullhorn? Big Smile [:D]
 
The build will start mid March. I'll keep you posted!

SirDrake

  • Member since
    September 2003
  • From: South Central Wisconsin
Posted by Daywalker on Monday, February 25, 2008 12:04 PM

Couple of questions for you guys on the Fokker DVIII:

Does anyone have a good match for the green on the main wing, cowl, and top metal deck? 

WOuld the bungee shock absorbers be visible next to the wheel, or would they be hidden under the axle wing?

Not sure if I have enough upper lozenge to do a factory fresh machine, does anyone have any wild color schemes?

Thanks in advance! Thumbs Up [tup]

Frank 


  • Member since
    September 2003
  • From: South Central Wisconsin
Posted by Daywalker on Monday, February 25, 2008 9:38 AM

I posted this over in decals, but thought I might mention it here too.  Mike (ruddratt) was so kind as to send me some of the AWESOME Eagle Strike 4-color lozenge decal sets for my DVIII.  I decided to build a factory fresh aircraft as I couldn't find any other schemes I liked, but I don't think I have enough of the 4-color upper lozenge (ES 48011) to finish the job.  Does anyone have any they could spare?  Just tought I'd ask.

SD- Very cool!  South Carolina is a beautiful state, enjoy it while you're there! Thumbs Up [tup]

Frank 


  • Member since
    January 2006
  • From: K-Town, Germany
Posted by sirdrake on Monday, February 25, 2008 9:29 AM
 Daywalker wrote:

SD-

Hmmm... probably gonna need a lot of putty on that one, and weathering it could prove interesting! You're heading to the US?  Whereabouts?

Visiting good ol' Durham, North Carolina, where I lived and worked for four years. It's nice to be back from time to time.  

SD 

  • Member since
    September 2003
  • From: South Central Wisconsin
Posted by Daywalker on Sunday, February 24, 2008 10:48 PM

Stephen,

I for one would LOVE to see those photos!  The E/V and DVIII have always been my favorite WWI birds. Thumbs Up [tup]

Frank 


  • Member since
    October 2004
  • From: Colorado
Posted by StephenLawson on Sunday, February 24, 2008 9:56 PM

 Daywalker wrote:
Thanks Stephen.   A full scale flying E.V?  DO you have any WIP photos of the build?  I would love to see those! Tongue [:P]

Yes I do!  While I am putting them onto a CD (150 high rez images) I might be able to post some images for general viewing.  I may even have to send out some to people who have expressed interest. Thumbs Up [tup]


Stachel...unconfirmed by Armee means unconfirmed!!!!

  • Member since
    October 2004
  • From: Colorado
Posted by StephenLawson on Sunday, February 24, 2008 9:49 PM

 sirdrake wrote:
"Hmmm... Big Smile [:D] Actually the guidelines of this GB don't say that it has to be a plastic model. Or resin... Just asking because I just purchased on ebay a "kit" of a Sopwith Camel .... from LEGO! Does that qualify?Smile,Wink, & Grin [swg] After all, it's some kind if plastic, isn't it?  Can't wait to build it - has been a REALLY long time that I played with lego. SirDrake 


ROFLMFBO Big Smile [:D]


Stachel...unconfirmed by Armee means unconfirmed!!!!

  • Member since
    September 2003
  • From: South Central Wisconsin
Posted by Daywalker on Sunday, February 24, 2008 4:16 PM

SD-

Hmmm... probably gonna need a lot of putty on that one, and weathering it could prove interesting! You're heading to the US?  Whereabouts?

Frank 


  • Member since
    January 2006
  • From: K-Town, Germany
Posted by sirdrake on Sunday, February 24, 2008 4:01 PM
 Daywalker wrote:

You're correct!  The guidelines don't specifically mention those criteria.  So, I have added a "LEGO Sopwith Camel" to your list.  Now, you HAVE to post pics of it when you build it. Propeller [8-]

Very well then... I'm curious to see about the kit quality. Hope the fit will be ok, or maybe I have to use a lot of putty? And what about weathering?  Big Smile [:D]

Alas, the build will have to wait a bit as I'm leaving the country for a few weeks (actually visiting the USA...). But the fun of a lego session is certainly something to look forward to after may return.  

SD 

  • Member since
    February 2006
  • From: Smithers, BC, Canada
Posted by ruddratt on Sunday, February 24, 2008 3:50 PM

 StephenLawson wrote:
Mike; Thank you  sir for your kind words. It does seem to be getting a bit of attention. I would like to do one with a little more varnished wood exposed in the cockpit.  When stocks ran low due to the blockade there had to be war time shortages.   We have images that reveal cockpit / interior formers were possibly varnished wood and the interior walls were the silbergraü in some cases.

Stephen, it was a very enjoyable read, and one I will refer to frequently when my build commences, so it is I sir, who must thank you.

...and I am glad you addressed the issue of the cockpit colors, specifically the formers and the interior walls. During my search for data on the Pfalz, this seemed to be where I found the most contradictory information. It was quite confusing, but you have done much to clear it up for me. Thumbs Up [tup]

Mike

 "We have our own ammunition. It's filled with paint. When we fire it, it makes pretty pictures....scares the hell outta people."


  • Member since
    September 2003
  • From: South Central Wisconsin
Posted by Daywalker on Sunday, February 24, 2008 3:39 PM

SirDrake-

You're correct!  The guidelines don't specifically mention those criteria.  So, I have added a "LEGO Sopwith Camel" to your list.  Now, you HAVE to post pics of it when you build it. Propeller [8-]

Frank 


  • Member since
    January 2006
  • From: K-Town, Germany
Posted by sirdrake on Sunday, February 24, 2008 3:12 PM

Hmmm... Big Smile [:D] Actually the guidelines of this GB don't say that it has to be a plastic model. Or resin... Just asking because I just purchased on ebay a "kit" of a Sopwith Camel .... from LEGO! Does that qualify?Smile,Wink, & Grin [swg] After all, it's some kind if plastic, isn't it?

Can't wait to build it - has been a REALLY long time that I played with lego.

SirDrake 

  • Member since
    September 2003
  • From: South Central Wisconsin
Posted by Daywalker on Sunday, February 24, 2008 2:53 PM

Thanks Stephen. 

A full scale flying E.V?  DO you have any WIP photos of the build?  I would love to see those! Tongue [:P]

Frank 


  • Member since
    October 2004
  • From: Colorado
Posted by StephenLawson on Sunday, February 24, 2008 2:38 PM

 Daywalker wrote:
"Thanks again Stephen.  I am planning on doing mine up in a nearly factory fresh scheme, so I may leave the wing as she sits.  I like the cupped look, but have no idea how to replicate it.  As for who just got to skin a wing, could it have been... you? . . ." Big Smile [:D]

The answer is yes.  I helped finish the wing to our full scale flying replica Fokker E/V. We purchased the fuselage back in 2001 if memory serves.  The wing was scratch built from plans by our fabrication team headed up by Mike Desanti.  After curing, skinning and finishing the wing it was decided to apply & dope fabric over the whole wing for longevity. As a replica at high altitude it will have a large horse power Continnental engine.   The wing has been painted an overall green and looks ok, though not entirely accurate.  The fuselage is yellow with black diamonds from nose to tail.  The horizontal tail unit is yellow with a single black stripe on each elevator running fore to aft. 

We know that  Hauptmann Sachsenberg commanding Marine Feld Jasta I and the Marine Jagdgruuppe  flew a Fokker D.VII in this scheme.  And there is a photo of his Fokker E.V showing the diamonds on the forward fuselage in a hangar.  The image is dark and it is surrounded by people.  Curiously yellow tends to show up dark on orthocromatic film used during this time period son the diamonds are difficult to see if you dont have a good first generation image.


Stachel...unconfirmed by Armee means unconfirmed!!!!

  • Member since
    October 2004
  • From: Colorado
Posted by StephenLawson on Sunday, February 24, 2008 2:16 PM
 Daywalker wrote:
"I managed to get quite a bit done on the DVIII this weekend. . .

Nicely Done!


Stachel...unconfirmed by Armee means unconfirmed!!!!

  • Member since
    October 2004
  • From: Colorado
Posted by StephenLawson on Sunday, February 24, 2008 2:11 PM

 Daywalker wrote:
". . .Oh, I have a question about applying lozenge decals.  DO you guys paint a light coat of white or gray under them to give them something to hold on to instead of bare plastic?"

Frank; Usually a coat of a gloss is good but with lozenge and the Micro Sol and Set system has always worked well for me.

Mike; Thank you  sir for your kind words. It does seem to be getting a bit of attention. I would like to do one with a little more varnished wood exposed in the cockpit.  When stocks ran low due to the blockade there had to be war time shortages.   We have images that reveal cockpit / interior formers were possibly varnished wood and the interior walls were the silbergraü in some cases.


Stachel...unconfirmed by Armee means unconfirmed!!!!

  • Member since
    October 2003
  • From: Southern California
Posted by ModelNerd on Sunday, February 24, 2008 2:01 PM
 Daywalker wrote:

I managed to get quite a bit done on the DVIII this weekend...

That's looking great, Frank! I always wanted to build one of those.


- Mark

  • Member since
    September 2003
  • From: South Central Wisconsin
Posted by Daywalker on Sunday, February 24, 2008 1:18 PM
Thanks Mike.  I think I may go the future-only route, as I am concerned about masking off the cockpit for painting for fear of breaking something off.  With the Future, I can use a paper shield and any slight overspray wouldn't be quite so noticeable.  Today, I am continuing with sanding down the main wing, can't believe how much work that it with filling all of the panel lines and such.  Another hour or two and I can finish sanding it and put a coat of primer on it to see what I have to fix yet.  Stay tuned! Big Smile [:D]

Frank 


  • Member since
    February 2006
  • From: Smithers, BC, Canada
Posted by ruddratt on Sunday, February 24, 2008 12:20 PM

No need to thank me, buddy. You're the one doing the work. It's one thing to have good references, and something else entirely to have the skills to apply them to your model. Those skills you have, Frank.

I'm sure there are as many ways of applying lozenge as there are modelers, but on larger areas like entire wing surfaces, I like to put a light-colored primer down nice and smooth, give it a coat of Future, and then apply the lozenge. I know that many skip the primer part and just apply the Future to bare plastic before applying the lozenge. In that case, I would make sure that the plastic got a good scrubbing before the Future is sprayed on. HTH.

Mike

 "We have our own ammunition. It's filled with paint. When we fire it, it makes pretty pictures....scares the hell outta people."


  • Member since
    September 2003
  • From: South Central Wisconsin
Posted by Daywalker on Sunday, February 24, 2008 12:01 PM

Mike-

You are too kind my friend! Big Smile [:D]

It's the work I see here that inspires me, and the cockpit photos you shared a while back of your DVII served as my guide for painting.  I also remembered to position the control column forward to go with the drooped elevators, and turned the rudder bar to one side as I plan to offset the rudder too.  Many thanks Mike! Thumbs Up [tup]

Oh, I have a question about applying lozenge decals.  DO you guys paint a light coat of white or gray under them to give them something to hold on to instead of bare plastic?

Frank 


  • Member since
    February 2006
  • From: Smithers, BC, Canada
Posted by ruddratt on Sunday, February 24, 2008 11:57 AM
Wow! That's a lot of work there, Frank, but the results speak for themselves. Your attention to detail never ceases to amaze me, and the level at which it is done continues to raise the bar. Looks to me like you're on your way to another masterpiece. I'll be following this build very closely! It's awesome so far! Thumbs Up [tup]

Mike

 "We have our own ammunition. It's filled with paint. When we fire it, it makes pretty pictures....scares the hell outta people."


  • Member since
    September 2003
  • From: South Central Wisconsin
Posted by Daywalker on Sunday, February 24, 2008 11:40 AM

I managed to get quite a bit done on the DVIII this weekend.  Used a tiny round bur in a motor tool to remove the offending "shelf" in the cockpit opening, then removed the damaged decal around it and put a new piece of lozenge decal in it's place that ended where the upper metal panel will be.  Also assembled the engine, and gave a wash to show some use. 

Assembled most of the cockpit, but decided to leave off the shoulder belts as adding the stainless ones provided by Dragon would have probably damaged the fragile seat assembly.  I made new seat supports and framework from soldered brass wire, and added the upper longeron.  Drilled tiny holes along the edges of the rear cockpit lozenge "bulkhead" and laced it to the frame with fine fishing line.  Also added the tiny rudder control cables with fishing line.  On the engine, I used the fishing line (again!) to add the spark plug wires. 

On the seat, I painted it silver and added a leather cushoin but opted not to add the lozenge covering.

Frank 


JOIN OUR COMMUNITY!

Our community is FREE to join. To participate you must either login or register for an account.

SEARCH FORUMS
FREE NEWSLETTER
By signing up you may also receive reader surveys and occasional special offers. We do not sell, rent or trade our email lists. View our Privacy Policy.