SEARCH FINESCALE.COM

Enter keywords or a search phrase below:

Knights of the Sky WWI GB The End

111747 views
1882 replies
1 rating 2 rating 3 rating 4 rating 5 rating
  • Member since
    September 2004
  • From: Vernon, BC, Canada
Posted by razordws on Saturday, February 9, 2008 7:26 PM

MK, Superb job!!! Thumbs Up [tup]Thumbs Up [tup]Thumbs Up [tup]

Mike, I'll be looking forward to the full build report on that Acadmy Me 262! Propeller [8-]

Dave

  • Member since
    February 2007
  • From: Lubbock, TX
Posted by MrDrummy on Saturday, February 9, 2008 1:45 PM

Mk-

Awesome job!  The time that it took you to paint the lozenge was very much worth it!  I think that it looks great!!

-Justin
On the Bench: 1:48 Dragon Dr. 1 1:48 Trumpeter MiG-15 Fagot B Photo Sharing and Video Hosting at Photobucket
  • Member since
    September 2003
  • From: South Central Wisconsin
Posted by Daywalker on Saturday, February 9, 2008 8:21 AM

Very nicely done mk!  That lozenge really looks the part.  I updated page 1 for you!

Mike- I updated your list my friend! Wink [;)]

Frank 


  • Member since
    October 2004
  • From: Colorado
Posted by StephenLawson on Saturday, February 9, 2008 5:39 AM

 mkhoot wrote:
"I finished up on my Hannover Cl. IIIa  Not my best build this kit fought me all the way, but it looks good with my other W.W. I builds. . ."

Nicely Done.  Congrats on a Very Decent build!


Stachel...unconfirmed by Armee means unconfirmed!!!!

  • Member since
    October 2004
  • From: Colorado
Posted by StephenLawson on Saturday, February 9, 2008 5:22 AM

Greetings rudratt; Here is a bit of fun I have started on the Roden 1/48 SE 5a.  

Click Here


Stachel...unconfirmed by Armee means unconfirmed!!!!

  • Member since
    February 2006
  • From: Smithers, BC, Canada
Posted by ruddratt on Friday, February 8, 2008 9:35 PM

mk, let me be the first to say "holy smokes!!" That is a superb build! Lot's of lozenge (I love that!!) and the woodgrain on the prop....just awesome! Thumbs Up [tup] A very unusual bird, and one I'd be proud to display.


OK guys, just ordered the only new kits I'm going to buy this year (yeah, right Wink [;)] ) ... Academy's new 1/72 Me 262A-1a, a Hasegawa 1/48 P-39 in RAF markings, and this one, which I couldn't resist adding to my list of entries to this GB....

So if you're lookin' in, Frank, you can definitely tack it on as another entry for me. Read some online reviews and it looks like a very impressive kit. Big Smile [:D]

Mike

 "We have our own ammunition. It's filled with paint. When we fire it, it makes pretty pictures....scares the hell outta people."


  • Member since
    January 2004
  • From: Westland. MI USA
Posted by mkhoot on Friday, February 8, 2008 8:54 PM

I finished up on my Hannover Cl. III

Not my best build this kit fought me all the way, but it looks good with my other W.W. I builds.


When in doubt just build it. Mark http://www.ipmslivonia.org/ipms/
  • Member since
    March 2005
Posted by philo426 on Thursday, February 7, 2008 4:38 PM
Drake it looks like its been weathered and sprayed with oil from the engine.Looks good!
  • Member since
    January 2006
  • From: K-Town, Germany
Posted by sirdrake on Thursday, February 7, 2008 4:21 PM

Hi Rich,

here's what i did to achieve the look of dark wood:

 sirdrake wrote:

The propeller is my first attempt to 'paint like wood'. A base layer of light brown was followed by a streaky layer of dark brown artist's oil color, and finally a light layer of thinned clear red. It ended up quite dark, but I'm happy with the result

SirDrake 

  • Member since
    September 2004
  • From: Vernon, BC, Canada
Posted by razordws on Wednesday, February 6, 2008 11:44 PM
 wing_nut wrote:

I was going through a drawer and found a roll of 1/64" chart tape I bought like forever ago.  It looked like it would be perfect for the laminations on the camel prop.  After the clear orange dries I am going to sand it carefully and hit with some gloss.


And here's what it looks like!

Dave

  • Member since
    September 2004
  • From: Vernon, BC, Canada
Posted by razordws on Wednesday, February 6, 2008 11:42 PM
 wing_nut wrote:

I was looking at other WWI builds and one guy said he puts a coat of wood or tan, does the laminates with rust and then a coat of clear orange. 


Rich here's the basics 

Dave

  • Member since
    February 2006
Posted by CH53CrewChief on Wednesday, February 6, 2008 10:35 PM

Forgive me for barging in here since I am not a participant in the GB...(Daywalker referred me so blame him!!) I am building a Ryan PT-22 and am in need of advice/techniques for painting a convincing natural wood grain propeller onto resin. I started looking through the posts but 1181 is going to take a while! Any help would be greatly appreciated.

Rich Erickson

  • Member since
    October 2004
  • From: Colorado
Posted by StephenLawson on Wednesday, February 6, 2008 4:39 PM
Very common on all post 1916 RFC, RNAS & RAF British designs.  Even the licence built    types like the SPAD VII & XIII of the British Companies used RAFwires.


Stachel...unconfirmed by Armee means unconfirmed!!!!

  • Member since
    December 2002
  • From: Northern California
Posted by jeaton01 on Wednesday, February 6, 2008 3:43 PM


Thanks, Stephen.  So the RAF wires would have been common on the Sopwiths, etc, I would think.

John

To see build logs for my models:  http://goldeneramodel.com/mymodels/mymodels.html


  • Member since
    October 2004
  • From: Colorado
Posted by StephenLawson on Wednesday, February 6, 2008 2:49 AM

Greetings jeaton01;

Actually the British developed (1916) what they called RAF wires.   These came in different thicknesses and were flat in cross section. On the Bristol F.2b these are very noticeable and the thicker ones are used in the "lift" status.


Stachel...unconfirmed by Armee means unconfirmed!!!!

  • Member since
    December 2002
  • From: Northern California
Posted by jeaton01 on Tuesday, February 5, 2008 11:45 AM

The connector that runs from the front to the rear lift and landing wires where they cross mid-span has been called a javelin, and it's main purpose is to keep the wires from banging on each other as they vibrate in the wind, which definitely happens.  It's a great aid in judging the proper landing speed, as the "tone" changes with speed.  The wires are aligned in trail, but they never are, really, except at one angle of attack.  If the nose is higher or lower than the ideal in level flight then they will be out of line with each other, but looking from the front the crossing angles should be equal.

Wire cross section changed with time.  On the early Wright and Curtiss airplanes they were solid like music wire and round.  I am less knowledgeable about the WW I airplanes, but I think they were still round, and at some point a change was made from solid wires to stranded wires, like control cables are made.  Later wires were formed to a very flat ellipse shape out of stainless steel except at the ends where they are left round and have threads formed. 

John

To see build logs for my models:  http://goldeneramodel.com/mymodels/mymodels.html


  • Member since
    October 2004
  • From: Colorado
Posted by StephenLawson on Tuesday, February 5, 2008 5:37 AM


Stachel...unconfirmed by Armee means unconfirmed!!!!

  • Member since
    January 2006
  • From: K-Town, Germany
Posted by sirdrake on Tuesday, February 5, 2008 2:14 AM

Thanks - good to know some of the names. It also helps swearing at them when they fall off or attach at the wrong places while rigging the model Big Smile [:D]...

So I take it that they are called flying (or lift wires) and landing (or anti-lift) wires, and they run all the way from the fuselage - lower and upper - to the outer struts - upper and lower. This means one has to position those wires carefully, otherwise they will not cross right at the center of the middle inpterplane struts, and look stupid. The struts of the kit have two tiny attachments right at the center, probably meant as a guide for rigging.

With regard to the picture it seems that flying wires of the SPAD are single and considerably thicker than the double landing wires. That will be a nice detail.

Thanks everybody, 

SD 

  • Member since
    October 2004
  • From: Colorado
Posted by StephenLawson on Tuesday, February 5, 2008 1:51 AM

I could not have said that any better!


Stachel...unconfirmed by Armee means unconfirmed!!!!

  • Member since
    December 2002
  • From: Northern California
Posted by jeaton01 on Monday, February 4, 2008 10:17 PM

Wires that run from the inboard lower to outboard upper are lift wires, almost always double, not always.  Inboard upper to outboard lower are landing wires.  From the nose to the outer struts are called drag wires.  Wires left to right between the cabane struts (fuselage to wing center section) are called roll wires.    Wires fore and aft between the interplane struts or cabane struts are called incidence (British) or stagger wires (US). 

Here are a couple of pages from Edwin Warner's 1927 book that discuss rigging wires and nomenclature.  Love these old books.  Warner was Assistant Secretary of the US Navy for Aeronautics when this book was published. 

John

To see build logs for my models:  http://goldeneramodel.com/mymodels/mymodels.html


  • Member since
    January 2006
  • From: K-Town, Germany
Posted by sirdrake on Monday, February 4, 2008 4:44 AM
Thanks, guys!
Now it's time to think about rigging this bird. Does anyone know how these interplane wires on a SPAD XIII are supposed to be rigged? - the ones that go all the way from left to right, from the fuselage to the outer struts (do they have a technical name? Probably... Confused [%-)]). My question is: are these two long wires that are connected to fuselage and outer struts only, and cross in front of the middle interplane struts (like a big X), or are they actually four wires, each of them connected to the center of the middle strut (more like ><)? Hope you understand what I'm trying to describe... I'm also wondering if they are double (e.g. like on a Camel) or single. It appears they are double - I've been looking around and have seen both versions, but many modelers just rig double wires as single ones. And from some murky pictures I got the impression that they were double, but taped or wrapped together. Is this at all possible or complete nonsense?
SirDrake


  • Member since
    February 2006
  • From: Smithers, BC, Canada
Posted by ruddratt on Sunday, February 3, 2008 2:03 PM
SirDrake, very nice looking SPAD so far. I was thrilled when you said you were building this bird, as it was the one that really got me hooked on bipes. Something about its lines that I've always found appealing. Looking forward to seeing her all rigged! Thumbs Up [tup]

Mike

 "We have our own ammunition. It's filled with paint. When we fire it, it makes pretty pictures....scares the hell outta people."


  • Member since
    February 2007
  • From: Lubbock, TX
Posted by MrDrummy on Sunday, February 3, 2008 2:02 PM

Sirdrake--

That's one colorful SPAD!! 

Really nice, and congrats on the airbrush--it'll change your modeling life!!

-Justin
On the Bench: 1:48 Dragon Dr. 1 1:48 Trumpeter MiG-15 Fagot B Photo Sharing and Video Hosting at Photobucket
  • Member since
    January 2006
  • From: K-Town, Germany
Posted by sirdrake on Sunday, February 3, 2008 1:59 PM

Daywalker, Dougums, thanks for the kind works. From you guys, that means a lt lot.

Frank, the Decals went on after a coat of future (I actually tried to use one of these spray things you use to spray water on plants - no need to clean the airbrush afterwards. Can't really recommend it - it sprays a lot of future at once... Actually using a simple brush worked best for me) with some MicroSet, and then quite a few layers of MicroSol. The decals were thick, so I could use the brush to flatten it well after the application of MicroSol without doing any harm.

Doug, the airbrush is a Harder & Steenbeck Evolution Silverline (double action). It's one of the most common airbrushes here in Germany, but think its not very well known in the US. But look here: http://www.germanairbrush.com. I really like it, easy to handle, and it gives you lot of control.

SirDrake

  • Member since
    June 2007
  • From: Kansas City MO
Posted by Dougums on Sunday, February 3, 2008 1:44 PM


sirdrake,


    Thats a heckava lot better than my first airbrush job.  I think mine ended up in the bin.  What kind of airbrush did you purchase?  It looks great, especially for the amount of "first times".  Keep up the good work .. I can't wait to see her finished!

Doug 

  • Member since
    February 2003
  • From: Saratoga Springs, NY
Posted by Jeeves on Sunday, February 3, 2008 12:44 PM
Wow- thanks Stephen!!  That's quite a bit to digest!!  So if I am gathering it correctly- I should be doing some sort of light blue on the undersides??  And there are two shades on brown and two of green on top??  I se the model you built was the -16...would the -11 be any different??
Mike
  • Member since
    February 2007
  • From: Lubbock, TX
Posted by MrDrummy on Sunday, February 3, 2008 11:25 AM

Well, heck. 

I was wanting to just build the thing OOB, so I guess that that particular model is out of the question now.  I'm not wanting to go building a motor at the moment!!

I've been reading over your notes on the page that you sent me-- seems all the other schemes that are here had the Clerget engine.  I'll probably end up doing either the C scheme (Lt. Hollington) or the F scheme, D3332 sans the dumbbell symbol.

Thanks, Stephen. 

-Justin
On the Bench: 1:48 Dragon Dr. 1 1:48 Trumpeter MiG-15 Fagot B Photo Sharing and Video Hosting at Photobucket
  • Member since
    September 2003
  • From: South Central Wisconsin
Posted by Daywalker on Sunday, February 3, 2008 8:42 AM

SD-

I like this one, very colorful!  I really don't know if the colors are "right", but it looks very good to me.  How did you apply your decals?  They look painted on.  Nice ly done! Thumbs Up [tup]

Frank 


  • Member since
    January 2006
  • From: K-Town, Germany
Posted by sirdrake on Sunday, February 3, 2008 8:28 AM

A beautiful warm and sunny winter day. What better thing to do that sit at your workbench and model away the day...

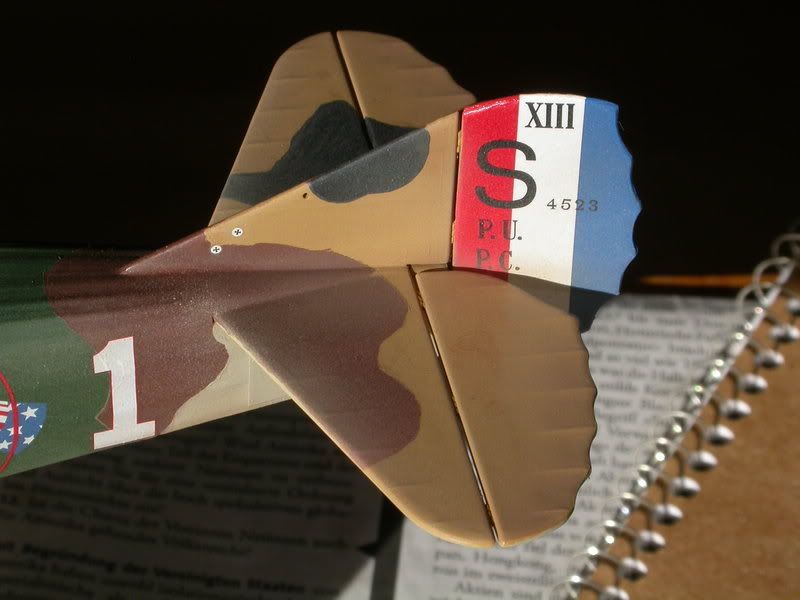
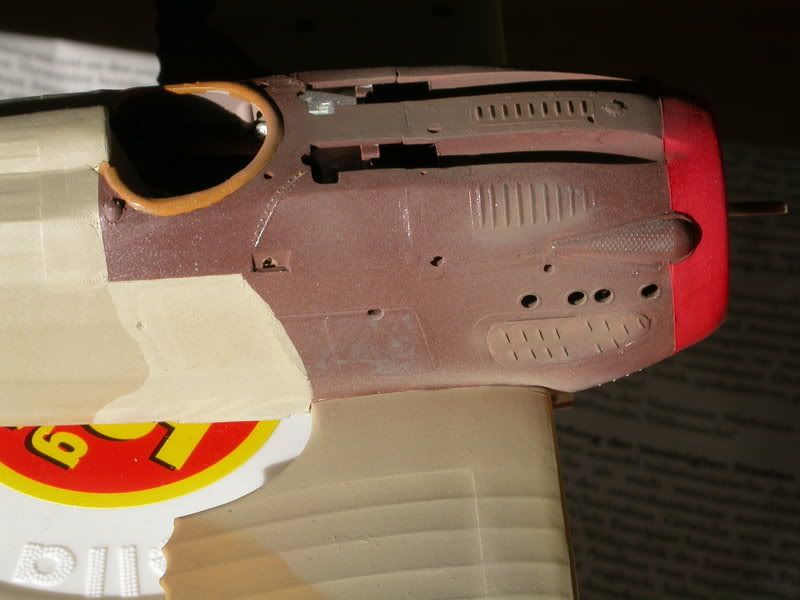
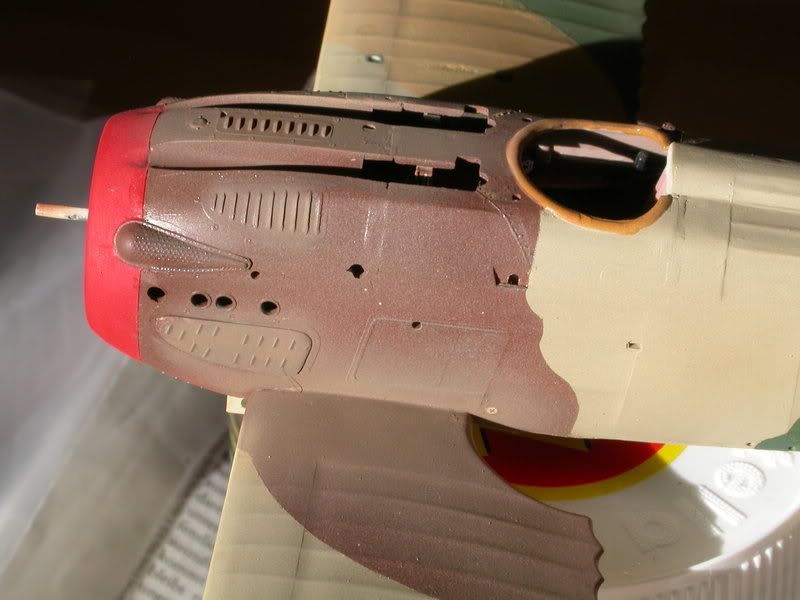
Ok, there've been some heavy painting sessions for the SPAD. First time I used an airbrush, and I can tell you that I learned some lessons! But now I can't imagine ever going back to brush painting. It's just amazing what you can do with an airbrush after learning a few basics (e.g. not to spill you paint bucket over your freshly painted upper wing..Banged Head [banghead]). As you can see from the pictures there's still lots of room for improvement. Well, there are still plenty of models to come!

I should mention that I did nothing like a careful reseach for the proper colors of the camouflage pattern. Research is my day job - when I'm modeling biplanes, I just want to play with glue and paint... Whistling [:-^] So I looked a bit at the box art, the instructions, and what paints there were on my bench (ok, I also bought some new ones), and just started painting. Now I got the feeling the colors are contrasting a bit to much, maybe could be a bit more dull, and especially the greyish color on the upper side should be much mor olive... Well, next time...

I also for the first time used a coat of Future (or what we have here in Germany - "Erdal Glänzer") before I applied the decals. Decals went on nicely, but they are a bit on the thick side. Lots of MicroSol helped. The decals for the tail didn't fit at all, but I still didn't use them becaus of al the lettering. so I cut them to size, and Luckily some old red, blue and white revell enamels culd be used to paint over the gaps.
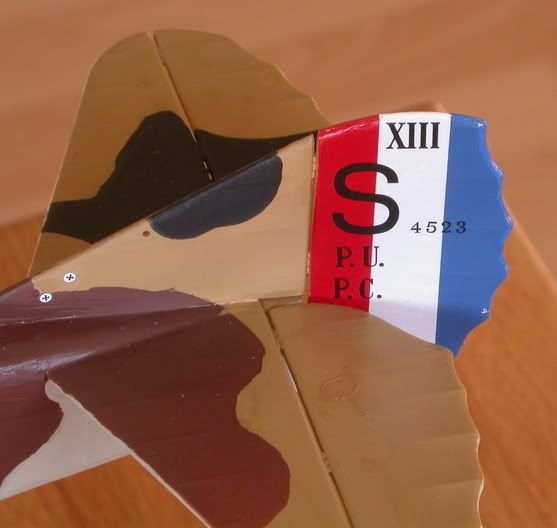
Afterwards I tried out some weathering (another "first time" here...) with watercolors at the front part, and finally gently oversprayed everything with Tamiya deck tan, flat flesh and flat earth to highlight some parts and to give it an overall dusty and worn appearance.
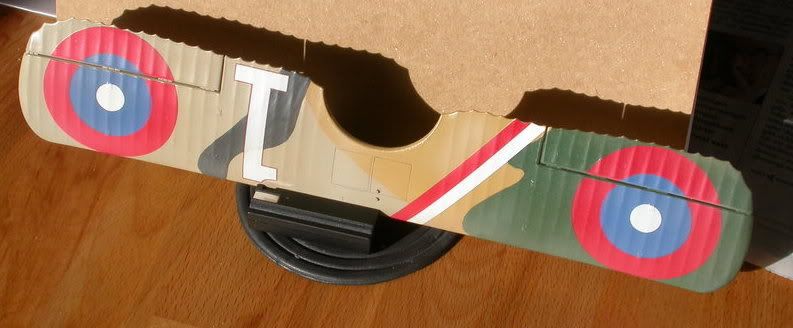
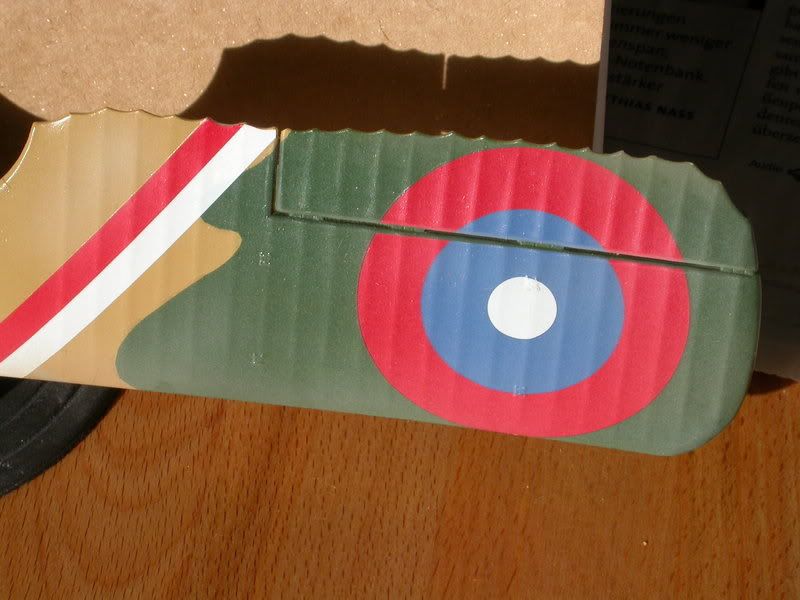
Now a few spots need to be fixed, the machine guns added, and the i can fially mount the upper wing and the landing gear. And then it's rigging time! Evil [}:)]

All comments welcome - don't be too gentle!

SD

  • Member since
    October 2004
  • From: Colorado
Posted by StephenLawson on Sunday, February 3, 2008 1:54 AM

 MrDrummy wrote:
". . .As far as markings go, I'm pretty sure that I've settled on the markings for B6212, FSL W.A. Moyle's aircraft.  I like the black cowl, and the blue/black tail!  Seems like a fairly simple scheme, that'll be a bit eye catching!!  You have any cool tidbits on this a/c? "


I think I may have a bit or two on the subject. I am sure you have seen this before.

Click Here

". . .Sopwith Camel F.1 B6212 with a Bentley BR. 1 150hp rotary was flown by Flt. Sub-Lt. W.A. Moyle of Sea plane Defense Squadron at St. Pol France in December 1917. This unit became 13N Sqdn RNAS by 15 January 1918. It was damaged on 19 February 1918 when flown by Flt. Sub-Lt. W. J. Mackenzie. Then repaired and sent to 203 RAF by 10 April 1918 where it was flown by an American, 1/Lt. W. W. Goodlow. Last recorded as being at Farnborough 30 June 1918. . ."

So your going to build a Bentley motor from a Clerget?


Stachel...unconfirmed by Armee means unconfirmed!!!!

JOIN OUR COMMUNITY!

Our community is FREE to join. To participate you must either login or register for an account.

SEARCH FORUMS
FREE NEWSLETTER
By signing up you may also receive reader surveys and occasional special offers. We do not sell, rent or trade our email lists. View our Privacy Policy.