SEARCH FINESCALE.COM

Enter keywords or a search phrase below:

BIG CATS GROUP BUILD 2008

55207 views
681 replies
1 rating 2 rating 3 rating 4 rating 5 rating
  • Member since
    November 2006
  • From: Coastal Maine
Posted by dupes on Thursday, July 3, 2008 9:25 AM
I know that feeling. No matter how much crud you plan on piling onto those wheels, you just feel wrong if you didn't paint the rubber black. Heh. Think it's part of the "AMS". Laugh [(-D]
  • Member since
    April 2007
  • From: Schroon Lake, NY
Posted by SMJmodeler on Thursday, July 3, 2008 9:19 AM
 mokei wrote:

SMJ & Mark, I am not painting Dark Yellow road wheels because it does not make sense to me if I want them to look heavily weathered later.  

I've thought about this a lot after viewing my completed builds.  The road wheels are so labor intense, but all the effort is "lost" after the weathering is done.  I think I do the work as part of the process...I feel like I have to or I've "cheated" on the build some how...make sense? 

  • Member since
    November 2006
  • From: Coastal Maine
Posted by dupes on Thursday, July 3, 2008 5:55 AM
Maybe "streaking" is a more accurate word? Either way, I know what you mean, and it looks good! Smile [:)]
  • Member since
    February 2007
Posted by mokei on Thursday, July 3, 2008 4:41 AM

SMJ & Mark, I am not painting Dark Yellow road wheels because it does not make sense to me if I want them to look heavily weathered later. Regarding the darker road bands, bear in mind outer line of road wheels are not glued and that allows me to paint inner wheels. As for the running surfaces inside the tracks I guess that is up  to the final setting of the tank, I mean running surfaces are supposed to be dirty on off road driving conditions, so lets see how it goes later because I must work on that areas anyways...Whistling [:-^] 

Dupes, thanks bro!  I am waiting for your updates too... Evil [}:)]

S T E P   3  

Once camo is done, I add some fading to level the colors in some grade. Fadding is made spraying Panzer Grey and Earth Brown here and there preparing surfaces for further weathering, so in that meaning this is only the prior step to weathering indeed and please do not mix this Fadding with traditional Post-shading because that is not the effect nor my intention. Fadding is applied on all surfaces following my intuition and personal taste only and it is not intended to add depth around details or panel lines. In fact my english is very limited and I am not even sure Fadding can be the right expression and concept for this, but I just hope you can get what I mean.  

Lu  

  • Member since
    April 2005
  • From: Piscataway, NJ!
Posted by wing_nut on Wednesday, July 2, 2008 7:52 PM

Nice work on that camo.

 SMJmodeler wrote:

How the heck are you going to spray those road wheels dark yellow?  Worse yet, how will you do the black running surfaces?,  AT 1/48 NO LESS!!!! 

Yeah... i wanna see that too.

Marc  

  • Member since
    April 2007
  • From: Schroon Lake, NY
Posted by SMJmodeler on Wednesday, July 2, 2008 8:46 AM

Lu: Nice camo', I like your attention to the shade variations of the green stripes...

How the heck are you going to spray those road wheels dark yellow?  Worse yet, how will you do the black running surfaces?,  AT 1/48 NO LESS!!!! 

  • Member since
    November 2006
  • From: Coastal Maine
Posted by dupes on Wednesday, July 2, 2008 8:40 AM
Lu - looking really good so far. Wink [;)] Keep it coming!
  • Member since
    February 2007
Posted by mokei on Wednesday, July 2, 2008 4:42 AM

SMJ, Thanks for putting me on the official list. Big Smile [:D]

S T E P   2  

Following the same phylosiphy I sprayed green stripes with little color modulation. For that I used one slightly darker shade for the vertical surfaces in order to make a difference on those areas less exposed to direct light. Well, I know that is just theorical because everything is up to where the light source is located but the intention is to keep Dark Yellow + Green stripes consistent as much as possible.  

Lu  

  • Member since
    November 2006
  • From: Coastal Maine
Posted by dupes on Tuesday, July 1, 2008 2:24 PM
Yeah, you'd best get your butt back ON the forums, O great GB leader! Evil [}:)]
  • Member since
    April 2007
  • From: Schroon Lake, NY
Posted by SMJmodeler on Tuesday, July 1, 2008 1:47 PM

Guys:  Sorry, I've been away from the forums as of late, lots of great stuff going on!  This GB seems to have some momentum right now! 

mokei:  FYI, you have been added to the participant list.

  • Member since
    February 2007
Posted by mokei on Tuesday, July 1, 2008 4:01 AM

Dupes, Hey, you are working quickly and never rest. That is good and your Big Cat is going well so far Thumbs Up [tup]. As for your question, yes, I replaced with copper rod the plastic solid handles on loader and commander hatches plus engine access cover. By the way, the engine cover featrures two opening flip tabs which cannot be there for one early model I also erased. On commanders hatch I added the inner opening handles too.  

S T E P   1

My Tiger is moving too. Here you have the result after free hand spraying base coat.  I played a bit with Dark Yellow following the princliples of color modulation to get one highlighted base color in order to enhance basic shapes and volumes. First I sprayed plain Dark Yellow that I illuminated with one lighter mix. Darker areas were directly treated with very thinned Panzer Grey to create shadow effect. Final look resembles -to me- one tricky 3D computer graphic someway. The running gear was primed in Earth Brown entirely and everything was painted with Tamiya acrylics.

Lu

  • Member since
    July 2007
  • From: Ohio
Posted by Geist on Monday, June 30, 2008 12:54 PM
Looking good Seth. Check your PMs.

On the bench: Italeri Leopard 1A2 correction build with Perfect Scale turret and Eduard PE

  • Member since
    May 2007
Posted by Specter on Monday, June 30, 2008 10:30 AM

Sorry I havn't really posted any progress pics or the like but here is where I'm at. Just have to add some small details and I'm ready to paint.

Everyone's builds are looking greatSmile [:)]

Seth
  • Member since
    November 2006
  • From: Coastal Maine
Posted by dupes on Monday, June 30, 2008 10:04 AM

Lu - couldn't figure out what you had done until I realized the fiefels were missing! Like what you've done with the jerrycans. Did you replace all of the hatch handles as well? If you aren't already addicted to GB's, it'll come. Wink [;)] Got a favorite hot sauce? Taped Shut [XX]

Quick and dirty pic I took this morning, a wash is drying which is why El Tigre is so shiny. Still working on the tracks (alllllmost wish this had vinyls instead of indys...almost) hence the still-not-fully-attached road wheels. Comments? Beefs? Anything?


  • Member since
    February 2007
Posted by mokei on Monday, June 30, 2008 5:23 AM

Gents, here you have two shoots of the assembled thing. Model goes OOB basically. I added PE grills and left commanders hatch opened to put one figure later. Jerrycans and stowage box at the rear are details inspired in some wartime images. Other small additions (copper rod handles, styrene periscopes, etc) required very little work indeed. The inquiring minds must know the model is assembled totally (but outer road wheels) and that will not be a problem to paint it comfortably. Side hull cable and MG barrel are absent at this stage. Well, it is time to drop some paint I guess...  

Dupes, I picked my avatar when Waikong hosted the 1/48th scale GB here past year, and I must admit I am totally hooked up by the quarter scaleI in fact although I also make others from time to time. BTW, I too love coffe and hot sauce and at this rate I might become addicted to group builds as well. Big Smile [:D]

Lu  


  • Member since
    July 2007
  • From: Ohio
Posted by Geist on Sunday, June 29, 2008 9:18 PM
I finally got around to painting my KT. I've only got the base dunkle gelb on now. I may paint the rest of the scheme tomorrow.

On the bench: Italeri Leopard 1A2 correction build with Perfect Scale turret and Eduard PE

Dre
  • Member since
    June 2007
  • From: here, not over there
Posted by Dre on Friday, June 27, 2008 9:07 PM

Since I can't remember when I last tuned into this GB, but here's a little update on my DML pre-zimmed KT.  Basic construction is finished except for the tools, the basic paint scheme is on and I've done a modest amount of pre-weathering weathering.  I went with the box art green blobs on a yellow background with turret #333.  I left the spare track hangers off the turret after a photo of a KT getting painted during the war.  Still a lot of work to do, but it's closer to looking like it should.


  • Member since
    November 2006
  • From: Coastal Maine
Posted by dupes on Friday, June 27, 2008 5:29 AM

Lu - I'm guessing by your avatar that you only build in 1/48? Laugh [(-D]

I remember your British Bren Carrier from the War In The Desert GB, so I'm looking forward to seeing what you do with the Tiger - should be a treat! Big Smile [:D]

  • Member since
    February 2007
Posted by mokei on Friday, June 27, 2008 5:20 AM

SMJ, Since you started this GB I wanted to join, but I was not into Big Cats then so have been patiently waiting for my chance to arise and fortunately right now I am starting one... so if you do not mind I would love joining the gang here.

If so, Please add to the list one more Tamiya 1/48th Tiger I Early Production with the only addition of PE grills.

This one must be a very fast build to me because my modeling time is very limited nowadays.  If everything goes well, I am posting a couple of pics of the assembled model over the weekend.

Dupes, We are making the same kit, and I am following your work with great interest. Thumbs Up [tup]

Lu

  • Member since
    July 2007
  • From: Ohio
Posted by Geist on Thursday, June 26, 2008 7:24 PM
I haven't worked much on the KT since I've been back from Germany. I've just put on some small details like handles and the spare track hooks on the turret. I should really start painting but I've been too lazy. Maybe I'll do it tonight??

On the bench: Italeri Leopard 1A2 correction build with Perfect Scale turret and Eduard PE

  • Member since
    March 2008
  • From: Colorado
Posted by TacoBuff on Wednesday, June 25, 2008 3:23 PM

i found mesh screen similar to that in an old italeri 1/35 sherman kit box (the one with the vents on the back).

It'd be a pain if i had to shell out 20$ everytime i needed screens, lol.

  • Member since
    November 2006
  • From: Coastal Maine
Posted by dupes on Wednesday, June 25, 2008 11:12 AM

I sure hope so. Wink [;)]

As for the screen mesh...I don't know where I got it. Sorry! It was in my "spare parts and scraps" box where I keep...spare parts and scraps. Laugh [(-D] It could have come from a Tamiya kit of some sort, but it doesn't look like it would work on something 1/35 (which is my usual scale). Huh.  

  • Member since
    March 2008
  • From: Colorado
Posted by TacoBuff on Wednesday, June 25, 2008 10:10 AM

i like the sort of 'cold' blue grey you painted the tiger.  that's gonna look really cool when it's finished.

where did you find the mesh for the screens?

  • Member since
    November 2006
  • From: Coastal Maine
Posted by dupes on Wednesday, June 25, 2008 9:02 AM

Alright, the phone stopped ringing for a couple of minutes and I threw these on Photobucket.

Pic #1:
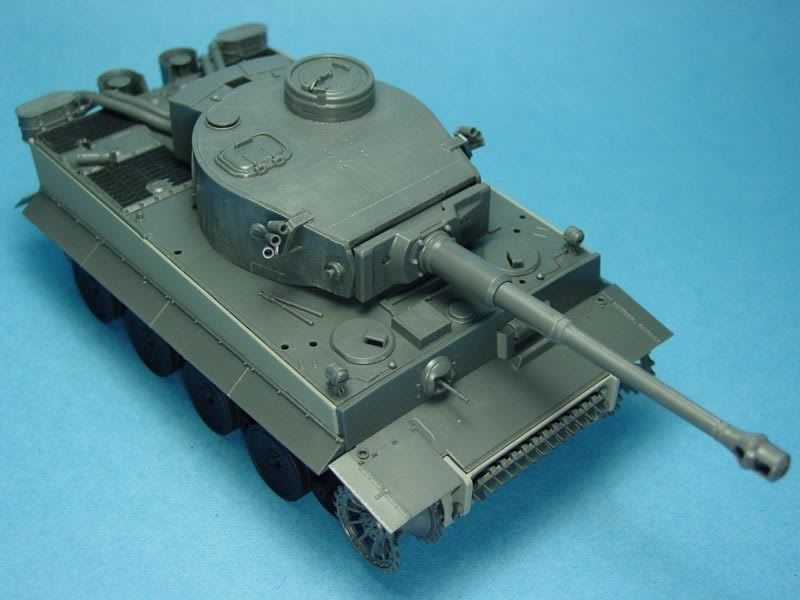
Finished assembly before paint. I made some custom mesh screens, I think I got the size of the grates about right. Didn't make the frames, but they're quite small, and only the most discriminating viewers (i.e., you guys!) will notice anyway. Wired the headlights and smoke grenade launchers. Also tried to simulate some of the cast look on the turret, but it looks like it got mostly swallowed up with the base coat of paint (see pic #2). Yes, there's a row of roadwheels missing, they wouldn't stay in without glue, so I left them off. Wink [;)]

Pic #2:

A quickie after I finished spraying the base coat (didn't bother to set up the booth again). Going with a mix of Panzer Gray I read about incorporating a bit of blue, wanted to give it a shot. Came out verrrrrrry smooth, going to hit the panels with a highlighted coat tonight. Big Smile [:D]

  • Member since
    November 2006
  • From: Coastal Maine
Posted by dupes on Wednesday, June 25, 2008 7:38 AM

Hey, no problem, just let me know if you need them. Thumbs Up [tup]

That Doog indy toot is really good. Definitely give it a try. But you have learned now why Dragon switched to Magic Tracks! Big Smile [:D]

Have some pics to put up of the fully assembled and ready for paint Tiger, just need to roll them through photoshop...should have them up by lunchtime. Wink [;)]

  • Member since
    March 2008
  • From: Colorado
Posted by TacoBuff on Tuesday, June 24, 2008 5:56 PM

hi guys,

thanks for the link Wing Nut, this'll help.

Dupes, i'm building DML's King Tiger Porsche turret kit #6189.  The links are molded onto sprues, so each must be trimmed then cleaned.  I'll try the tracks using wing nut's link, but if that doesn't work, the rubber bands would be a great help (i prefer them anyway).

thanks

  • Member since
    April 2005
  • From: Piscataway, NJ!
Posted by wing_nut on Tuesday, June 24, 2008 11:34 AM

tacobuff, here is a link to a toot the doog put up at armorama.  I follow that procedure and have no problems with the indy links


http://armorama.com/modules.php?op=modload&name=Sections&file=index&req=viewarticle&artid=1737

Marc  

  • Member since
    November 2006
  • From: Coastal Maine
Posted by dupes on Tuesday, June 24, 2008 11:25 AM

Tacobuff - couple of questions for you - what manufacturer KT are you doing? And what kit by said manufacturer? I have a set of left over Tamiya rubber band tracks from the KT "Ardennes" I did, which you're welcome to have if you're interested. Other than that, there are several companies that make replacement tracks, but I don't know if they're going to be a) affordable or b) any easier to put together than the ones you have now.

Go into the armor forum and use the search function, look up "indy track tutorial" or things like that, there's lots of good past info on assembling indy links. Thumbs Up [tup]

  • Member since
    March 2008
  • From: Colorado
Posted by TacoBuff on Tuesday, June 24, 2008 10:59 AM

hey guys, sorry i dropped off the map for a while.

quick question.  I'm working on the single link tracks for my KT that are included in the kit. These are very time consuming to put together, and often don't come out straight.  Any suggestions as to how to ease this progress, or where i can find some affordable replacements?

rememeber 'affordable' being the key word.

thanks

  • Member since
    November 2006
  • From: Coastal Maine
Posted by dupes on Tuesday, June 24, 2008 7:13 AM
Hey, no problem. I know that moving really bites...if it happens to go well, or you manage to squeeze in some more build-time, let me know! Cool [8D]
JOIN OUR COMMUNITY!

Our community is FREE to join. To participate you must either login or register for an account.

SEARCH FORUMS
FREE NEWSLETTER
By signing up you may also receive reader surveys and occasional special offers. We do not sell, rent or trade our email lists. View our Privacy Policy.