SEARCH FINESCALE.COM

Enter keywords or a search phrase below:

BIG CATS GROUP BUILD 2008

55207 views
681 replies
1 rating 2 rating 3 rating 4 rating 5 rating
  • Member since
    April 2005
Posted by Thunderbolt379 on Monday, June 23, 2008 7:53 PM

Hi Dupes,

Yes, I raised the pressure above 20 and got back some control, but the flow rate was then too great. You know, I'm thinking the problem might have been triger-stick. She was blowing through too much paint as if the needle was getting gummed up and jamming too far open... I'll give it a thorough clean and lubricate and take another crack. If I can thin-down and randomize the pattern a bit more, I'll be happier!

I don't think I'll have time to come aboard the 251 build, unfortunately... I have a Merkava waiting for completion, Battle of Britain is now underway, I've not touched my entries for Mustang and Corsair yet, and I've been casting longing (over-ambitious?) glances at Scott's Red Storm on the Reich, even the Cold War build... I dunno how I'll fit 'em all in! Especially as we suspect we'll be packing to move house yet again in just a few months... YUCK. I'll be happy if I get half of that lot done by next April!

Good news is I've found a source for those Eureka tow cables from Poland at half the Aus price... (Model Point US)

Cheers,

TB379

http://worldinminiature.blogspot.com/

  • Member since
    November 2006
  • From: Coastal Maine
Posted by dupes on Monday, June 23, 2008 10:55 AM

Dang...that's weird that the paint won't behave for you. Have you tried bumping the pressure up a bit? I know I always shoot around 20-25 in order to get good effects with the hyper-thin paint.

Hey, side note for you T-bolt - I know you expressed interest in the 251 GB a little while ago - the "official" thread is up in the GB section. You should take a look at it.Wink [;)]

That goes for any of the rest of you who are interested as well!!! Big Smile [:D]

  • Member since
    April 2005
Posted by Thunderbolt379 on Monday, June 23, 2008 9:47 AM

Hi Dupes and SMJ,

Yup, I'm thinning at 1:1, even going beyond that in the hopes of control, but not having any luck... I keep cleaning the AB, using my Paasche cleaning brushes on the paint pickup and needle channel, lubricating the needle with petroleum jelly, and have a wide range of pressures available... Thinned paint and low pressure is supposed to equal control, but I've not encountered much. At this point the AB is great for single colour subjects or masked colours, but for softedge I've not got her tamed...

Now where did I get the impression this build finished at mid-year??? Here I was hurrying thinking I needed her done in a week to get my badge!

Thanks guys!

Cheers,

TB379

http://worldinminiature.blogspot.com/

  • Member since
    April 2007
  • From: Schroon Lake, NY
Posted by SMJmodeler on Monday, June 23, 2008 8:23 AM
 Thunderbolt379 wrote:

... This build has a week to go, right?

WHOAAAAA!!!...Shock [:O]Shock [:O]Shock [:O]...big fella', you have until December 31st!!!

  • Member since
    November 2006
  • From: Coastal Maine
Posted by dupes on Monday, June 23, 2008 7:55 AM

A week to go? Holy cow I hope not! Shock [:O]

Pretty sure we've got til the end of the year, right?

T-bolt - how much are you thinning your acrylics? If you're using Tamiya like I do, you need to cut it WAAAAAY down. I use 50% as my starting point - half paint, half alcohol. It takes a bit longer to get coverage, but the control is much better. Smile [:)]

  • Member since
    April 2005
Posted by Thunderbolt379 on Monday, June 23, 2008 7:47 AM

Hi Wing_nut and SMJ,

Thanks for your positive comments -- she doesn't look too bad, though not as authentic as I had hoped. The paint really fought me, and when I got to the hull I swear the AB 'blatted' before my eyes... I had to mop paint off with a paper towel in a couple of places, and was glad to finish up where I did. Yes, the brown areas are proportionally heavier on the hull, and less 'random,' and I've already toned them back with yellow. The problem with getting them any narrower, or even a different shape, is the overspray factor of the yellow -- they'll speckle away to fuzz if I try to narrow them. I think I got the turret as good is it is because the paint was barely flowing through the AB at all. I got finer control with enamels when I did my IP M1.

I could try again, but I'm not confident of better results, and this beast is on a schedule. I was going to work on it today, but didn't get a chance... This build has a week to go, right? I'll take a look in daylight tomorrow, and see if I can refine the paint any more before going to the oil washes.

Cheers, guys,

TB379

http://worldinminiature.blogspot.com/

  • Member since
    April 2007
  • From: Schroon Lake, NY
Posted by SMJmodeler on Monday, June 23, 2008 7:31 AM
T379:  Sounds like your a bit disappointed now but hang in there.  The first thing I notice is the difference in the spacing of the camo' on the turret versus the hull.  I think the results on the turret are great, I like the tight curves, zig-zags, and variations in width of the lines.  The hull is missing that "random" feel, take another look and see if that helps... 

  • Member since
    December 2002
  • From: Bury St Edmunds, Suffolk, England
Posted by Bish on Sunday, June 22, 2008 10:40 AM

If anyone is thinking of useing verlindens Tiger I engine compartment, all i can say is DON'T. The fit is awful. Once you manage to squeeze the engine in, the pipe work dsoesn't match.

 I was thinking of useing a Verlinden engine for a Panther, but now am thinking of the Czech Master one, even though its over twice the cost. Has anyone used these before, for what ever vehicle.

I am a Norfolk man and i glory in being so


On the bench: Airfix 1/72nd Harrier GR.3/Fujimi 1/72nd Ju 87D-3

  • Member since
    April 2005
  • From: Piscataway, NJ!
Posted by wing_nut on Sunday, June 22, 2008 9:37 AM

Lookin' really good tbolt.  I am about to start spraying the same 2 tone on the KT I am working on and was wondering what those colors look like without the green.  Now I know...and I like it.  I wanna see this one done.

Marc  

  • Member since
    April 2005
Posted by Thunderbolt379 on Sunday, June 22, 2008 7:53 AM

Hi guys,

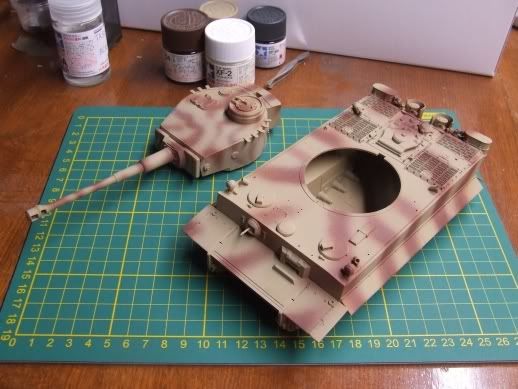
I got the gas bottle changed on Friday morning, and was able to get back to the project today. Here she is:

Photobucket" border="0" />

I used Tamiya acrylics all the way. The rotbraun is lightened 10% to match with the dunkelgelb, to offset the darkening effect of the oil filter to come. I used the Paasche #1 tip and needle but frankly was very disappointed with the result. The paint spattered, didn't want to come up the syphon despite thinning way over spec, and overspray was fully as bad as with the greens. It makes me think longingly of the velvet application of enamels. Okay, they stink, they're toxic and their cleanup smells like a gas station, but what a beautiful paintjob they do!

I used the extra-thinned dark yellow left over from doing the wheels (both sides of them all excepting those combined as the 16 twin-wheel units, two coats, plus drives and idlers, sprayed through a template) to touch up the oversprayed yellow.

Also, the fineness I expected from the small tip was totally absent. I was spraying lines as fine as this with a single-action Badger nearly 30 years ago. As a result, though Bison supply (on the web) a colour profile of each vehicle, based on their research, duplicating the 'actual' pattern on LAH 1325 was simply not possible. This pattern is generic/fictional, whatever you want to call it, and permisible perhaps only because there was no specific pattern on German armour.

Next will come a subtle fade coat on the upper surfaces, applied quickly, along with airbrushing the spare track links, which I forgot to do when doing the tracks as a whole. Then I'm onto detailing, tools, touch up the tires, and start the weathering... Hopefully the fade coat and oil filter will together draw the cammo colours into one 'element,' and de-emphasise the shortcomings of the sprayjob. Then I can add all external fittings and the running gear. Decals and dust should finish the process -- hopefully before the end of the week.

Cheers,

TB379

http://worldinminiature.blogspot.com/

  • Member since
    December 2002
  • From: Bury St Edmunds, Suffolk, England
Posted by Bish on Saturday, June 21, 2008 12:41 PM
Finally managed to get started on my Tiger on Thurs. mainly been working on the Verlinden engine compartment, as thats part of the dio for it. Unfortunatly i start work again on Tues which means i only get to build at weekends from now. hopefully i will be at a stage to get some pics posted next weekend.

I am a Norfolk man and i glory in being so


On the bench: Airfix 1/72nd Harrier GR.3/Fujimi 1/72nd Ju 87D-3

  • Member since
    November 2006
  • From: Coastal Maine
Posted by dupes on Friday, June 20, 2008 5:49 PM

I'm pretty interested myself! Big Smile [:D] Seen some good results here on the forums, figured it was time to give it a try. Thinking of doing a bunch of these on little dio bases...throw them on display at my wife's office, try to generate a little "local interest" in the whole modeling scene. Propeller [8-]

Should get a bunch done later tonight. Wink [;)]

  • Member since
    May 2007
Posted by Specter on Friday, June 20, 2008 12:37 PM

Started my KT the day after I got in the gb and I have no idea where the time went the build is going so fast. Still a good amount to do still though. I'll post pics soon. Really liking the gb SMJSmile [:)]

Scott: I said I would tell you how the build goes. It's just like any other DML KT, you just have to make sure there are no/or fill gaps in a few places due to the zimm, other than that everything is great

Seth
  • Member since
    April 2007
  • From: Schroon Lake, NY
Posted by SMJmodeler on Friday, June 20, 2008 10:34 AM
 dupes wrote:

SMJ - need a slight adjustment on page 1...it should read "Tamiya Tiger I Early 1/48". Wink [;)]

Done! 

That Tiger is my first choice if I ever try the 1/48 thing.  I'll be watching closely to see how that one comes together! 

  • Member since
    November 2006
  • From: Coastal Maine
Posted by dupes on Friday, June 20, 2008 10:17 AM

SMJ - need a slight adjustment on page 1...it should read "Tamiya Tiger I Early 1/48". Wink [;)]

In an effort to get my butt moving (and crank out some builds!), I've decided to scale down (get it? Laugh [(-D]) my project a tad. Been jonesing to do one of these Tamiya 1/48 kits since I snagged a few a while back...and while it's only 1/48 scale, it's still a Big Cat! Big Smile [:D] Here's what it looks like so far:

I'm pretty sure I'm not a huge fan of the die-cast chassis' on the Tam 1/48 line - not sure I see the point, and plastic is much easier to work with? Anyhoo, this one should build up pretty quickly. Going OOB, adding some homemade screens, and then it's off to the paintbooth. Found some decent pics of the tank Tamiya used for the markings options in Tigers In Combat I, will post one or two when I get a chance. Cool [8D]

  • Member since
    April 2007
  • From: Schroon Lake, NY
Posted by SMJmodeler on Thursday, June 19, 2008 8:02 AM
T379:  I like those screens, and it's good to see some paint on that Tiger!Thumbs Up [tup]...bummer about the gas bottleDisapprove [V]

  • Member since
    April 2005
Posted by Thunderbolt379 on Thursday, June 19, 2008 7:49 AM

Hi again,

The big cat was in the paintshop today, here she is with a couple of coats of dunkelgelb applied (lightened 20% with white to offset the darkening effect of oil washes to come).

Photobucket" border="0" />

Academy matched the colour of the plastic very closely to dark yellow, presumably so an inexperienced modeller would get an appreciably finished look without painting.

In the same round of work I also got the tracks done:

Photobucket" border="0" />

I used the same formula as for the StuG III for "The Hunters." They were sprayed dark brown acrylic (mixed shade) to represent the oxidation colour of the high-manganese steel of German tracks, given acrylic washes, to suggest surface rust, of lighter, brighter shades, then drybrushed with mixed enamel gunmetal for the bare steel areas. They'll get plenty of MiG dust to finish off with. I don't think the rust shows up too well on this photo, they look better in real life...

It'll b a couple of days before I can get back to the project. When I came to spray today I had barely 2 bars pressure left, instead of the 4.5 I expected. I may not have closed the valve fully on my last spraying session, and the air bled away. I've never done that since the first gas bottle I ever had, which was around 1995 or earlier. I'll change it for a full one in the morning, but I have to be away Friday afternoon to Saturday night (Aus time, it's Friday tomorrow here), so Sunday will be my first chance to blow the wheels into yellow, tackle the rotbraun overspray, then the fade coat, and spray the spare track links. There's plenty to do yet!

Cheers,

TB379

http://worldinminiature.blogspot.com/

  • Member since
    April 2005
Posted by Thunderbolt379 on Wednesday, June 18, 2008 7:38 AM

...And here she is with the PE grills installed. I'm very impressed with these grills, excellent parts that take about ten minutes to install, and look great under paint.

Photobucket" border="0" />

The masking is underway here, all twenty axles have been masked with tape and Maskol, and the locators for all tools likewise, along with the exhaust connector points to the Feifels. The inner end connectors are still to go, along with the jack, jack block, crowbars and flank tow cable attachment points, and the turret slide rings on both hull and turret base, and the track connector ends.

I'm optimistic of getting some paint onto her tomorrow.

Cheers,

TB379

http://worldinminiature.blogspot.com/

  • Member since
    April 2005
Posted by Thunderbolt379 on Tuesday, June 17, 2008 8:38 AM

Hi Dupes and SMJ --

Yup, I'm waiting on the Eduard PE grill set for the engine deck, it should be in the post any day now. And that answers the second point, as they're the last structural parts needed before painting. With luck I could have her in the paint bay in a couple of days. I've only got 4 bars pressure left in my tank, though, and that may not get me there (the last bars disappear quicker than the first ones do). I have the overall yellow to do, then the redbrown stripes, then the fade coat on the upper surfaces, spray the tracks and spare links... We'll see. I need a gas bottle change sometime soon, that's for sure. But this kittie will definitely be ready for action (read, the glass case!) in time for build's end!

Glad you like my work guys, it means a lot from modelers of your calibre!

Cheers,

TB379

PS: Next-day ammendment: The Eduard grills were in the mail this morning!

http://worldinminiature.blogspot.com/

  • Member since
    April 2007
  • From: Schroon Lake, NY
Posted by SMJmodeler on Tuesday, June 17, 2008 7:37 AM

Scott: Some nice detailed info and guidance, looking good!Thumbs Up [tup]

T379:  I've used a wood burning tool to do weld seams and, if you can believe it, ZIM'!...it worked pretty good too, I'll post a pic' if you'd like.  By the way, when do you plan to start painting?

  • Member since
    December 2002
  • From: Reno, NV
Posted by espins1 on Monday, June 16, 2008 10:40 AM

 ps1scw wrote:

I'm just finishing up their Premium A, looks like they decided to keep the color instructions, I got used to them, but I prefer the standard two color black/blue type. 

I'm glad they at least included the black, white and blue style for the detailed assemblies, such as for the jack and exhausts. 

Sometimes the photo instructions make it really difficult to see exactly how a part is supposed to be placed.  Case in point part #P7....

Scott Espin - IPMS Reno High Rollers  Geeked My Reviews 

  • Member since
    November 2006
  • From: Coastal Maine
Posted by dupes on Monday, June 16, 2008 8:14 AM

T-bolt - looking really good. Thumbs Up [tup]

You probably mentioned this before, but are you going to add some PE grill screens?

  • Member since
    April 2005
Posted by Thunderbolt379 on Sunday, June 15, 2008 10:41 PM

Thanks SMJ and Scott, I was mildly surprised to find the weld trick is so easy to do. I might try heat-working the actual kit plastic one day too.

Well, here she is, all bits on (with the exception of an S-mine ejector which fell off and needs remounting, and three teensy latches on the inside of the commander's hatch, which don't show here).

Photobucket" border="0" />

Note there are no smoke grenade mounts. At least some of the LAH's Early Tigers at Kursk seem to have not been using them (the cover painting of Tiger in Action is an example, and the decal instructions indicated the same).

Okay, on with the masking while I'm waiting on the PE set, and I can look at getting the tracks ready too.

Scott, the Panther is looking good, it's a mite more tricky than others, I look forward to seeing her come together. My feeling is PE is probably going to be too fine for my dexterity and eyesight for any more than grills and racks, so I'll be watching how you handle this lot with interest.

Cheers,

TB379

http://worldinminiature.blogspot.com/

  • Member since
    June 2006
  • From: Michigan
Posted by ps1scw on Sunday, June 15, 2008 8:40 PM
 espins1 wrote:

TB379 - Nice save on the rain covers for the exhaust and nice weld seams!  Smile [:)]

I've made a little headway on the Panther Ausf. D w/zimmerit.  Been pretty busy the last few days and have been digging deep into the research for this kit.  As you can see in steps 5 and 6, some modifications need to be made to the exhausts and the jack. 

First up are the exhausts.  The grooves in the pipes needed to be filled and the excess plastic on the back needed to be removed.  The modifications are necessary to remove anything relating to the plastic brackets in order to use the the photo etch brackets provided in the kit and to get them to fit properly.  I carefully trimmed off the plastic on the backs, then filled the groove with squadron white putty.


Then came the jack modifications.  I carefully cut away the plastic brackets using a #11 blade, then carefully sanded everything smooth.  


The drive sprockets look great, as do the idlers.   There are two different sprocket caps included in the kit.  The more recessed cap appears on earlier variants of the Panther Ausf. D.  Be sure to check your references carefully to be sure you're using the correct cap for the vehicle you're modeling.  The vehicle I'm modeling features the later sprocket cap with the weld seam going around it.


I'm just finishing up their Premium A, looks like they decided to keep the color instructions, I got used to them, but I prefer the standard two color black/blue type. 

  • Member since
    December 2002
  • From: Reno, NV
Posted by espins1 on Sunday, June 15, 2008 4:31 PM

TB379 - Nice save on the rain covers for the exhaust and nice weld seams!  Smile [:)]

I've made a little headway on the Panther Ausf. D w/zimmerit.  Been pretty busy the last few days and have been digging deep into the research for this kit.  As you can see in steps 5 and 6, some modifications need to be made to the exhausts and the jack. 

First up are the exhausts.  The grooves in the pipes needed to be filled and the excess plastic on the back needed to be removed.  The modifications are necessary to remove anything relating to the plastic brackets in order to use the the photo etch brackets provided in the kit and to get them to fit properly.  I carefully trimmed off the plastic on the backs, then filled the groove with squadron white putty.


Then came the jack modifications.  I carefully cut away the plastic brackets using a #11 blade, then carefully sanded everything smooth.  


The drive sprockets look great, as do the idlers.   There are two different sprocket caps included in the kit.  The more recessed cap appears on earlier variants of the Panther Ausf. D.  Be sure to check your references carefully to be sure you're using the correct cap for the vehicle you're modeling.  The vehicle I'm modeling features the later sprocket cap with the weld seam going around it.


Scott Espin - IPMS Reno High Rollers  Geeked My Reviews 

  • Member since
    April 2007
  • From: Schroon Lake, NY
Posted by SMJmodeler on Sunday, June 15, 2008 10:50 AM
TB379: Those seams look awesomeThumbs Up [tup], I'll be looking forward to seeing that bad-boy with some paint!

  • Member since
    April 2005
Posted by Thunderbolt379 on Sunday, June 15, 2008 2:12 AM

Okay, turret weld seams are done.

Photobucket" border="0" />

Above, the seams, as nearly as they can be followed allowing for the vagaries of the moldings and parts-fit, especially at the very front, are outlined in .010" x .020" microstrip (couldn't get .020" half-round, which would have been more realistic). Below, the strip has been textured with the hot tip of an exacto blade. They have since been filed lightly to reduce both height and roughness.

Photobucket" border="0" />

The track hangers have now been installed correctly on both sides. The only remaining subassembly is the commander's hatch. I can add the skirts and forward U-hooks to the hull and she's almost ready for the paintshop. I need to mask all axles, the turret ring and the location points for all tools and track plates, and mating surfaces between wheel subassemblies and track connector-ends. I'm still waiting on the PE grills, also. When these details are complete, she's under the airbrush.

Cheers,

TB379

http://worldinminiature.blogspot.com/

  • Member since
    April 2005
Posted by Thunderbolt379 on Saturday, June 14, 2008 6:44 PM

Thanks, Moose!

Yes, making a small part larger and trimming the rest later is a technique I was introduced to a year or two back by a friend from England. I had to basically carve an aircraft fin from solid plastic for a scratchbuild project, a single-piece airfoil which would then be molded and cast in fast-cure resin as needed. The piece was maybe an inch and a quarter in size, and for the amount of elbow-grease required to shape it from 3.2mm sheetstock, holding it would have been impossible. So I shaped it from the end of a bar of the stock, the big end forming a 'handle' that could be controled by hand or fitted into my vice. When the part was shaped to my satisfaction, I simply cut it free of the handle, across its base, with my razor saw, exactly the same way as freeing a resin part from its pour stub.

Doing the rain covers was the same technique, in essence, at very much smaller scale. Use more material so you can control it, then trim it to size when it's fixed.

Cheers,

TB379

http://worldinminiature.blogspot.com/

  • Member since
    November 2007
  • From: Wisconsin Rapids, WI
Posted by moose421 on Saturday, June 14, 2008 8:53 AM

Nice save on the rain covers.  I to have found it sometimes is easier to install stuff like the rods over size and trimming to fit.  I to agree with your reasoning for misalignment.  Weak parts like that on the reall vehicle would get bent easily.  Keep up the great work.


  • Member since
    April 2005
Posted by Thunderbolt379 on Saturday, June 14, 2008 2:28 AM

Okay, progress to report! Remember those nasty little rain covers on the exhausts that were holding things up? They're fixed. When kit parts fail, scratchbuilding techniques take over.

This is what I did:

Photobucket" border="0" />

One is finished, the other under way. I drilled through the caps with a .020"/0.5mm twistdrill in a micro pin-vise, and drilled out the receivers in the exhaust the same way. Then I cut 10mm lengths of .020" microrod (long enough to get hold of!) and passed them through. The bottom ends were dipped in superglue and snugged down into the lower holes, the cap, still loose, being used to cntrol them. When the glue was dry, I marked the rods with a pen at 5mm, and added supeglue to each,then eyeballed the alignment to settle the cap into place.

When this was dry, I used a sharp blade and trimmed away the excess rod, then filed the stubs down flush, and they were done. The caps aren't completely level and the rods aren't completely straight, but the kit parts were never going to be, and such relatively delicate structures probably got bent and knocked around on the real tanks too.

Here they are mounted, waiting for the external shields ('scuse the focus...):

Photobucket" border="0" />

Now I can get on with the build! Note the portside track test-fitted. I have the weld-seam experiment underway as well, that should be the next major job.

Cheers,

TB379

http://worldinminiature.blogspot.com/

JOIN OUR COMMUNITY!

Our community is FREE to join. To participate you must either login or register for an account.

SEARCH FORUMS
FREE NEWSLETTER
By signing up you may also receive reader surveys and occasional special offers. We do not sell, rent or trade our email lists. View our Privacy Policy.