SEARCH FINESCALE.COM

Enter keywords or a search phrase below:

The RCAF Group Build Birthday Party

46959 views
396 replies
1 rating 2 rating 3 rating 4 rating 5 rating
  • Member since
    January 2008
  • From: Hamilton, Ontario
Posted by Poppie on Thursday, April 10, 2008 2:14 PM

You blody guys are gong to dazzle me to death with alll this fancy work you've been doing. It's been a real education just to watch some of this stuff gro o  n thi s forum. You' ve got to be proud of your hand i work. and your wives - You should be able to knock together a project every weekend for her. Her wee apt will be a real little showcase. I',m simplly in awe.  My wife says I haved to go to bed now as I have had to take     a morpphine shot for the pain of which I am feeling nonne or a t least very letttle. and I can't type or make a sentence  p or talk / type straight, screen in doiuble nd  fuzzly tto.   I'm going for a nap and seeing how i fffffel later if i feel better. sorrlllly gulys but this has been going on gor  45 years. now. Jlust gonna get a big magnet and get the metal out somehow...    al mj s;kne donnt mind. niighty night,,,,,,,,


This is Mrs Poppy,

Poppy had a bit of a fall earlier this morning and as usual, refused to lie down and take it easy as the Dr. prescribed. I've given him  his morphine and it makes him a bit jumbled, but as you know by now, if your his friends,  thats my husband.  He should wake up this evening, madder than 'H' that I wrote this but I think you should understand that when you see him start to get like this please suggest that he take a break and lie down, for my sake as well as his own. Even when he hurts he gets very, very stubborn. I don't know how to use this forum so I hope this goes through. Thank you for supporting him. He should be Ok tomorrow.

Thank You,

Mrs. Poppy


"This is a gentle place if I but make it so." Poppie
  • Member since
    January 2008
  • From: Hamilton, Ontario
Posted by Poppie on Wednesday, April 9, 2008 6:57 PM
Ye Gods! You guys do some fantastic work. I feel like I'm still in the newsprint and crayon stage - course, that may be because I am. I've only been at this for about 6 months - air brushing I mean. As far as modeling goes - well, lets say I no longer glue my finger 'completely' together.
"This is a gentle place if I but make it so." Poppie
  • Member since
    October 2007
  • From: Inland Northwest
Posted by Summit on Wednesday, April 9, 2008 6:16 PM

Bullet, that is a Fantastic Build ! I am awestruck by the detail and paint. Very much a Top Notch Build.

I guess the Aztec Gods smiled upon me for some reason Wink [;)]  I painted this car body two days ago with my Aztec and GP (gray) tip. I think it turned out really nice and smooth. Sorry I can not at this time get a pic that shows the metallic better. I really need to take the pic outside but hey, I live in the PNW - I dont think I have seen the Sun since last August Wink [;)]

New Paint Sorry Poppie for being OT with this...

Sean "I've reached nearly fifty years of age with my system." Weekend GB 2008
  • Member since
    December 2003
  • From: Prince George B.C., Canada
Posted by Bullet21 on Wednesday, April 9, 2008 5:52 PM

So I'm not the only one who dislikes his Aztec! I had used a Badger 150 for years but when we moved back into our house after the rebuild (we had a fire, I love my insurance co. lol) somehow 1 out of 189 boxes was lost by the restoring co. and it contained parts for 4 kits that were almost done, some tools from my bench and my beloved Badger.Sad [:(]

I had heard nothing but good things about the Aztec, and since it was touted as being "Designed for modelers by modelers" I went out and bought one. I got a deluxe set with several tips and jars and I even ordered extra tips & jars. Well after watching the supplied instructional video and mixing both acrylics & enamels in many ways and adjusting my regulater until my fingers started bleeding, I gave in.Banged Head [banghead] I charged downtown and came home with a new Paasche VL set.

Now I agree that the Aztec is waaaaay more user friendly and a whole lot easier to clean but for the life of me I just could not get the paint to come out even. No watter what I tried it looked like crap. Right now I am re-painting a 1/32 Hurricane Mk. IIC in desert colors using the Paasche. The Aztec did a horrible job on it. It is the same type as the Badger so I reckon it's not so much the airbrush itself as the TYPE of airbrush. There are far too many who love thier Aztec to blame the brush, in fact we are the odd-men-out on this one. I, personelly, find I have more control with the Paasche/Badger type.

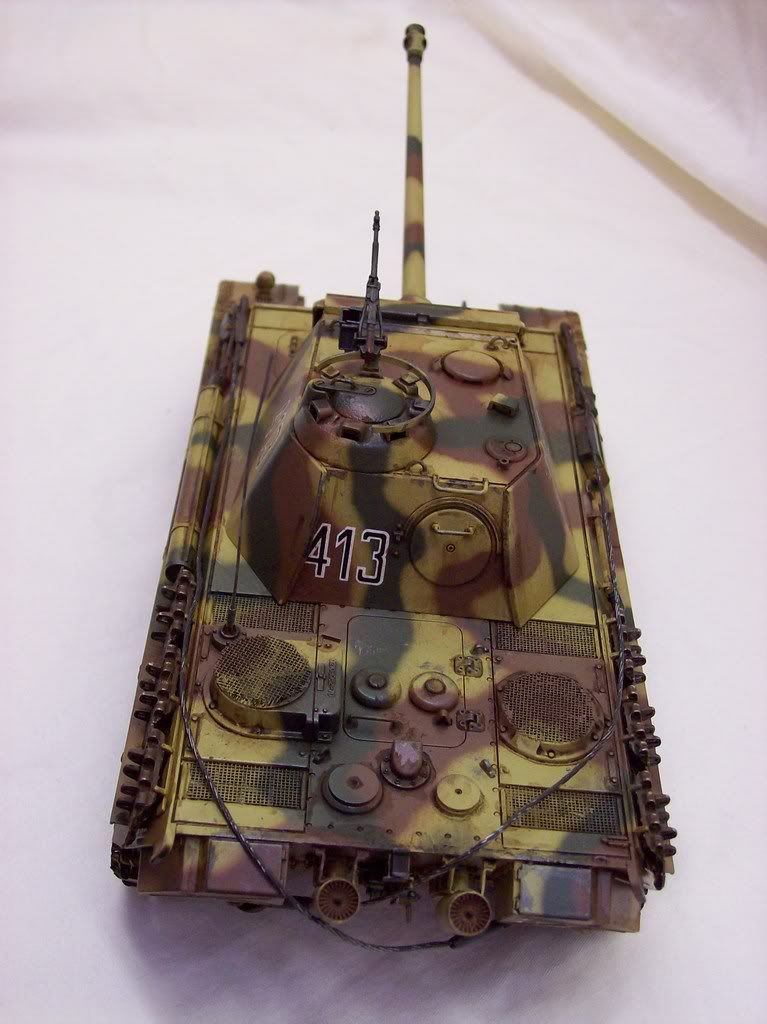
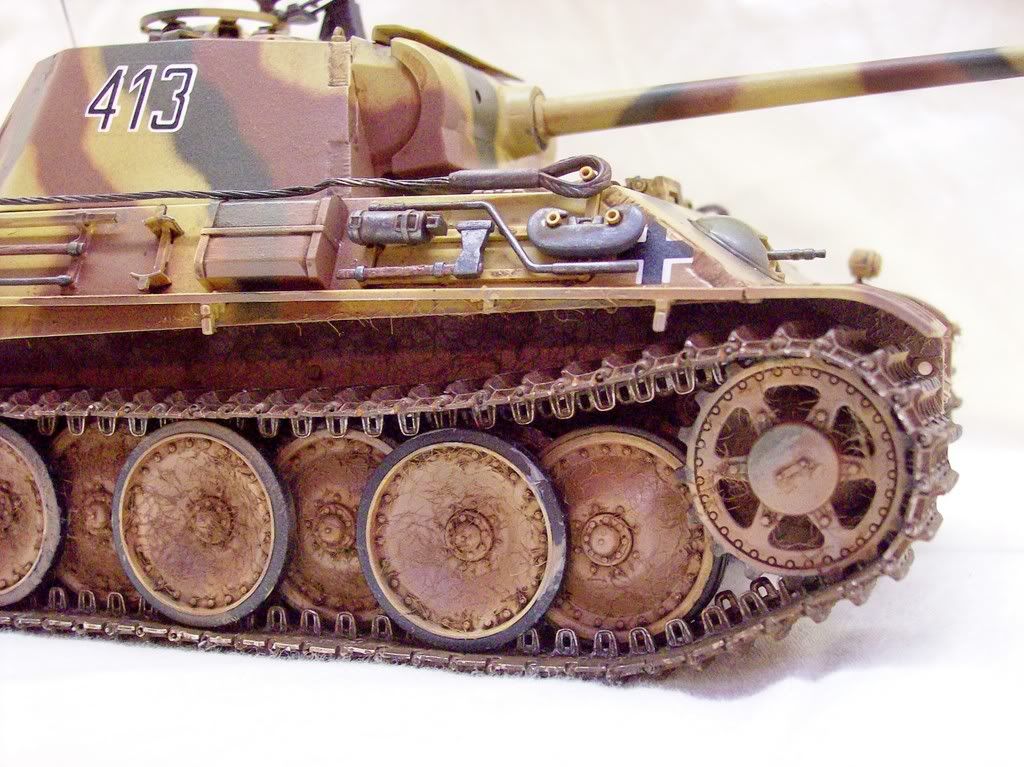
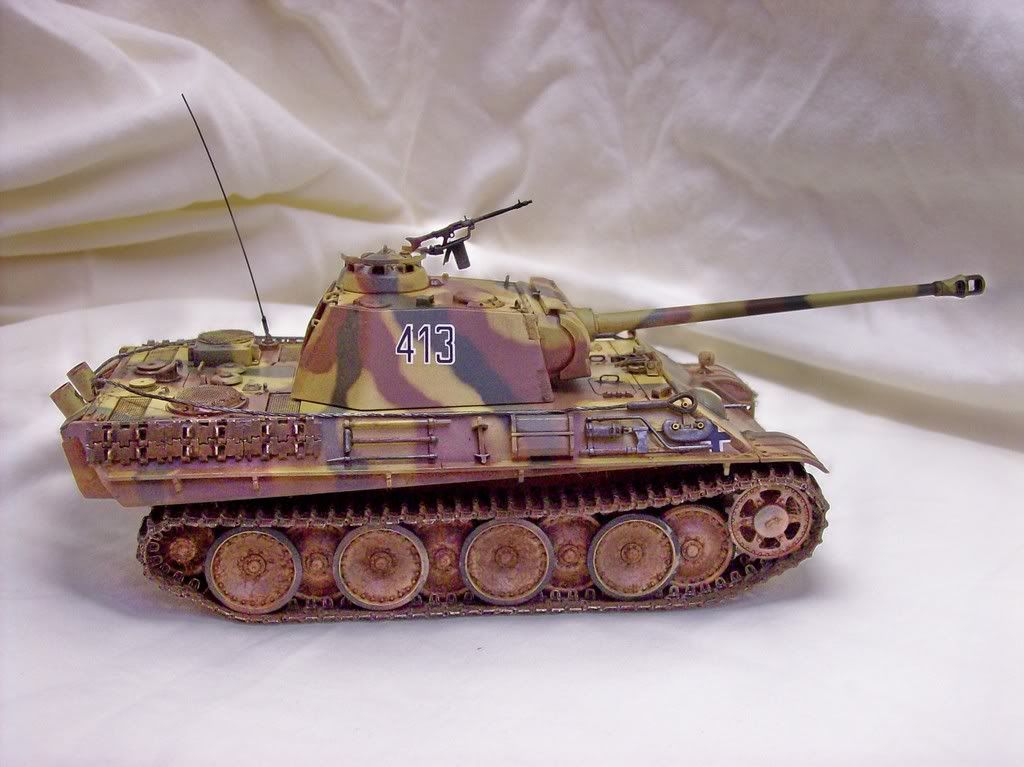
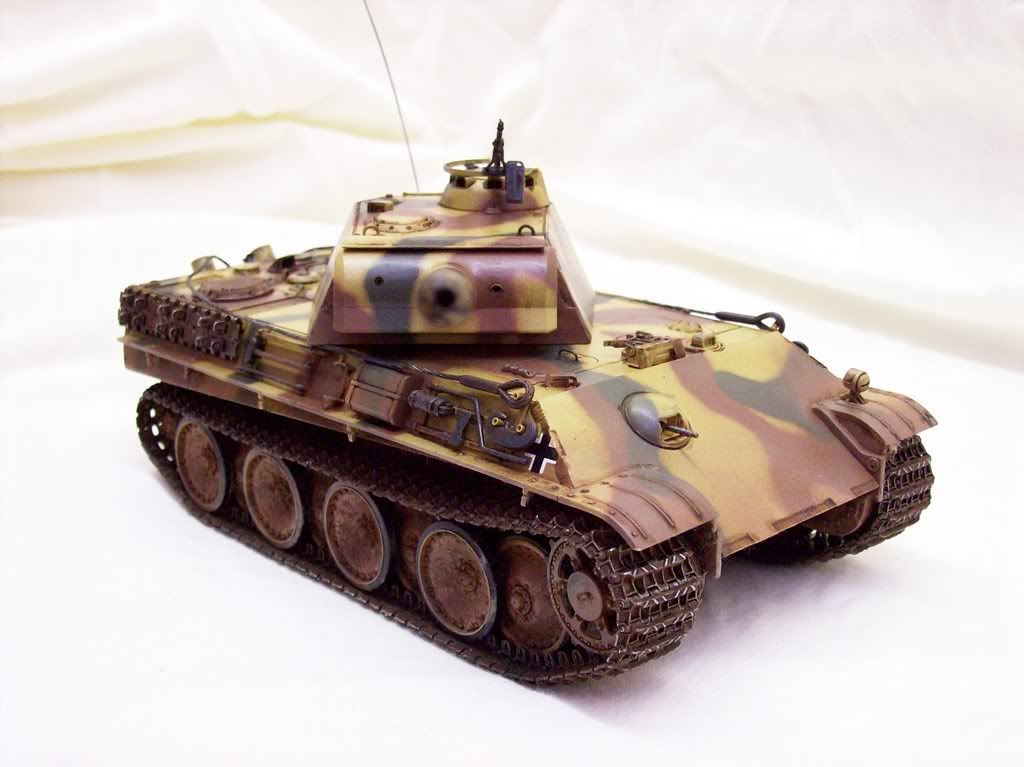
I know this isn't an airplane but here are a few pics of a 1/35 WWII German Panther G (Late) tank that I recently completed as part of another GB. I used both acrylics and enamels, and even oils (by hand brush for some weathering) I used no masks of any kind when I did the camo, totally freehand. This was the 1st paint job I did with the Paasche.
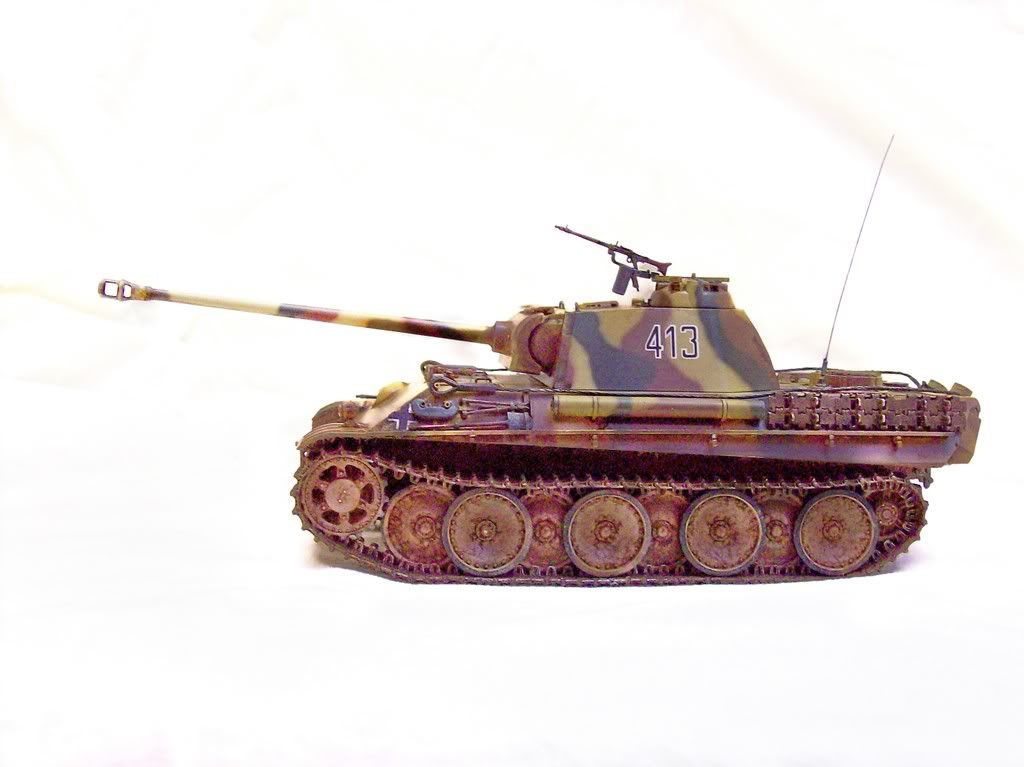
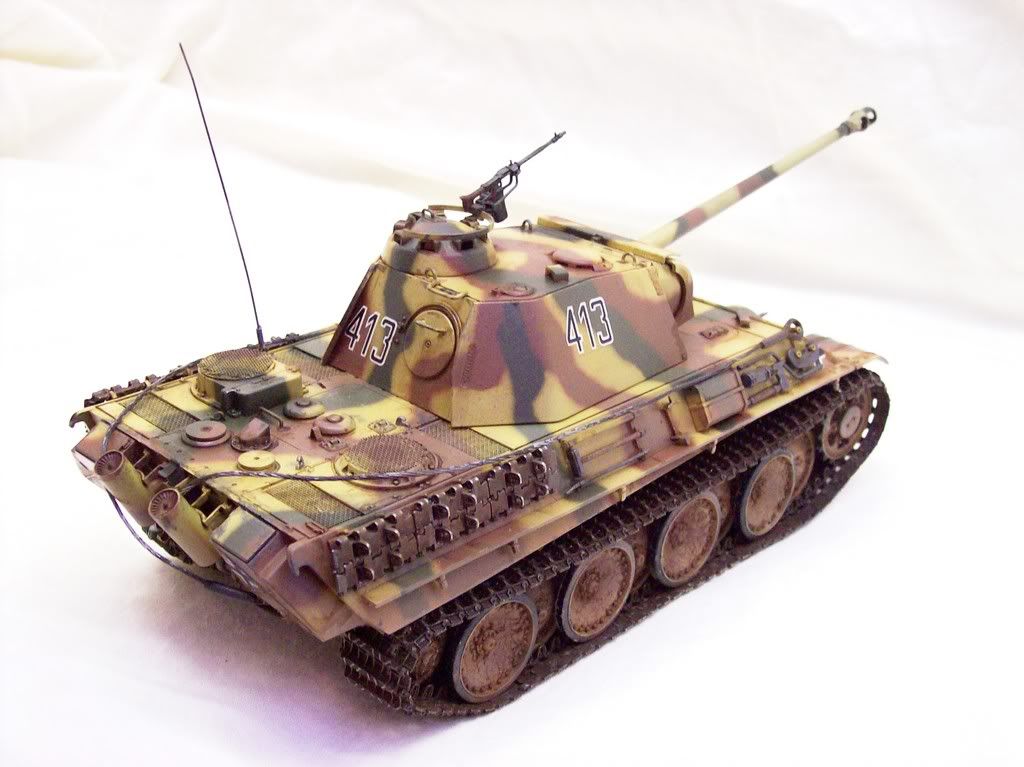
And Summit, I'm glad you like your Aztec. Like I said, I don't think it's the brush, it just doesn't work for me. Or Poppie. And if you know anyone that wants to buy a slightly used Aztec ..Whistling [:-^]

 Keep SmilinLiberation of Western Europe'--it makes this world a nicer place.

  • Member since
    January 2008
  • From: Hamilton, Ontario
Posted by Poppie on Wednesday, April 9, 2008 3:40 PM

'ROYAL' BACK IN RCAF

A petition has begun across Canada to have the 'Royal' put back in the Canadian Forces Naming Structure.  The Queen never removed her blessing on using the 'Royal' designation so it just takes an act of Parliament to fix the mess that Hellyer made with Unification.  This will change the air force from: Canadian Armed Forces - Air Command to the "Royal Canadian Air Force" with all its accumulated traditions and honours and the navy from: Canadian Armed Forces - Maritime Command back to the "Royal Canadian Navy", with its rich history and traditions. Please take a read of the petition and pass it on to as many other Canuks or friends as you can.

http://www.gopetition.com/petitions/restore-the-royal-designation-to-the-canadian-navy-and-canadian-air-force.html

Thanks

"This is a gentle place if I but make it so." Poppie
  • Member since
    January 2008
  • From: Hamilton, Ontario
Posted by Poppie on Wednesday, April 9, 2008 3:26 PM

RCAF BADGE

 Could you fellas that have not yet done so please put up their GB Badge.   You have your option of the straight badge that I put up or the neat waving gif that John so gracioiusly did for us. Here is the 'straight job:

http://i256.photobucket.com/albums/hh161/rcnaye/badges/RCAF-1.gif

Here is the URL to the 'Waving Flag' that John did:

http://yolo.net/~jeaton/fsmforum/gbbadges/rcafgb1.gif 

I think I'm going to be a twit and fly them both! (for awhile anyway)

"This is a gentle place if I but make it so." Poppie
  • Member since
    December 2002
  • From: Marquette, Michigan
Posted by jssel on Wednesday, April 9, 2008 12:43 PM

Poppie, check our private mail for a message


Jeff

Mr President, I'd p@#* on a sparkplug if I thought 'id help!
  • Member since
    February 2003
  • From: Montreal, Quebec, Canada
Posted by superbear on Wednesday, April 9, 2008 12:16 PM
Thumbs Up [tup]
 Poppie wrote:

WOW! Stitches out. Plastic Surgeons do a wonderful job - barely a closure line. Physio was a breeze. No follow up - just do gentle squeezing of a soft rubber ball. Good ability to pick up small objects now that the bandage is off.  I'm in business guys!

I was able to find the equivilant of "Blue Tack" at the local Staples (used to be 'Office Depot') store under their own brand name - cost a measly $2.69 a pack of 8 sticks.  I tried it out first thing when I got home - secret seems to be to make sure you warm it up first - hard as heck to work with when cold and not sticky. But, once a 'worked' with it a while, it softened, got a bit 'sticky' and I tried sticking a piece of card stock onto a model I had already painted. It works just fine.  Thanks you, thank you, thank you. Thanks to all you kind hearted souls. It's going to look nice to see 12 planes with all the same camo pattern but different numbers. I'm debating  whether I should show them 'scrubbed up' and newly painted as 'on parade' for inspection, or try and do the work and show them how they might have looked during the BoB when they didn't have time to wipe the mud off their shoes. I think the BoB 'look' appeals to me more, but I've got more to learn about weathering. By the way guys, if anybody comes across a Hasegawa 1/48 Spitfire Mk Vb kit # JT4:2000 please let me know. I need 4 more to make up my Sqn. I've got one on ebay right now.

 Poppie   I'm glad to hear all is well with your hand and now you can have some real fun with your new AB.  What a great familly to come up with such a great suprise giftThumbs Up [tup].

Cheers

Bear

Marc
  • Member since
    January 2008
  • From: Hamilton, Ontario
Posted by Poppie on Wednesday, April 9, 2008 11:40 AM

CANADIAN MODEL RELATED COMPANIES:

I foiund this website that gives a list of about a dozen (or less) Canadian Companies that do some resin work, some decal work, some full kits, etc.  Hope you can find what your looking for here: Canadian Model Related Companies http://hedgehoghollow.com/buzz/cdn_model_companies.html#Arrow

enjoy, Poppie

"This is a gentle place if I but make it so." Poppie
  • Member since
    January 2008
  • From: Hamilton, Ontario
Posted by Poppie on Wednesday, April 9, 2008 11:36 AM

DECAL SOURCE:

SHARING SOURCE INFO: I've found a great Canadian 'cottage industry' source for decals. They'll do any size, any plane, any pilot (just about). They have a catalogue worth browsing through for all RCAF Group Build members  -  they are not expensive either as these things go: Give them a look-see at http://www.canmilair.com/index.htm   CanMilAir  Decals

"This is a gentle place if I but make it so." Poppie
  • Member since
    January 2008
  • From: Hamilton, Ontario
Posted by Poppie on Wednesday, April 9, 2008 10:40 AM

WOW! Stitches out. Plastic Surgeons do a wonderful job - barely a closure line. Physio was a breeze. No follow up - just do gentle squeezing of a soft rubber ball. Good ability to pick up small objects now that the bandage is off.  I'm in business guys!

I was able to find the equivilant of "Blue Tack" at the local Staples (used to be 'Office Depot') store under their own brand name - cost a measly $2.69 a pack of 8 sticks.  I tried it out first thing when I got home - secret seems to be to make sure you warm it up first - hard as heck to work with when cold and not sticky. But, once a 'worked' with it a while, it softened, got a bit 'sticky' and I tried sticking a piece of card stock onto a model I had already painted. It works just fine.  Thanks you, thank you, thank you. Thanks to all you kind hearted souls. It's going to look nice to see 12 planes with all the same camo pattern but different numbers. I'm debating  whether I should show them 'scrubbed up' and newly painted as 'on parade' for inspection, or try and do the work and show them how they might have looked during the BoB when they didn't have time to wipe the mud off their shoes. I think the BoB 'look' appeals to me more, but I've got more to learn about weathering. By the way guys, if anybody comes across a Hasegawa 1/48 Spitfire Mk Vb kit # JT4:2000 please let me know. I need 4 more to make up my Sqn. I've got one on ebay right now.

"This is a gentle place if I but make it so." Poppie
  • Member since
    January 2008
  • From: Hamilton, Ontario
Posted by Poppie on Wednesday, April 9, 2008 7:43 AM

OK Guys, time for Poppie to update.

First, I'm playing with the new Badger.

Report:  It's a completely different gun than the Aztec. The spray is 'finer', it handles acrylics no matter what thickness I seem to throw  at them - I've thrown everything at it right out of the bottle. My wife is hiding her Royal Daulton figurines as I've been casting a longing look at trying to refresh the colours for her! - she doesn't look pleased.  Now to business. 

I have done a bit of work on the cockpit.  I've been doing a bit of work on the IP and I think it's coming along. Having these stitches in my hand is really slowing me down  but that will change in a few hours - I hope)  Hopefully today, I will get the cockpit area painted and the first wash put in and start 'highlighting' this evening. I'll try and get some pics of wip by tomorrow morning. I'm just not sure exactly how today is going to go what with waiting in Dr.s offices and such, then my first bit of physio. I'm hoping I'll not be left stiff and sore - I'd like to get caught up.

"This is a gentle place if I but make it so." Poppie
  • Member since
    January 2008
  • From: Hamilton, Ontario
Posted by Poppie on Wednesday, April 9, 2008 7:35 AM
 jssel wrote:

If I get the chance today I will mask off the canopy of KH*R so you can see my system of using little squares of tape for masking straight lines.

Jeff

Jeff,  I'd really appreciate that as I briefly saw an article on that in one of the mag's I picked up when I first started back last year, but for the life of me I can't find it now.  It showed how the guy used little triangles to mask off the canopy.  I imagine your system will be somewhat similar and I'm reallly looking forward to learning from you about how to do it. 
"This is a gentle place if I but make it so." Poppie
  • Member since
    January 2008
  • From: Hamilton, Ontario
Posted by Poppie on Wednesday, April 9, 2008 7:30 AM

Max Power, I'm so sorry that the wording of the 'blurb' outlining the build gave the impressionthat it was restricted to 1/48 and 1/72. Man, your 1/32 plane is more than welcome. Please, grab a badge, pull up a seat, and tell us about the CF-188. That's one of the requirements of the build - that we do a little educational stuff ie something about the plane, or the sqn, its inception, honours, awards, noteable pilots, etc.

I'll be fixing the recruitment call today.  Please accept our apology and come join us. We'd love to to have your plane shown as part of the RCAF tradition.

Poppie

"This is a gentle place if I but make it so." Poppie
  • Member since
    December 2002
  • From: Marquette, Michigan
Posted by jssel on Wednesday, April 9, 2008 7:26 AM

Poppie, Dave explained the use of "blue tack" better than me.  Just roll out a dab and make a long snake of it.  Place it on along the camo line on the model fill in the gap so you do not get overspray and shoot on the paint.  Sorry for the confusion. 

If I get the chance today I will mask off the canopy of KH*R so you can see my system of using little squares of tape for masking straight lines.


Jeff

Mr President, I'd p@#* on a sparkplug if I thought 'id help!
  • Member since
    September 2004
  • From: Vernon, BC, Canada
Posted by razordws on Tuesday, April 8, 2008 11:27 PM
 MaxPower wrote:

I'm just finishing up a 1/32 CF-188. S/N 188711 which I have done as the 2006 demo jet. Unfortunately it's 99% complete so I won't be joining this GB (even though 1/32 isn't allowed!)

I mention this because I'll be posting pics likely on the weekend so keep your eyes out! I'm very proud of her.

This GB goes for two years Max.  I'm sure you can think of something else to build for this GB in that time frame.  Come on in, the more the merrier Wink [;)]

Dave

  • Member since
    June 2006
  • From: Calgary
Posted by MaxPower on Tuesday, April 8, 2008 9:37 PM

I'm just finishing up a 1/32 CF-188. S/N 188711 which I have done as the 2006 demo jet. Unfortunately it's 99% complete so I won't be joining this GB (even though 1/32 isn't allowed!)

I mention this because I'll be posting pics likely on the weekend so keep your eyes out! I'm very proud of her.

  • Member since
    January 2008
  • From: Hamilton, Ontario
Posted by Poppie on Tuesday, April 8, 2008 9:14 PM

CAMO WORK:  I've come to the conclusion, from our previous discussion(s) that the best way to do the camo work is to make a 'bead' of some sort of material (blue tack, silly putty) that will hold an outline of your camo slightly off  the plastic. For a 'crisp' edge, I like the pure 'silly putty' approach-guess because I'm basically lazy. 

All in all, you guys have taught me a lot. thanks.  Now we'll see what I can do with it. I'm still playing around with the new Badger and I do have to admit that I get a much better spray with it than I do with the Aztec.  I think once I get the stitches out of my hand tomorrow and my hand and fingers loosen up a bit, I'll have a bit more control of the the 'dual action button'. But, from what I've been able to do today, just in terms of drawing, fine lines, dots, fills, etcs, the Badger wins hands down. I'll keep the Aztec for quick, small jobs, like doing the cockpit area but I think the major work is going to the Badger. It just gives a better, overall finish.

"This is a gentle place if I but make it so." Poppie
  • Member since
    February 2008
  • From: Toronto, Canada
Posted by DaveCS on Tuesday, April 8, 2008 9:10 PM

Hi again guys..

Been busy today with work, the dog, and we had the IPMS Toronto meeting this evening.  Seems like the Spit was quite a hit - not nearly as good as some of the other kits on the table (Bernie Hengst has a wicked looking CMR resin Seafire done up in Canadian colours and decals !!) but it was nice to know that my first kit in decades is "good" Big Smile [:D]

Poppie, the kit is, basically, out of the box. The only additions are the Eduard cockpit kit and a Squadron vac formed canopy (meant for the Airfix kit but it works just dandy on this one). The kit that has some scratchbuilding involved is my current fixation - the Airfix Avro Anson Mk1 which I'm converting to a Mk V (Plywood Annie).

The camo was done by enlarging the painting section of the kit instructions and then masking the sections off with that "blu tac" stuff that you can use to tack up papers on your wall or such - it's kind of like "Silly Putty" but it's not Smile [:)] - same concept though. It's easy to apply and easily comes off too; like "Brylcreem".. a little dab'll do ya Wink [;)]

The airbrush used is my Iwata Revolution CS - some of the "touching up" to camo was done freehand - I could go freehand on the next kit if I have enough confidence to attempt camo like that.

Cheers,
Dave

  • Member since
    January 2008
  • From: Hamilton, Ontario
Posted by Poppie on Tuesday, April 8, 2008 7:49 PM
 jssel wrote:

 Roll it out to 1/4 inch lines and place it on the area you are painting.  I back fill the open space with card stock to prevent overspray.  Jeff

Nope!  Do you mean you make an outline using 1/4 inch lines of blue tack, fill it in with  card stock, and spray?

I'm a little slow here today - been sniffing the cleaning fluid for the new badger. What a different machine!!!

"This is a gentle place if I but make it so." Poppie
  • Member since
    December 2002
  • From: Marquette, Michigan
Posted by jssel on Tuesday, April 8, 2008 7:27 PM

Just ran down to the bench and found that my package is now devoid of the labelBoohoo [BH].  It comes in about 6-8 two inch strips and is blue in color.  Acts just like silly putty.  I mentioned hardware stores but office supply stores also carry it.  At any rate is is easy to use and even after it gets paint on it can be re-kneaded and used again before the "stickiness" is gone. 

I might add that I have used card stock slightly elevated off the part with rolls of masking tape.  The cardstock is cut to the pattern before hand.  This is labor intensive however.

Does this make any senseWhistling [:-^]?

Jeff

Mr President, I'd p@#* on a sparkplug if I thought 'id help!
  • Member since
    January 2008
  • From: Hamilton, Ontario
Posted by Poppie on Tuesday, April 8, 2008 7:03 PM
 jssel wrote:

Poppie, I use "blue tack" available at most hardware stores. 

I'v e not seen "blue tack" before - probably because I've never looked for it. Can you tell me it's full name?

"This is a gentle place if I but make it so." Poppie
  • Member since
    December 2002
  • From: Marquette, Michigan
Posted by jssel on Tuesday, April 8, 2008 7:00 PM

Poppie, I use "blue tack" available at most hardware stores.  Roll it out to 1/4 inch lines and place it on the area you are painting.  I back fill the open space with card stock to prevent overspray.  For tiny areas or mottling style I use high pressure 25psi or better and get in close with a tight pattern.  My KH*R is due for the paint shop soon.  I will do one more update before the primer coat.


Jeff

Mr President, I'd p@#* on a sparkplug if I thought 'id help!
  • Member since
    January 2008
  • From: Hamilton, Ontario
Posted by Poppie on Tuesday, April 8, 2008 5:55 PM

CAMOFLAGUE TECHNIQUES: HOW DO YOU DO THEM?

Can I instigate a discussion here. Dave sent me some patterns for some Spitfire Camo that are sure going to come in handy for me as I have a long range project to do a complete Squadron of Spitfire Mk Vb's (I have 7 kits now in my stash) but, as I say, that's a long range project. I'd really like to 'tighten up' my camo jobs on the individual planes I do. Can we share some techniques.

The easiest I've found so far is to mark of the colours using "Silly Putty" - I subsequently found a one page article in an old FSM magazine outlining the "Silly Putty" technique.

"This is a gentle place if I but make it so." Poppie
  • Member since
    January 2008
  • From: Hamilton, Ontario
Posted by Poppie on Tuesday, April 8, 2008 5:41 PM

Dave, just a question on technique, how did you do the camo on this plane? It looks pretty exacting to be freehand.  I'd like to know how you did it.  Poppie


 DaveCS wrote:

As promised - here's some quicky pics shot with the lenses and flash I have available 

Cheers,
Dave


"This is a gentle place if I but make it so." Poppie
  • Member since
    January 2008
  • From: Hamilton, Ontario
Posted by Poppie on Monday, April 7, 2008 10:38 PM
 DaveCS wrote:

As promised - here's some quicky pics shot with the lenses and flash I have available (I don't have a macro lens anymore or a macro ring flash - I sold both of them a while back in order to fund more camera gear for my wedding business) - I hope to actually take the time to get better ones in the future.

The kit is the Hasegawa AP42 Spitfire Mk. IX built as a Mk. IX c (I think) from No. 421 Squadron (Red Indian Squadron) 1945.

The WWII history of the Squadron taken from RCAF.com:

The last RCAF fighter squadron to formed in the UK, the squadron was established at Digby in April 1942 with the Supermarine Spitfire Mk Va's, moving to Fairwood Common in May and receiving Spitfire Mk Vb's. Operations in the 10 Group area continued until early 1943, using Warmwell, Bolt Head, Ibsley, Zeals and Charmy Down amongst other airfields. In January 1943 the squadron joined the Canadian Wing at Kenley using Redhill as a forward base. In May Spitfire Mk IX's replaced the Mk V's, operations continuing until August when the unit became part of No. 127 Airfield (later No. 127 Wing) of the 2nd TAF (Tactical Air Force). Operations in preparation for the Normandy invasion continued until May 1944. With the landing achieved the unit moved to French soil on the 16th of June, becoming involved in air superiority patrols over the beachhead until the breakout. The rapid advance into Belgium brought the Squadron to airfields there by October, Evere becoming a fairly permanent base late in the year. In December re-equipping with the Spitfire XIV's took place, followed by a move into Holland in March and then into Germany. With the ending of hostilities the unit had claimed 92 1/2 victories. The squadrons aircraft carried the unit code AU during this period.

I added the Eduard cockpit kit and a Squadron Vac Form canopy - I wish the photos would show the paint job better than they do..  Big Smile [:D]


Cheers,
Dave
 

Dave, thats mighty nice work at 1/72 - I just cannot work at that scale anymore and am envious of people who can. The Eduard accessories add a nice touch, but can you point out what all you have done that can be called 'scratchbuilt'?  I really like the way you've brought out the panel lines, especially the underside - I get a real sense of the plane having fought the 'airflow'. (Also wish I could do photography the way you do, but, hey, maybe in another lifetime).  Nice short touch of Sqn history. Thanks for showing the pics.  Comments guys?

BTW - Anybody know just exactly what it meant to be a pilot in a TAC (Tactical Air Command) Sqn.? What made them 'special'?

"This is a gentle place if I but make it so." Poppie
  • Member since
    January 2007
  • From: St. John's Newfoundland
Posted by chester101 on Monday, April 7, 2008 10:13 PM
Poppie
Any day during the week is alright with me. I don't have my schedule for may yet so there is a possibility that I will be working Mondays also. I use a digital Cannon S1IS, its getting old but is still working fairly well. It has a 10X zoom with an image stabilizer so I should be able to get some close up pictures.
Alain
  • Member since
    February 2008
  • From: Toronto, Canada
Posted by DaveCS on Monday, April 7, 2008 10:01 PM

 Summit wrote:
Poppie my Pavla Moth is 1/72 , the resin looked realy great upon first inspection, but then again I was not wearing my opti -visor. BTW did you get the photos I PM'ed  you earlier today ?

Sean, 

I've got that kit as well; it's not too bad - trust me, compared to the Airfix moth - this one's a millenia ahead Big Smile [:D]

Dave 

  • Member since
    February 2008
  • From: Toronto, Canada
Posted by DaveCS on Monday, April 7, 2008 10:00 PM

As promised - here's some quicky pics shot with the lenses and flash I have available (I don't have a macro lens anymore or a macro ring flash - I sold both of them a while back in order to fund more camera gear for my wedding business) - I hope to actually take the time to get better ones in the future.

The kit is the Hasegawa AP42 Spitfire Mk. IX built as a Mk. IX c (I think) from No. 421 Squadron (Red Indian Squadron) 1945.

The WWII history of the Squadron taken from RCAF.com:

The last RCAF fighter squadron to formed in the UK, the squadron was established at Digby in April 1942 with the Supermarine Spitfire Mk Va's, moving to Fairwood Common in May and receiving Spitfire Mk Vb's. Operations in the 10 Group area continued until early 1943, using Warmwell, Bolt Head, Ibsley, Zeals and Charmy Down amongst other airfields. In January 1943 the squadron joined the Canadian Wing at Kenley using Redhill as a forward base. In May Spitfire Mk IX's replaced the Mk V's, operations continuing until August when the unit became part of No. 127 Airfield (later No. 127 Wing) of the 2nd TAF (Tactical Air Force). Operations in preparation for the Normandy invasion continued until May 1944. With the landing achieved the unit moved to French soil on the 16th of June, becoming involved in air superiority patrols over the beachhead until the breakout. The rapid advance into Belgium brought the Squadron to airfields there by October, Evere becoming a fairly permanent base late in the year. In December re-equipping with the Spitfire XIV's took place, followed by a move into Holland in March and then into Germany. With the ending of hostilities the unit had claimed 92 1/2 victories. The squadrons aircraft carried the unit code AU during this period.

I added the Eduard cockpit kit and a Squadron Vac Form canopy - I wish the photos would show the paint job better than they do..  Big Smile [:D]


Cheers,
Dave


  • Member since
    October 2007
  • From: Inland Northwest
Posted by Summit on Monday, April 7, 2008 9:05 PM
Poppie my Pavla Moth is 1/72 , the resin looked realy great upon first inspection, but then again I was not wearing my opti -visor. BTW did you get the photos I PM'ed  you earlier today ?
Sean "I've reached nearly fifty years of age with my system." Weekend GB 2008
JOIN OUR COMMUNITY!

Our community is FREE to join. To participate you must either login or register for an account.

SEARCH FORUMS
FREE NEWSLETTER
By signing up you may also receive reader surveys and occasional special offers. We do not sell, rent or trade our email lists. View our Privacy Policy.