SEARCH FINESCALE.COM

Enter keywords or a search phrase below:

Red Storm on the Reich GB - Sept. 8, 2008 - May 9, 2009

61951 views
710 replies
1 rating 2 rating 3 rating 4 rating 5 rating
  • Member since
    November 2006
  • From: Coastal Maine
Posted by dupes on Monday, September 22, 2008 10:28 AM

Moose - I'm still amazed that all of that stuff will fit onto a single Tiger chassis...Laugh [(-D]

Looking REALLY good! Those weld beads are sweet. Thumbs Up [tup]

SMJ - yeah, those Italeri's are good for a simple build. Think I still have the 234/3 kicking around in the stashola somewhere...that may accidentally get replaced with the DML at some point. Wink [;)]

  • Member since
    April 2007
  • From: Schroon Lake, NY
Posted by SMJmodeler on Monday, September 22, 2008 9:57 AM

wing_nut:  Fantastic looking interior!  If it's any indication of where this one is going, she'll be one sweet build!!!Thumbs Up [tup]Thumbs Up [tup]

moose421: Another great job on that PE!!!

 dupes wrote:

SMJ - I'm hoping you got him the old Italeri kit, and not the DML boxing??? Shock [:O]

It CAN be made into a halfway decent build...for about a quarter of the cost. Thumbs Up [tup]

dupes: Yep...that's the one he has (got it for $10 at Natty's) and he's doing a really nice job too!!!  I had to help him on the suspension but he's done the rest!..by the way, this is Corbin's build (the younger one that you met)

  • Member since
    November 2003
  • From: Nashville, TN area
Posted by bobbaily on Sunday, September 21, 2008 7:30 PM
Very nice Moose.  Your research and hard work are paying off.

Bob


  • Member since
    November 2007
  • From: Wisconsin Rapids, WI
Posted by moose421 on Sunday, September 21, 2008 7:15 PM

bobbaily   thanks for the complement.

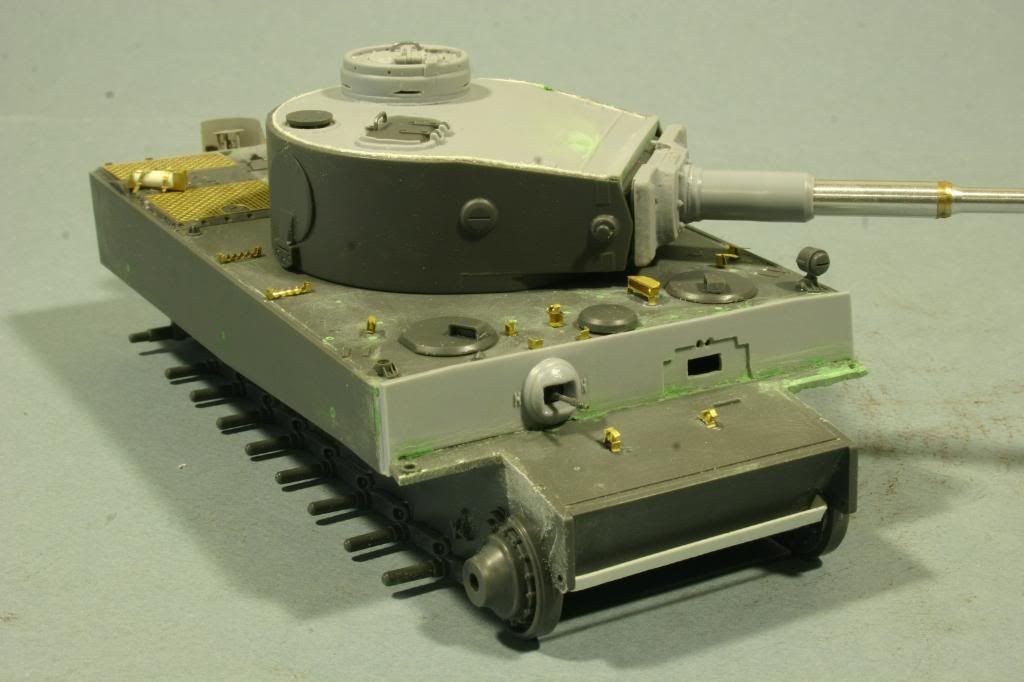
Here is the latest update with pictures.  One thing after reviewing the pictures of the tiger in front of b-berg gates, I noticed that it had no front fenders as well.  Out came the dremel.  Then got a little to happy with the dremel and had to fill some back in.
 

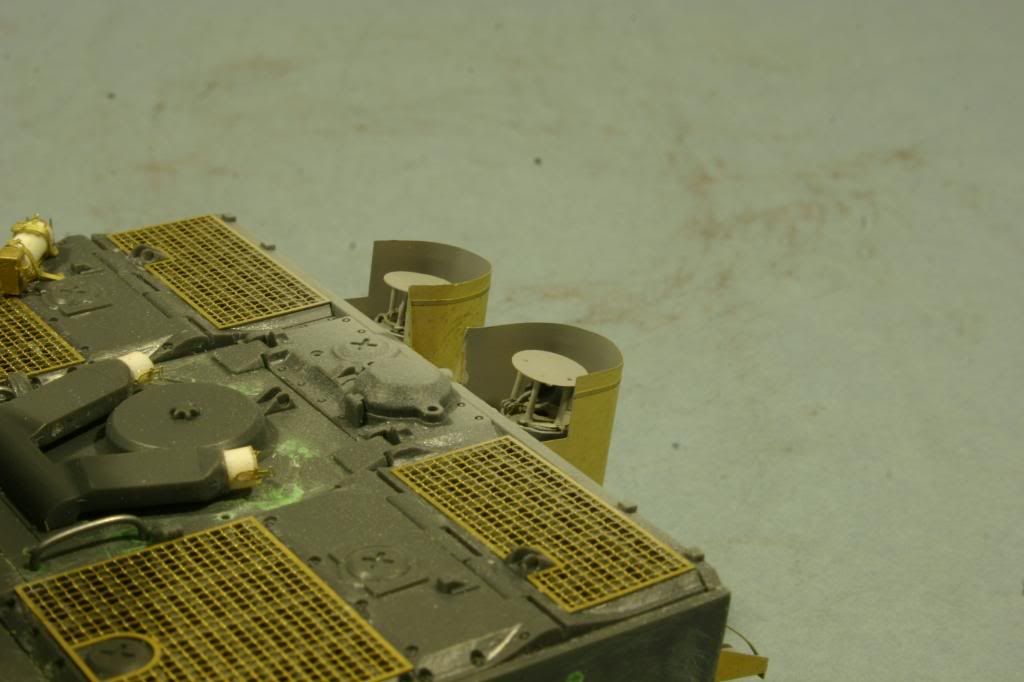
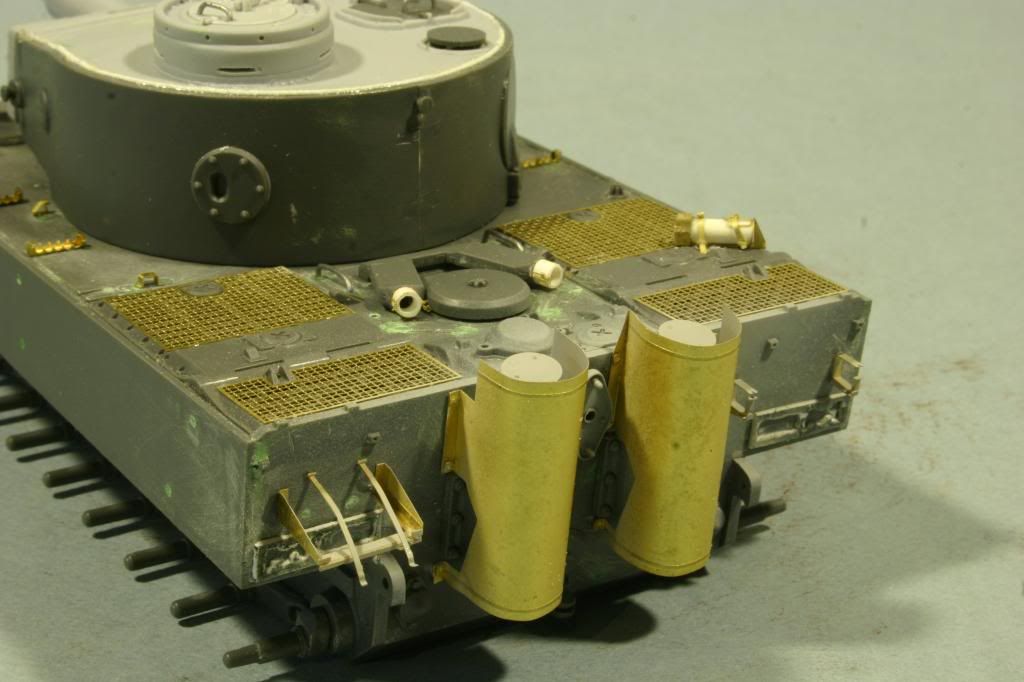
I also primed the inside of the muffler guard and tops of the mufflers.  Figured it would be kinda hard to paint after the guards were installed.  Didn't want the nice shinny brass to show. I also thinned out some plastic rod to install on the intake pipe.  I tired to just cut off the extra off the kit piece, but it didn't want to thin out.  I added the lion roar PE clamps to the new intake pipes. 
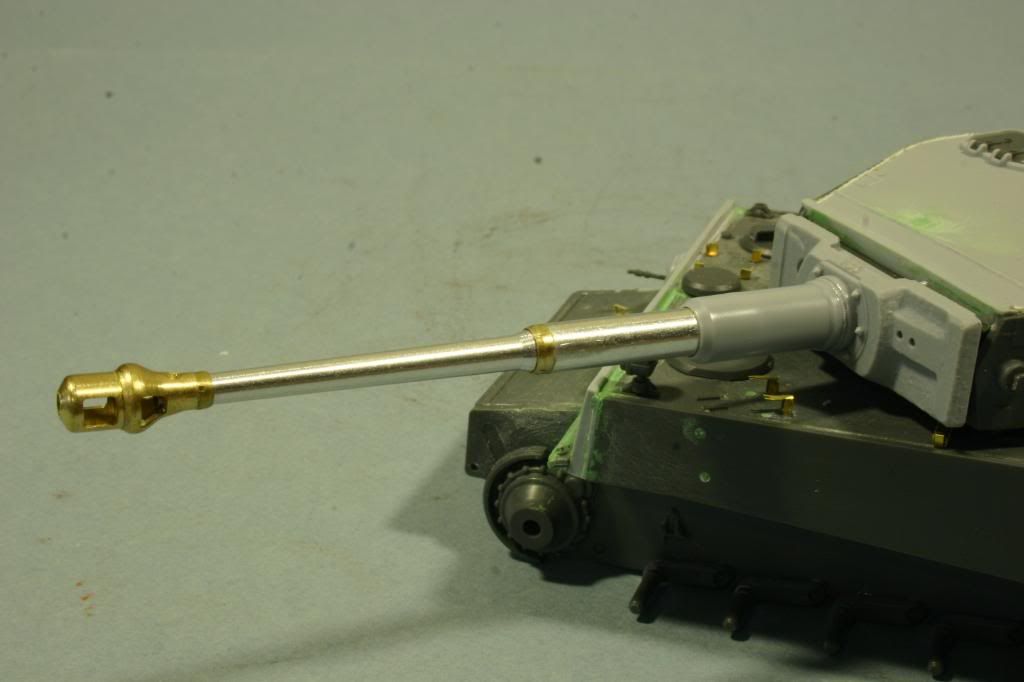
Next up the turret.  I have installed the tiger workshop roof with coupla.  One small note, there was a gap all the way around the turret sides.  I filled this and tried my hand at making a weld bead for the first time.  I used testors liquid cement and 0.050 plastic rod.  I also made grab handles from wire.  Some minor grinding was required to fit the armoscale barrel into the tiger workshop mantlet.  All, I can say is the barrel went together and looks beautiful in the new mantlet.
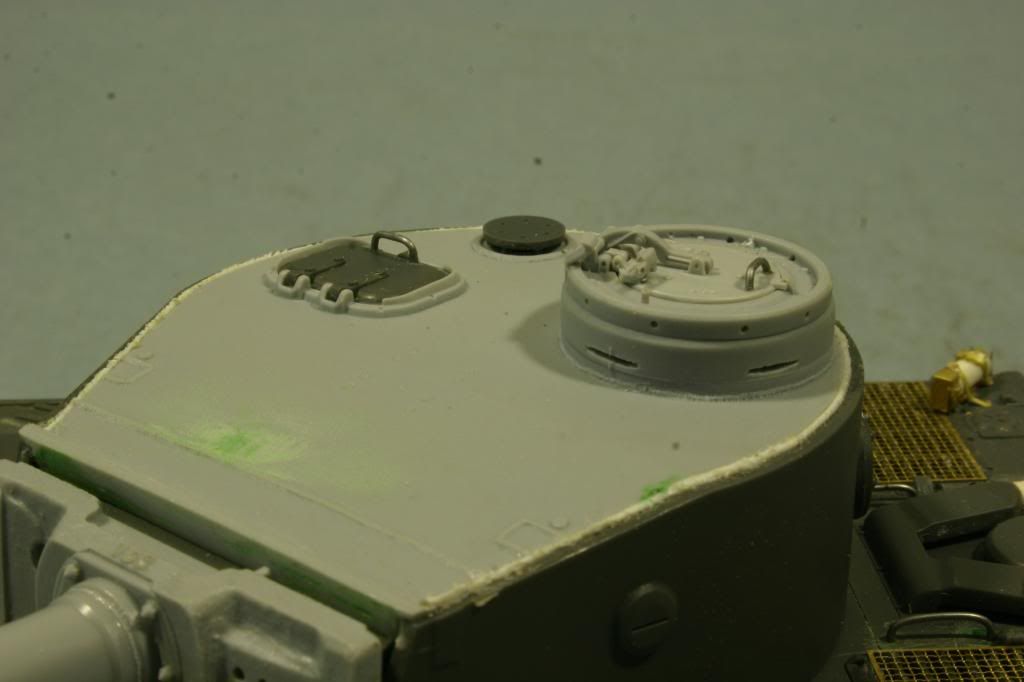
Next on the building bench is to finish the turret basket. Add some details to the right side headlight socket.  Then scatch build the side fender mounts.  It seams this tiger didn't have alot fenders. 

  • Member since
    November 2003
  • From: Nashville, TN area
Posted by bobbaily on Sunday, September 21, 2008 2:19 PM

Marc-very impressive detail work.  Looking forward for more updates.

Moose-looking forward to seeing pics of your Tiger.  You've put a lot of research in it so far.

Scott-Hopefully you can get some bench time soon.  I fully understand & appriciate the demands of work & family.  Quite frankly, I find the work thing terribly overrated.....Whistling [:-^]

I'll be fortunate if I start on my King Tiger before '09.

Bob


  • Member since
    December 2002
  • From: Reno, NV
Posted by espins1 on Sunday, September 21, 2008 1:24 PM
 dupes wrote:

Looks like a fun build, Scott. Nice review, too! Do I see PE grills in the box for this kit?

I take it that your semi-absence from the forum of late has been to write for Armorama? I hope you get lots of free stuff. Wink [;)]

Thanks dupes!  Well, to answer your question, yes and no.  The biggest reason I haven't been on much or building much is because I've just been too busy with work and family.  What little free time I'm left with is spent working on my reviews (often times on my lunch hour) and occasionally I am able to squeeze in some bench time.  

I've started the JS-2, all the wheel assemblies are finished as is the lower hull except for the suspension arms.  Once I get those on I'll post some pics.

Scott Espin - IPMS Reno High Rollers  Geeked My Reviews 

  • Member since
    November 2007
  • From: Wisconsin Rapids, WI
Posted by moose421 on Saturday, September 20, 2008 10:21 PM

wing_nut  Your interior is looking totaly sweet.  Love the weathering that you did.  Looking forward to the rest of your build.

Just a little update on my b-berg kitty.  Sorry no pictures yet, will have them up tomorrow.  I managed to get most of the turret built.  Finally got most of the turret basket built.  WOW the PE for it is fun, NOT. Banged Head [banghead]  But it is taking shape.  Nothing a little filler won't solve.  Also most of the mufflers are built.  Hope to get even more done tomorrow.

Till then have a happy, happy, joy, joy time tonight.Party [party]


  • Member since
    November 2006
  • From: Coastal Maine
Posted by dupes on Saturday, September 20, 2008 9:28 PM

Looks like a fun build, Scott. Nice review, too! Do I see PE grills in the box for this kit?

I take it that your semi-absence from the forum of late has been to write for Armorama? I hope you get lots of free stuff. Wink [;)]

  • Member since
    December 2002
  • From: Reno, NV
Posted by espins1 on Saturday, September 20, 2008 12:42 PM

Beautiful work on the interior Marc!  Thumbs Up [tup] Thumbs Up [tup]

I've decided to switch gears a bit and am going to build something Russian for a change.  

I'm going with Tamiya's 1/35 JS-2 Model 1944 ChKZ which I've just reviewed for Armorama.  If you're interested you can check it out here:  Tamiya JS-2 Model 1944 ChKZ Review   

Along with these Aber Accessories

Russian 122mm D-25T tank Barrel for IS-2 Review 

Grilles for Soviet Heavy Tank JS-2 or Tank Destroyers JSU-122/15
Review

Scott Espin - IPMS Reno High Rollers  Geeked My Reviews 

  • Member since
    November 2006
  • From: Coastal Maine
Posted by dupes on Saturday, September 20, 2008 12:08 PM

Whoa-ho-hoah! That interior is awesome! Bow [bow]

So that's what you get for the extra money over the Italeri kit...trust me, the inside of mine doesn't look anything like that! I'll take it for 10 bucks, though. Laugh [(-D]

I hope beyond hope there's a way for you to open up some panels and hatches to have the interior be visible...wow. Thumbs Up [tup]Thumbs Up [tup]

  • Member since
    April 2005
  • From: Piscataway, NJ!
Posted by wing_nut on Saturday, September 20, 2008 6:45 AM
 dupes wrote:

SMJ - I'm hoping you got him the old Italeri kit, and not the DML boxing??? Shock [:O]

It CAN be made into a halfway decent build...for about a quarter of the cost. Thumbs Up [tup]


What do you mean half way?  Looks 100 % to meBig Smile [:D]  And  let's not get crazy... I didn't quadruple the total cost... just a tad more than double.Whistling [:-^]


Interior painted and dirtied up pretty good and I scratched a tiny set of headphones for the radio.

Marc  

  • Member since
    November 2006
  • From: Coastal Maine
Posted by dupes on Friday, September 19, 2008 6:22 PM

SMJ - I'm hoping you got him the old Italeri kit, and not the DML boxing??? Shock [:O]

It CAN be made into a halfway decent build...for about a quarter of the cost. Thumbs Up [tup]

  • Member since
    April 2007
  • From: Schroon Lake, NY
Posted by SMJmodeler on Friday, September 19, 2008 12:26 PM
wing_nut:  Looking good Marc, at that pace you'll have her done for AMPS next week!  My son (7 yeas old) is building one like you...he's doing a nice job too...kinda' fun to see yours now that I'm a little more familiar with the vehicle.

  • Member since
    December 2002
  • From: Reno, NV
Posted by espins1 on Friday, September 19, 2008 10:13 AM
Marc, you are just going to town!  Excellent work!  Tongue [:P]

Scott Espin - IPMS Reno High Rollers  Geeked My Reviews 

  • Member since
    April 2005
  • From: Piscataway, NJ!
Posted by wing_nut on Friday, September 19, 2008 8:05 AM

Thanks dupes.Smile [:)]


They are the Voyerger sets E35116 for the suspension and E35167 for the deatils set.  I found the fender set online seperately. Gotta think about that oneWhistling [:-^]

Marc  

  • Member since
    November 2006
  • From: Coastal Maine
Posted by dupes on Friday, September 19, 2008 7:35 AM

Egads Wing_nut - when exactly did you start building armor?!? Killer. Make a Toast [#toast]

Can you tell me whose PE set you're using again? I'd look back but...dialup. Meh. Taped Shut [XX]

  • Member since
    April 2005
  • From: Piscataway, NJ!
Posted by wing_nut on Friday, September 19, 2008 7:21 AM

Except for a few tiny bits that need to go in after painting, the interior is done.

I pinned the seats so the backs and seat fold.  The shift levers from the kit where a bit stubby so I made new ones with a bit of wire dipped alternately in thick CA and zip kicker to build up a round knob.

Marc  

  • Member since
    December 2006
  • From: t.r.f. mn.
Posted by detailfreak on Friday, September 19, 2008 12:31 AM
ok.,there must be at least one sturmgeschutz abtielung in the defense of berlin.just started scratching the inner rails on a g early that should qualify for this build.most of my refs are'nt to specific.my guess would be that you would see whatever the re- arm/re-furb depots could spit out.i'm in stug three g early with mods to period.

[View:http://s172.photobucket.com/albums/w1/g-earl828/]  http://i158.photobucket.com/albums/t104/cycledupes/1000Roadwheels4BuildBadge.jpg

  • Member since
    February 2005
  • From: Nashotah, WI
Posted by Glamdring on Thursday, September 18, 2008 9:58 PM

Looking good guys so far! 

I haven't started the Panther yet, but I at leased broke the seal and stared at the trees.  I really want to start this weekend, but t looks like I'm doing OT on Saturday so that means my entire weekend is shot (mentally speaking).  Oh well, I need the money anyways.  Sign - Dots [#dots]

Robert 

"I can't get ahead no matter how hard I try, I'm gettin' really good at barely gettin' by"

  • Member since
    April 2005
  • From: Piscataway, NJ!
Posted by wing_nut on Thursday, September 18, 2008 7:55 AM
Lookin' good moose.  And it's not a fetish... it's a life style choiceWink [;)]

Marc  

  • Member since
    December 2002
  • From: Reno, NV
Posted by espins1 on Wednesday, September 17, 2008 9:57 AM

Moose421 - Wow!  That's quite the smorgasbord of parts you have there for your Tiger!  You're making lots of progress too, keep up the good work!   

Marc - That's some fantastic work there!  Too bad about the engineering of the suspension pivots.  Keep up the excellent work my friend!

Erik - Glad to hear your missing part situation is being rectified.  Smile [:)]

Scott Espin - IPMS Reno High Rollers  Geeked My Reviews 

  • Member since
    August 2008
  • From: Round Lake Heights, IL
Posted by Lofweir on Wednesday, September 17, 2008 9:42 AM
All right.  Got the parts washed.  Should be able to start building this weekend.  Still finishing up a P-61 I had started a while back, but would like to start on this build while paint and/or parts are drying.  Ugh, detailing an airplane engine occasionally makes my eyes cross, so working on a piece of armor will be a blessing.  Should have some pics than as well.
Currently Building: Tamiya 1/35 Panther Ausf. A
  • Member since
    November 2006
  • From: Coastal Maine
Posted by dupes on Wednesday, September 17, 2008 7:39 AM

Moose! You're flying! Big Smile [:D]

Wow, that is going to be a lot of PE work...not to mention all the other goodies you're adding. Looking good so far! Thumbs Up [tup]

  • Member since
    November 2007
  • From: Wisconsin Rapids, WI
Posted by moose421 on Tuesday, September 16, 2008 8:26 PM

wing_nut  looking good, makes me think my PE fetish is not wrong.Whistling [:-^] 

Here is a couple of pictures of my PE work on my b-berg kitty.  I am trying the giffin hinges for the first time and I love them.  Instead of the three pieces that lion roar has it is only two.  I know doesn't sound like much but bending the griffin hinges is sweet.  Thanks to biffa for that one heads up.  Also installed is the tiger workshop front armor plate.  Haven't put the vision block yet.  Of course the filling of location holes and removal of various brackets is evident.

Bad thibng is that I removed the mounting bracket for the rear fenders.  WOOPS, had to rebuild them.  I now have a beautiful set of rear fenders.  Don't need them for my kitty.


  • Member since
    July 2007
  • From: Ohio
Posted by Geist on Tuesday, September 16, 2008 7:30 PM

Here is a little update on my missing parts. I found the exact same kit on ebay today and I bid on it. Well, less than 30 minutes later my DragonCare rep eailed me saying that they had found the sprue I needed in another kit. They will send them to me for free. You can imagine that I was happy and a little mad considering I had just bid on the kit. Oh well... I guess I can use the ebay kit and build the 122mm version...

 I received my Eduard detail set in the mail a couple of days ago. I've hacking away at the upper hull of the ISU the last few days. So far I've installed the deck grills and at the moment I'm working on the front mud guards. Pics will come once I get more done.


BTW, wing_nut, your PE work is amazing! It makes my work look, well bad.


Erik


On the bench: Italeri Leopard 1A2 correction build with Perfect Scale turret and Eduard PE

  • Member since
    April 2005
  • From: Piscataway, NJ!
Posted by wing_nut on Tuesday, September 16, 2008 5:54 PM
Thanks for the comments guys.  Sadly the wheels are no longer steerable.Because nearly all of the inteiror can be seen though hatches and the open top, all the pivots for the steering arms are visible. Not to mention that 2 of them come up through the lower hull under where other parts have to be glued to the inside. So all the pivot points are cut off and the the wheel will be glued into position.  BummerDisapprove [V]  Not sure what Voayager was thinking on this.  And I am bit ticked at them.  The box for the second detail set shows full fenders in brassbut this is actually not included. What's up with that.  Anyone else notice this type of thing with Voyager products?

Marc  

  • Member since
    October 2007
  • From: N.H.
Posted by panzerguy on Tuesday, September 16, 2008 3:46 PM


  WOW! Wing nut Moose you guys are starting this thing of with a serious BANG!

   Should be finishing up my BergeTiger tonight so tommorow the JS2 hits the bench. I'll only be adding MK tracks to this one. The paint job I have planned is whats going to be the fun part.

"Happiness is a belt fed weapon"

  • Member since
    April 2007
  • From: Schroon Lake, NY
Posted by SMJmodeler on Tuesday, September 16, 2008 10:41 AM
wing_nut:  INTENSE detail work...flawlessly executed!  You @#$%^& A/C types sure can build 'em!Thumbs Up [tup]

  • Member since
    November 2006
  • From: Coastal Maine
Posted by dupes on Tuesday, September 16, 2008 10:19 AM
Wingy - looks great! I'm hoping you're going to display this puppy upside down, though, or a lot of this excellent work is going to go unnoticed. Boohoo [BH]
  • Member since
    March 2003
  • From: Western North Carolina
Posted by Tojo72 on Monday, September 15, 2008 5:51 PM
Wow Wingnut !!!! That really is NUTTS !!! I mean seriously that is some great detailed work,takes patience and nerves of steel,way beyond my capabilities,but all your hardwork will pay off in a great build,looking foward to see more !!!

JOIN OUR COMMUNITY!

Our community is FREE to join. To participate you must either login or register for an account.

SEARCH FORUMS
FREE NEWSLETTER
By signing up you may also receive reader surveys and occasional special offers. We do not sell, rent or trade our email lists. View our Privacy Policy.