SEARCH FINESCALE.COM

Enter keywords or a search phrase below:

251 Halftracks GB 1 October '08 - 8 June '09

129714 views
1459 replies
1 rating 2 rating 3 rating 4 rating 5 rating
  • Member since
    December 2002
  • From: Bury St Edmunds, Suffolk, England
Posted by Bish on Thursday, March 26, 2009 1:57 PM

Yes, Verlinden did an engine set, meant for the Tamiya 251/9. I have one but haven't used it yet, but apparently its meant to be a poor fit, which i can believe after useing their Tiger Engine. But no doubt with a bit of work it would fit in any 251. But i am not sure if thats still available. They also have a new set for the 251, which might be a bit better, we can hope.

Your best bet in the UK is Historex, heres a link to the new Verlinden Engine.

http://www.historexagents.com/shop/hxproductdetail.php?ProductCode=2098


I am a Norfolk man and i glory in being so


On the bench: Airfix 1/72nd Harrier GR.3/Fujimi 1/72nd Ju 87D-3

  • Member since
    June 2008
Posted by lewbud on Thursday, March 26, 2009 1:50 PM

 Antony Wright wrote:
Hi guys. Im not part of the GB but I am building the 251/16. I was wondering if anyone can tell me if anyone (and who) produces an after sales kit for the engine for this vehicle?

Antony,

Verlinden makes an engine update for the 251.  Don't know if it's for a specific version, but probably isn't (besides you, who'll know).  Internet Hobbies carries his stuff but last time I checked there was a 2-3 week wait for it.  Might be faster to order direct from Verlinden.  www.verlindenonline.com Scroll down to 1/35 Armor update and details click on German and it's on page 8 IIRC.  Hope this helps.

Buddy- Those who say there are no stupid questions have never worked in customer service.

  • Member since
    January 2009
Posted by Antony Wright on Thursday, March 26, 2009 2:33 AM
 panzerguy wrote:

 Antony Wright wrote:
Hi guys. Im not part of the GB but I am building the 251/16. I was wondering if anyone can tell me if anyone (and who) produces an after sales kit for the engine for this vehicle?

  Antony thats a good question I've looked for one on line and had no luck. I know that somebody out there makes them, probably Verlinden.

   Here's a link that gives you a good look at the motor and drive train.

    http://images.google.com/imgres?imgurl=http://www.achtungpanzer.com/votw/251d_1.jpg&imgrefurl=http://www.achtungpanzer.com/votw/251d.htm&usg=__k4ZDEdwcNci_cBBKXAYCmYoVIF4=&h=306&w=500&sz=41&hl=en&start=2&um=1&tbnid=P9zq1V0FgW0IYM:&tbnh=80&tbnw=130&prev=/images%3Fq%3Dsdkfz%2B251%2BD%26hl%3Den%26rls%3Dcom.microsoft:en-us:IE-SearchBox%26rlz%3D1I7ADBR_en%26sa%3DN%26um%3D1


Thanks Panzerguy. Those pics are great. I finally came across a couple of possibilities as follows:

For AFV http://www.perthmilitarymodelling.com/reviews/vehicles/jphobby/jphobby35a12.htm

and for Tamiya/Dragon/Revell http://www.jphobby.cz/accessories.htm

Both seem to be from JP Hobby

  • Member since
    October 2007
  • From: N.H.
Posted by panzerguy on Wednesday, March 25, 2009 7:27 PM

 Antony Wright wrote:
Hi guys. Im not part of the GB but I am building the 251/16. I was wondering if anyone can tell me if anyone (and who) produces an after sales kit for the engine for this vehicle?

  Antony thats a good question I've looked for one on line and had no luck. I know that somebody out there makes them, probably Verlinden.

   Here's a link that gives you a good look at the motor and drive train.

    http://images.google.com/imgres?imgurl=http://www.achtungpanzer.com/votw/251d_1.jpg&imgrefurl=http://www.achtungpanzer.com/votw/251d.htm&usg=__k4ZDEdwcNci_cBBKXAYCmYoVIF4=&h=306&w=500&sz=41&hl=en&start=2&um=1&tbnid=P9zq1V0FgW0IYM:&tbnh=80&tbnw=130&prev=/images%3Fq%3Dsdkfz%2B251%2BD%26hl%3Den%26rls%3Dcom.microsoft:en-us:IE-SearchBox%26rlz%3D1I7ADBR_en%26sa%3DN%26um%3D1


"Happiness is a belt fed weapon"

  • Member since
    December 2002
  • From: Reno, NV
Posted by espins1 on Wednesday, March 25, 2009 3:05 PM
If I have enough energy left in me at the end of the work day I'm going to swing by High Sierra Hobbies and pick up some replacement needle files so I can drill out the necessary holes in the hull/chassis bottom. I'm hoping to be able to get on a bit of a roll this evening with my build.

Scott Espin - IPMS Reno High Rollers  Geeked My Reviews 

  • Member since
    January 2009
Posted by Antony Wright on Wednesday, March 25, 2009 1:35 PM
Hi guys. Im not part of the GB but I am building the 251/16. I was wondering if anyone can tell me if anyone (and who) produces an after sales kit for the engine for this vehicle?
  • Member since
    March 2007
  • From: NJ
Posted by JMart on Wednesday, March 25, 2009 7:28 AM

panzerguy - I hear you about basement cleaning... had to change the water heater; got rid of the leaking tank and installed a tankless one. Of course, had to shut down workshop for weeks,,, back in business now. Nice progress, coming along well, I like the details you have been adding. PE does make a difference!

Steve - Microscale sells a liquid mask; aircraft folks use it to mask canopies, you "paint" the mask onto place and rub off when done.

Bish - very nicely done!  Good info on the postshading with LIGHTER shades, will have to attempt that.

Sfcmac - That is an amazing amount of details and clutter...excellent!

Dupes - glad to hear your Mom is doing better! My kit box will "crack open" in the next week or two, have a ship almost done and the 251 will take its place when done.


  • Member since
    December 2002
  • From: Reno, NV
Posted by espins1 on Monday, March 23, 2009 10:36 AM
 dupes wrote:

Scott - glad to see you're on the /1! Interested to hear how the AFV kit compares to the DML.


It seems like a really nice kit so far. I'll try to document the build as much as possible for you all. The kit comes with all kinds of goodies, including several types of tracks for early rubber and late rubber and steel tracks. The PaK40 is a true gem and includes many small parts and photo-etch. I'm not sure which I'm more stoked about, the halftrack of the AT gun! LOL

I didn't make much progress last night. I needed to drill a few holes in the hull floor and my pin vise and some of my needle files are missing.... grrrrr. I found one of my airbrush needles and one of the needle files in one of the kids rooms, apparently the brainiacs thought those tools would be a great way to clean resin out of a pipe..... lovely. Those kids aren't allowed over to our house anymore as I don't want that crap going on in my house, not to mention the little bastards helping themselves to my expensive modeling tools. The airbrush needle was my super fine needle which I don't use very often, but when I need it well, I need it! They managed to bend the tip so it's completely unusable now. :(

Scott Espin - IPMS Reno High Rollers  Geeked My Reviews 

  • Member since
    November 2006
  • From: Coastal Maine
Posted by dupes on Monday, March 23, 2009 9:46 AM

Scott - glad to see you're on the /1! Interested to hear how the AFV kit compares to the DML.

Don - haven't heard from Hermes (or a lot of other members) since I polled everyone in the beginning of January for a "participation check". Hoping he's still around. 

  • Member since
    December 2002
  • From: Reno, NV
Posted by espins1 on Sunday, March 22, 2009 7:44 PM

The parts are all washed and work as begun on my AFV Club 251/1D mit PaK40.  I know it's not that exciting, but here is a shot of the halftrack parts drying in the kitchen.  I'm going to wait a while before I begin the PaK40.  Whistling [:-^]

Scott Espin - IPMS Reno High Rollers  Geeked My Reviews 

  • Member since
    October 2007
  • From: Louisville, KY
Posted by pordoi on Sunday, March 22, 2009 4:59 PM

 dupes wrote:
Yeah...about that...I wasn't going to mention anything until we got down to the 2-month mark, but there are exactly 80 DAYS left in this GB. Not to throw anyone into a panic or anything, but it's probably time to crack into those kit boxes if you haven't already!!! Smile [:)]


Dupes,

Have you heard anything from Hermes re: the 251/8?  Last I saw was many, many pages ago when he was in the process of grinding down the thickness of the side plates to better match scale.  This was one I was waiting to see and still hope to do so.

 Don


P.S.  finally got me an avatar.  "life in a constant state of confusion"


  • Member since
    December 2002
  • From: Bury St Edmunds, Suffolk, England
Posted by Bish on Sunday, March 22, 2009 11:09 AM
dupes i know you been busy and got alot on your plate, so don't want to hassle you. But have you been able to sort my badge out yet. Thanks.

I am a Norfolk man and i glory in being so


On the bench: Airfix 1/72nd Harrier GR.3/Fujimi 1/72nd Ju 87D-3

  • Member since
    November 2006
  • From: Coastal Maine
Posted by dupes on Sunday, March 22, 2009 10:34 AM
Yeah...about that...I wasn't going to mention anything until we got down to the 2-month mark, but there are exactly 80 DAYS left in this GB. Not to throw anyone into a panic or anything, but it's probably time to crack into those kit boxes if you haven't already!!! Smile [:)]
  • Member since
    October 2004
  • From: League City, Texas
Posted by sfcmac on Saturday, March 21, 2009 5:18 PM

 Thanks fellows.  Nope not going to call it done just yet. Gotta pace myself and not peak too soon.  LOL!  I have been really taking my time with this one which is a diff approach for me.  Usually I dig in and Marathon it to completion. There are just so many great modelers showing off their mad skills that give me new ideas here.  Guy with his PE extremes, WingNut scratch built his own trailer and Pordois Fab figures to name just the early ones.  Heck when you look at all the others and works in progress I am just trying to fit in. LOL!

 The main body still needs final touching up and things like a metal drybrush in areas and an antenna.  Little stuff but I want to let you know that even though I am slow poking this one I am working on it.  June will be here before you know it!  

  • Member since
    December 2002
  • From: Reno, NV
Posted by espins1 on Saturday, March 21, 2009 2:05 PM
I haven't built a half track since I was a kid, so I'm going to have to think ahead with my painting strategery. I need to go back and review the builds so far, that will probably help me a lot. :)

Scott Espin - IPMS Reno High Rollers  Geeked My Reviews 

  • Member since
    November 2006
  • From: Coastal Maine
Posted by dupes on Saturday, March 21, 2009 12:45 PM

SFCMac - looking good, man! Are you waiting for the base and figs to call it 'done'?

Yeah, I've been plugging away on a few kits in between visits to see my mom (thanks for asking guys, really...means a lot). Actually broke into the 251/2 box last night, started assembling the driver fig - fiiiiiinally picked up that 72-color case of Vallejo paints I've been eyeing for a long time in the hopes of painting some figs some day! Figured that guy could be my "guinea pig". Wink [;)]

Hope to be able to poke my head in here a bit more frequently in the future.

Scott - glad you're on your way! Looking forward to your /1. Thumbs Up [tup]

  • Member since
    December 2002
  • From: Bury St Edmunds, Suffolk, England
Posted by Bish on Saturday, March 21, 2009 3:20 AM
 sfcmac wrote:

Scott!  WB!  Good to see ya! 

 Bish that is a very cool  /17. I think the Darker look is pretty acurrate for a late war 251.  Given the evergreen sap and such that were in the European forest it looks weathered just like how our tanks in the reforger exercises ended up. It is a darker kinda dirty rather than a lighter dersert dusty look.  That's what I think and I'm sticking with it!

 PanzerGuy! Coming along nicely That PE set is really making things pop out!  Watch the fit issues on joining the upper and lower hulls!  You got the floating wheel whipped but there are more hidden traps to be certain.  Also really have enjoyed the 251 "funny" pics!  Really makes you wonder what was out there that we don't know about!

 Fupes!  Hope your mother is doing better and you were able to enjoy a little of that time off.  Think somebody posing as you has been working on a ME 109!

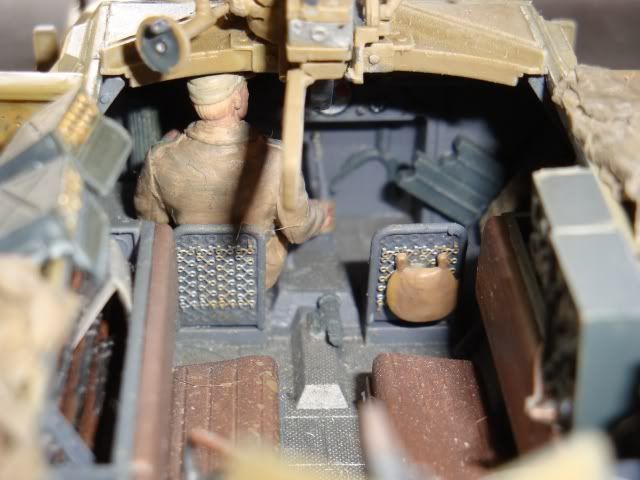
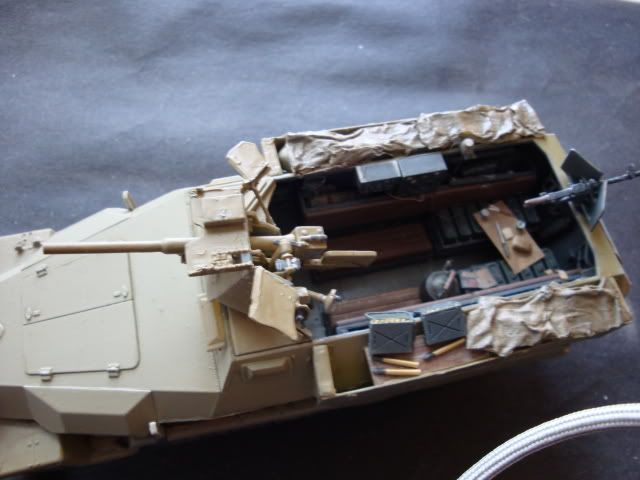
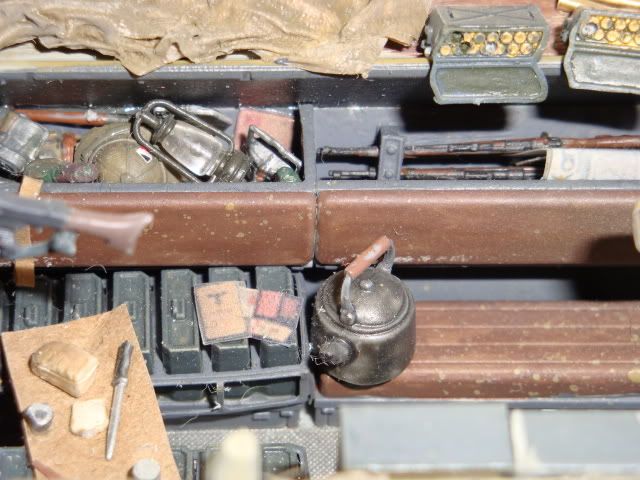
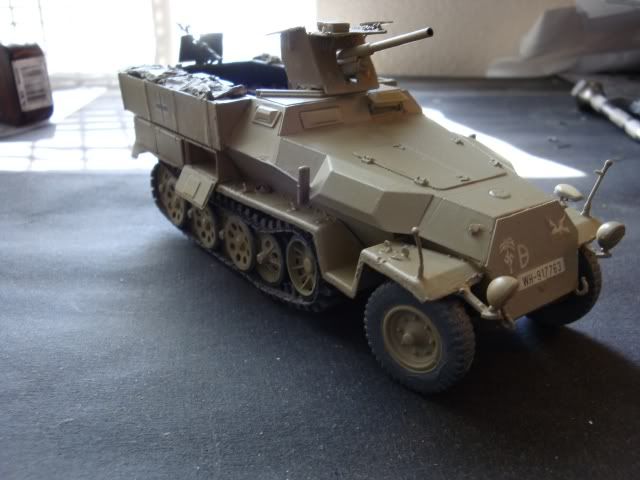
 I have been doing a little bit everyday. Time has been passing me by but I have tried to do a little something to my 251/10 every day.  Even if it is a small step.  So It's getting there. Actually I think it's finished as far as the kit goes.  I am working on a base and the figures which has been pretty time consuming, Well that and I have to remember where I left the one I already made. Banged Head [banghead]

 Recreating a picture is pretty challenging. Picking out little details and figuring out how to represent them reminds me of doing a puzzle of sorts.  Very fun I am enjoying it but it does take a lot of time. Or maybe I'm just slow... Dunce [D)]

 Let me stick a few pics up so you all can have at it and see what you think? Any suggestions  and critics welcome!  I put a lot of merit into what you all think! Bow [bow]

 So here is where the Dragon 251/10 sits. With just a few add ons and modifications.
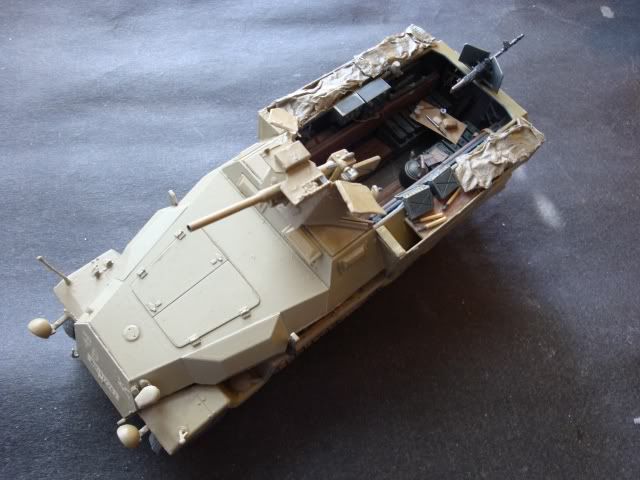
 I have a few more additions to make with the Base and FIgures.  Like a PE Radio headset and an old pair of boots which was suggested.  The Base will be fairly simple in look but complex in construction.  I actually am using some cooked dirt I collected a few years back during Operation Bright Star. Canned it up from a little trading post called El Alamein.  Looks like dirt but it has the cool factor!


Thanks. I am really pleased with it for a first time on these methods.

Your /10 is looking good. I like those schemes with the gray interior and camo on the outside.

I am a Norfolk man and i glory in being so


On the bench: Airfix 1/72nd Harrier GR.3/Fujimi 1/72nd Ju 87D-3

  • Member since
    October 2004
  • From: League City, Texas
Posted by sfcmac on Friday, March 20, 2009 4:44 PM

Scott!  WB!  Good to see ya! 

 Bish that is a very cool  /17. I think the Darker look is pretty acurrate for a late war 251.  Given the evergreen sap and such that were in the European forest it looks weathered just like how our tanks in the reforger exercises ended up. It is a darker kinda dirty rather than a lighter dersert dusty look.  That's what I think and I'm sticking with it!

 PanzerGuy! Coming along nicely That PE set is really making things pop out!  Watch the fit issues on joining the upper and lower hulls!  You got the floating wheel whipped but there are more hidden traps to be certain.  Also really have enjoyed the 251 "funny" pics!  Really makes you wonder what was out there that we don't know about!

 Fupes!  Hope your mother is doing better and you were able to enjoy a little of that time off.  Think somebody posing as you has been working on a ME 109!

 I have been doing a little bit everyday. Time has been passing me by but I have tried to do a little something to my 251/10 every day.  Even if it is a small step.  So It's getting there. Actually I think it's finished as far as the kit goes.  I am working on a base and the figures which has been pretty time consuming, Well that and I have to remember where I left the one I already made. Banged Head [banghead]

 Recreating a picture is pretty challenging. Picking out little details and figuring out how to represent them reminds me of doing a puzzle of sorts.  Very fun I am enjoying it but it does take a lot of time. Or maybe I'm just slow... Dunce [D)]

 Let me stick a few pics up so you all can have at it and see what you think? Any suggestions  and critics welcome!  I put a lot of merit into what you all think! Bow [bow]

 So here is where the Dragon 251/10 sits. With just a few add ons and modifications.
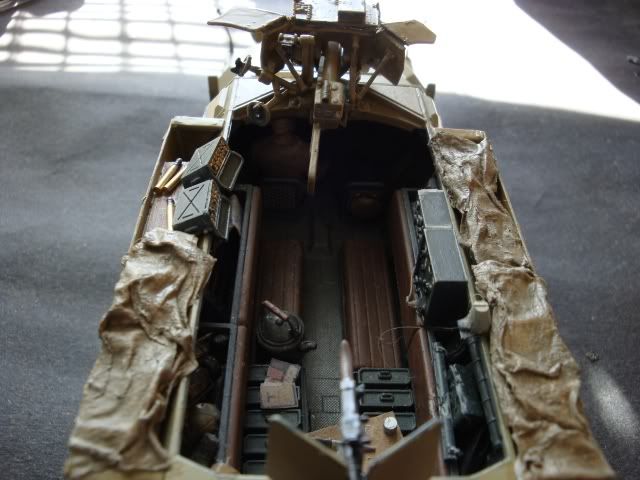
 I have a few more additions to make with the Base and FIgures.  Like a PE Radio headset and an old pair of boots which was suggested.  The Base will be fairly simple in look but complex in construction.  I actually am using some cooked dirt I collected a few years back during Operation Bright Star. Canned it up from a little trading post called El Alamein.  Looks like dirt but it has the cool factor!


  • Member since
    December 2002
  • From: Reno, NV
Posted by espins1 on Friday, March 20, 2009 3:27 PM
Hey guys, I'm studying the directions to the 251/1. The half track looks a lot easier than the PaK40 to build. LOL So far I'm planning on doing mine up in the 3 tone scheme of 2nd SS "Das Reich" July 1944.

Scott Espin - IPMS Reno High Rollers  Geeked My Reviews 

  • Member since
    December 2002
  • From: Bury St Edmunds, Suffolk, England
Posted by Bish on Friday, March 20, 2009 10:49 AM
panzerguy/Assurgeant/bbrowni  Thanks, really enjoyed this build and was really pleased with how mine came out. All been really great builds so far and looking forward to the rest.

I am a Norfolk man and i glory in being so


On the bench: Airfix 1/72nd Harrier GR.3/Fujimi 1/72nd Ju 87D-3

  • Member since
    December 2002
  • From: Bury St Edmunds, Suffolk, England
Posted by Bish on Friday, March 20, 2009 10:41 AM
 SMJmodeler wrote:
 Bish wrote:

dupe's sorry for the delay. But finally, here's my finished 251/17. She ended up darker than i intended, due to me not allowing for the affects of the washing. But this is a major leap forward for me, going from just dry brushing and pastels to adding washer's. Overall, i really like the result, even if it is a bit heavy. But it deffinatly give's me something to work on.

Bish: This is a REALLY nice build!...it's a bit dark but not bad..in fact, you just muted the tones some, but it's very convincing...DEFINATLY consider it a succcess, nicely doneThumbs Up [tup]Thumbs Up [tup]!!! 

It's easy to "correct" on the next project if you're not satisfied.  When you airbrush the base color, just post shade it one and then TWO shades lighter  It will seem too light at first but not after you get the filter washes on.  Everything else is superb...the chips and scratches are just right, well placed...again, very convincing.  I like that open storage bin too!

FYI: You might want to watch those streaks on the front, make sure they are straight down! 

...here's an example of the post shading I mentioned for your reference:


Thanks. As i am sure you have already seen, i have taken the lessons i have learnt onto my Kugelblitz. Thanks for the advice on the streaks. I really am pleased with this, it's a massive step forward compared to my past builds. Just need to perfect it a bit more and learn to vary it to get different finishes. I am even planning on going back to the Tiger i did got the Big Ctas GB and giving it a wash when i do the dio.

Thanks for all your help and advice, your tut's have been a great help.

I am a Norfolk man and i glory in being so


On the bench: Airfix 1/72nd Harrier GR.3/Fujimi 1/72nd Ju 87D-3

  • Member since
    April 2003
  • From: 41 Degrees 52.4 minutes North; 72 Degrees 7.3 minutes West
Posted by bbrowniii on Thursday, March 19, 2009 6:29 PM

Bish

Really nice work on that /17.  Good job Thumbs Up [tup]

'All that is necessary for the triumph of evil is for good men to do nothing' - Edmund Burke (1770 ??)


  • Member since
    October 2007
  • From: N.H.
Posted by panzerguy on Tuesday, March 17, 2009 4:44 PM

 dupes wrote:
Steve - looks great so far! So is the "floating wheel" trick solved just by setting the roadwheels on a length of tracks? PE work is Thumbs Up [tup]Thumbs Up [tup]!

     Thanks Dupes 

   The trick is to just let gravity do all the work.

   Here's how I did it 

   First I assembled a section of track for both sides and the road wheels. Next came the front wheels and suspension.  As you know, even with the little guide pins the torsion bars have a little play in them. Using liquid glue I attached the torsion bars and after about twenty minutes slid on the road wheels, no glue, and then placed it on the sections of track. Using a piece of styro foam to prop it up to the correct height and making sure the wheels were straight I let it sit over night. Simple and effective.Big Smile [:D] 

"Happiness is a belt fed weapon"

  • Member since
    April 2007
  • From: Schroon Lake, NY
Posted by SMJmodeler on Tuesday, March 17, 2009 10:30 AM
 Bish wrote:

dupe's sorry for the delay. But finally, here's my finished 251/17. She ended up darker than i intended, due to me not allowing for the affects of the washing. But this is a major leap forward for me, going from just dry brushing and pastels to adding washer's. Overall, i really like the result, even if it is a bit heavy. But it deffinatly give's me something to work on.

Bish: This is a REALLY nice build!...it's a bit dark but not bad..in fact, you just muted the tones some, but it's very convincing...DEFINATLY consider it a succcess, nicely doneThumbs Up [tup]Thumbs Up [tup]!!! 

It's easy to "correct" on the next project if you're not satisfied.  When you airbrush the base color, just post shade it one and then TWO shades lighter  It will seem too light at first but not after you get the filter washes on.  Everything else is superb...the chips and scratches are just right, well placed...again, very convincing.  I like that open storage bin too!

FYI: You might want to watch those streaks on the front, make sure they are straight down! 

...here's an example of the post shading I mentioned for your reference:


  • Member since
    November 2006
  • From: Coastal Maine
Posted by dupes on Tuesday, March 17, 2009 9:00 AM
Steve - looks great so far! So is the "floating wheel" trick solved just by setting the roadwheels on a length of tracks? PE work is Thumbs Up [tup]Thumbs Up [tup]!
  • Member since
    April 2007
  • From: Bonnie Scotland
Posted by Assurgeant on Monday, March 16, 2009 5:58 PM

Hi Bish,

Like the 251/17 great job....

Cheers, Bryan
  • Member since
    October 2007
  • From: N.H.
Posted by panzerguy on Monday, March 16, 2009 4:48 PM

        Bish your /17 came out great.

   Well bench times been a little scarce but I've managed to get some in here and there.

  Here's my progress so far.

   After playing around with the torsion bars and the front wheels I managed to eliminate any floaters.


     The kit comes with two upper hulls. The one to the left is the early hull with the split engine access doors the other is the later version with the single piece door. Either can be used with this variant but I chose the early.


   I'm really glad I decided to go with the pe set for this and here's one of the reasons why,


  As you can see the kit radio mount doesn't even come close to the Eduard one. I managed to get a bit done yesterday, Attached the sides and stowage bins and got the gun mount together.


  The mount is giving me a little bit of a fit problem where it attaches to the bulkhead but nothing I can't handle (I hope).

   I have Wednesday off and that's when I plan on going to work on the Pak.


"Happiness is a belt fed weapon"

  • Member since
    December 2002
  • From: Bury St Edmunds, Suffolk, England
Posted by Bish on Saturday, March 14, 2009 4:10 PM
No worries, after this weekend i doubt i will get online till next Fri. Hope you have a nice time.

I am a Norfolk man and i glory in being so


On the bench: Airfix 1/72nd Harrier GR.3/Fujimi 1/72nd Ju 87D-3

  • Member since
    November 2006
  • From: Coastal Maine
Posted by dupes on Saturday, March 14, 2009 4:04 PM
Ahhh yes! Your badge! I'll have to post it up when I get back from vacation...look for a PM on Monday or Tuesday with that. Thumbs Up [tup]
  • Member since
    December 2002
  • From: Bury St Edmunds, Suffolk, England
Posted by Bish on Saturday, March 14, 2009 3:41 PM

The metal cleat were tried in early 1944. But they were found to cause to much vibration so were discontinued. They can be used on vehicles from Feb to July 44 going off the top of my head. The metal ones are those with two raised lines on them. I think if you had the patience you could remove the lines from the dragon sets and pass them off as rubber pads. I am going to try it anyway as i would like to use my left over Dragon tracks on my tamiya and AFV 251's.

I do like the end result and i know it will fit into the dio i have planned, a muddy scene in march 44. I have already taken on board what i can improve on and am putting it into effect on my Kugelblitz. But for my first time doing washes i am very happy.

As for doing another 251 i am sooooooooooooo tempted, i will think about it. And i will deffo stick around. The 251 is my favorite German vehicle, the predecessor of modern Infantry fighting vehicles like the Warrior that i drove for 8 years. I hope i can help others and i know i can learn a few things for future builds as i have alot of the kits being built on here.

A great GB, thanks alot. And i hope your mum is getting better.

And now my big cats badge won't be lonely any more.

I am a Norfolk man and i glory in being so


On the bench: Airfix 1/72nd Harrier GR.3/Fujimi 1/72nd Ju 87D-3

JOIN OUR COMMUNITY!

Our community is FREE to join. To participate you must either login or register for an account.

SEARCH FORUMS
FREE NEWSLETTER
By signing up you may also receive reader surveys and occasional special offers. We do not sell, rent or trade our email lists. View our Privacy Policy.