SEARCH FINESCALE.COM

Enter keywords or a search phrase below:

M1009 CUCV build

9244 views
44 replies
1 rating 2 rating 3 rating 4 rating 5 rating
  • Member since
    December 2002
  • From: Valrico, FL
M1009 CUCV build
Posted by HeavyArty on Tuesday, November 22, 2022 8:12 PM

My next build is an M1009 CUCV (Commercial Utility Cargo Vehicle), (https://en.wikipedia.org/wiki/Commercial_Utility_Cargo_Vehicle) which was a militarized 3/4 ton Chevy Blazer. These were mainly used as staff officer vehicles. 
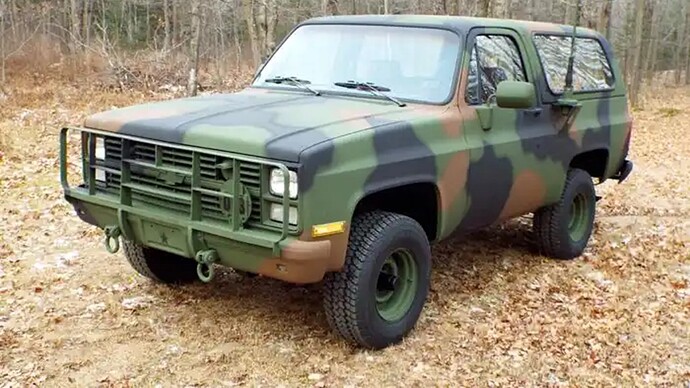
These trucks were a stop-gap measure used in the early '80s when the US military found that the M151 was wearing out and too small, and the HMMWV was in development, but not yet ready to field. They took civilian trucks and outfitted them as military vehicles by upgrading the electrical system to 24 volts, adding a blackout light system, tow shackles and pintle, etc. They were still being used by rear area units up until the early 2000s.

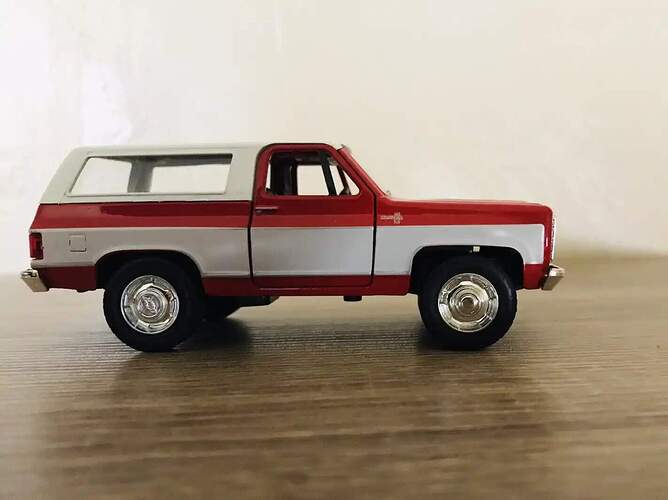
I know about the Miniman Factory resin kit of this truck (and the M1008 CUCV pickup), but found a cheaper die-cast version by Jada. It is listed as 1/32, but scales out to about 1/36, so close enough. I wanted to see if I could make it into a respectable CUCV model.
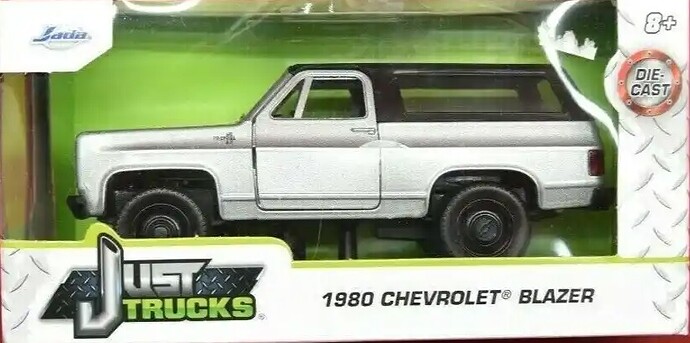
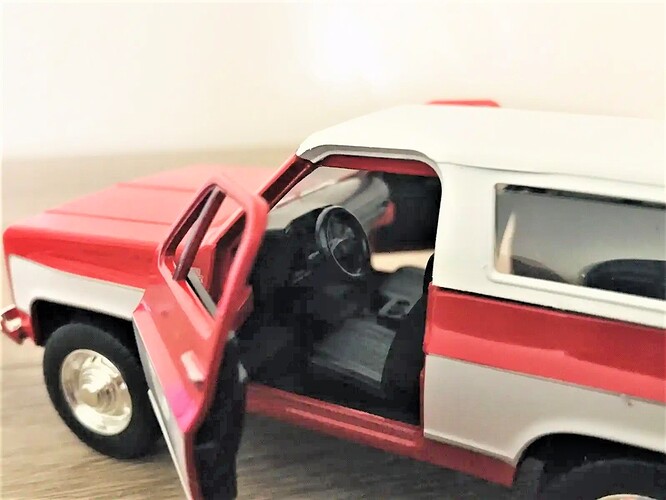
It is pretty well detailed for a die-cast model. The only die-cast metal part is the body. Everything else is plastic. You can see the well detailed grill with clear plastic headlights. It also has clear red taillights, plastic bumpers, a detailed interior, etc…

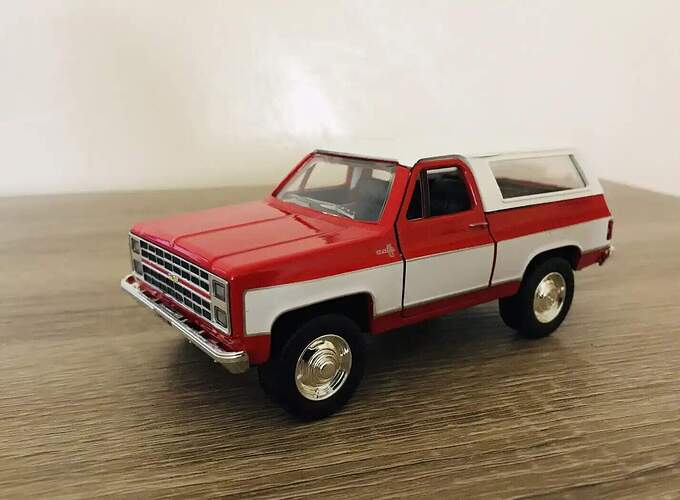
A different color, but the same Jada die-cast model.
blazer CUCV 3

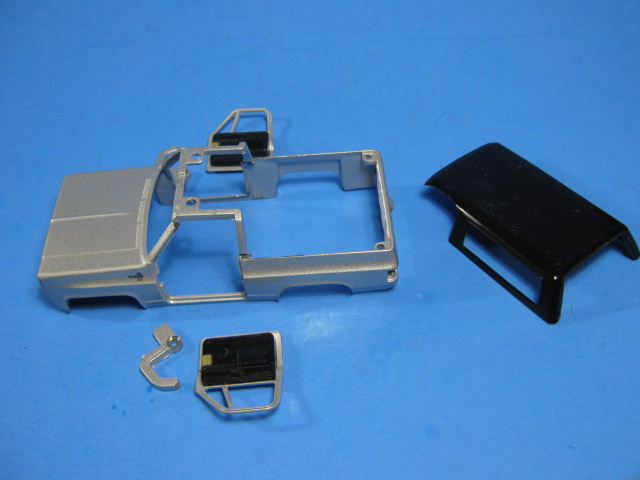
I started by tearing it down.

IMG_2220

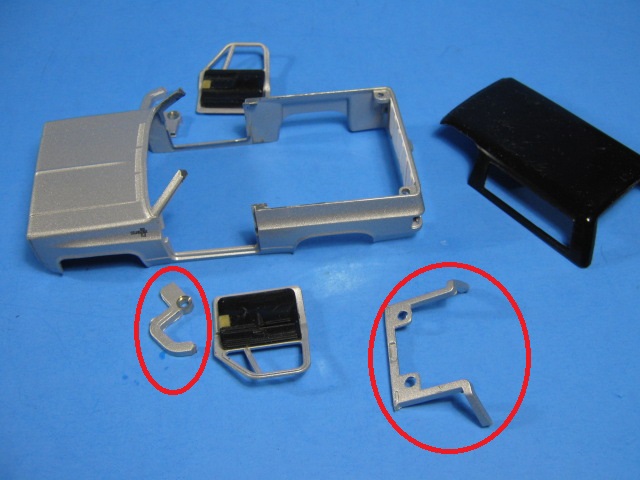
I cut away the piece that attached the roof above the driver’s area as it isn’t really there nor needed. I also cut the oversized hinge bars off the doors.
IMG_2221

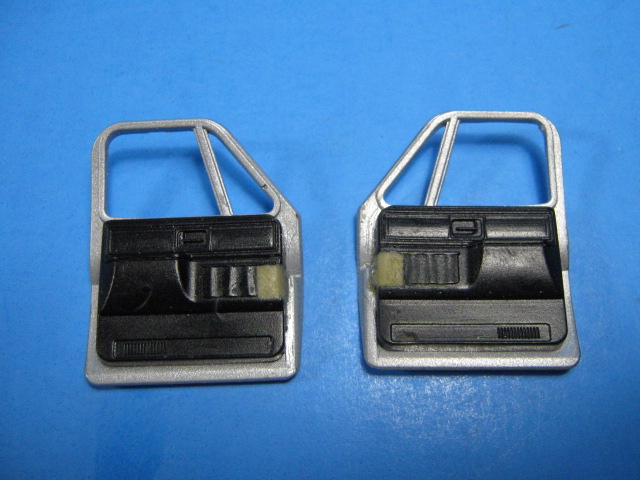
I filled in where the hinges attached to the doors w/A&B putty. I will add window cranks later.
IMG_2223

One of the biggest area that needed improvement was the frame/running gear, which is pretty much a flat plate bottom with metal rod axles and a few bumps here and there to represent the engine, differentials, etc. I swapped it out for the frame and running gear from a Dodge WC56 3/4 ton staff car.  It fits the M1009/Blazer almost perfectly.  I did extend it at the rear by 1/4 inch and had to add a center support for the transfer case.
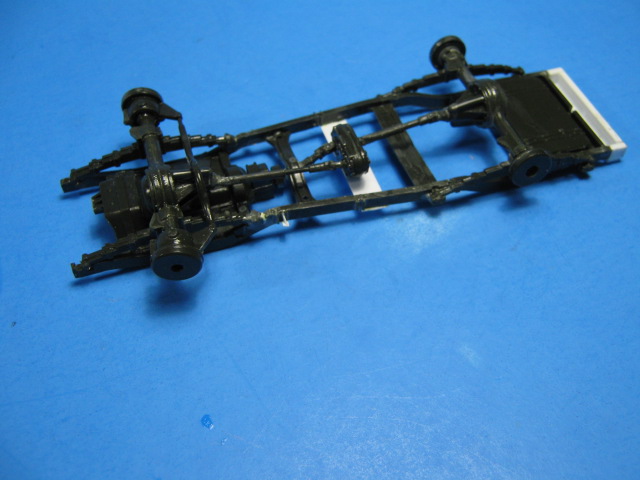
IMG_2229

Here it is on the frame w/interior in place.  I also made front inner fenders from the WC56 rear fenders and more sheet styrene.
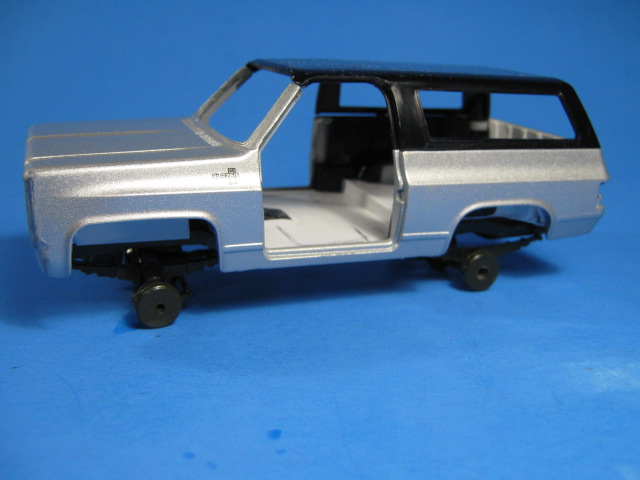
IMG_2230

The cab interior also needed attention. There was a large bump in the middle of the floor for, I’m assuming, a motor. The rear cargo floor was way too high as well. I cut the hump out and rebuilt the floor and cargo area with sheet styrene.  I also made a fire wall from sheet styrene.
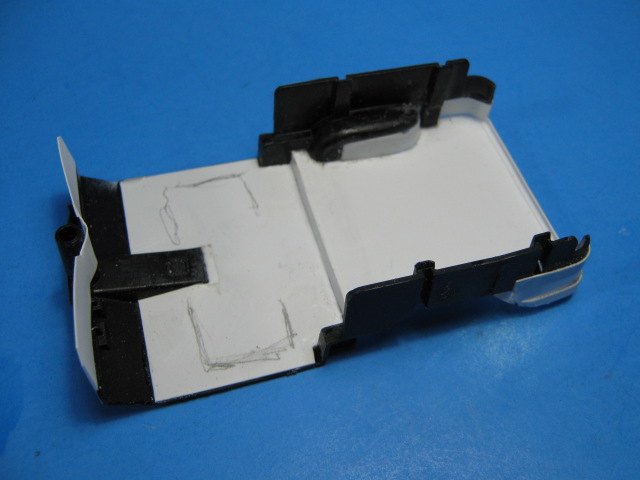
IMG_2228

On the dash, I filled in the two cut outs for the hinge bars with A&B putty. I sculpted them to match the dash and added the lines for the glove box.
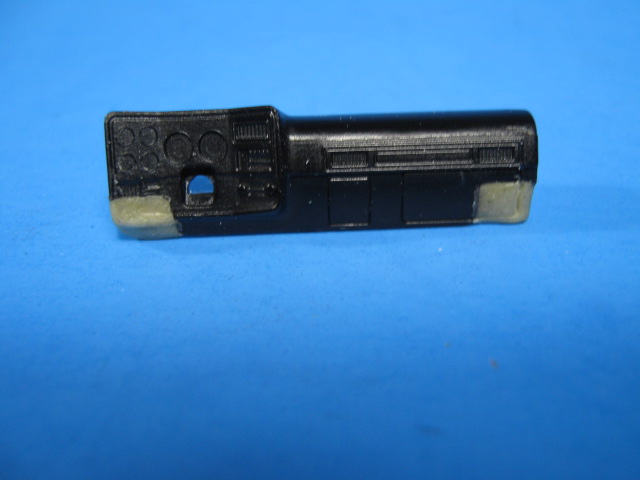
IMG_2225

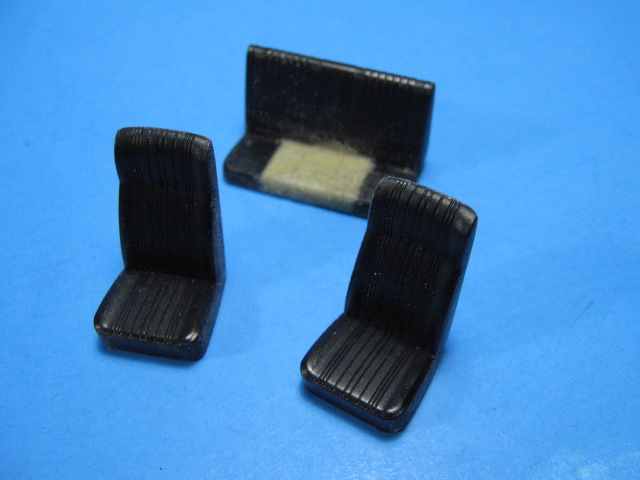
I also had to fix the seats as well. The front seats had no backs, so I filled them in w/sheet styrene. On the back seat, it required more work. The motorization box extended into the seat. After cutting it away, I rebuilt it w/more A&B putty and a piece of styrene to fill in the back. I scribed the folds and line pattern onto it as well.
IMG_2224

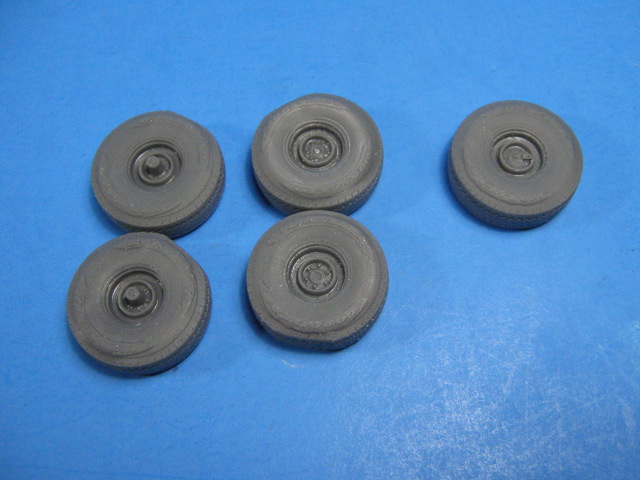
The Jada tires were pretty good, but the wheels were all wrong. I had new tires/wheels 3D printed by our own Michael “MikeyBugs” Goldberg. They look great and fit perfectly.
IMG_2226

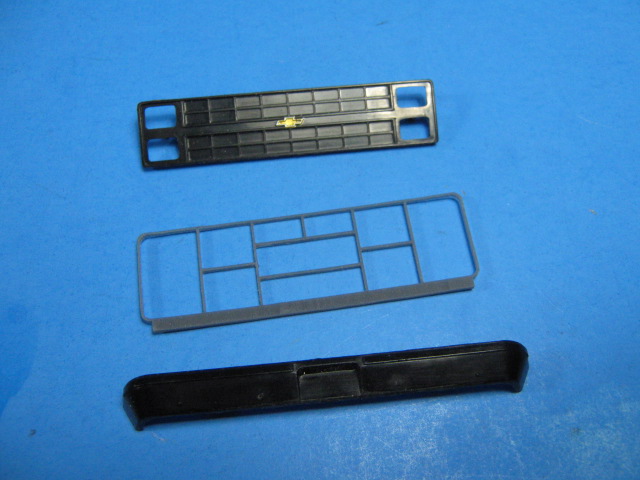
I also had the brush guard 3D printed by our own James_Lee. It is an exquisite piece of work. Here it is along with the grill and front bumper.
IMG_2227

Next up is to start painting and detailing the interior, then adding the militarized details. More to come.

Gino P. Quintiliani - Field Artillery - The KING of BATTLE!!!

Check out my Gallery: https://app.photobucket.com/u/HeavyArty

"People sleep peaceably in their beds at night only because rough men stand ready to do violence on their behalf." -- George Orwell

  • Member since
    July 2004
  • From: Sonora Desert
Posted by stikpusher on Tuesday, November 22, 2022 9:28 PM

Oh yeah! I'm curious to see how you do this conversion.


F is for FIRE, That burns down the whole town!

U is for URANIUM... BOMBS!

N is for NO SURVIVORS...

       - Plankton

LSM


  • Member since
    September 2005
  • From: North Pole, Alaska
Posted by richs26 on Tuesday, November 22, 2022 10:40 PM

Nice work, Gino.  As a suggestion, I would use 1/25 CJ/Wrangler Dana 30 open knuckle axles as these would approximate the GM 10 bolt front/rear axles in 1/35 if you can find some.  The last truck to use closed knuckle axles was 1975 F-250's so the WC axles are kind of out of place in my opinion.  Another thing is that the WC used a divorced transfer case while the Blazer used a married TC without an intermediate shaft with the Turbo 400 automatic trans.

WIP:  Monogram 1/72 B-26 (Snaptite) as 73rd BS B-26, 40-1408, torpedo bomber attempt on Ryujo

Monogram 1/72 B-26 (Snaptite) as 22nd BG B-26, 7-Mile Drome, New Guinea

Minicraft 1/72 B-24D as LB-30, AL-613, "Tough Boy", 28th Composite Group

  • Member since
    May 2009
  • From: Poland
Posted by Pawel on Wednesday, November 23, 2022 4:23 AM

Hello!

Another interesting project! How does that die cast model compare to the resin kit in terms of price and availability?

Wouldn't it be cool to have the entire undercarriage 3D printed in one piece for a "drop in"?

There was also this cool bit about the keys for a CUCV, maybe you could write about it too?

Good luck with your build and have a nice day

Paweł

All comments and critique welcomed. Thanks for your honest opinions!

www.vietnam.net.pl

  • Member since
    December 2002
  • From: Valrico, FL
Posted by HeavyArty on Wednesday, November 23, 2022 7:38 AM

Thanks guys.  It will be a fun build.

As to the underside, I am not too worried about it being exact as you can't really see any of the details once the truck is upright.  It is close enough.

The die-cast only cost me $8, so it is a much better deal than the resin kit and it can be found all over eBay and at toy stores here in the states.  The extra 3D parts and WC kit added a bit more, but not too bad.  I could only find the resin kit directly from Miniman Factory and it was almost $100 with postage from Hungary.  So a much better deal w/the die-cast to me.

Pawel
There was also this cool bit about the keys for a CUCV, maybe you could write about it too?

Yes, they were all keyed the same so any key would fit any vehicle.  This was so if you lost a key, you could still get into and start them w/another.  Pretty cool, esp. when you wanted to screw with your buddy.  Big Smile


Gino P. Quintiliani - Field Artillery - The KING of BATTLE!!!

Check out my Gallery: https://app.photobucket.com/u/HeavyArty

"People sleep peaceably in their beds at night only because rough men stand ready to do violence on their behalf." -- George Orwell

  • Member since
    August 2021
Posted by lurch on Wednesday, November 23, 2022 8:03 AM

It was fun doing that. They were good trucks. I discovered the key situation by accident. Like I said had fun withit. Going to follow this one closely. 

  • Member since
    December 2002
  • From: Valrico, FL
Posted by HeavyArty on Wednesday, November 23, 2022 3:11 PM

Thanks lurch.

Gino P. Quintiliani - Field Artillery - The KING of BATTLE!!!

Check out my Gallery: https://app.photobucket.com/u/HeavyArty

"People sleep peaceably in their beds at night only because rough men stand ready to do violence on their behalf." -- George Orwell

  • Member since
    November 2005
  • From: Formerly Bryan, now Arlington, Texas
Posted by CapnMac82 on Friday, November 25, 2022 12:03 PM

And outstanding build, if one that takes a person down memory lane.

  • Member since
    December 2002
  • From: Valrico, FL
Posted by HeavyArty on Friday, November 25, 2022 3:58 PM

CapnMac82
...one that takes a person down memory lane.

Thanks and yup, me too.  When I was a wet behind the ears 2LT, I was Gold Bar Recruiter for UF ROTC for the summer before I went to OBC.  The ROTC unit borrowed a CUCV from the local NG unit that I drove around all summer to high schools and junior colleges recruiting new ROTC cadets.  It was a fun summer.

Gino P. Quintiliani - Field Artillery - The KING of BATTLE!!!

Check out my Gallery: https://app.photobucket.com/u/HeavyArty

"People sleep peaceably in their beds at night only because rough men stand ready to do violence on their behalf." -- George Orwell

  • Member since
    November 2009
  • From: SW Virginia
Posted by Gamera on Tuesday, November 29, 2022 8:22 PM

Very cool Gino, great choice and looking forward to seeing how you adapt the die-cast into a detailed model. 

We've always been a Chevy/GMC family and my dad always had a truck so I'm assuming the one we had back then was a simular civilian version (around '77 model probably) - though to be honest I was pretty young then so my memory is pretty hazy. 

"I dream in fire but work in clay." -Arthur Machen


  • Member since
    December 2002
  • From: Valrico, FL
Posted by HeavyArty on Tuesday, November 29, 2022 8:57 PM

Thanks Gamera.  Work continues.

With Thanksgiving and putting up Christmas decorations, I haven't gotten much done lately. I did get a bit more done on the details though.

I am getting close to finishing the cargo area interior. Here is how it actually looks.


I added reinforcement ribs in the rear cargo area and added a tailgate interior with ribs. I also added a mount for the fuel can. I made them from sheet styrene. I still need to add the mount for the spare tire. You can see the antenna mounts on the sides as well, also made out of styrene sheet.

IMG_2238
IMG_2240

The door interior.


I added the window cranks.
IMG_2241

On the exteriors, I made the mirrors and their mounts from left over resin blocks. I sanded and carved them to shape and used a piece of wire to connect them.  You can also see where I added a small strip of styrene in front of the front wheel opening to represent the turn signal.
IMG_2231

Up front ,the dash board.


I added the headlight knob and switches for the blackout lights on the lower left. I also added the STE/ICE (Simplified Test Equipment/Internal Combustion Engines; early engine diagnostics system) port on the center bottom.
IMG_2233

I replaced the turn signal indicator rod and the shift lever with thinner wire and a bird-shot ball.
IMG_2234

A also added the 4-wheel drive selector lever in the center front floorboard as well, again using sheet styrene, wire and a bird-shot ball at the top.
IMG_2243

On the inner roof, I added a styrene sheet headliner. I still need to add a dome light and sun visors.
IMG_2239

Finally, I detailed the grill and bumpers. I added the NATO slave cable adaptor on the left side and the blackout drive light on the right side of the grill.
IMG_2235

I also attached the brush guard using pieces of styrene for the mounts. On the bumpers, I cut slots for the blackout marker lights and added pieces of 1/16 square brass tubing for the shackle mounts. Lastly, I added the bridge classification plate from left over PE parts.
IMG_2236

I still need to make a radio rack and add the radios inside, along with the front seat mounts. More work to do.

Gino P. Quintiliani - Field Artillery - The KING of BATTLE!!!

Check out my Gallery: https://app.photobucket.com/u/HeavyArty

"People sleep peaceably in their beds at night only because rough men stand ready to do violence on their behalf." -- George Orwell

  • Member since
    August 2021
Posted by lurch on Saturday, December 3, 2022 9:31 AM

Thats looking great. It is still bringing back old memories. Looking great with all the detailing you are doing. 

  • Member since
    November 2005
  • From: Formerly Bryan, now Arlington, Texas
Posted by CapnMac82 on Saturday, December 3, 2022 11:51 AM

Oh my, I can smeel the mix of Marlborough, Coenhagen, instant coffee, motor il and sweat . . .

  • Member since
    December 2002
  • From: Valrico, FL
Posted by HeavyArty on Saturday, December 3, 2022 2:18 PM

Thanks gents.  It is a fun build filled with all sorts of memories...and smells. Ick!

Gino P. Quintiliani - Field Artillery - The KING of BATTLE!!!

Check out my Gallery: https://app.photobucket.com/u/HeavyArty

"People sleep peaceably in their beds at night only because rough men stand ready to do violence on their behalf." -- George Orwell

  • Member since
    December 2002
  • From: Fort Knox
Posted by Rob Gronovius on Sunday, December 4, 2022 10:22 PM

I didn't have much experience with the old CUCVs until they were about out of the inventory. In the Guard we had a few of the "five quarters", old Dodge 880 series pickup trucks.

In the Regular Army, we used M151s and M998s. When I commanded that maintenance school, we had a few contact trucks and one pickup truck version that had a snow plow we used to clear the motor pool.

My most time with one was when I had to evaluate a NYARNG unit doing their AT at Drum. I drew a regular CUCV Blazer. Decent enough truck for running around from company to company in the field.

Your truck looks good. It's quite a project to make this into a "true" model kit. Didn't someone do a resin one a few years back?

  • Member since
    December 2002
  • From: Valrico, FL
Posted by HeavyArty on Monday, December 5, 2022 7:30 AM

Thanks Rob.  It has been a fun build so far.  Yes, there is/was a resin kit.  I found one, but shipping from Czech Rep was almost as much as the kit and the total was almost $100.  This is much more cost effective and more fun in the long run, for me anyways.

Gino P. Quintiliani - Field Artillery - The KING of BATTLE!!!

Check out my Gallery: https://app.photobucket.com/u/HeavyArty

"People sleep peaceably in their beds at night only because rough men stand ready to do violence on their behalf." -- George Orwell

  • Member since
    November 2009
  • From: SW Virginia
Posted by Gamera on Monday, December 5, 2022 10:19 PM

She's lookin' great Gino!!! 

Maybe I should do something like this. My big bugbear with vehicles is the gloss finish, if I can do it matte like this I might actually get it to work! 

"I dream in fire but work in clay." -Arthur Machen


  • Member since
    December 2002
  • From: Valrico, FL
Posted by HeavyArty on Tuesday, December 6, 2022 7:48 AM

Thanks Gamera.  I say go for it.  There are quite a few options of 1/35 civilian/staff cars that have a flat finish.  Lots of other wheeled softskins and armored vehicles too.

Gino P. Quintiliani - Field Artillery - The KING of BATTLE!!!

Check out my Gallery: https://app.photobucket.com/u/HeavyArty

"People sleep peaceably in their beds at night only because rough men stand ready to do violence on their behalf." -- George Orwell

  • Member since
    September 2006
  • From: Dripping Springs, TX, USA
Posted by RBaer on Tuesday, December 6, 2022 10:58 AM

Neat build Gino. 

I have memories of those things once they hit the surplus market. People snagged them, brought them to me for work and then they hit the ranch or trail. No one ever asked me to re-key one though, even when they spent a bunch of money on them and I told them anyone else with the keys to one could drive theirs off. 

Apprentice rivet counter.

  • Member since
    December 2002
  • From: Valrico, FL
Posted by HeavyArty on Tuesday, December 6, 2022 1:24 PM

Thanks Russ.  You would think that rekeying would be a no brainer.  I guess they were hoping noone near them had another or a spare key.

Gino P. Quintiliani - Field Artillery - The KING of BATTLE!!!

Check out my Gallery: https://app.photobucket.com/u/HeavyArty

"People sleep peaceably in their beds at night only because rough men stand ready to do violence on their behalf." -- George Orwell

  • Member since
    November 2009
  • From: SW Virginia
Posted by Gamera on Tuesday, December 6, 2022 7:21 PM

HeavyArty

Thanks Gamera.  I say go for it.  There are quite a few options of 1/35 civilian/staff cars that have a flat finish.  Lots of other wheeled softskins and armored vehicles too.


Thanks Gino, that is an interesting idea. Maybe I'll try a rusty grimey technical sometime in the future. 

"I dream in fire but work in clay." -Arthur Machen


  • Member since
    December 2002
  • From: Valrico, FL
Posted by HeavyArty on Thursday, December 22, 2022 9:03 PM

Work continues on the CUCV. I have been able to lay some paint on it. I painted it inside and out w/Tamiya TS-61 NATO Green.

Here are some of the interior details so far.

The seats were painted w/a red-brown spray can. The bases are left over PE from a Stryker kit.  I think they were originally the rear jerry can racks, which were also in plastic and looked just fine.
IMG_2253

I also scratched up a spare wheel mount and radio rack using sheet and rod styrene.
IMG_2257
IMG_2258

The same brown was used on the inside of the doors as well.
IMG_2259

I added the sun visors from sheet styrene as well, also sprayed the same red/brown.
IMG_2260

The dash board. I used 1/32 generic airplane decals for the instruments.
IMG_2251
IMG_2252

I hand-painted the brown and black camo on the exterior. I still need to blend it with a coat of dullcoat and them some weathering.
IMG_2255

Lastly, here is a look at the underside. I added the dual exhaust from solder with the ends drilled out.
IMG_2261

Gino P. Quintiliani - Field Artillery - The KING of BATTLE!!!

Check out my Gallery: https://app.photobucket.com/u/HeavyArty

"People sleep peaceably in their beds at night only because rough men stand ready to do violence on their behalf." -- George Orwell

  • Member since
    November 2009
  • From: SW Virginia
Posted by Gamera on Thursday, December 22, 2022 10:03 PM

Looks great Gino, good to see you back to work on this! 

"I dream in fire but work in clay." -Arthur Machen


  • Member since
    December 2002
  • From: Fort Knox
Posted by Rob Gronovius on Friday, December 23, 2022 9:32 AM

Looking good Gino. I seem to remember the vinyl interior seats looking an almost maroon color, but I guess they would vary.

When I was in the Guard, we used to have the old Dodge versions of these trucks and they were called 5/4 tons (Five Quarters), not 3/4s.

  • Member since
    November 2005
  • From: Formerly Bryan, now Arlington, Texas
Posted by CapnMac82 on Friday, December 23, 2022 12:56 PM

I'm having a CRS on the seat color.  I want to remember GMC calling the color "cordova."

Dodge having an equally "artiste" name, too.  And the color running from chestnut to cheap wine--and the brown always making me wonder why they had not selected for plain black vinyl.

The only thing missing on this build is a single chronically low tire Smile

  • Member since
    September 2012
Posted by GMorrison on Friday, December 23, 2022 1:00 PM

That thing must have been LOUD!


Bill

 Modeling is an excuse to buy books.


  • Member since
    December 2002
  • From: Valrico, FL
Posted by HeavyArty on Friday, December 23, 2022 4:12 PM

Thanks gents.  Yup, the interior brown varied quite a bit.  Also added a few horespower and a bit of noise with the bigger straight pipes.Big Smile

Rob Gronovius
When I was in the Guard, we used to have the old Dodge versions of these trucks and they were called 5/4 tons (Five Quarters), not 3/4s.

Hi Rob.  Yes, all the pickup version Chevy CUCVs were 5/4 tons as well.  Only the M1009 Blazer CUCV was 3/4 ton.

Gino P. Quintiliani - Field Artillery - The KING of BATTLE!!!

Check out my Gallery: https://app.photobucket.com/u/HeavyArty

"People sleep peaceably in their beds at night only because rough men stand ready to do violence on their behalf." -- George Orwell

  • Member since
    June 2014
Posted by BrandonK on Tuesday, December 27, 2022 10:45 AM

Excellent! I love stuff like this. Jada has tons of cars and trucks noone makes in plastic so they are great for putting togther kits you just can't find. I started a simlar project with a 64 Nova before Moebius releasted the new Novas. I'll get it finished one day. Great idea and it is coming along nicely.

BK

On the bench:

A lot !! And I mean A LOT!!

2024 Kits on deck / in process / completed   

                         14 / 5 / 2  

                              Tongue Tied

  • Member since
    December 2002
  • From: Fort Knox
Posted by Rob Gronovius on Tuesday, December 27, 2022 2:08 PM

This reminds me of my basic course at Knox. We were at the ground recovery site and there was a CUCV. Another lieutenant asked me if the painted black star where the front license plate would go meant that it was a general's vehicle.

I was like, yeah, "General Motors" and told him it was the subdued national insignia.

  • Member since
    February 2011
Posted by GreySnake on Tuesday, December 27, 2022 4:35 PM

Very nice work. 

JOIN OUR COMMUNITY!

Our community is FREE to join. To participate you must either login or register for an account.

SEARCH FORUMS
FREE NEWSLETTER
By signing up you may also receive reader surveys and occasional special offers. We do not sell, rent or trade our email lists. View our Privacy Policy.